A Crag Guide gives an extensive view of all sub areas and climbs at a point in the index. It shows a snapshot of the index heirachy, up to 300 climbs (or areas) on a single web page. It shows selected comments climbers have made on a recently submitted ascent.
At a minor crag level this should be suitable for printing and taking with you on a climbing trip as an adjunct to your guidebook.
This guide was generated anonymously. Login to show your logged ascents against each route.
Warning
Rock climbing is extremely dangerous and can result in serious injury or death. Users acting on any information directly or indirectly available from this site do so at their own risk.
This guide is compiled from a community of users and is presented without verification that the information is accurate or complete and is subject to system errors. By using this guide you acknowledge that the material described in this document is extremely dangerous, and that the content may be misleading or wrong. In particular there may be misdescriptions of routes, incorrectly drawn topo lines, incorrect difficulty ratings or incorrect or missing protection ratings. This includes both errors from the content and system errors.
Nobody has checked this particlular guide so you cannot rely on it's accuracy like you would a store bought guide.
You should not depend on any information gleaned from this guide for your personal safety.
You must keep this warning with the guide. For more information refer to our:
Usage policy
Contributors
Thanks to the following people who have contributed to this crag guide:
Kieran Loughran
Gareth Llewellin
Campbell Gome
Brendan Heywood
Clive Curson
Cameron Roy
Wendy Eden
Luen Warneke
benwiessner
Phil Laukens
The size of a person's name reflects their Crag Karma, which is their level of contribution. You can help contribute to your local crag by adding descriptions, photos, topos and more.
Some content has been provided under license from: © Australian Climbing Association Queensland (Creative Commons, Attribution, Share-Alike 2.5 AU)
Table of contents
- 1. Syrinx Area 30 in Sector
- 2. Index by grade
1. Syrinx Area 30 routes in Sector
- Summary:
-
All Trad climbing
Stick to the paths.
Don't disturb the wildlife.
Routes near peregrine falcon nesting sites are closed in the spring.
Minimise the impact of your camping (fuel stoves not fires, take your rubbish with you, etc).
description
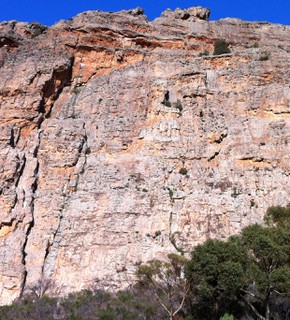
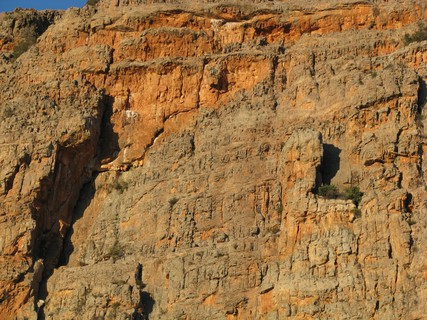
These routes are in the area near Syrinx which is the big orange corner with the balconies high above.
Emergency Location: Mount Arapiles, Tiger Wall Area
access issues
Cultural heritage closures now apply to some parts of Arapiles. This advice continues to evolve and may not be fully reflected in this website; refer to Parks Victoria for details applicable at the time of your visit. https://www.parks.vic.gov.au/-/media/project/pv/main/parks/documents/management-plans/mount-arapiles-tooan-state-park/mount-arapiles-tooan-state-park---aboriginal-cultural-heritage-protections---october-2020.pdf
Bird Nesting September-December Raptors usually nest on the following climbs in Spring : Cassandra, Eurydice, Harlequin Cracks, Revelations. Nesting usually finishes mid-December. There may or may not be signs in place at these times. Please keep 50m clear of these climbs if there appears to be nesting activity.
State Park - no dogs. No fires allowed Oct-Apr (inclusive).
approach
10 minute walk from the campground.
descent notes
Walk away from the cliff to the dirt road, turn L and follow the road. Then take he Central Gully tourist track (signposted) back down.
ethic
Mount Arapiles is first and foremost a trad climbing area. The few sport climbs tend to be in the higher grades where no natural pro is available.
Bolting, particularly retro-bolting, is discouraged and should only be undertaken after extensive consultation with the local climbers, first ascensionists, etc. Inappropriately placed bolts have been chopped.
Do not chip the rock.
Look after the park.
  |
||||||||
| Route | Grade | Style | Selected ascents | |||||
|---|---|---|---|---|---|---|---|---|
| 1 |
★★★ Syrinx
The first three pitches in particular offer superb climbing at the grade, while the final pitches provide an opportunity to explore those high balconies dominating the upper reaches of the cliff. The first two pitches are often combined. While the first part of the climb only spends a small amount of time in the chimney, some parties have mistakenly climbed the chimney in its entirety. This is not a club that you should aspire to join. Despite its enjoyable nature, there have been a number of serious injuries and a death on this climb. Here the start of the fourth pitch has been revised to reduce the danger of a long fall to the belay ledge.
FA: Bruce Hocking & Mike Stone, 1964 | 10 | 170m, 7 | |||||
| 2 |
Penelope Pitstop
Positional Climb the wall and steep arete to the left of Boy Racer. FA: Ingvar Lidman, 2010 | 25 | 25m, 2 | |||||
| 3 |
★★★ Boy Racer
A fabulous route that is one of the harder 22s about. From 3rd Belay of Syrinx, head up to the hand traverse leading left to overhanging corner. Up this to reachy step left around roof then meander to top. FA: Greg Child, Rod Young & Jeremy Boreham, 1978 | 22 | 30m | |||||
| 4 |
★★ Sunday Best
Warning Flora and Fauna: birds nesting Sustained right-hand line starting out of 'Boy Racer'. Half of this pitch was originally aided as 'Syrinx' 'Direct Finish' by Peter McKeand and Gordon Talbett on 26-12-1968 and Chris Baxter had freed the top half of the route from above the crux on 3-12-1977. FA: Kim Carrigan & Mark Moorhead., 1982 | 25 | 50m | |||||
| 5 |
★★★ Syrinx Direct
A significantly shorter, easier and more exciting finish than the original. The u-bolt is on Hot Lonely Planet. Pitches 1 - 3. As for Syrinx, belaying to the right of the large ledge, near the painted arrow.
FA: Clive Curson & Steve Greig, 2012 | 10 | 130m, 5, 1 | |||||
| 6 |
★ Hot Lonely Planet
The route starts from the big ledge at the end of Syrinx's 3rd pitch, about 7m R of Sunday Best.
FA: Clive Curson & Louise Shepherd, 2013 | 21 | 40m, 4 | |||||
| 7 |
★ Trump Tower
A good pitch up the buttress between Syrinx and The Lute. Double ropes are useful.
FA: Keith Lockwood, 13 Sep 2017 | 18 | 40m, 2 | |||||
| 8 |
★★ Ariadne
Warning Flora and Fauna: Bird nesting Provides a good 4 pitch climb largely independent of Syrinx incorporating Clive’s magnificent traverse on Syrinx Direct (odd name for a traverse). There are only two short sections shared with Syrinx. As a whole, it offers good clean climbing, except for 10 metres of easy, somewhat mossy ground on the second pitch. That, as they say, will clean up with traffic, at which time we can probably add an additional star. Rope-drag can be a big issue, potentially destroying the fun on the traverse and there are many ways to slice and dice the pitch lengths and belays for pitches 2 and 3 to minimise this. This description takes a long, fairly direct second pitch finishing at an uncommon belay point. This allows for a shorter third pitch and the anchors are pretty straightforward so it’s quite an efficient option. Take lots of alpine draws or slings as most runners on pitches 2 and 3 will need a sling. Start at the obvious line 7 metres right of Syrinx, as for The Lute.
FA: | 13 | 120m, 4, 1 | |||||
| 9 |
★ The Lute Original
An old climb which is just too vegetated and chossy. Start as for The Lute but at 18m continue up the mossy vegetated line for two 35m pitches to join Syrinx at it's third belay. Finish as for Syrinx. FA: Ian Speedie & Mike Stone, 1965 | 13 | 150m, 4 | |||||
| 10 |
★ The Lute / The Lute Direct
This good, sustained variant on the old route has become popular as a single pitch option. Bridge the deep line 7 metres right of 'Syrinx'. At 18m continue straight up the steep thin line (the original followed the r-hand line). At 35 metres, traverse right below a large balanced boulder to ledge and rap anchor(35m rap). Note: Don't touch the boulder, you should cross below it. It would have been better if the new rap anchors had been placed in the line rather than on the traverse. FA: Kieran Loughran, Ray Lassman & Norm Booth, 2006 | 13 | 45m | |||||
| 11 |
★ Deathwatch Beetle
This fine climb varies considerably from the original climb but is much better. Start as for 'The Lute Direct'.
FA: Keith Lockwood, Ray Lassman (alt). Pitch 3 direct variant : Simon Mentz & Glenn Tempest., 1981 | 16 | 130m, 4, 1 | |||||
| 12 |
★ Greasy Burritos
A good pitch. Now has two bolt anchor. FA: David Gallagher & fan club, 1992 | 19 | 28m | |||||
| 13 |
★ Greasy Burritos Extension
Straight up from GB's anchor for 10m past 1 BR (staple). The lichen is gone but there's not much other gear apart from the bolt. New anchor (2017) FA: Tim Day & Louise Shepherd, 1994 | 20 | 10m, 1 | |||||
| 14 |
Fish Disco
The finger-shredding sickle starting two metres right of 'Greasy Burritos', veering left into that climb. FA: David Gallagher, 1992 | 25 | 30m, 1 | |||||
| 15 | Hard Chat | 23 | 28m, 1 | |||||
| 16 |
★ Exit Stage Left
As for Break a Leg. When at basin, move leftwards past bolt(19) to lower off. FA: Geoff Little, Aug 2017 | 22 | 35m, 1 | |||||
| 17 |
★★ Break a Leg
All trad. Start at seam 2m left of Broken Song up past bulge. Up line to headwall and into shallow basin stance, wish yourself good luck then step right into seam and up on small holds to lower off. The finish seams unlikely and is committing. FA: Geoff Little, Aug 2017 | 23 | 35m | |||||
| 18 |
★★ Broken Song
Hard moves down low and glorious rock on the headwall. Could be done in one pitch but the cruxes are at the beginning and end. Start: Start about 8m right of 'Greasy Burritos' from a diagonal ramp.
FA: Kieran Loughran & Ray Lassman | 21 | 40m, 2 | |||||
| 19 |
★★ Headbanger
This good continuation for 'Broken Song' finally tackles the big overhang above the big diagonal pitch of 'Syrinx'.
FA: Esther Bollinger & Simon Mentz, 2008 | 22 | 120m, 4 | |||||
| 20 |
★★ Little By Little
Nice technical climbing on quality rock with good protection. Start on wide ledge, 4m right of Broken Song. Up past 2 bolts, continue up on easier ground to final headwall, trending rightwards up to lower off. FA: Maureen, Geoff & Maureen Little, Aug 2017 | 19 | 32m, 2 | |||||
| 21 |
★ Riding the Quayle
‘’We’ll give you a dink, Beau’’ A fantastic journey up Tiger Wall. Start: the next seam right of Little by Little. Begin at ground level, at the brushed streak (or step right from base of Little By Little which makes the first pitch 32m).
FA: Keith Lockwood, Maureen Little, Geoff Little & Norm Booth, 9 Sep 2017 | 18 | 130m, 4, 2 | |||||
| 22 |
Beetlemania
The easiest route on Broken Song Wall. Nice climbing but the ledge system breaks the flow. Belay as for Little By Little. Move right and go up easy ground on Riding The Quayle to ramp at 5m. Step up and go up diagonally right and up to a slight nose. Move around the left side of the nose to avoid large detached blocks and up to a large ledge that stretches off to the right. Lovely climbing up crack on left edge of ledge until it stops. Smooth wall past a FH to lower-off. FA: Kieran Loughran & Ray Lassman, 30 Apr 2018 | 17 | 35m, 1 | |||||
| 23 |
★ To Say Nothing Of The Dog
A long second pitch culminating in a fantastic finish up the centre of The Belvedere. Lots of slings and long draws to reduce drag.
There are FHs on top to allow a comfortable belay as well as the rap anchor just below the top. 45m abseil to rings near top of first pitch. FA: Kieran Loughran & Keith Lockwood, 28 Jul 2018 | 18 | 77m, 2, 4 | |||||
| 24 |
★ Shtarde
Some funky moves on the first pitch but it deteriorates after that. Starts at a steepening slabby seam about 10 metres right of 'Broken Song'. There's a faint initial S chipped in the rock on the left side of the seam, a vegetated seam 2 metres further right and then the brushed streak of "Shaggy's Route" another 2 metres to the right. The belay at the end of the second pitch can have an active beehive. Noddy almost died after being attacked by bees at this point.
FA: Paul Gillis & John Bowen, 1970 | 15 | 72m, 3 | |||||
| 25 |
★ Shaggy's Route
Increasing traffic means that this route has cleaned up quite nicely. With more traffic it should become as good as the Dribble but at a higher grade and with more varied climbing. The climb originally included a grade 18 finish through the capping overhangs which Shaggy didn't think worth writing up. Start: Start below a cleaned streak about 15 metres right of 'Broken Song'. There may be the remains of a cairn.
FA: Shaun Kratzer & Derek Chadderton | 14 | 110m, 4 | |||||
| 26 |
Radish
(Somewhat rad?) A long adventure on good rock, straight to the summit of the mount. Individual pitch grades not supplied - the overall grade is 16 but some pitches are easier. The last pitch is in a similar vein to the forgotten final pitch of Shaggy's Route and could well have been better consigned to the same fate. Start: Start up easy, vegetated crack about 5 metres right of Shaggy's Route. This is also the start of 'The Wobble'.
FA: Keith Lockwood, Norm Booth, Ray Lassman & varied leads, 2006 | 16 | 150m, 5 | |||||
| 27 |
The Wobble
The challenge of this old route, should you choose to accept it, is working out where it goes. Start as for 'Radish'.
FA: Steve Craddock & Bob Craddock, 1963 | 5 | 130m, 5 | |||||
| 28 |
★★ The Dribble
Ruthless cleaning, trundling and bolting have brought this climb back to popular notice. A good effort all around. It's a pity that the route hasn't been set up with a rap route as the last pitch is pretty poxy and then there's the walk-off. Start below the first clean streak left of Pan Grove, above the clear-felled area.
FA: Keith Lockwood & Ed Neve Mid 70s., 2000 | 11 | 120m, 4 | |||||
| 29 |
DejaVu, I Think
So-so. Second pitch is OK. Start: Scramble across to a line about 3 metres right of The Dribble's second pitch overhang.
FA: Peter Treby, Kieran Loughran & Peter Allen, 1983 | 17 | 60m, 2 | |||||
| 30 |
Pan Groove
A gentle romp that could serve as an alternative start to The Dribble. Up the Pan Grove slab to whitish blocks at 15m. Instead of moving right (as for Pan Grove), continue following the left-leaning groove. When the groove peters out, step slightly right and finish in the obvious groove. Note: the steep bulging crack on the right is lovely to start, but the finishing blocks are a bit dodgy. Belay on the Senior Citizens terrace and descend Pan Grove. FA: Keith Lockwood & John Smart, 20 May 2018 | 8 | 40m | |||||
2. Index by grade
| Grade | Stars | Name | Style | Pop | |
|---|---|---|---|---|---|
| 5 | The Wobble | 130m, 5 | |||
| 8 | Pan Groove | 40m | |||
| 10 | ★★★ | Syrinx | 170m, 7 | ||
| ★★★ | Syrinx Direct | 130m, 5, 1 | |||
| 11 | ★★ | The Dribble | 120m, 4 | ||
| 13 | ★★ | Ariadne | 120m, 4, 1 | ||
| ★ | The Lute | 45m | |||
| ★ | The Lute Original | 150m, 4 | |||
| 14 | ★ | Shaggy's Route | 110m, 4 | ||
| 15 | ★ | Shtarde | 72m, 3 | ||
| 16 | ★ | Deathwatch Beetle | 130m, 4, 1 | ||
| Radish | 150m, 5 | ||||
| 17 | Beetlemania | 35m, 1 | |||
| DejaVu, I Think | 60m, 2 | ||||
| 18 | ★ | Riding the Quayle | 130m, 4, 2 | ||
| ★ | To Say Nothing Of The Dog | 77m, 2, 4 | |||
| ★ | Trump Tower | 40m, 2 | |||
| 19 | ★ | Greasy Burritos | 28m | ||
| ★★ | Little By Little | 32m, 2 | |||
| 20 | ★ | Greasy Burritos Extension | 10m, 1 | ||
| 21 | ★★ | Broken Song | 40m, 2 | ||
| ★ | Hot Lonely Planet | 40m, 4 | |||
| 22 | ★★★ | Boy Racer | 30m | ||
| ★ | Exit Stage Left | 35m, 1 | |||
| ★★ | Headbanger | 120m, 4 | |||
| 23 | ★★ | Break a Leg | 35m | ||
| Hard Chat | 28m, 1 | ||||
| 25 | Fish Disco | 30m, 1 | |||
| Penelope Pitstop | 25m, 2 | ||||
| ★★ | Sunday Best | 50m |