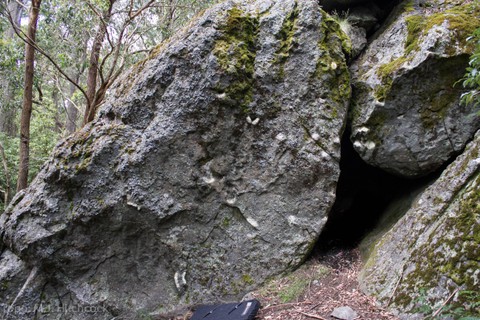
Topo #625853820 Kingdom of the Green
Not logged in
You are not logged in, please login or signup to make updates.
| Route | Grade | Popularity | Style | |||
|---|---|---|---|---|---|---|
| 5 | ★ Leaky Bucket
Stand start on crimpy dishes, big move to giant jug, then two committing sloper moves to top out. You can sit start the problem at the same grade. | V2 | 4m | Unlink route | ||
| 7 | Arete
Sit start the arete with high crimp and left side pull. Don't use the chockstone to the right. Fun but contrived. | V2 | 4m | Unlink route | ||
| 8 | Crouching Michael, Praying Mantle
Climb the chockstone. From good jugs, campus between good holds to mantle. Some might call this a bad landing and uninspiring moves... they would be right. | V3 | 2m | Unlink route | ||
| 6 | ★ Four digits
Sit start with opposing side pulls; one on arete and one on face. Head straight up. | V3 | 4m | Unlink route | ||
| 3 | ★ Kingdom of the Green
Start at base of wall and traverse up and right to finish as per "Four Digits". The lip jugs are out the whole way until top out (or take VE if you use them). | V3 | Unlink route | |||
| 4 | Gotta start somewhere
Sit start with side pull and crimp, head up to opposing gaston and top out. | V1 | Unlink route |
Topo #1753562574 grey
Not logged in
You are not logged in, please login or signup to make updates.
| Route | Grade | Popularity | Style | |||
|---|---|---|---|---|---|---|
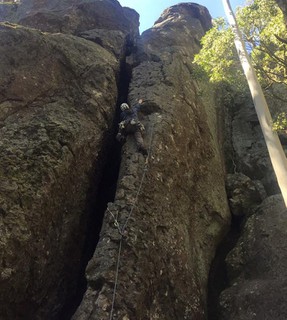
| 12 | ★★ Grey Arete
Narrow rib at the L end of the lower cliff. Follow arete and climb L into a large crack and then continue R up the pinnacle to a DRB belay (25m rap into R gully). | 10 | 32m | Unlink route | ||
| 14 | ★★ Slug’s Honour
Starts just right of 'Grey Arete'. Originally graded 23. Multiple retrobolts have tamed down the experience. Plus the later added easier left hand finish which everyone takes gives the impression it was overgraded. For the true experience as climbed by Charlie, only clip the 2nd bolt to the break to experience the original scary runout weighed down with trad rack to lace up the break. Above go slightly right not left. Has also had its name amended to something much nicer at the request of some good friends! A big thank you to “Hard Very” Tzvia for suggesting the slug theme. Charlie Creese | 21 | 17m, 6 | Unlink route |
Topo #1753562568
Not logged in
You are not logged in, please login or signup to make updates.
| Route | Grade | Popularity | Style | |||
|---|---|---|---|---|---|---|
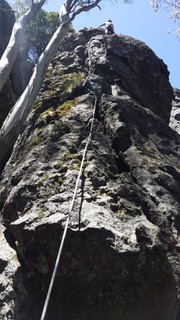
| 20 | ★ Return of the Fush
Well protected line on left side of buttress to the right of Grey Arete. Climb easily up the rib with the big trench to the wall at top on left with the shallow double corner. Good wires in the left corner then up to jugs and around right to follow the diagonal right leading line to the top and DRB. FA soloed. | 9 | 20m | Unlink route | ||
| 21 | ★ Silent Assassin
Start as for 'Unprofessional Conduct', moving up past a BR and RB to chains. | 22 | 20m, 2 | Unlink route | ||
| 22 | ★ Unprofessional Conduct
Start as for 'Silent Assassin' at the base of the rib, but trend slightly rightwards. Up through cracks/groove to chains on left. Not run out but fiddly gear that some will not be happy with. Take care. | 21 | 20m | Unlink route |
Topo #1753562562
Not logged in
You are not logged in, please login or signup to make updates.
| Route | Grade | Popularity | Style | |||
|---|---|---|---|---|---|---|
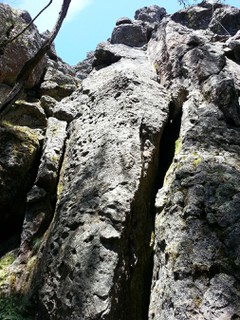
| 27 | ★ Blind Justice
The lower arete was rebolted with consultation of the FA in Oct 2018, this still requires mixed gear. Follow the initial arete past 3 FHs and onto the slab. Up the slab past another FH to gain the little rooflet, round this past another FH then up the top arete onto it L side to DB lower off. Michael did this onsite, covered in moss in damp conditions. Matty Brooks came in a week or 2 later and cleaned it up and added a bolt or 2 and claimed it. Nice of him to tidy it up for the FA, ha ha! | 16 | 40m, 5 | Unlink route | ||
| 28 | ★ Blind Justice - State Of Shock link up
Maybe the better way to do SOS. Start as for BJ. Follow the arete past 3 FHs and onto the slab. Step R and up into the corner of SOS and follow this past 3 RBs to the lower off. | 20 | 20m, 6 | Unlink route | ||
| 29 | ★ Blind Sox
Up Blind Justice to slab, across R into corner, then R to the arete (not great pro till towards the top of the arete), up arete to top of State of Shock. Belay from DBR on State of Shock. | 15 | 30m, 3 | Unlink route | ||
| 30 | ★ State of Shock
Rebolted by the FA in Oct 2018. Start: just left of Poxbow under obvious corner. Up chimney/crack to fused corner protected by 3RBs bolt to rap station | 20 | 25m, 3 | Unlink route |
Topo #5562638562
Not logged in
You are not logged in, please login or signup to make updates.
/12/e1/12e1dbac350d1fd4e50d6934f6b0be1853af6396)
| Route | Grade | Popularity | Style | |||
|---|---|---|---|---|---|---|
| 31 | ★★ Poxbow
The obvious crack/corner line on the left of the face around left of Oxbow. The crux is at about 1/2 height, moving off the face and right facing corner and onto the arete of this corner. A critical cam (#1 [Red] BD Camalot in one orientation only) can be found to protect this move. Continue into the scoop above and follow the beautiful flake out right to a tricky exit move. | 17 | 30m | Unlink route | ||
| 32 | ★★ Poxbow Variant
This was the original way 'Poxbow' was done and is still a great piece of climbing. From the slabby ground, instead of moving up to the chalked flake edge, traverse around R onto the nose on surprisingly large holds. Pull up the two pocketed bulges directly above. DRBs. | 18 | 25m, 1 | Unlink route | ||
| 33 | ★ Sox Glo
As for Poxbow past the crux then finish on left arete (as for Blind Sox) rather than traversing right on the flake (FA Solo) | 17 | 29m | Unlink route | ||
| 35 | ★ Split Images
The original route started as for Law Enforcer and was graded (18), so add a grade or two if you start that way. Starts up the front of the rib, with gear before the first bolt. After the second bolt, step right around the arete then up the pocketed wall | 16 | 20m, 2 | Unlink route | ||
| 37 | ★★ Law Enforcer
Right of Split Images, starts in the gully of Oxbow. Straight up to RB, then follow Split Images using its 2 RBs to the overhang. Clip the RB above the lip and move left under the overhang and pull awkwardly into Poxbow. Then into the overhanging headwall using flakes, clip last RB and finish on the Poxbow ledge. | 19 | 20m, 5 | Unlink route |
Topo #1753583607
Not logged in
You are not logged in, please login or signup to make updates.
| Route | Grade | Popularity | Style | |||
|---|---|---|---|---|---|---|
| 38 | ★ One Hump or Two
1) 18m (12) Bridge the 8m of Oxbow to the chockstone. Step off and climb the L wall moving to near the arete. Select pockets carefully then pull over the bulge to a large ledge and bolt belay. 2) 12m (11) Climb the face just R of the prominent crack-line in the wall above to a big ledge. 3) 45m (7) Up the arete/rib on the L (as for Oxbow) , for 15m to Oxbow's small 2nd belay stance. Pull over the little bulge above and scramble easily to the summit of the Omega block. Descend - scrambling down the juggy NE arete/blocks or rap-off RH side bolts (see details in Omega Block) | 12 | 75m, 3 | Unlink route | ||
| 34 | ★ Split Images Direct
Start as for Law Enforcer, cross through 'Law Enforcer' direct through roof right of poxbow (bolt), doesnt travers left under roof into poxbow etc. | 21 | 20m, 5 | Unlink route | ||
| 35 | ★ Split Images
The original route started as for Law Enforcer and was graded (18), so add a grade or two if you start that way. Starts up the front of the rib, with gear before the first bolt. After the second bolt, step right around the arete then up the pocketed wall | 16 | 20m, 2 | Unlink route | ||
| 36 | ★ Law Enforcer Variant
Start as for Split Images and then continue as for Law Enforcer | 19 | 20m, 4 | Unlink route | ||
| 37 | ★★ Law Enforcer
Right of Split Images, starts in the gully of Oxbow. Straight up to RB, then follow Split Images using its 2 RBs to the overhang. Clip the RB above the lip and move left under the overhang and pull awkwardly into Poxbow. Then into the overhanging headwall using flakes, clip last RB and finish on the Poxbow ledge. | 19 | 20m, 5 | Unlink route | ||
| 39 | ★ Oxbow
Pitch lengths are definitely inflated Start: Up chimney just right of 'Sox Glo' and 'Poxbow' 1. 33m (6) The chimney is climbed all the way to the ledge. 2. 25m (6) The steep little 6m wall on the L to a large ledge. Move L and continue up the clean arete/rib to a small airy belay stance. 3. 32m (6) Traverse L (tending slightly down) past the chimney and around the exposed arete. Step across the chimney and continue to a roomy ledge and cave. 4. 20m (6) Crux pitch! Wander up through the easy cave/chimney to exit conveniently in the descent gully behind the Omega Block. Note the original 30m last pitch, reversed the last 4m of the traverse and climbed up the juggy groove to the top. This is very mossy and doesnt add much to the route. | 6 | 110m, 4 | Unlink route |
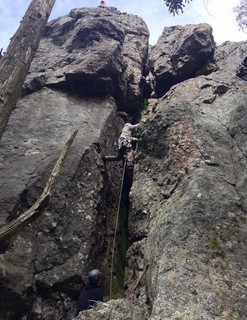
Topo #1753583613 one hump or 2 - 2nd pitch
Not logged in
You are not logged in, please login or signup to make updates.
| Route | Grade | Popularity | Style | |||
|---|---|---|---|---|---|---|
| 38 | ★ One Hump or Two
1) 18m (12) Bridge the 8m of Oxbow to the chockstone. Step off and climb the L wall moving to near the arete. Select pockets carefully then pull over the bulge to a large ledge and bolt belay. 2) 12m (11) Climb the face just R of the prominent crack-line in the wall above to a big ledge. 3) 45m (7) Up the arete/rib on the L (as for Oxbow) , for 15m to Oxbow's small 2nd belay stance. Pull over the little bulge above and scramble easily to the summit of the Omega block. Descend - scrambling down the juggy NE arete/blocks or rap-off RH side bolts (see details in Omega Block) | 12 | 75m, 3 | Unlink route |
Keyboard shortcuts
| esc | Deselect routes and areas while editing |