A Crag Guide gives an extensive view of all sub areas and climbs at a point in the index. It shows a snapshot of the index heirachy, up to 300 climbs (or areas) on a single web page. It shows selected comments climbers have made on a recently submitted ascent.
At a minor crag level this should be suitable for printing and taking with you on a climbing trip as an adjunct to your guidebook.
This guide was generated anonymously. Login to show your logged ascents against each route.
Warning
Rock climbing is extremely dangerous and can result in serious injury or death. Users acting on any information directly or indirectly available from this site do so at their own risk.
This guide is compiled from a community of users and is presented without verification that the information is accurate or complete and is subject to system errors. By using this guide you acknowledge that the material described in this document is extremely dangerous, and that the content may be misleading or wrong. In particular there may be misdescriptions of routes, incorrectly drawn topo lines, incorrect difficulty ratings or incorrect or missing protection ratings. This includes both errors from the content and system errors.
Nobody has checked this particlular guide so you cannot rely on it's accuracy like you would a store bought guide.
You should not depend on any information gleaned from this guide for your personal safety.
You must keep this warning with the guide. For more information refer to our:
Usage policy
Contributors
Thanks to the following people who have contributed to this crag guide:
Dylan Edwards
Brendan Heywood
Cameron Roy
Paul Badenoch
Dan millar
Adam Clay
Carl Schneider
Matthew Broadbent
Sean Charles
Guy Moore
The size of a person's name reflects their Crag Karma, which is their level of contribution. You can help contribute to your local crag by adding descriptions, photos, topos and more.
Some content has been provided under license from: © Cameron Roy (CC BY-SA 3.0 AU) © Australian Climbing Association Queensland (Creative Commons, Attribution, Share-Alike 2.5 AU)
Table of contents
- 1. Thorn Buttress 53 in Cliff
- 2. Index by grade
1. Thorn Buttress 53 routes in Cliff
- Summary:
-
Trad climbing, Sport climbing and Bouldering
Lat / Long: -34.908570, 138.715499
description
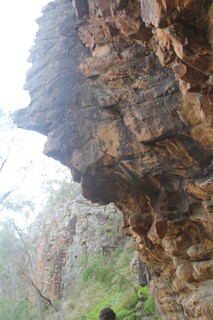
A pleasant place to spent a summer morning as the cliff faces SW and provides shade until midday, and shade most of the day in winter.
Routes are described left to right facing the cliff.
access issues
Part of the area is located within the Morialta Conservation Park.
approach
From the Eastern end of 'Far Crag', descend the steep eroded track to the walking track along the creek. Head downstream for 50m and then cross the creek. The track goes up a gully and crosses some scree before arriving at the cliff.
descent notes
Popular routes have lower offs.
ethic
Morialta is primarily a trad climbing and toproping area. Chipping, excessive chalk, litter and new bolts are all frowned upon and/or illegal.
Some routes have good natural gear, some have none (if the first ascensionist soloed it that is a good giveaway.) Most routes can be toproped and there are ring bollards in the more popular areas - use these where available and do not tie off to trees.
Any bolt repairs should be done in conjunction with the Climbing Club of South Australia.
| Route | Grade | Style | Selected ascents | |||||
|---|---|---|---|---|---|---|---|---|
| 1 |
Super Furry Beaver
The narrow wall and arete just L of Breathless to a double bolt belay. FA: Mark Witham & Doug Brooks, 31 Dec 2014 | 19 | 16m, 4 | |||||
| 2 | Breathless | 23 | ||||||
| 3 | Prickly Heat | 13 | ||||||
| 4 | March Flies when You're Having Fun | 16 | 18m | |||||
| 5 |
Hakea
Start: The ragged corner 10M right of the blackberry filled gully. FA: Dave McNamara & John Dutton, 1973 | 14 | 18m | |||||
  |
||||||||
| Route | Grade | Style | Selected ascents | |||||
| 6 |
★ Smash and Axe Demolition Company
Takes the line of bolts up the jagged arete just left of Gladiator's start. Re-equipped with a new lower-off. FA: Stuart Willams & mark Witham, 1990 | 21 | 9m, 3 | |||||
| 7 |
★ Old Dog, New Trick
Straight up the layback flake to the chains (or beyond). FA: Dave Nelson | 20 | ||||||
| 8 |
★ Barking Up Another Sacred Sight (sic)
Mixed pro. FA: Mark Barnett & David Paull, 1989 | 18 | 20m, 1 | |||||
| 9 |
As the Crowe Flies
Bolts L of Gladiator, stepping into that route to finish. FA: Tony Barker & John Marshall, 2005 | 19 | 20m | |||||
| 10 |
★★ Gladiator
Takes the overhanging line just left of the corner (marked). Climb through the overhanging start (crux) to a stance just under a small roof, then reach out right and climb into the opposing corner. Continue up the line to a layback finish and chains. | 20 | 16m, 3 | |||||
| 11 |
★ Gladiator Direct Start
Takes the poor-looking rock immediately left of the marked Olympus start, joining the upper corner via a reachy and powerful sequence. Was the original line until the loss of some holds. FA: Col Reece | 22 | 20m | |||||
| 12 |
★★ No Mustard on Withdrawal
Climbs 'Gladiator' until into the corner, then drops down and traverses right across the lip of the Olympus roof via some pockets. Once at the arete, blast straight on up the face, finishing at chains. | 24 | 21m | |||||
| 13 |
★ Direct Withdrawal
Climbs 'Gladiator Direct' into 'No Mustard' - thereby avoiding the contrived drop-down move. Very sustained. Recommended to stick clip the 1st traverse bolt from the ground prior to starting. Hard for the grade. | 24 | 22m | |||||
| 14 |
★★★ Repetitive Strain
Sit-starts on the good edge left of the marked Olympus start (just right of 'Gladiator' Direct). Big move to the square jug at the start of Olympus, then reach right for underclings on the left edge of the small cave (feet on pillar only). Grab a positive edge on the lip, then dyno right to the large flared pinch. Swing feet onto the right-side of the cave and drop down to the finger jug at the start of 'The 'Warm Up' Traverse'. Has been linked into The 'Warm Up Traverse' & onwards up 'Japetus' Direct - which is worth 27 for effort! | V6 | ||||||
| 15 | Repetitive Traverse | V7 | ||||||
 |
||||||||
| Route | Grade | Style | Selected ascents | |||||
| 16 |
★★ Olympus / (Mmm, Nice Thighs)
Now superseded by 'Following A Feltch'. The original boulder problem start. 1st bolt is for belayers benefit. Stick clip 2nd, then boulder up and right to a small jug under roof, then span right to gain a sidepull and move into Kiss My Brain. Continue over the roof and finish directly up easy headwall. FA: Stuart Williams, 1990 | 28 | 20m, 6 | |||||
| 17 |
★★ Following a Felch Is No Fun Part II
Climbs the initial boulder problem start of Olympus, then breaks left through the main roof (instead of avoiding it - see 'Olympus') to join 'No Mustard On Withdrawal' at its crux. Continue up headwall then trend right to arete and climb to the Gladiator chain. FA: Stuart Williams, 1991 | 29 | 20m | |||||
| 18 |
★ Minor Threat
Starts as for Fred Radford then takes the Following a Feltch finish, ending at the chain of Gladiator. FA: Sharik Walker, 2000 | 29 | 15m | |||||
| 19 |
★★ Fred Radford
The hardest route in Morialta. Boulder problem start through low roof above boulder (stick clip bolt shared with Olympus), 2m left of Pussy Cats. Join Following a Feltch through big roof then cut back right around arete via another bouldery sequence. Finish at loweroff shared with Kiss My Brain. FA: Sharik Walker | 30 | ||||||
| 20 |
★★★ KMB easy
KMB to the roof and then follow the bolts to olympis finish rings | 25 | ||||||
| 21 |
Kiss My Brain Radford Start
Climb Fred Radford start through roof then finish as for Kiss My Brain. FA: Trent Searcy, 2016 | 28 | ||||||
 |
||||||||
| Route | Grade | Style | Selected ascents | |||||
| 22 |
★ Kiss My Brain
Strenuous boulder problem (stick clip very high bolt) starting by stepping off the block to a large undercling (right of Radford start), then trending up and left to arete (crux), and into the finish of Olympus to the piton. From here gain hold over roof and up to crimps in face, then diagonally left to finish at single bolt lower off. | 25 | 15m | |||||
| 23 |
★ Hippy and a Wharfie
Rarely done, mainly because it has a sport (bolted) start, then relies on trad (small wires) to finish. Climbs Pussycats start (crux) then trends left into Kiss My Brain (bolt and old piton). Over roof, but instead of taking the bolt line left (KMB), go up 2/3m then trent left to arete. Finish at top chain for maximum enjoyment. FA: Stuart Williams, 1988 | 24 | 22m | |||||
| 24 |
★★ Warm Up Traverse
Starts on the right side of the small cave at a jug and finger pocket (left of the start of 'Pussycats'). Traverse right past a large sloper and block undercling to a rest beneath the start of 'Sardine'. Keep traversing right via sidepulls to drop down onto the large jug at the start of 'Japetus'. | V1 | ||||||
| 25 |
★★ Warm Up Reverse
Climb The 'Warm Up Traverse' there and back. | V2 | ||||||
| 26 |
★ Pussycats and Crushed Kneecaps
Takes the line of ring bolts on the left side of 'Sardine', joining that route at its rest. | 24 | 18m | |||||
| 27 |
★ Sardine
Starts just left of the 'Terrathea' corner and climbs up to the big sidepull sloper and two good edges. Clip the next bolt and launch out left (crux) to a big crank level with the small roof (rest). Cut back right - then left - until below the final face (rest). Continue to the chain. This route can also be done by going direct through the roof (at the same grade). | 22 | 21m, 6 | |||||
| 28 | ★★ Sardine Direct | 22 | ||||||
 |
||||||||
| Route | Grade | Style | Selected ascents | |||||
| 29 |
★★ Terrathea
The good-looking corner crack just right of 'Sardine'. Cruxy start, then once level with Sardine's 2nd bolt, it eases off (but not completely). Best finished by traversing left to the 'Sardine' chains. FA: Dave McNamara, George Adams & Doug Mclean | 18 | 20m | |||||
| 30 |
★★ Terra Incognita
Climb the reachy boulder-problem off the deck just right of the Terrethea crackline via a big move to the dubious flat jug. Continue up to the 'shield' (which is living on borrowed time) - then onwards up the face. FA: Stuart Williams, 1995 | 22 | 20m | |||||
| 31 |
★★★ Terrathea-Incognita
A really good combo route. Start as for Terrethea, but prior to its crux reach out right for the big flake of 'Terra Incognita'. Match this and continue up the line. Effectively dismisses the original 'Terra Incognita' reachy crux. | 21 | ||||||
| 32 | ★ Incognita-Japetus DF Link | 22 | ||||||
| 33 |
★ Two Hour Hole
Take 'Japetus' to the 'hole' - then launch up the left side of the arete past a small edge and a 'hidden' sidepull to the 'Japetus' break. The original line continued up the face of 'Terra Incognita' - however cutting back right at the good rest and launching up the direct finish of 'Japetus' Direct makes for a far better route. FA: Stuart Williams & Duncan Graham, 1995 | 24 | 18m | |||||
| 34 |
★★ Japetus
The original route. Now superseded by the direct finish. Start: Takes the very overhanging arete from its base up to the 'hole', then tacts right around the steep arete and up to the big break via a good undercling. This original line then stepped left and finished up the 'Terra Incognita' face. FA: Kim Carrigan (all on trad), 1979 | 23 | ||||||
| 35 |
★★ Japetus Direct Finish
Originally established as a bold traditional outing by Kim Carrigan. Now retro-bolted with general consensus due to it residing in a largely sport-route populated area. Not surprisingly, it has now become one of the most travelled lines for its grade at 'Morialta'. Makes for a far better outing than the original. Once at the big break, climb straight up the continuation of the arete largely on its right border to finish at a chain. FA: Kim Carrigan (all on trad), 1981 | 23 | ||||||
| 36 |
★ Japetus Extension
A boulder problem traverse link up into Japetus Direct Finish. Start (sit) left of base of Olympus - dyno rightwards and climb across cave to juggy traverse that leads underneath Sardine etc to base of Japetus. Continue up that route. Best done with a top-rope clipped in prior to embarking on the route itself. Basically a V5/6 problem into an existing 23. | 27 | 30m | |||||
| 37 |
★★ Japetus-Stench Connection
A more powerful version of 'Japetus'. Once at the large break, cut right up the rampline of 'Stench' and finish at that routes chain. Sustained. FA: Stuart Williams & Robert Knott, 1995 | 23 | 20m | |||||
| 38 |
★★ Japetus Right Hand
FA: Finish up black streak right of last bolt | 23 | ||||||
| 39 |
★★ Stench-Japetus DF Connection
A worthwhile variant. Start as for 'The Stench' then once past its roof climb up to its good 'ear' edge and make a reach out left to the 'Japetus' undercling. Finish as for 'Japetus' Direct. | 24 | 18m | |||||
| 40 |
★★★ The Stench Before the Storm
One of the best routes in the Gorge. Climb the roof right of the undercut arete (Japetus) via a large undercling. Get your breath back over the lip, then launch up and left (or go direct) to the obvious rampline. One final hard move remains, then large holds lead to the chain in a runout position (Cam optional). Unfortunately the scene of some chipping circa 2005 when the crux slot on the face after the roof was altered to allow certain people's fingers to close crimp the hold. What they didn't know is that this route can be climbed direct up the face (slightly harder). FA: Stuart Williams, 1988 | 25 | 19m | |||||
| 41 |
★ Hyperion
Begin at the Overhung Corner / Protruding Buttress right of Stench Before the Storm's face. Continue up the wall on good holds. FA: Colin Reece (Aid 14 M4), 1972 FFA: Kimm Carrigan & Gary Scott, 1979 | 22 | 19m, 3 | |||||
| 42 |
★ October
The line of bolts to the lower off on the short buttress R of the Hyperion corner. Stick clip recommended. FA: ? | 21 | 12m, 3 | |||||
| 43 | Fenceline | 14 | 19m | |||||
| 44 | Debut | 16 | ||||||
| 45 | Hanging Foul | 11 | 15m | |||||
| 46 | Get Smart | 21 | 15m | |||||
| 47 | Moss Wall | 10 | ||||||
| 48 | Passing Shadows | 17 | 15m | |||||
| 49 | Thorn In My Side | 11 | 12m | |||||
| 50 | Numbats | 12 | 8m | |||||
| 51 | Blessed Ignorance | 20 | 13m | |||||
| 52 |
Kiss my brain Olympis finish
Start at for Kiss my Brain and then follow the easier line up to Olympis ring bolts. | 24 | ||||||
| 53 |
KMB easy finish
KMB to the roof and then follow the bolts to the Ring bolt chains | 24 | ||||||