A Crag Guide gives an extensive view of all sub areas and climbs at a point in the index. It shows a snapshot of the index heirachy, up to 300 climbs (or areas) on a single web page. It shows selected comments climbers have made on a recently submitted ascent.
At a minor crag level this should be suitable for printing and taking with you on a climbing trip as an adjunct to your guidebook.
This guide was generated anonymously. Login to show your logged ascents against each route.
Warning
Rock climbing is extremely dangerous and can result in serious injury or death. Users acting on any information directly or indirectly available from this site do so at their own risk.
This guide is compiled from a community of users and is presented without verification that the information is accurate or complete and is subject to system errors. By using this guide you acknowledge that the material described in this document is extremely dangerous, and that the content may be misleading or wrong. In particular there may be misdescriptions of routes, incorrectly drawn topo lines, incorrect difficulty ratings or incorrect or missing protection ratings. This includes both errors from the content and system errors.
Nobody has checked this particlular guide so you cannot rely on it's accuracy like you would a store bought guide.
You should not depend on any information gleaned from this guide for your personal safety.
You must keep this warning with the guide. For more information refer to our:
Usage policy
Contributors
Thanks to the following people who have contributed to this crag guide:
Adam Rabjohns
Matt Tranter
Cavell Martin
Paul Frothy Thomson
Brendon Flanagan
James
Murray
Stephen Varney
Brendan Heywood
Sam May
The size of a person's name reflects their Crag Karma, which is their level of contribution. You can help contribute to your local crag by adding descriptions, photos, topos and more.
Table of contents
- 1.
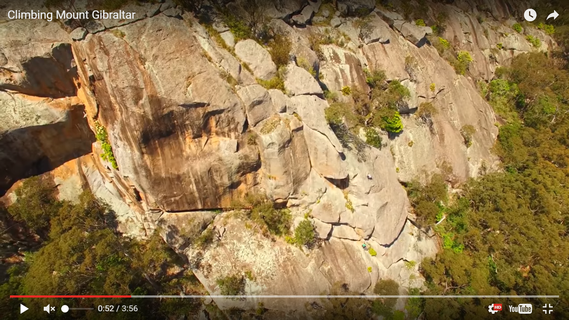
Mt Gibraltar
71 in Crag
- 1.1. North Walls 15 in Cliff
- 1.2. Main Wall 19 in Cliff
- 1.3. Slab Walls 27 in Cliff
-
1.4.
Mt Gibraltar Bouldering 10 in Area
- 1.4.1. North West Boulders 5 in Sector
- 1.4.2. South West Boulders / Slippery Slopes 2 in Sector
- 1.4.3. Eastern Boulders 3 in Sector
- 1.4.4. Northern Boulders / Bearded Boulders 0 in Sector
- 2. Index by grade
1. Mt Gibraltar 71 routes in Crag
- Summary:
-
Sport climbing, Trad climbing and Bouldering
Lat / Long: -34.463157, 150.428745
description
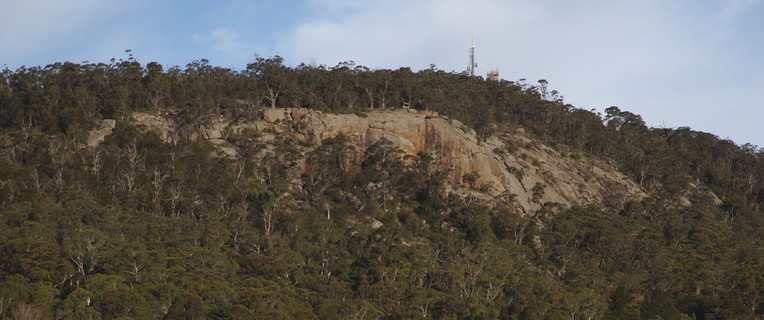
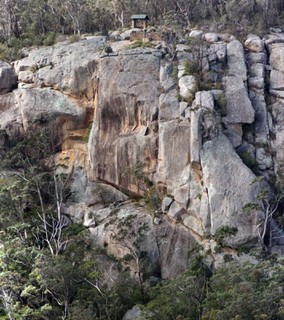
Mount Gibraltar is an 863 metre high mountain in the Southern Highlands Region of New South Wales. The mountain is thought to have been formed from a collapsed volcano core. The rock type is called Mount Gibraltar Trachyte, or alternatively, micro-syenite. It is the most prominent peak in the Mount Gibraltar Reserve.
access issues
Located in the Mount Gibraltar Reserve.
approach
Mount Gibraltar is accessible by car via Oxley Drive.
  |
1.1. North Walls 15 routes in Cliff
- Summary:
-
Mostly Sport climbing
Lat / Long: -34.461944, 150.427704
description
The North Walls are a group of smaller walls located on the northern descent track. These walls include The Bat Cave, 14 Wall & Flake Wall.
approach
Park at the top of Jellore Lookout. Walk to the northern end of the paking area then turn left down through small boulders (30m). You will arrive at a large rock platform, from here turn right and join the northern descent track. Follow the descent track to Northern Walls (more info in descent notes below).
Alternatively continue straight down hill from rock platform and rap down Chadwicks Revenge.
descent notes
Climbers Left. To walk down the Northern Descent, go north along the rim track for about 80m to the end of the rock shelf, then head down and left, there is a big boulder above "Punks on the Gib", the gully is just to the left of it. The gully between this buttress and the slabs is too scary to descend (and a bit grim to climb up) To get out, walk up the Northern Descent.
   |
||||||||
| Route | Grade | Style | Selected ascents | |||||
|---|---|---|---|---|---|---|---|---|
The Bat CaveLocated on your right as you walk down the northern descent track. Just north of Skiers Crack. | ||||||||
| 2 |
★ Punks on the Gib
The only route in the Bat Cave. Up to BR then to jug, move right then up past 2 BRs. DBB. FA: G. Miller | 22 | 15m | |||||
14 WallSmall slab wall with a mixture of trad and sports climbs. | ||||||||
| 4 |
Skier's Crack
A short but sweet little splitter at the left side of the 14 wall, then follow the ramp and flake to the top. Tree & gear belay. Obvious from the descent gully, this was surely not missed by earlier climbers, but was never described. | 14 | 8m | |||||
| 5 |
1
Start at tree on far left of wall. Up past BR. Requires bolt plates for carrots FA: T Cartwright | 14 | 10m | |||||
| 6 |
★ Magic (2)
Original description started at tree and traversed right, but it's better to start on the ground and mantel onto the rail. Up past BR, then juggy wall Requires bolt plates for carrots (2) FA: T Cartwright | 13 | 15m, 2 | |||||
| 7 |
★ Fawkes (3)
Start just right of Two. Up past 5 BRs to chain. Rebolted August 2014 on expansions. FA: T.Cartwright | 16 | 15m, 5 | |||||
| 8 |
4
Right again. Up past 2 BRs to chain. FA: T Cartwright | 15 | 15m, 2 | |||||
  |
||||||||
| Route | Grade | Style | Selected ascents | |||||
Flake WallThe Flake Wall is immediately (1m) right of 14 Wall and is easily identified by the flake which forms a mini-roof over all others. | ||||||||
| 10 |
Five
About 2m right of the double cracks. Up wall past 2 BRs to small overlap, past BR and small tree. DBB. FA: T.Cartwright | 17 | 10m | |||||
| 11 |
Five point five
1m right of Five, start up large flake past bolt and up to break, clip another bolt above roof then up easy slab to shared DBB | 17 | 12m | |||||
| 12 |
The Great Prawn Hunt
Up as for Four to overlap, traverse right along flake to join Six. 3BRs. FA: F.Duxfield & G.Williamson 1996 | 17 | 15m | |||||
| 13 |
Six
Start as for Four. Traverse right along low flake to BR, then up and past another BR to tree. FA: T.Cartwright | 15 | 10m | |||||
Chadwicks CornerFrom northern end of parking area follow dirt track through boulders and straight across rock platform (20m). Rap down (10m). | ||||||||
| 15 |
★★ Seven
Line of bolts left of Chadwick's D.S. Bouldery start to minor lip then up, 4 RBs. Double bolt belay. Rebolted 2018 FA: T.Cartwright | 22 | 10m, 5 | |||||
| 16 |
★ Chadwick's Dynamic Society
Where large boulder caps the cliffline. Up closed corner, through roof, up slab. 3RBs. Double bolt belay. Rebolted 2018 FA: G.Miller Jun 1991 | 22 | 7m, 3 | |||||
| 17 |
Chadwick's Revenge
Start 2m right of Chadwick's DS. Up layback, over roof, up slab. 3RBs. Double bolt belay. Rebolted 2018 FA: G.Miller | 17 | 10m | |||||
| 18 |
★★ A Crack Affair
Hard start. Layback up arete, followed by plenty of crack. Use the tree to mantle over the top to doubles. FA: Adam Rabjohns, 12 Oct 2018 | 18 | 8m, 6 | |||||
| 19 |
Short and Curly
Up crack and then step left on to blocks. Finish at tree. FA: Matt Tranter & Ryan Hanvey, 2014 | 14 | 9m | |||||
1.2. Main Wall 19 routes in Cliff
- Summary:
-
Sport climbing and Trad climbing
Lat / Long: -34.462281, 150.427139
description
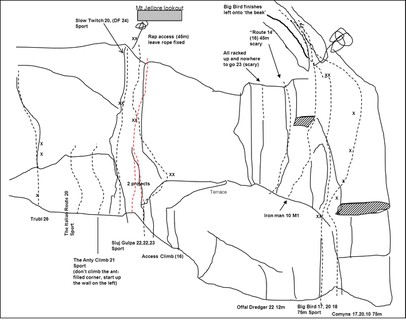
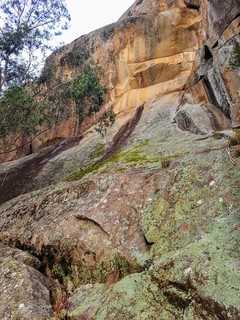
Located directly below Mount Jellore lookout. Main wall hosts the highest concentration of Hard classics at the crag. Best to do the Slab Walls descent (40m south of the lookout) and walk around.
      |
||||||||
| Route | Grade | Style | Selected ascents | |||||
|---|---|---|---|---|---|---|---|---|
| 1 |
★★ Trubl
Thin crack on left wall of main corner. FA: M.Law & S.Butler, 1987 | 26 | 50m, 2 | |||||
| 2 |
★ the Italian Route
Slab 10m left of Slow Twitch corner. 4 BRs. Set: Michael Law FA: Patrick Burr, 2012 | 20 | 20m | |||||
| 3 |
★★ The Anty Climb
Slab 6m left of Slow Twich corner. Avoid corner at start (ants!), stay left on slab. 6 bolts. FA: Vanessa Peterson, 2012 | 22 | 20m, 6 | |||||
| 4 |
★★ Slow Twitch
Start below obvious corner. Up slab to corner, then up corner to finish. Lower-Offs. 7 bolts. FA: M. Law, 1988 | 20 | 30m, 7 | |||||
| 5 |
★★ Slow Twitch Extension
Start as for Slow Twitch, then continue up corner to top. The line of the cliff. tenuous and weird FA: M. Law, 1988 | 25 | 40m | |||||
| 6 |
★★★ Slow Gulpa
Links Slow Twitch into the top pitch of Sluj Gulpa past 1 additional bolt and a techy boulder-problem to create a 38m mega pitch from the ground. Start up Slow Twitch, after clipping the last bolt (before the final desperate mantle) traverse up and rightwards towards the NEW bolt, keeping fairly high (you shouldn't be touching those Orchids) to join Sluj Gulpa P3 after it's traverse (where the climb begins to head up the flake/corner systems. Follow this to the top. A 60m rope will NOT lower back to the ground from the anchors. HOWEVER, if you are working this route, you CAN lower to the ground from the LAST BOLT with a 60m rope. FA: Paul Thomson, 26 May 2015 | 24 | 38m, 14 | |||||
  |
||||||||
| Route | Grade | Style | Selected ascents | |||||
| 7 |
★★ Mikl's Face Project - CLOSED PROJECT
CLOSED PROJECT - MIKL. The line of bolts straight up the face between the Slow Twitch Corner and the obvious line of Sluj Gulpa. Set: Mike Law | 35m | ||||||
| 8 |
★★ Gulpa’s Gin Palace
The malevolent Chimney between the Slow Twitch corner, and the obvious line of Sluj Gulpa. Mantel next to trees and step right back onto face and continue to the the ledge (runout to the anchor) bolt and FH Set: Mike Law FA: nathanual hebbard, 5 Apr 2021 | 28 | 35m | |||||
| 9 |
★★★ Sluj Gulpa
6m right of Slow Twitch corner.
FA: Mike Law, Geg Child, Greg Moore & Giles Bradbury, 1988 | 23 | 60m, 3, 14 | |||||
| 10 |
The Access Climb
Start about 12m downhill from the massive corner (Slow Twitch) in a chimney/crack system. Up system till you can step left. Continue out sickle shaped crack to ledge and tree belay. Abseil off (dodgy tree) or continue to top via one of the many other routes. | 16 | 25m | |||||
|
The base of the following routes are more directly accessed by walking down the left side of the lookout. Be careful when it's damp and slippery. A fixed rope from the top of Big Bird leads to an abseil point above route 14 corner. 50m to the deck from here. There is a intermediate abseil point 20m down (belay for Monsterpiece Theatre). | ||||||||
| 12 |
All Racked Up and Nowhere to Go
FA: J. Bell, G. & G. Williamson, 1996 | 23 | 20m, 1 | |||||
| 13 |
★ Monsterpiece Theatre
Start left of Big Bird at detached block.
FA: Stephen Varney, 8 May 2017 | 19 | 50m, 2, 14 | |||||
| 14 |
Route Fourteen
Up corner past 2 carrots to pod in corner, and up to rap station. FA: Unknown | 16 | 20m, 2 | |||||
| 15 |
★ Iron Man
Start as for Access Route.
FA: G.Williamson & F.Duxfield Jun 96, 1996 | 10 M1 | 45m, 3 | |||||
  |
||||||||
| Route | Grade | Style | Selected ascents | |||||
| 16 |
★★ Modern Masculinity
Climbs up and left through the corner above the 1st belay on Big Bird.
Set: James, Rene Provis & Sam May FA: James, Rene Provis & Sam May, 7 Feb 2015 | 21 | 80m, 4 | |||||
| 17 |
★★ Modern Masculinity Top Pitch
Can be climbed as an alternate pitch to the final pitch of Big Bird. It's a little harder and a lot scarier. Seconds beware of the potential for a big swing. Maybe clean the second draw after mantling (you'll see). 2 fixed hangers on the left arete of the beak. FA: James Bultitude, 22 Jun 2014 | 20 | 15m, 2 | |||||
| 18 |
★ Offal Dredger
Start approx 30m right of Slow Twitch, around corner. Short, curving corner. FA: A. Prehn, 1979 | 22 | 12m | |||||
| 19 |
★★ Big Bird
Start at short crack with U-bolts about 80M R of the big corner, below obvious steep layback corner.
Scramble up and left to lookout. FA: Gareth Downey & Mikl Law, 2012 | 20 | 65m, 3 | |||||
| 20 |
★ Comyns
Start 15m right of Offal Dredger, 6m right of Big Bird. Climb rib right of obvious corner.
FA: Mike Law & G.Eggins, 1986 | 20 | 50m, 3 | |||||
1.3. Slab Walls 27 routes in Cliff
- Summary:
-
Sport climbing and Trad climbing
Lat / Long: -34.462604, 150.427019
description
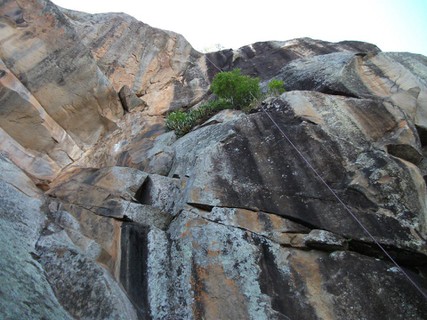
Dew can make the cliff slippery till 10am or so. Hot in summer after 12. Sizable expanse of rock separated from Main Wall by large vegetated gully.
approach
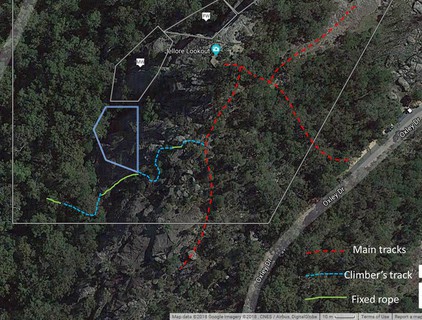
When approaching Slab Walls please stick to the established paths. Local rangers have approached climbers identifying that new trails (short cuts) are being created which is affecting the local vegetation.
The Slab Wall descent is NOT suitable for beginners, take them down the North Walls access and around the base OR belay them down the long rope downclimb about halfway down, especially if the rock is damp.
Easiest approach is either down the descent ramp, or abseil in as per the Main Wall and walk around, or down the north descent and walk around.
descent notes
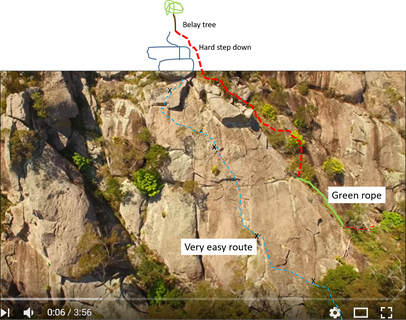
Not suitable for beginners!Use the North wall access or belay. Facing out walk 12m left from the little hut to a "Warning Cliff Edge" sign. Continue another 12m where you'll find a flattened cairn on your right. Walk down this trail to a tree (belay at top of Gripping Yarn). Facing out descend to your left and through the hard step down. Continue down and right where you'll see the mantel on Gripping Yarn. Head diagonally left and down 25m across gully, then back right to a green rope tied to a tree. Far From The Madding Crowd and Road Less Travelled start R (facing cliff) of the bottom of this roped section. Continue down through the scrub to another short rope down to base. You are now about 20m R (facing cliff) of The Very Easy Route. It takes about 3 minutes to get down.
history
Wandered all over in the 70s, rediscovered by locals.
     /26/22/2622d6b1974bc8c96d0699163ac166b94796d75d) |
||||||||
| Route | Grade | Style | Selected ascents | |||||
|---|---|---|---|---|---|---|---|---|
Left Hand SideAt the bottom of the descent rope drop down one more level to the bottom of the crag. Turn left facing the cliff and walk past the cracks of The Very Easy Route Etc. Blood Magic starts at the very low point of the crag, under the prow of Big Bird. | ||||||||
| 2 |
★ Blood Magic
Start at the very low point of the crag.
Set: Adam Rabjohns FFA: Adam Rabjohns, 6 Nov 2018 | 17 | 75m, 4, 40 | |||||
| 3 |
★★ Here be Dragons
Start at the very low point of the crag. Meanders up through the old descent gully on really cool features.
Set: Matt Tranter FA: Matt Tranter, 18 Sep 2018 | 18 | 52m, 4, 32 | |||||
| 4 |
Suicidal Dreams
Offwidth corner crack about 50m right of Access Route, 20m R of big choss gully, and 50m left of base of Descent Ramp.
FA: F.Duxfield & G.Williamson 1996 | 18 | 50m, 2 | |||||
| 5 |
★ Onwards
Nice corner 10m R of Suicidal Dreams. Belay at rings on right (belay 2 of The very Easy Route). Done before, thought to be RRD for many years. | 14 | 20m | |||||
| 6 |
★★ Nintendo 64
3 nice pitches. Start at RRD initials, about 10m L of Gripping Yarn. P1 30m 17 Start up first few moves of RRP and left up nose to 2nd belay Very Easy Route (rings). P2 30m 17 Up friction slab above belay (stay out of the crack) then up left to Gripping Yarn second belay, left end of overlap. P3 10m 17 Up arete to hidden pockets on slab FA: Eugene Mak, Jeffrey Crass & Michael Law, 2018 | 17 | 70m, 3 | |||||
| 7 |
★ R.R.D
About 20m right of Suicidal Dreams, groove 8m left of gripping Yarn. Marked with faint yellow paint.
| 16 | 60m | |||||
      |
||||||||
| Route | Grade | Style | Selected ascents | |||||
| 8 |
★★ Gripping Yarn
Nice slabbing with a few easy run outs. Easiest to walk down the descent ramp, the route starts up a thin crack some 35m L of the Descent Ramp. Or else 30m R of the big choss gully on the R side of the Main Wall is a fine thin crack up the face of short flake.
(P1 claimed as Mark Farrels Crack in 1997, but regularly climbed in the 70s) FA: Jeffrey Crass & Michael Law | 16 | 95m, 3, 13 | |||||
| 9 |
★★ The very slightly harder route
FA: Michael Law, 1978 | 16 | 80m, 2, 1 | |||||
| 10 |
★★ The Very Easy Route / The Ring Route
It's possible to wander all over the wall with many variations. This captures the best easy climbing, the pitches are short so you can watch seconds. You can easily combine P1+2, and P4+5 if you use a few slings. All rings. Follow the rings. There is one ring to rule them all.
FA: Michael Law & Jeffrey Crass, 1977 | 13 | 110m, 5 | |||||
| 11 |
★★ Roomba style
Nice climbing up an old fashion slab with good but sparse gear, Climb up chimney about 6m R of Gripping Yarn (sling tree), step R and onto slab and easily straight up black streak to diagonal at 15m, good wires. Easy runout up black streak to flake, step left (good baby cams now that the paper flakes have been removed) finishing up a flared seam. There are 3 good small wire placements , take a nut tool as the crack catches bit of dirt (and reading glasses if you're old) Finishes at the top of the green rope in the Access Ramp. Technically about 16, and would have been graded 17 if it was in Booroomba FA: Michael Law & Jeffrey Crass | 20 | 45m | |||||
| 12 |
Maur i Rompa
Original route in the area, superseded by The Mittagong Two Step. After the 3rd BR go up the easy corner FA: James Bultitude & Jake Griffiths | 16 | 35m, 2, 2 | |||||
| 13 |
★ Mittagong Two Step
Start up The Very Easy Route to the first belay or walk in along ledge. Up rightwards past 3 bolts to the smooth scoop (18) then left to the corner (optional medium cam), step left and up arete past 2 bolts. Up delicately to the belay (2 bolts, descent rope tied to one)).The first half of the pitch was originally done as Maur i Rompa FA: Ian Ryan & Jeffrey Crass, 2017 | 18 | 35m | |||||
| 14 |
★ On The Shoulders Of Giants
Start on the ledge directly below the descent rope. Follow the cool little ripple up the ledge to double belay anchors. Great beginners slab route, easy to protect, easy to bail. Follow the handline to the belay bolt. | 15 | 15m, 9 | |||||
Right Hand SideRoutes on the right hand side of the descent rope. Routes read left to right looking at the crag. Barking Knuckles starts one metre right of the descent rope. | ||||||||
| 16 |
★ Barking Knuckles
Three good easy pitches going leftwards up the spine of the buttress
Set: Jeffrey Crass & Brendon Flanagan, 12 Dec 2017 FA: Brendon Flanagan, Jeffrey Crass, Phuong Ho, Geoff Cooper, Chanté Fisk, kip, ian, sandy & Matt Tranter, 18 Mar 2018 | 13 | 60m, 3, 19 | |||||
  |
||||||||
| Route | Grade | Style | Selected ascents | |||||
| 17 |
★ Barking Knuckles Pitch 3 Variant 1.1 / The Balancing Pitch
Left line on the slab. Use both sides of the big flake to get onto the face. Balancy moves on good holds to get to the first FH. Set: Brendon Flanagan, 8 Apr 2018 FA: Brendon Flanagan & Chris A, 8 Apr 2018 | 16 | 18m, 7 | |||||
| 18 |
★★ Barking Knuckles Pitch 3 Variant 2 / The Runnel Pitch
Right line on the slab. Pass the first easy bolt and up to runnel. Up runnel and trend left. Up easy slab, around bush, easy mantel to DFH. Set: Brendon Flanagan & Matt Tranter, 18 Mar 2018 FA: Brendon Flanagan & Chris A, 8 Apr 2018 | 15 | 20m, 7 | |||||
| 19 |
★★ Barking Knuckles Pitch 3 Crack Finish / Kats Crack's Back Pitch
Set: Brendon Flanagan Set: Jeffrey Crass & Brendon Flanagan, 12 Dec 2017 FA: Brendon Flanagan, Jeffrey Crass, Kip Newing, Matt Tranter, Phuong Ho, Geoff Cooper, Sandy & Ian, 18 Mar 2018 FFA: 18 Mar 2018 FA: Brendon Flanagan, Jeffrey Crass, Phuong Ho, Matt Tranter, Geoff Cooper, kip, Ian Ryan & Sandy, 18 Mar 2018 | 17 | 55m, 3, 19 | |||||
| 20 |
★ Slab Dash
Nice easy (introductory) slab climbing, 2 meters left of 'Far from the Madding Crowd'. up the short black slab to DBB and lower off. FA: Jeffrey Crass, Peter Butcher, Claire Cinnoni, Paula A Cisternas, Chanté Fisk, Brendon Flanagan, Emily Petherbridge, Phuong Ho & Richelle, 12 Nov 2017 | 12 | 15m, 4 | |||||
| 21 |
★ Far from the Madding Crowd
Either abseil down from above or descend the fixed rope in the descent gulley or from bottom by following cliff around until a fixed rope is found to access start alcove. Top wall tends to be wet after rain and will seep.
FA: Matthew Tranter & Jon Soper-Dyer | 18 | 40m, 2, 14 | |||||
| 22 |
★★ The Devils Tears
Pitch 1 is the nicest moderate pitch on the mountain. Start on the same ledge as 'Far from the Madding Crowd' and 'Road Less Travelled'. Follows the cool looking water runnel up to the mini arête and slab above.
FA: Matt Tranter & Jon S-D | 17 | 45m, 2, 16 | |||||
  |
||||||||
| Route | Grade | Style | Selected ascents | |||||
| 23 |
★★ Road Less Travelled
Starts at same ledge as 'Far from the Madding Crowd' and 'The Devils Tears', about 5m further right.
FA: Matt Tranter | 19 | 50m, 2, 15 | |||||
Single Pitch Slab.6 metres further around the cliff is a small slab of good rock bordered on each side by a crack. The next 4 routes are good quality single pitch moderate slabs. | ||||||||
| 25 |
★★ Look Ma, No Hands
First route on the mini slab. Pull past horizontal break and then up to the reinforced hold. Micro holds all the way to the final over lap and jugs. Set: Matt Tranter FA: Matt Tranter, 19 Dec 2018 | 18 | 15m, 8 | |||||
| 26 |
★★ Riding Shotgun (Underneath the Hot Sun.)
Middle of the slab. Thin moves well protected. FA: Matt Tranter, 2018 Set: Matt Tranter, 2018 | 20 | 15m, 8 | |||||
| 27 |
★★ Paved With Good Intentions
Right hand side of the slab. Start on the conveniently positioned old tree trunk. Pull up slab into curving crack, lay back with style and surmount the head wall with care. Set: Matt Tranter FFA: Matt Tranter, 18 Dec 2018 | 17 | 15m, 10 | |||||
| 28 |
Pioneers, rebels and mutineers.
2 metres further right. Start on the flake of rock, up the clean slab and over the overlap. Romp to top. FA: Matt Tranter, 26 May 2019 | 17 | 20m, 8 | |||||
 |
||||||||
| Route | Grade | Style | Selected ascents | |||||
|
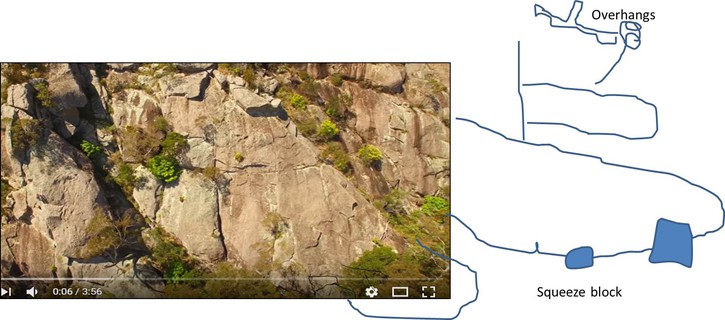
The following routes are a further 10 metres along the cliff. Pass a spear of rock leaning against the face. (Start of Mad Dogs.) | ||||||||
| 30 |
★★ Mad Dogs and Englishmen
Start, walk about 40m R of The Road less travelled etc at a body high flake you can just squeeze thru (or walk around).
Set: Matt Tranter & James FA: Matt Tranter, 11 Feb 2018 | 17 | 60m, 3, 18 | |||||
| 31 |
★ Orchid Alley
Great climbing,more smearing and balance than crimping, up a clean water streak. Start, walk about 40m R of The Road less travelled etc to a body high flake you can just squeeze thru (or walk around) (Mad Dogs and Englishmen). Clean black streak 6m right of squeeze. Now easier as it has cleaned up.
FA: Jeffrey Crass & Michael Law, 2017 | 19 | 90m, 3, 17 | |||||
Unknown RoutesThe following route descriptions could not be located. If you can figure it out, let us know! Afterthought 23m (9) Halfway down descent gully on right behind wattle trees. Up slab to groove/crack, up this and wall to right, to ledge. Up between cracks. N.Wilson, N.Jacobs Dec 77 Three D 29m (15) At crack about 5m right of descent gully. Up crack to block, up right of block. Righwards onto wall and up slabs to chimney. W.Newton, N.Wilson, Dec 77 Cricket Hat 50m (12) At block leaning against cliff about 15m right of Three D. Up to tree right of blade to corner, up onto ramp to right. Up crack and wall to trees. Right onto wall and up slabs to chimney. N.Wilson, W.Newton, J.Warren Nov 77 Jwan 58m (9) At corner 5m right of Cricket Hat. Up corner and loose rock to another corner, to bushy ledge. Up slab towards crack, just below bush move right onto wall and up. N.Wilson et al Nov 77 Second Thoughts 26m (14) Behind wattle tree about 20m right of 'F'. Up wall to slab, then to trees. Up wall and slab to crack in block, left to crack, up block to top. N.Wilson Jan 78 Goat Track 45m (15) At overhanging corner and wall about 4m right of Second T. N.Wilson, W.Newton Dec 77 | ||||||||
1.4. Mt Gibraltar Bouldering 10 routes in Area
- Summary:
-
All Bouldering
Lat / Long: -34.463511, 150.428810
description
WIP
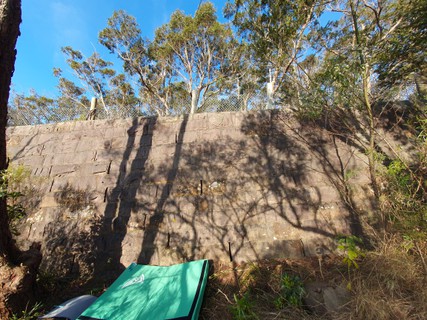
1.4.1. North West Boulders 5 routes in Sector
- Summary:
-
Lat / Long: -34.463098, 150.427671
description
WIP Boulder field. Above Slab Walls
Great potential
approach
Via the rim track.
 /a8/cc/a8ccbb61adc4cc123daeec69e51090e91db22c5d) |
||||||||
| Route | Grade | Style | Selected ascents | |||||
|---|---|---|---|---|---|---|---|---|
Spray WallThe southern end of the wall right below the road. | ||||||||
| 2 |
Mountain Goat
Feet only. Straight up, top out. | V1 | 4m | |||||
| 3 |
★ Warm Up Laps
Pick one course of bricks each, for you hands and feet and stick to it, doing laps counter clockwise. Pockets mark the edges. No Top. FA: Cavell Martin, 14 Sep 2023 | V0- | 4m | |||||
| 4 |
Crack Prac
Stand start, hands can only use the three slits, top out. FA: Cavell Martin, 14 Sep 2023 | V0 | 4m | |||||
| 5 |
The Little Dyno
Both hands on jug, start to finish dyno, top out. | V1 | ||||||
| 6 |
The Big Dyno
Both hands on start the brick with the pocket, start to finish dyno, top out. | V3 | 4m | |||||
1.4.2. South West Boulders 2 routes in Sector
- Summary:
-
Lat / Long: -34.464629, 150.427358
description
WIP Boulder field. Across the road from the radio tower substation.
A handful of climbs currently being projected.
approach
Can be accessed from the road near the last power pole or from the bottom via the rim track.
| Route | Grade | Style | Selected ascents | |||||
|---|---|---|---|---|---|---|---|---|
| 1 |
Gerber
On the left of 'Roadside Acracktion' Start with one hand on each side pull and a heel hook next to your left hand, traverse up the crimp crack to top out | V3 | ||||||
| 2 |
★ Roadside Acracktion
Sit start with both hands in the crack, up the crack to top out. Base rock is out of bounds FA: Cavell Martin, 7 Sep 2023 | V2 | ||||||
/dd/d6/ddd625658007aa0dc1d80418a584d81b7aaf276c) 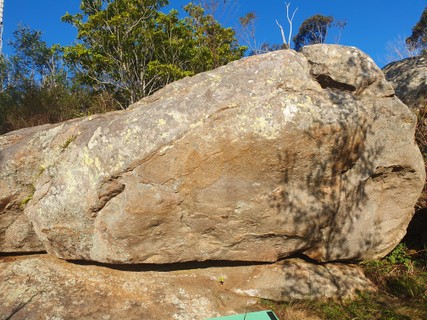 |
||||||||
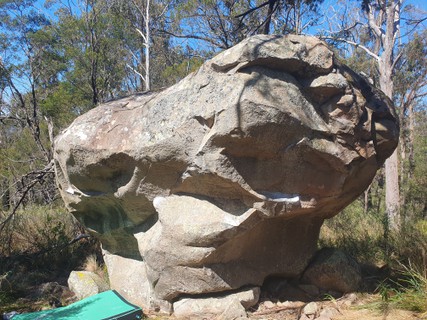
1.4.3. Eastern Boulders 3 routes in Sector
- Summary:
-
Lat / Long: -34.464213, 150.430421
description
Two good freestanding boulders covered in chalk marks and one wall with promise.
approach
Visible from the road, entrance track about 30m up from the gate.
history
Projected and utilized by unknown person early 2023
   |
||||||||
| Route | Grade | Style | Selected ascents | |||||
|---|---|---|---|---|---|---|---|---|
| 1 |
Broken Wattle
Sit start, working your way to the right then finally up and back to top out. Setter unknown, best reading of the chalk. Grade unconfirmed V5-V7? | V6 | ||||||
| 2 |
Mudscarf / Assumed Traverse
I think the best reading of the chalk is sit starting on the far right and traversing all the way along to the left. Unconfirmed grade | V5 | ||||||
| 3 |
★ Mad Hatter
Sit start with both hands in the crack reach up with the let then work your way up and back along the flake. FA: Cavell Martin | V1 | 3m | |||||
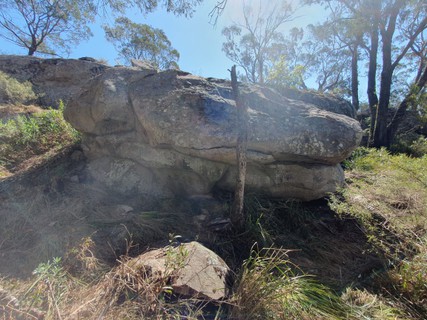
1.4.4. Northern Boulders 0 routes in Sector
description
WIP
The biggest and most underutilized boulders on the GIB. Lots of potential. Hard grade chalk marks and gluing present.
approach
From the Mittagong lookout head along the rim track until you get to the reservoir/ravine track sign. Head down that track 20m until you hit the first big boulder on your left.