A Crag Guide gives an extensive view of all sub areas and climbs at a point in the index. It shows a snapshot of the index heirachy, up to 300 climbs (or areas) on a single web page. It shows selected comments climbers have made on a recently submitted ascent.
At a minor crag level this should be suitable for printing and taking with you on a climbing trip as an adjunct to your guidebook.
This guide was generated anonymously. Login to show your logged ascents against each route.
Warning
Rock climbing is extremely dangerous and can result in serious injury or death. Users acting on any information directly or indirectly available from this site do so at their own risk.
This guide is compiled from a community of users and is presented without verification that the information is accurate or complete and is subject to system errors. By using this guide you acknowledge that the material described in this document is extremely dangerous, and that the content may be misleading or wrong. In particular there may be misdescriptions of routes, incorrectly drawn topo lines, incorrect difficulty ratings or incorrect or missing protection ratings. This includes both errors from the content and system errors.
Nobody has checked this particlular guide so you cannot rely on it's accuracy like you would a store bought guide.
You should not depend on any information gleaned from this guide for your personal safety.
You must keep this warning with the guide. For more information refer to our:
Usage policy
Contributors
Thanks to the following people who have contributed to this crag guide:
Adrian Kladnig
Jason Brown
Laef Hosking
Iain Duggin
Chan
Nick Clow
Brendon Flanagan
Dane Evans
Donald Gibson
Diego DeDiana
The size of a person's name reflects their Crag Karma, which is their level of contribution. You can help contribute to your local crag by adding descriptions, photos, topos and more.
Some content has been provided under license from: © Australian Climbing Association Queensland (Creative Commons, Attribution, Share-Alike 2.5 AU)
Table of contents
- 1. Four Cracks Wall 19 in Cliff
- 2. Index by grade
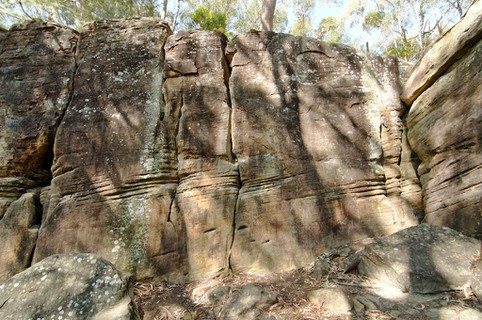
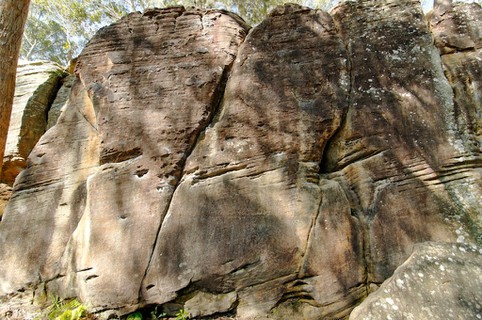
1. Four Cracks Wall 19 routes in Cliff
- Summary:
-
All Bouldering
Lat / Long: -33.769048, 151.178724
description
It's getting taller!
A popular wall with easy classics. Bolts available at the top of the cliff to protect the trees.
access issues
If you have benefited from climbing infrastructure in NSW, please consider making a donation towards maintenance costs. The Sydney Rockclimbing Club Rebolting Fund finances the replacement of old bolts on existing climbs and the maintenance of other hardware such as fixed ropes and anchors. The SRC purchases hardware, such as bolts and glue, and distributes them to volunteer rebolters across the state of New South Wales. For more information, including donation details, visit https://sydneyrockies.org.au/rebolting/
approach
Obvious wall with cracks opposite the 'Kenny Boulder'
ethic
Respecting the enviroment and keeping crags clean will maintain a healthy and important relationship between the climbing community, local councils and National Parks. Carry out what you take in and enjoy what the North Shore has to offer.
If you come across an area that is being developed or you think could be under development, please show all due respect to the developers and do not climb the projects listed on thecrag.com.
 |
||||||||
| Route | Grade | Style | Selected ascents | |||||
|---|---|---|---|---|---|---|---|---|
| 1 | Corner Crack | V0 | 4m | |||||
| 2 |
★ 1
Thin seam on the right hand side of the wall. | V2 | 4m | |||||
| 3 |
★★ The Thin Seam
Eliminate all face holds and climb the seam by finger-locking and a tips layback | V4 | 4m | |||||
| 4 |
★ Razorblade Alley / 2
Fierce little ironstone crimps just left of the seam. | V5 | 4m | |||||
| 5 |
★★ Knifeblade Nasty
Left hand sloper, right hand knifeblade. Grit your teeth and pull. Knifeblade is bigger than it used to be! | V4 | 4m | |||||
| 6 |
★ 4
Right hand sloper, up on small holds. Sidepull to the left is off. | V3 | 4m | |||||
| 7 |
★ 5
Just right of the crack. Plenty pockets and edges | V1 | 4m | |||||
| 8 |
★ 6 - The Layback Crack
The layback crack. Layback on its right side or jam it. | V0 | 4m | |||||
| 9 |
★★ 7
Straight up this buttress, staying out of the cracks. | V4 | 4m | |||||
| 10 |
★ 8 - Twin Cracks
The twin crack system. | V0 | 4m | |||||
 |
||||||||
| Route | Grade | Style | Selected ascents | |||||
| 11 |
★ 9
Bold face to the left of '8 - Twin Cracks'. | V4 R | 4m | |||||
| 12 |
★ 10 - The Finger Crack
Tricky finger crack. Do it pure for the full tick, else wimp out onto actual holds. | V1 | 4m | |||||
| 13 |
★ 11 - The Juggy Face
Excellent juggy face. Do it! Can be done with 3 dynos! | V0 | 4m | |||||
| 14 |
★ 12 - Slanting Crack
The slanting crack | V1 | 4m | |||||
| 15 |
★ 13
The face to the left, crimpy ironstone. The left side of the face is slightly thinner and harder. | V2 | 4m | |||||
| 16 |
★ 14
Start on the big shelf in the corner, squirm up avoiding the right face | V2 | 4m | |||||
| 17 |
★ 15
Grab the break and mantle it to reach a pockety sidepull 1.5m above. | V4 | 4m | |||||
| 18 |
★★ 15 Variant
Between arete and corner eliminating the break and big pocket. | V5 | 4m | |||||
| 19 |
★★ The Lindfield Traverse - 3
Starts high at the end of The Downclimb Slab. Drop down to the middle of the wall near problem 4 - feet on the obvious horizontal break. At the left hand end pop onto the shelf and scramble onto Abseil Wall without touching the ground or using the tree. | V3 | 12m | |||||
2. Index by grade
| Grade | Stars | Name | Style | Pop | |
|---|---|---|---|---|---|
| V0 | ★ | 11 - The Juggy Face | 4m | ||
| ★ | 6 - The Layback Crack | 4m | |||
| ★ | 8 - Twin Cracks | 4m | |||
| Corner Crack | 4m | ||||
| V1 | ★ | 10 - The Finger Crack | 4m | ||
| ★ | 12 - Slanting Crack | 4m | |||
| ★ | 5 | 4m | |||
| V2 | ★ | 1 | 4m | ||
| ★ | 13 | 4m | |||
| ★ | 14 | 4m | |||
| V3 | ★ | 4 | 4m | ||
| ★★ | The Lindfield Traverse - 3 | 12m | |||
| V4 | ★ | 15 | 4m | ||
| ★★ | 7 | 4m | |||
| ★★ | Knifeblade Nasty | 4m | |||
| ★★ | The Thin Seam | 4m | |||
| V4 R | ★ | 9 | 4m | ||
| V5 | ★★ | 15 Variant | 4m | ||
| ★ | Razorblade Alley | 4m |