A Crag Guide gives an extensive view of all sub areas and climbs at a point in the index. It shows a snapshot of the index heirachy, up to 300 climbs (or areas) on a single web page. It shows selected comments climbers have made on a recently submitted ascent.
At a minor crag level this should be suitable for printing and taking with you on a climbing trip as an adjunct to your guidebook.
This guide was generated anonymously. Login to show your logged ascents against each route.
Warning
Rock climbing is extremely dangerous and can result in serious injury or death. Users acting on any information directly or indirectly available from this site do so at their own risk.
This guide is compiled from a community of users and is presented without verification that the information is accurate or complete and is subject to system errors. By using this guide you acknowledge that the material described in this document is extremely dangerous, and that the content may be misleading or wrong. In particular there may be misdescriptions of routes, incorrectly drawn topo lines, incorrect difficulty ratings or incorrect or missing protection ratings. This includes both errors from the content and system errors.
Nobody has checked this particlular guide so you cannot rely on it's accuracy like you would a store bought guide.
You should not depend on any information gleaned from this guide for your personal safety.
You must keep this warning with the guide. For more information refer to our:
Usage policy
Contributors
Thanks to the following people who have contributed to this crag guide:
Jason Lammers
Mikl Law
Phillip Booth
Graham Dowden
Brendan Heywood
Matt Short
Tom Bes
Gabriele G
Murray
Adam Rabjohns
The size of a person's name reflects their Crag Karma, which is their level of contribution. You can help contribute to your local crag by adding descriptions, photos, topos and more.
Some content has been provided under license from: © Australian Climbing Association Queensland (Creative Commons, Attribution, Share-Alike 2.5 AU)
Table of contents
- 1.
Alfords Point
53 in Crag
- 1.1. Bridge North Side 1 in Area
- 1.2. Alfords Point Main Area 45 in Area
-
1.3.
Alfords 2 Point 0 7 in Area
- 1.3.1. Alfred's monument 1 in Sector
- 1.3.2. The Project Wall 6 in Sector
- 1.4. Alfords Playground 0 in Crag
- 2. Index by grade
1. Alfords Point 53 routes in Crag
- Summary:
-
Sport climbing, Bouldering and other styles
Lat / Long: -33.981563, 151.031624
description
This area was known as a Scout abseiling hangout for many years. Because of its weird access off the freeway it avoided the crowds for years. In the early 1990s the area was visited by Chris Wallace, Dave Barnes and the growing crowd from the new local gym at the time, The Rocknasium. This is when many of the established routes were done. A day underneath the high voltage wires, on a cliff a little larger then the normal Shire stone, with ten second access from your car, makes for a good day out.
access issues
For over 50 years climbers in the Sutherland Shire have enjoyed free access to many fantastic crags and caves. But as of 2014 there have been access problems emerging at several climbing and bouldering areas due to aboriginal art sites and shell middens in caves. Sutherland Shire Council and the Dept of Enviroment and Heritage have announced closures and sign-posted some of these aboriginal sites, with further closures and signs to be added during summer/autumn 2016/2017. Areas of particular problem are ground level overhangs with flat bases, the type of terrain popular at hard bouldering areas. Whilst the details are sorted out keep a low profile, clean up ALL rubbish (inc removing mattresses in bouldering caves) and avoid climbing at closed areas. In particular treat non-climbers you see at crags with the utmost respect as they could be rangers, archeologists, traditional owners or anyone else with a dim view of climbers and the ability to shut us out. Climbing in Royal National Park has been officially banned for many years - probably due mostly to the Wattamolla 'don't jump off rocks' cliff-diving-into-water ban. For more information about aboriginal sites and rockclimbing please read this link from Sutherland Council: https://drive.google.com/file/d/0B0KxtU2nUQB9cjhHUWE4cE5HWnM/view?usp=sharing
approach
The crag is located on the eastern side of Alford's Point Rd, south of the Alford's Point Bridge. The new bridge and road works have changed access. Park in Maxwell Close (if you are big group with a lot of cars please park along Sylvan Ridge drive at the intersection rather than crowding Maxwell close, to respect the residents' space) and walk back (north) along the bike path along Alford's Point Rd for a couple of hundred meters until you see a thin concrete pillar 1m high in the bush with white and blue stickers, and extensive views out east over the river. The crag is below. There is an easy scramble down to the base at the southern end of the cliff (right hand, facing river). Sometimes there is a hermit living in the cave near "Green Frogs and Liver", he is not too scary so say hello! The crag is located within Georges River National Park.
1.1. Bridge North Side 1 route in Area
- Summary:
-
All Rock climbing
| Route | Grade | Style | Selected ascents | |||
|---|---|---|---|---|---|---|
| 1 | Ada's Classic Traffic Escape | 14 | 28m | |||
1.2. Alfords Point Main Area 45 routes in Area
- Summary:
-
Mostly Sport climbing
Lat / Long: -33.986595, 151.027839
description
A major Shire destination crag, with a heap of quality sport routes now that everything has been retrobolted. Great on a cold winter's morning or hot summer's afternoon.
approach
Park at the end of Maxwell Close, Illawong - note it is a narrow street, watch for traffic congestion. Walk down the footpath towards the main road, cross the grassy field on right and head down a worn path running North and along the top of the cliff line. After 150 meters, when you see the large highway traffic sign through the trees on left head right and down a small gully and turn left to reach the start of the crag line running North. Do NOT be tempted by well formed ribbon marked paths that run down towards the bay!
Alternate access if you are not sure - follow the cycle way on the main road then hop through the fence at the large traffic sign.
| Route | Grade | Style | Selected ascents | |||||
|---|---|---|---|---|---|---|---|---|
| 1 |
Green Frogs and Liver
Start: 30m left of main wall. 2 BRs to lower off. Not as hard as it looks. FA: Shae Constantine, 1994 | 18 | 10m, 2 | |||||
| 2 |
Blackened Slab
Black slab 10m R of Green Frogs and Liver, and 20m left of main wall. Up to move through bulge then easily to lower off, shared with Runnel Wall. FA: unknown | 16 | 8m, 3 | |||||
| 3 |
Runnel Wall
Start 2m R of Blackened Slab. Step up R on ledge then up to big ledge. Left to nose and up to shared lower-off. Set up for a practice belay in the middle off 2 rings. FA: Michael Law, 2014 | 10 | 10m, 3 | |||||
| 4 |
iota
Start 1m left of MacGuyer, up. Nice but tiny. Soloed then bolted. FFA: Michael Law, 2015 | 17 | 6m | |||||
| 5 |
Smidgeon
Start as for McGuyver and up, move left to single bolt lower off for Iota. Soloed then bolted. FA: Michael Law, 2015 | 19 | 6m, 2 | |||||
| 6 |
MacGyver
Start on left side of short orange wall. Traverse right wards along the break then up the big flake. Continue to move right to anchors below big tree. FA: Jason & Wade Stewart, 26 Oct 2014 | 16 | 8m, 3 | |||||
| 7 |
★ Bee's Dick
As per M, but continue to traverse along the break for another bolt then up the tricky moves on NA. FA: Wade Stewart & Jason Lammers, 26 Oct 2014 | 24 | 10m, 5 | |||||
| 8 |
★ No Answers
Start: Below orange streak, left of main wall. Thin and bulgy. 3 Ubolts to shared lower off with M FA: Chris Wallace, 1993 | 24 | 6m, 3 | |||||
| 9 |
Open Project
Start up Suburbanitis for a few bolts, then slightly left up the thin wall. | 16m | ||||||
| 10 |
★ Suburbanitis
Nice wall with a hard thin start and easy finish. Start at big pockets on left side of tall wall. Most people go right into Brown Hornet for a move, then back left to 2nd bolt. Cruxy thin moves for three bolts to ledge. Up to steep flake with cool, easy moves, then right and up to lower-off anchor. FA: David Barnes, 1993 | 19 | 15m, 6 | |||||
| 11 |
★ Brown Hornet
Start 1m right of S. Stickclip first ring and boulder the bulge at the start to pockets. Trend right for a few bolts then straight up the middle of wall above to shared lower-off with S. FA: Chris Wallace, 1993 | 19 | 15m, 6 | |||||
| 12 |
★★ Brother Sun
A great wall route with excellent features. Juggy pockets to start, then a few tricky moves to gain big left facing flake. Also makes quite a nice trad route, throw a few extra cams in to protect the start. FA: Unknown, 2000 | 20 | 15m, 6 | |||||
| 13 |
★★ Sister Moon
2m right of BS. Crag classic up the highest part of this crag. A long featured wall climb with lots of stainless. Don't dodge the crux if you want the full tick - it goes! FA: Unknown | 21 | 15m, 6 | |||||
| 14 |
★★ Cherry
Burly start right of SM, with a bit of a move to start. FA: Jason Lammers, Paul Thomson & Neil Monteith, 2013 | 21 | 15m, 6 | |||||
| 15 |
★ Fabulous Muppet Show Direct Start
Start 2m R of Cherry. Stick clip bolt then boulder up and dyno to jug. Continue as for FMS. Death bolt replaced 17/3/2020. FA: Doug Smith, 1998 | 21 | 14m | |||||
| 16 |
★ Fabulous Muppet Show
Start: small corner at right end of wall, up and leftwards up scooped arete to double rings. 5 rings. FA: Shae Constantine, 1994 | 17 | 15m, 5 | |||||
| 17 |
★ Fabulous Muppet Traverse
Traverses right from the Fabulous Muppet show top anchors. Top out from top of triangle roof. A bit convoluted but would be great multi pitch practice on Trad gear. Take a No. 3 cam and one or two micro cams. Check top is clean, covered in leaves when I did it. You can pull your gear from above. FFA: Leo Stanners, 1 Mar 2018 FA: Leo Stanners, 1 Mar 2018 | 18 | ||||||
| 18 |
★ Mercury On The Mind
Roof in cave up and right of FMS. Small biner recommended for 2nd bolt. FA: nathanual hebbard, 7 May 2020 | 21 | 7m, 4 | |||||
| 19 |
★ Mrs Doubthold
Pumpy! Start just right of Mad Bolter and traverse left crossing MB at the 3rd bolt. Finishes with hands on top at the crack, backjump to clean. Set: Jeff Crass, 2014 | 20 | 7m, 3 | |||||
| 20 |
Bumbly's first
Corner and arete 4m L of 4moves3bolts FA: Erwin Gamboa, 24 Nov 2014 | 14 | 8m, 2 | |||||
| 21 |
★ Stumpy
Easy once you find the correct holds, hard to onsight though. Climb the crack and wall just R of Bumbly's First, step left to shared lower-off. FA: Michael Law, 2016 | 21 | 8m, 2 | |||||
| 22 |
★ 4 moves 3 bolts
18m R of main wall area, 2m R of a short crack. Up to horizontal and R to Ubolt. Up to big ledge and up wall easily behind. FA: Michael Law, 19 Jun 2014 | 24 | 18m, 3 | |||||
| 23 |
★ Stretch Target
Start 2m R of 4 moves 3 bolts. Up, up, and away. Bouldery. FA: Michael Law, 2014 | 24 | 8m, 2 | |||||
| 24 |
★★ Breaking Good
Great trad climbing, plugging cams into Arapiles style rock. 20m right of the main wall on an orange section. Long reach to first break and up to ledge and easy wall behind. Good cams (3 small ones to start, then small to hand size), someone has drilled holes in all the wrong places also. FA: Michael Law, 9 May 2014 | 21 | 15m | |||||
| 25 |
★ It's a wrap
3m R of Breaking Good in middle of wall, 3m L of seam (Gushing Knees). Step off short persons cheater rock on first ledge (clip 1st bolt with a single screwgate to limit fall distance and unclipping) and up and head left. Slight runout to the anchor. FA: Vanessa Peterson, 28 Dec 2015 | 18 | 12m, 6 | |||||
| 26 |
★ Gushing Knees
Start 25m R of main wall, some 5m R of the smooth orange section (Breaking Good) at a thin seam, and about 2m R of a corgi-sized boulder (It's a Wrap) sitting on the ledge. Marked gK. May have been an old top-rope route.(clip 1st bolt with a single screwgate to limit fall distance and unclipping) FA: Jeff Crass, 18 May 2014 | 19 | 15m, 4 | |||||
| 27 |
★★ Gushing Shins
Start 1.5 m R of Gushing Knees. Hardest of the 3 'easy' routes. Share a hold with Necropolis Kidney then up and left to share anchors with Gushing Knees. (clip 1st bolt with a single screwgate to limit fall distance and unclipping) FA: Jeff Crass, 19 Jun 2014 | 20 | 13m, 4 | |||||
| 28 |
★ Necropolis Kidney
About 30m R of the Main Wall is a smooth wall. Scramble up onto the ledge and find line of RBs and old carrots 2m R of a painted "K" on the wall. Move slightly right to lower off (shared with VLP). | 20 | 15m | |||||
| 29 |
★★ Viva La Papa
Tricky slab 2m R of NK and 3m L of an orange left-facing corner (VC), then super orange stone and left to laybacks. 4 rings. Share loweroff with NK. | 19 | 15m, 5 | |||||
| 30 |
★ Lurch
Start 1m R of Necropolis Kidney and 2m left of the corner (Vintage Cuvee). Up and around roof, bridging into Vintage Cuvee for a move. Reachy. FA: Michael Law, 19 Jun 2014 | 20 | 13m, 4 | |||||
| 31 |
★★ Vintage Cuvée
About 35m R of the main wall at a left facing orange corner. Easy start and up into nice corner. Pop out of the corner and up the nice headwall. All new RB's in 2014. | 17 | 15m, 4 | |||||
| 32 |
★★ Vintage Direct
Start just R of VC, follow the seam and holds on right then through bulge and seam. Classic Araplies style trad climbing on bomber rock. The top 4m was an old sport route on dangerous bolts. The new trad version was head-pointed (easy to toprope off Vintage Cuvee rings) to find gear including 2 good RPs in first seam, and a yellow and big Blue Camalot in the back of the cave before final bulge. FA: Michael Law, 29 May 2014 | 24 | 15m | |||||
| 33 |
★★ Sweet Charlotte
A great pocket pulling crux. Start 3m R of Vintage Direct, up thin walls and pull roof. All Ubolts now FA: Dave Barnes, 1994 | 24 | 15m, 6 | |||||
| 34 |
★★ Show Us Your Form
12m R of Vintage Direct at tree. Easily to roof and heave yourself up and past lip to laybacky glory. FA: Dave Barnes, 1984 | 23 | 15m, 4 | |||||
| 35 |
★ Glamworm Roof
Start as for Show Us Your Form. Step right to seam and up. FA: Michael Law, 15 Jun 2014 | 23 | 15m, 4 | |||||
| 36 |
★★ Working Overtime
Line starts 3m R of Show Us Your Form. FA: nathanual hebbard, 9 May 2020 | 23 | 15m | |||||
| 37 |
★ Working from Glamworm
Start as for GR and at the roof traverse across into WFH using the bolts from both. The drag through the draws is quite extensive by the end, and is best dealt with by unclipping the second draw of GR once you've clipped the third in the roof. There are options with how many draws you use. FA: Peter Jeavons, 26 Mar 2016 | 23 | 18m | |||||
| 38 |
★ Working from Home
2 fun boulders. Start up GMS, and move left at the break after the 3rd bolt - Up and thru the small roof to anchors. FA: Jason Lammers, 11 Jul 2014 | 23 | 16m, 6 | |||||
| 39 |
★★ Give Me Souls
Start 10m R of SUYF in cave. Up steeply left and on to the head wall. The first move is the crux, unless you start about 1.5m right of the first bolt - which lops off at least a grade. | 23 | 15m, 7 | |||||
| 40 |
★★ Roof Stalker
Start 5m R of GMS in cave. Hard start (left of the first bolt) and up to horizontal flake thingo. Clip a couple RB's in the roof, and then up the pumpy headwall. | 22 | 16m, 7 | |||||
| 41 |
★ Ogawayama
Up RS to the Mikl flake (use extended draw or sling here) and traverse right across the lip of the roof to a big move on big holds to easy finish. FA: Jason Lammers, 30 Nov 2014 | 23 | 15m | |||||
| 42 |
★★ Exploding V
Steep start with some hard moves thru the V - then easy to the top. FA: Wade Stewart, Jason Lammers & Viona Young, 9 Nov 2014 | 23 | 15m | |||||
| 43 |
★ Sideline Jack
Start 10m R of RS at the right side of roofs. 6 Ubolts to lower off. | 15 | 14m, 6 | |||||
| 44 |
★ Japan15
Clip first bolt on 'SJ' then up rightwards thru the bulges. FA: Jason Lammers, 9 Nov 2014 | 18 | 12m | |||||
| 45 |
★ Soccer Mum
Start at right end of cave, at right side of small trees sitting against the rock, 4m R of Sideline Jack. Up. Another nice warmup. FA: Vanessa Peterson, 2014 | 17 | 13m, 5 | |||||
/df/9d/df9dee5a34f43a108911ada16cd38cf7c01660fa) /3a/f3/3af30f29ec96b63af711eab08c8e36ddbca92b40) /69/4a/694a6ff2fd1c29594b447958cbb1ca4527115f6d) 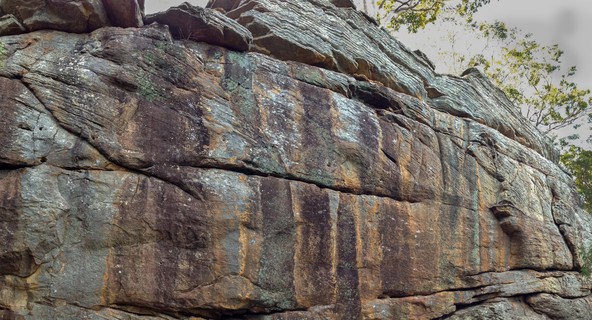  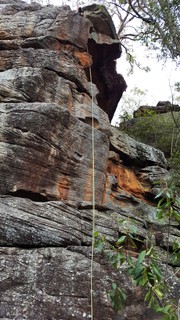 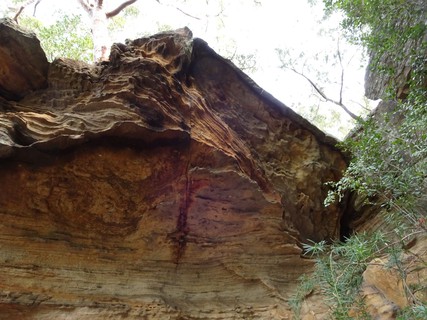 /32/12/32129efa0541f6a1b5ae369607bf22d096ff9b6c) 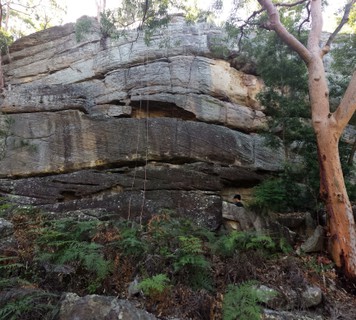 /66/b5/66b573d4f6fd04e19ca453a92b4d4bde0de692cb) 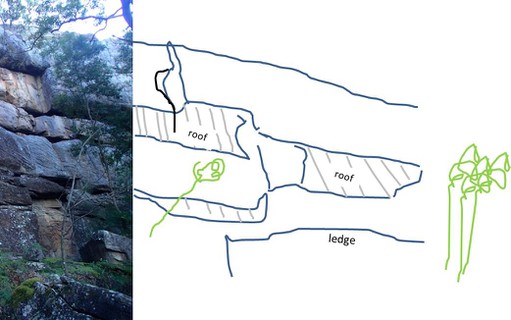 /0a/8d/0a8d9d4fb75b2e94acb84bbc25cbeff442bc2d66) |
||||||||
1.3. Alfords 2 Point 0 7 routes in Area
- Summary:
-
All Bouldering
Lat / Long: -33.978913, 151.032326
summary
Two smallish, distinct areas of mostly solid rock with a lovely outlook. Potential for a good few more problems.
description
A varied but somewhat limited crag made up of two small areas. One, The Project Wall is an excellent wall; decent height, solid rock, bulging... but sadly, pretty featureless. The second area (Alfred's Monument) is a large rock (or several) perched atop another smaller rock, making for decent rooves and hard headwalls. There's plenty more potential here and in the surrounding area. I'm moving away so probably won't add much more. Have a go!
approach
The crag is on the south eastern side of the Alford's point bridge. Park either as for Alford's Point climbing, or if you're game, pull over directly after coming off the bridge. Walk down hill past the locked gate and down the sealed road for about 50m. When you notice the rocky gutter on the right forming a run off (which has a white post at the end) walk down this for a few meters. Then notice a tree on the right with a fork. Walk towards it. You should then pick up a trail of cairns. Follow these up the hill and left towards the sweet looking cliff. On the way across, you'll see Alfred's Monument up above you.
history
Dan Webster came accross this area in 2012 while living in Revesby. Not sure it's seen any other visits?!
1.3.1. Alfred's monument 1 route in Sector
- Summary:
-
Lat / Long: -33.979163, 151.031496
description
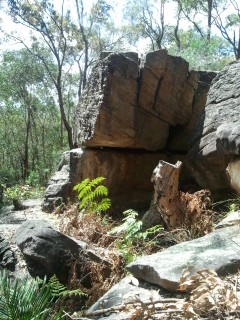
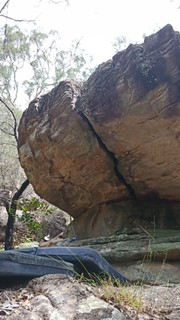
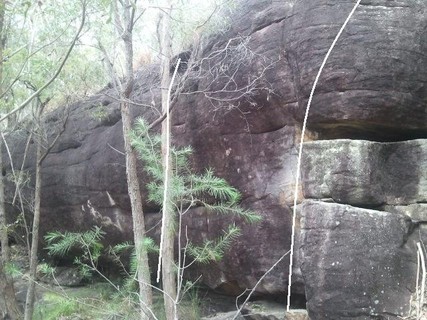
Just to the right of the main project wall is a large split rock perched atop another smaller rock. Rage is the first route here and faces into the crag with more potential for roof routes and hard headwalls.
approach
After you have gone down the track and stepped across the ditch on the right, the monument is obvious up on the hill to the right, with the project wall to the left of this.
| Route | Grade | Style | Selected ascents | |||||
|---|---|---|---|---|---|---|---|---|
| 1 |
★★ Rage
A fairly burly but surprisingly technical roof fist crack. There are only a few points where it contracts down enough for a jam, so it's big moves between these. You need to get deep so long sleeves are recommended.
Start at base of crack with both feet and hands in crack before first constriction. Stay in crack until rounded flake on top left after lip.
FA: Tom Bes, 2021 | V4 | 3m | |||||
  |
||||||||
 Tom Bes FA
1.3.2. The Project Wall 6 routes in Sector
- Summary:
-
description
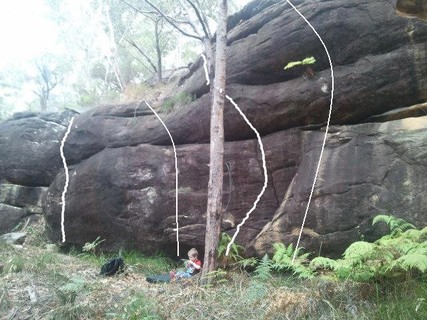
The Project Wall is an excellent wall; decent hight, solid rock, bulging... but sadly, pretty featureless. One for the hard nuts! Around it are one or two other fun (sometimes scary) offerings.
approach
As with the general approch, keep following the cliff line easterward till you see the large cliff line. Can't miss it.
  |
||||||||
| Route | Grade | Style | Selected ascents | |||||
|---|---|---|---|---|---|---|---|---|
| 1 |
King of Wessex
King Alfred, King of Wessex! Butt start just right of ramp and tree. Up and slightly right through nice territory. Then necky to the top. Tough for the grade? FA: dwebster, 2012 | V3 | 7m | |||||
| 2 |
★ Alfred the Great
Butt start between KoW and AP. Up nice moves to break, then more boldly to top. Easiest to stay just left of tree. The big ramp is on for feet only. FA: dwebster, 2012 | V4 | 5m | |||||
| 3 |
★★ Alfred's Point
Butt start just left of tree and KoW. Feet can be jambed low, but not on separate rock. Great hard pulling through pocket, to ledge, then carefully up left. FA: dwebster, 2012 | V5 | 4m | |||||
| 4 |
Sam and the Golf Ball
5m left of AP. Standing, just right of the chimney. Take the easiest route up via the pocket. FA: dwebster, 2012 | V2 | 4m | |||||
| 5 |
Have to start somewhere...
First problem done here. Just left of the chimney and the bulging arete type feature. Use the feature on right for feet only (otherwise v2). FA: dwebster, 2012 | V3 | 4m | |||||
| 6 |
★ Sam's Adventure
Hands on ledge and pocket about 3m left of HtSS. Move straight up via little ripples, finishing rightwards. Tough for the grade? FA: dwebster, 2012 | V5 | 4m | |||||
1.4. Alfords Playground 0 routes in Crag
summary
An undeveloped jumble of various sized blocks and cliffs in a bracken fern forest above the river.
description
A totally different bouldering experience to anything else I've come across in the area! Adventure bouldering?! Basically, this area is made up of a mess of short cliff lines with boulders below it, for a stretch of about 50m (though there's loads of scattered boulders further along on each side), situated in a cool bracken fern forest, all perched above a quiet and attractive part of the George's River. There's some sweet aretes, slabs, rooves, traverses, then ledges to shimmy cross and tunnels to go through. There's so much rock all over the place (some shabby, some great), I don't know how to document it! So I've decided not to. Just go down there and climb something!
approach
Park as for Alford's Point Climbing. Walk back towards the bridge till you find the sealed fire trail through a locked gate which goes straight up the hill (about 100m past the end of the bridge). Go up the hill through the gate, then follow the trail as it flattens out. At the fork, go right (the main trail). Soon you'll see the power lines above you (a helpful guide). Turn right at some point to the dead end where the power pole tower thing is. Find the trail of cairns (slightly to the left of the dead end). This goes down the hill, off a boulder, turns right and crosses a fallen tree, straight again, then left for a bit, before turning tight right to the cliff edge. Go down and start exploring! An easy way to the Amped-theatre and other boulders is to turn right after the first drop, follow the ledge, then down left to the very bottom, and right below a boulder. This is a top stop to start.
history
Dan Webster discovered this area while exploring the area in 2012. Too much rock around to develop.