A Crag Guide gives an extensive view of all sub areas and climbs at a point in the index. It shows a snapshot of the index heirachy, up to 300 climbs (or areas) on a single web page. It shows selected comments climbers have made on a recently submitted ascent.
At a minor crag level this should be suitable for printing and taking with you on a climbing trip as an adjunct to your guidebook.
This guide was generated anonymously. Login to show your logged ascents against each route.
Warning
Rock climbing is extremely dangerous and can result in serious injury or death. Users acting on any information directly or indirectly available from this site do so at their own risk.
This guide is compiled from a community of users and is presented without verification that the information is accurate or complete and is subject to system errors. By using this guide you acknowledge that the material described in this document is extremely dangerous, and that the content may be misleading or wrong. In particular there may be misdescriptions of routes, incorrectly drawn topo lines, incorrect difficulty ratings or incorrect or missing protection ratings. This includes both errors from the content and system errors.
Nobody has checked this particlular guide so you cannot rely on it's accuracy like you would a store bought guide.
You should not depend on any information gleaned from this guide for your personal safety.
You must keep this warning with the guide. For more information refer to our:
Usage policy
Contributors
Thanks to the following people who have contributed to this crag guide:
The size of a person's name reflects their Crag Karma, which is their level of contribution. You can help contribute to your local crag by adding descriptions, photos, topos and more.
Table of contents
- 1. Kinloch Crag (K1) CLOSED 29 in Cliff
- 2. Index by grade
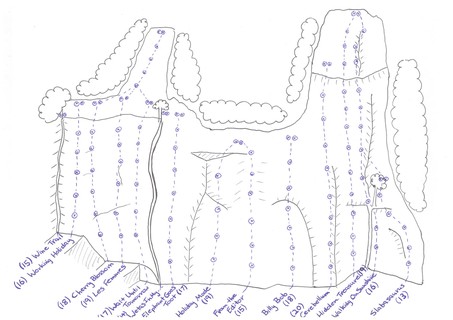
1. Kinloch Crag (K1) CLOSED 29 routes in Cliff
- Summary:
-
Sport climbing and Trad climbing
Lat / Long: -38.668345, 175.925293
description
This crag is now closed until further notice due to cultural significance. There are no signs at the crag. Please do not climb here.
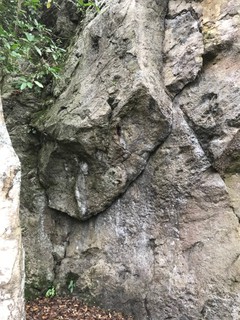
Kinloch (K1) is not a very large crag with just over few dozen routes in total, however it offers a great days climbing with easy access and superb easy to moderate climbs. Contrary to the other guides online, there are few naked bolts remaining, and some of the old trad routes have been retrobolted. It gets the sun late morning so in winter the afternoon is best while in summer you can spend the afternoon swimming after a mornings climbing. But the left hand end is in the trees/shade, while the right hand end is out in the sun, so you can usually find something at the right temperature. The rock is ryolite and very solid and the routes are generally all high quality. Some Maori rock art has been discovered at the base of "Buckets in the Belfry", so this climb is now closed. Please do NOT climb on this otherwise you jeopardise access to the crag.
approach
The land is owned and administered by the Wairakei Terraces Trust. They have currently banned access to climbers so please respect this and do not climb here until advised otherwise.
Once you have reach the settlement of Kinloch drive straight past the golf course veering slightly right onto Marina Terrace then left down Ketha Place. Park you car at the far end of Ketha place. The crag is a 1 minutes walk from here, or alternately you can walk in from the water front and follow the walking track in. Routes described from left to right.
history
Climbing first started at Kinloch in October 1991 when Mark Jones along with others based at the Tihoi Venture school started to develop the area. The crag has been developed with an effort to minimise the visual and physical impact of climbing. Native trees have been preserved and naked bolts used on the most visible parts of the cliff
| Route | Grade | Style | Selected ascents | |||||
|---|---|---|---|---|---|---|---|---|
Left Hand EndRoutes described from Left to Right. | ||||||||
| 2 |
Wine Trail
Left most route of the crag following the obvious crack. FA: Allan Kane, Richard Dunn & Robyn Wayne, 1991 | 15 | 10m | |||||
| 3 |
★ Working Holiday
Climb the face left of Les Femmes et Les Grimpeurs A'bord FA: Bryce Martin & Craig Martin, 1997 | 16 | 12m, 5 | |||||
| 4 |
★★ Cherry Blossom
Climbs between Working Holiday and Les Femmes. P2 can be a great practice multi-pitch or an extension for the two routes to the right; L.F. and W.U.T Set: Alice Heath & Dan Head FA: Alice Heath, Dan Head & Marine Baiguerra, Oct 2020 | 18 | 22m, 2, 10 | |||||
| 5 |
★★ Les Femmes et les Grimpeurs d'Abord
Line in the middle of the face. Easy climbing leads to a tricky section between the third and fourth bolt. FA: Vincent Zintzen & Cécile Glorot, 2013 | 19 | 15m, 6 | |||||
| 6 |
★ Wait Until Tomorrow
Move up the easy slab then up the face onto the top out ledge. FA: Shane Harrison & Cécile Glorot, 2013 | 17 | 20m, 6 | |||||
| 7 |
★ There's Wetas In My Porridge
A great easy trad line. Re-cleaned in 2020 by Alice Heath. The number 5 cam is handy at the top. FA: Allan Kane, Richard Dunn & Robyn Wayne, 1991 | 13 | 12m | |||||
| 8 |
★★ The Elephant Goes Toot
Up through the bulletproof looking face. Great moves on some cool pockets and edges. Second pitch can be done as multi-pitch practice from this climb or There's Wetas in my Porridge. FA: Marcus Manning & Catherine Moger, 2013 | 17 | 30m, 2, 10 | |||||
| 9 |
★★ Ahorangi
"Enlightened" An old, forgotten route, established around 1990. It now sees the light again, and should be much more popular with its modern hardware. Old-school style cruxes reward technique over brute strength. Climbs the arete (left of Holiday Mode), with massive jugs up to the 1st bolt, then has small moves on small holds with an easy finish, traversing left to the top. Retro-bolted in September 2021. Pitons and naked bolts upgraded with glued in rod & hangers. Shares the anchor with the trad & sport route to the left (now upgraded with a ring hanger). 2nd pitch to come soon. FA: Unknown, 1990 Maint: Dan Head, Sep 2021 | 19 | 20m, 6 | |||||
| 10 |
★★ Holiday Mode
The direct line up the juggy face and overhang. Brilliant climbing. Recleaned in 2020 by Dan Pearl. FA: Bryce Martyn & Jo Willet, 1992 Maint: Dan Pearl, Sep 2020 | 19 | 15m, 4 | |||||
| 11 |
★ From the Editor
Classic, but a bit polished and technically challenging for 15. FA: Pete Manning, Jo Willet & Bryce Martyn, 1992 | 15 | 15m, 6 | |||||
| 12 |
★★ Billy Bob
Following the left curving line before heading through the slight overhang to the anchor. FA: Scott Taylor, 2013 | 18 | 15m, 5 | |||||
| 13 |
★★ Cerebellum
Tough onsite, easy redpoint (for the grade). Original grade and name unknown. Named, retro bolted and extended in 2020. Trends right then back left. If the runout between 3rd and 4th bolt looks too scary, imagine doing it with the original single bolt to feel better, (or rap in and clip a piton with an extendable or long draw). Finish on the big ledge at the double ring belay or continue up the buldge to the very top, sharing the anchor for Hidden Treasure and Walking on Sunshine. FA: Unknown, 1990 Maint: Dan Head, Sep 2020 | 21 | 19m, 7 | |||||
| 14 |
★★ Hidden treasure
Climb the middle of the face. A low bolt protects the hard start, power through the over lap on big holds with more welcome bolts and a nice bridgy / slab rest. Easier climbing in the middle with spaced bolts up to the big ledge with a final test at the top overhang. Like the name suggests, who would have thought such a nice climb was there! FA: Dan Head, Sep 2020 | 19 | 22m, 12 | |||||
| 15 |
★★ Walking on Sunshine
A tough start laybacking the arete (or easy grovelling in the corner), leads to beautiful climbing up most of the wall with a tricky exit. Shares the same anchor as Hidden Treasure. A nice long route. FA: Alice Heath & Dan Head, Sep 2020 | 16 | 22m, 11 | |||||
| 16 |
★ Slabasaurus
Climb up the slab through right facing corner, then move left onto small ledge. Hug the tree on the way past and up easy ground to double ring bolt anchor. If you want a second pitch, step left from the anchors and onto the top half of Walking on Sunshine (grade 16). FA: Sash Nukada, Jun 2021 | 13 | 10m, 5 | |||||
Right Hand End | ||||||||
| 18 |
Avalanche
This climb has been swallowed up by the bush. | 11 | 20m | |||||
| 19 |
Tunnel Web Tread
Immediately left of the overhanging flake. The crack and face above, TBC Belay FA: Mark Jones & Sally Rowe, 1991 | 14 | 19m | |||||
| 20 |
★ Stab Of The Stonekeeper
Takes the flake and over hang directly up the middle. Pull over onto the face above then continue up to the DBC belay out right. FA: Mark Jones, 1991 | 21 | 12m, 6 | |||||
| 21 |
★ Terminal Stillness
A superb route up the right-hand crack of the flake. Protection is good round the flake then one bolt in the face. Belay at the chains or keep going to the higher belay of Tunnel Web Spider. (Pro CD, Wires) FA: Mark Jones & Sally Rowe, 1991 | 17 | 8m | |||||
| 22 |
★★ No One / Katoa
The bolted route up the shallow corner immediately left of the arete. 'No one' had put much effort into cleaning it, protect it safely or even name and credit it. Now it's fully bolted (with hangers), relatively clean and adequately protected. A route for Katoa (everyone) - climbing 23's, to enjoy. The large boulder behind it has a belay bolt on it to keep light belayers grounded. Maint: Dan Head, Sep 2020 | 23 | 20m, 8 | |||||
| 23 |
★ Romancing The Haggis
Either start out right or do the pleasant little boulder problem start straight up the arete. Clip the peg then continue up on easier ground till you reach the finger crack proper, a cool head is required and a few micro cam placements can be found. Pleasant climbing up the crack to the DBC belay ledge of Rockness Monster. [Pro: Small & Med CD, W] FA: Mark Jones & Allan Kane, 1991 | 21 | 17m | |||||
| 24 |
★ Rockness Monster
Climb the obvious corner straight up and over the bulge. This is the crux but it is well protected with fail safe bomber wire placements. Continue up the groove above. Move left near the top and finish on the large belay ledge. DBC belay and the protection is good if you take your time arranging it. [Pro: CD, W] FA: Mark Jones & Sally Rowe, 1991 | 17 | 17m | |||||
| 25 |
★ Highland Cling
Climb the face and blunt arete. Pull over the bulge then continue up the face and arete to the belay of Electric Wizard. FA: Mark Jones & Allan Kane, 1991 | 18 | 15m, 3 | |||||
| 26 |
★★ Electric Wizard
Climb up the face left of the corner to the small roof, pull through the roof, crux, then continue up the face. After the top bolt you can either escape out onto the left arete or move over right, both are difficult and both are much of a much ness grade wise. 4 Bolts and a DRB belay. FA: Mark Jones, 1991 | 20 | 15m, 4 | |||||
| 27 |
★ Crystal Enquiry
Climb up the steep right facing corner then through the small over hang, crux. Continue up the crack and groove system above, then break out left higher up onto the head wall (bolt) and the DRB belay of Where to From Here. The gear placements are a little difficult to arrange but sound. FA: Mark Jones & Allan Kane, 1991 | 18 | 15m | |||||
Interim closure noticeACAT is in a discussion with Ngāti Te Kohera representatives and we have been advised that there is a wāhi tapu site in the vicinity. As such the following 3 routes are CLOSED while we discuss how the wāhi tapu site may be appropriately managed without a crag-wide closure. Please respect this interim closure pending further update. | ||||||||
| 29 |
★★ Buckets In The Belfry
Warning Access: Interim closure notice The bucket strewn arete just left of Where to From Here. Easy climbing onto the ledge then launch up the arete past 5 bolts , the crux is in the middle to top section. Shares the DRB belay of Where to From Here. FA: Mark Jones & Allan Kane, 1991 | 17 | 15m, 5 | |||||
| 30 |
★★ Where To From Here
Warning Access: Interim closure notice Climb the corner crack system at about grade 14 to the large intermediate ledge. Then continue out left round the arching roof crack. A secret hold provides salvation. DRB belay. (Pro, CD, Hex, Wires) FA: Allan Kane & Richard Dune, 1991 | 16 | 15m | |||||
| 31 |
★ Waiting For The Ant
Warning Access: Interim closure notice An awkward start move leads to easy climbing up the middle of the face past 3 hangers then mantle onto the large ledge (crux) and belay off the DBC belay. One of the nicest 14s around. FA: Richard Dunn & Robyn Wayne, 1991 | 14 | 7m, 3 | |||||
| 32 |
★ Summer At The Beach
The small corner groove at the far right hand end of the crag . Climb the slab & arete then pull over the small overhanging section onto the slab above. From this point climb the twin crack’s in the head wall and belay further back in the bush, DRB belay. (Pro CD, Wires, Hex) FA: Richard Dunn & Robyn Wayne, 1991 | 14 | 10m | |||||
  |
||||||||
2. Index by grade
| Grade | Stars | Name | Style | Pop | |
|---|---|---|---|---|---|
| 11 | Avalanche | 20m | |||
| 13 | ★ | Slabasaurus | 10m, 5 | ||
| ★ | There's Wetas In My Porridge | 12m | |||
| 14 | ★ | Summer At The Beach | 10m | ||
| Tunnel Web Tread | 19m | ||||
| ★ | Waiting For The Ant | 7m, 3 | |||
| 15 | ★ | From the Editor | 15m, 6 | ||
| Wine Trail | 10m | ||||
| 16 | ★★ | Walking on Sunshine | 22m, 11 | ||
| ★★ | Where To From Here | 15m | |||
| ★ | Working Holiday | 12m, 5 | |||
| 17 | ★★ | Buckets In The Belfry | 15m, 5 | ||
| ★ | Rockness Monster | 17m | |||
| ★ | Terminal Stillness | 8m | |||
| ★★ | The Elephant Goes Toot | 30m, 2, 10 | |||
| ★ | Wait Until Tomorrow | 20m, 6 | |||
| 18 | ★★ | Billy Bob | 15m, 5 | ||
| ★★ | Cherry Blossom | 22m, 2, 10 | |||
| ★ | Crystal Enquiry | 15m | |||
| ★ | Highland Cling | 15m, 3 | |||
| 19 | ★★ | Ahorangi | 20m, 6 | ||
| ★★ | Hidden treasure | 22m, 12 | |||
| ★★ | Holiday Mode | 15m, 4 | |||
| ★★ | Les Femmes et les Grimpeurs d'Abord | 15m, 6 | |||
| 20 | ★★ | Electric Wizard | 15m, 4 | ||
| 21 | ★★ | Cerebellum | 19m, 7 | ||
| ★ | Romancing The Haggis | 17m | |||
| ★ | Stab Of The Stonekeeper | 12m, 6 | |||
| 23 | ★★ | No One | 20m, 8 |