A Crag Guide gives an extensive view of all sub areas and climbs at a point in the index. It shows a snapshot of the index heirachy, up to 300 climbs (or areas) on a single web page. It shows selected comments climbers have made on a recently submitted ascent.
At a minor crag level this should be suitable for printing and taking with you on a climbing trip as an adjunct to your guidebook.
This guide was generated anonymously. Login to show your logged ascents against each route.
Warning
Rock climbing is extremely dangerous and can result in serious injury or death. Users acting on any information directly or indirectly available from this site do so at their own risk.
This guide is compiled from a community of users and is presented without verification that the information is accurate or complete and is subject to system errors. By using this guide you acknowledge that the material described in this document is extremely dangerous, and that the content may be misleading or wrong. In particular there may be misdescriptions of routes, incorrectly drawn topo lines, incorrect difficulty ratings or incorrect or missing protection ratings. This includes both errors from the content and system errors.
Nobody has checked this particlular guide so you cannot rely on it's accuracy like you would a store bought guide.
You should not depend on any information gleaned from this guide for your personal safety.
You must keep this warning with the guide. For more information refer to our:
Usage policy
Contributors
Thanks to the following people who have contributed to this crag guide:
Donald Gibson
Grigota Monasterio
John Pitcairn
Campbell Gome
JOHNNYBRAVO
Chris Bentham
Adrian Ridgley
Mat Eaton
Chad Harrison
The size of a person's name reflects their Crag Karma, which is their level of contribution. You can help contribute to your local crag by adding descriptions, photos, topos and more.
Table of contents
- 1.
Lyttelton Rock
144 in Crag
- 1.1. Susie's Slab 10 in Cliff
- 1.2. Left Side 20 in Cliff
- 1.3. Feeding Time Area 17 in Area
- 1.4. Rage Wall 22 in Cliff
- 1.5. Mr Clean Wall 15 in Cliff
- 1.6. Year Right Wall 9 in Cliff
- 1.7. The Thunderdome 24 in Cliff
- 1.8. Ataturk Wall 28 in Cliff
- 2. Index by grade
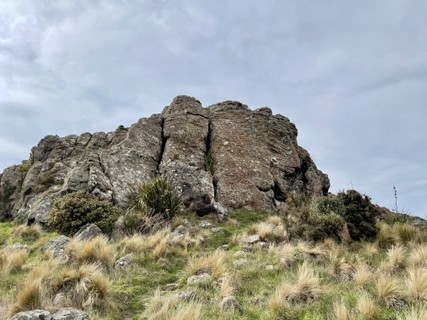
1. Lyttelton Rock 144 routes in Crag
- Summary:
-
Sport climbing, Trad climbing and other styles
Lat / Long: -43.588542, 172.723801
summary
South Facing
description
A great crag which faces south over Lyttelton Harbour. It will remain mostly shady in summer days, and is protected by north-westerlies.
approach
5 minutes
1.1. Susie's Slab 10 routes in Cliff
- Summary:
-
Trad climbing and Sport climbing
Lat / Long: -43.588016, 172.721529
 |
||||||||
| Route | Grade | Style | Selected ascents | |||||
|---|---|---|---|---|---|---|---|---|
| 1 |
Kissing the Frog
FA: Alan Hill & Damian Cotton, 2000 | 21 | ||||||
| 2 |
★ Ugly 1
FA: Stu Allan, 1972 | 13 | ||||||
| 3 |
Ugly 2
FA: Stu Allan, 1972 | 16 | ||||||
| 4 |
★ Susie's Slab
FA: Merv English, 1983 | 19 | 9m, 1 | |||||
| 5 |
★ Pumping Susie
FA: Marcus Thomas, 2003 | 23 | 9m, 2 | |||||
| 6 |
★★ Pumping Velvet
FA: Ton Snelder, 1984 | 23 | 9m, 2 | |||||
| 7 |
Cheap Shoes Don't Kill
FA: Tony Ward-Holmes, 1989 | 21 | 9m, 1 | |||||
| 8 | Unnamed One | 18 | 9m, 1 | |||||
| 9 |
Nihilist
FA: Lindsay Main, 1985 | 16 | ||||||
| 10 | Neophyte | 13 | 10m | |||||
1.2. Left Side 20 routes in Cliff
- Summary:
-
Trad climbing and Sport climbing
Lat / Long: -43.588296, 172.722138
| Route | Grade | Style | Selected ascents | |||
|---|---|---|---|---|---|---|
| 1 |
★ Hex Arête
FA: John Chambers, 1996 | 19 | 12m | |||
| 2 |
Gone With The Wind
FA: Lindsay Main, 1983 | 18 | ||||
| 3 |
Let It Grow
FA: Lindsay Main, 1983 | 18 | 12m | |||
| 4 |
★★ Afghan Bandit
FA: Lindsay Main, 1983 | 20 | 13m | |||
| 5 |
Yisturdie
FA: Ton Snelder, 1985 | 17 | 6m | |||
| 6 | Skunk | 8/9 | 13m | |||
| 7 |
Sinking Ship
FA: Lindsay Main, 1978 | 16 | 12m | |||
| 8 |
Social Ostracite
FA: Roger Parkyn, 1984 | 21 | 13m, 1 | |||
| 9 |
★★ Social Ostracyte Direct
FA: Roger Parkyn & Pete Smale, 1984 | 25 | 14m, 2 | |||
| 10 |
Changing Times
FA: Merv English, 1982 | 18 | 12m | |||
| 11 |
Crucifix
FA: Lindsay Main, 1983 | 21 | 14m | |||
| 12 |
★ Idol Boys
FA: Paul Jackson & John Chambers, 1997 | 23 | 12m, 3 | |||
| 13 |
★★ Gooder's Line
Obvious corner with crack system. One of the best of the early lines, with good gear options FA: Ross Gooder, 1971 | 16 | 14m | |||
| 14 |
★ Rubicon
FA: Lindsay Main, 1983 | 21 | 14m | |||
| 15 |
★ It's Tough At The Top
FA: Lindsay Main, 1983 | 20 | 14m | |||
| 16 |
★ Eight Million Years
FA: Lindsay Main, 2000 | 20 | 14m, 4 | |||
| 17 |
True Blue
FA: Ross Gooder, 1971 | 15 | 14m | |||
| 18 |
Velvet Prescribed
FA: John Chambers, 1992 | 21 | 14m, 5 | |||
| 19 |
Dumping Velvet
FA: Joe Arts, 1983 | 19 | 14m, 2 | |||
| 20 |
Gravy Train
FA: & John McCallum, 1978 | 15 | 10m | |||
1.3. Feeding Time Area 17 routes in Area
- Summary:
-
Sport climbing and Trad climbing
Lat / Long: -43.588347, 172.722488
 |
||||||||
| Route | Grade | Style | Selected ascents | |||||
|---|---|---|---|---|---|---|---|---|
| 1 |
★ Red Herring
FA: Tony Burnell, 13 Feb 2020 | 23 | 15m, 5 | |||||
| 2 |
★★ Red Wall
FA: Tony Burnell, 1996 | 24 | 15m, 5 | |||||
| 3 | Get A Grip On Yourself | 21 | 15m, 1 | |||||
| 4 |
Red Dwarf
FA: Tony Burnell, Mar 2020 | 23 | 15m, 5 | |||||
| 5 |
Whitless
FA: Lindsay Main, 1982 | 20 | ||||||
| 6 |
Diamond Head
On the blunt arete left of Prophet of Doom. FA: 22 Dec | 21 | 12m, 5 | |||||
| 7 |
★★ Prophet of Doom
FA: Simon, 1990 | 23 | 12m, 5 | |||||
| 8 |
★★ Feeding Time At The Zoo
FA: Joe Arts, 1982 | 21 | 12m, 1 | |||||
| 9 |
★ Driftnet
FA: Ton Snelder, 1989 | 22/23 | 13m, 2 | |||||
| 10 |
★ The Promised Land
climb up to underclings and large feet under the overlap feature, clipping a high first bolt and then pulling up to good gear in a horizontal. Follow the flake feature up and right with obvious but sparse gear easily to double modern anchor FA: Lindsay Main, 1983 | 17/18 | 16m, 1 | |||||
| 11 |
Steppenwolf
Climbs the obvious crack dividing the two walls between Promised Land on the left, and Restless on the right FA: Paul Drake, 1975 | 14 | 15m | |||||
| 12 |
Calling All Sportclimbers
Climb Steppenwolf to the ledge then follow a faint weakness between Steppenwolf and Restless. FA: Joe Arts, 1989 | 17 | 16m, 2 | |||||
| 13 |
★ An Alpinist Answers
FA: John Entwisle | 19 | 16m, 2 | |||||
| 14 |
★ Restless
FA: Joe Arts, 1982 | 19 | 16m, 2 | |||||
| 15 |
★ Restless Direct
FA: Tony Burnell, 2019 | 24 | 16m, 3 | |||||
| 16 |
★ Mistery
FA: Simon Middlemass, 2001 | 18 | 16m, 2 | |||||
| 17 |
Porcupine
FA: Al Hay, 1977 | 15 | 16m | |||||
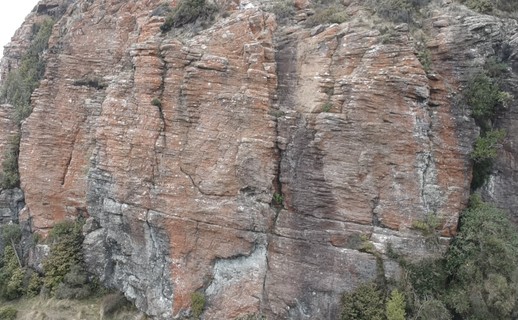
1.4. Rage Wall 22 routes in Cliff
- Summary:
-
Sport climbing, Trad climbing and Aid climbing
Lat / Long: -43.588236, 172.722875
/45/1e/451e5861df341d8f80da1b81ce7730e8e1b0fa0d) |
||||||||
| Route | Grade | Style | Selected ascents | |||||
|---|---|---|---|---|---|---|---|---|
| 1 |
★ Out On A Limb
Warning Rock: Two loose-ish blocks, be careful FA: John Birch, 1990 | 19/20 | 18m, 5 | |||||
| 2 |
★★ The Environment Centre Bites The Dust
Boulder up the juggy wall & faint corner to ledge and corner crack. Crux near the top. Move left at the top. Double bolt belay. Good pro. FA: Joe Arts, 1983 | 17 | 18m | |||||
| 3 |
White Lies
starts as for the trad route Envirnment centre, then out to 2 spaced bolts with maybe some supplemental gear. FA: John Barnes, 1988 | 18/19 | 18m, 2 | |||||
| 4 |
Into The Trees
Direct start into White Lies, toprope by preclipping first bolt, or else solo/boulder? up to it, possibly place some gear to the right, but why bother FA: Ton Snelder, 1990 | 21 | 18m, 2 | |||||
| 5 |
★ Suppressed Personalities
Trad route starts with good holds up the overhang and plenty of solid gear. Above, the angle eases. There is a manky old rusty pin and some questionable other gear on the top half, but the difficulty eases substantially FA: Joe Arts, 1983 | 20 | 20m | |||||
| 6 |
Delicia
FA: Athol Whimp, 1990 | 23 | 20m, 1 | |||||
| 7 |
Prize Fighter
Starts just left of Leaning Wall, on big holds to the first bolt. A fierce crux presents itself immediately off of the ledge, then eases to a juggy ramble. Join Leaning Wall above the last bolt. FFA: Owen Davies Set: Tony Burrell | 27 | 18m, 8 | |||||
/cd/ed/cded53523030fee8047980b0f5ef47a0ed061e41) 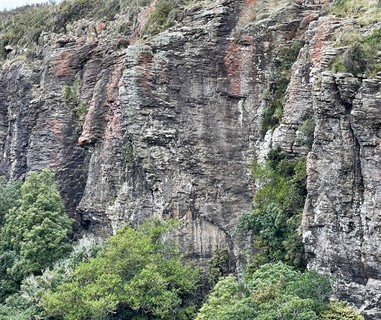 |
||||||||
| Route | Grade | Style | Selected ascents | |||||
| 8 |
★★ Leaning Wall
Climb onto ledge then onto block, then ascend the steep featured wall, to the left of the vegetated crack. FA: Tony Burnell, 2013 | 21 | 20m, 7 | |||||
| 9 |
★ Carbon Neutral
FA: Grant Piper, 2013 | 19 | 20m, 7 | |||||
| 10 |
★★ Pulling on Pinches
Bouldery moves through the overhang to the right of Carbon Neutral. Above the roof, carry on up the arête. FA: Tony Burrell, 2013 | 25 | 20m, 8 | |||||
| 11 |
Spoonerism
FA: Tony Burnell, 1997 | 24 | 20m, 8 | |||||
| 12 |
Christchurch Disco
FA: Roger Parkyn, 1988 | AID:A1 | ||||||
| 13 |
Smash Palace
FA: Joe Arts, 1985 | 23 | 23m, 2 | |||||
| 14 |
Acid Drop
FA: Andy Milne & 1994, 1994 | 24 | 20m, 4 | |||||
| 15 |
★★★ Rage Sur La Plage
Fierce crimping up the face of the overhanging pillar shaped wall. Small incuts past the first bolt to a rest out left and a trad placement, then up three more bolts on the headwall. FA: Dave Fearnley, 1987 | 25 | 20m, 4 | |||||
| 16 |
★★ Ground Effect
FA: Tony Burnell, 1998 | 25 | 20m, 6 | |||||
| 17 |
★★ Effectively Ravished
Climb Ground Effect to the second bolt, then join Victim of Ravishment to finish. Possibly the hardest line on the wall, though probably not harder than Raj or Ground Effect by a full grade. | 25 | ||||||
| 18 |
★★★ The Active Ingredient
What was once a very bold mixed line is now a fully bolted sport route. Start as for Victim, but follow the arching flake left at the 3rd bolt, the angle straight up at the 5th. FA: Roger Parkyn, 1985 | 22 | 23m, 6 | |||||
| 19 |
★★★ Bodies
Once one of the most heads up routes around, this line has recently been retrobolted and is now a sport climb. Start up Victim but instead of breaking right at the flake, carry on straight up. Excellent, sustained movement and good rock. FA: Ton Snelder, 1985 | 22 | 23m, 7 | |||||
| 20 |
★★★ Victim Of Ravishment
Start up the cracks and moving left as for the Active Ingredient, then move back right off the big flake to the second bolt. There is a good cam placement after the third bolt, and the angle eases, but still exciting to the top. FA: Ton Snelder, 1985 | 22 | 23m, 5 | |||||
| 21 |
★★ Victim of Ravishment Direct Start
Start behind the horopito tree to the right of the standard start. Move up the thin wall past 2 bolts then join the standard route at the 3rd. Pumpy if you avoid the rest left of the 3rd bolt. | 24 | 6 | |||||
| 22 |
★★ Buddies
rebolted by Tony in 2016, this is a great warm-up or a good lead for those breaking into 20 on lead. Climbs good flat holds just left of the vegetation and up into the quake scar at the top. FA: Tony Burnell, 1998 | 21 | 20m, 8 | |||||
1.5. Mr Clean Wall 15 routes in Cliff
- Summary:
-
Trad climbing and Sport climbing
Lat / Long: -43.588208, 172.723222
| Route | Grade | Style | Selected ascents | |||||
|---|---|---|---|---|---|---|---|---|
| 1 |
Drop Out
FA: Tony Burnell | 21 | 18m, 6 | |||||
| 2 |
★★ Bombs Away
FA: Joe Arts, 1983 | 22 | 18m, 3 | |||||
| 3 |
★ Drop The Bomb
Climbs the corner just above the track, immediately left of Dr Strangelove. Originally attacked the corner directly, but broken holds necessitate traversing in from the left. 2 bolts and gear for the cracks above. FA: Dave Fearnley, 1987 | 26 | 18m, 2 | |||||
 |
||||||||
| Route | Grade | Style | Selected ascents | |||||
| 4 |
★★ How I Learned to Stop Worrying and Love the Bomb
FA: Derek Thatcher, 2018 | 27 | 4 | |||||
| 5 |
★★ Dr Strangelove
FA: Derek Thatcher, 2018 | 32 | 14m, 6 | |||||
| 6 |
★★ Clip or Fly
FA: Peter Taw, 1991 | 24 | 18m, 4 | |||||
| 7 |
★★ Scratching Julius
FA: John Visser, 1981 | 21 | 18m | |||||
| 8 |
★★ Fillet of Arnold
The line of 4 bolts immediately right of the Scratching Julius crack. Boulder up to the top of the shield feature, where you will find consistently engaging climbing all the way to the anchors, on some of the best rock in the Port Hills. This route is safely bolted, but prepare for air time if you come off! FA: Ton Snelder, 1989 | 26 | 19m, 4 | |||||
| 9 |
Stars And Stripes
FA: Steve Schneider, 1987 | 24 | 19m, 2 | |||||
| 10 |
★★★ Getting Rid Of Mr Clean
The bolts are perfectly placed, as long as you don't fall at the start... or the end. Good climbing. FA: Ton Snelder, 1984 | 23 | 19m, 3 | |||||
| 11 |
★★★ Citizen Kane
FA: Joe Arts, 1984 | 22 | 19m, 1 | |||||
| 12 |
★★★ Citizen Four
Start just right of Citizen Kane at the obvious fridge feature. Yes, it is possible to climb into the corner right of the bolt line for 24 points, but the better option is to take the direct line up the fridge, as intended. Some creative beta leads to better holds above the second bolt, to an easier but pumpy finish. FA: Derek Thatcher, 2018 | 26 | 19m, 5 | |||||
| 13 |
Tupping Cecil
FA: Pete Sykes, 1987 | 21 | 16m, 1 | |||||
| 14 |
★ Sting
The line of bolts immediately to the left of Hornet's Nest. Ascend to a small roof where you can find the first bolt, then make big moves on mostly good but sometimes hard to see holds for the next several bolts. FA: Tony Burnell | 23 | 16m, 5 | |||||
| 15 |
Hornets' Nest
FA: Lindsay Main | 14 | ||||||
1.6. Year Right Wall 9 routes in Cliff
- Summary:
-
Mostly Sport climbing
Lat / Long: -43.588494, 172.723603
approach
Walk past Mr. Clean wall to get to this cliff with some gems hiding in the bush
| Route | Grade | Style | Selected ascents | |||||
|---|---|---|---|---|---|---|---|---|
| 1 |
★ Zombie Fodder
FA: Grant Piper, 2015 | 18 | 17m, 5 | |||||
| 2 |
★★ Retrobolitix
FA: Kevin Barratt & Grant Piper, 2014 | 23 | 20m, 5 | |||||
| 3 |
★ Minimal Disturbance
FA: Grant Piper & Dave Van Der Kraben, 2014 | 20 | 23m, 6 | |||||
/fe/6f/fe6f00f931a7744c87ca4384583bbae059f2081d) /d5/4a/d54abbf66206b8324422482b9fd3cd7479080fab) |
||||||||
| Route | Grade | Style | Selected ascents | |||||
| 4 |
★★ Arm & Hammer
Start between Minimal Disturbance and Funication, in the middle of the main part of the Year Right Wall. Climb the surprisingly technical slab, then surmount the roof following the v-groove. Execute a mantle and then ramble to the top, linking into the last two bolts of Funication. FA: David Jefferson, 21 Feb | 24/25 | 18m, 6 | |||||
| 5 |
★ Funacation
Start in the largish left facing corner around to the left of Nanny State below the roofs. Climb up the corner and out to a ledge to the right. Then climb up the bulge and up and left on slabs to the anchor. FA: Grant Piper, 2014 | 18 | 22m, 7 | |||||
| 6 |
★ Wiki Leaks
Up narrow dihedral section to high first bolt. Climbs then easily to rap station. FA: Grant Piper, 2011 | 17 | 20m, 5 | |||||
| 7 |
★ Nanny State
FA: Kevin Barratt, 2011 | 18 | 20m, 6 | |||||
| 8 |
Easy Action
FA: Kevin Barratt, 2013 | 21 | 20m, 4 | |||||
| 9 |
★ Grace
FA: Dave Van Der Kraben, 2014 | 23 | 15m, 4 | |||||
1.7. The Thunderdome 24 routes in Cliff
- Summary:
-
Mostly Sport climbing
Lat / Long: -43.588785, 172.724298
description
It may not look like much, but the Thunderdome offers highly enjoyable movement on (relatively) good rock. It's like the Cave, but with about 10% of the glue! Most of the routes seep in the wetter seasons, especially around Layer Cake and Gone Bimbo, but when dry they clean up nicely.
The grades of some of the more trafficked lines are sometimes a matter of debate, as many variants and linkups exist. However hard you find them, expect to accumulate a good pump on these climbs!
| Route | Grade | Style | Selected ascents | |||
|---|---|---|---|---|---|---|
| 1 |
Fantasia
FA: Rob Rainsbury, 1975 | 18 | ||||
| 2 |
★ Hyperspace
FA: Ton Snelder, 1991 | 22 | 18m, 4 | |||
| 3 | Chocolate Discharge | AID:A2 | ||||
| 4 |
★★ Arms Race
Starts in the corner to the left of Layer Cake and joins this route in the overhanging chimney. FA: Tony Burnell, Dec 2017 | 24 | 12m, 6 | |||
| 5 |
★★ Layer Cake
At the left hand end of The Thunderdome, goes directly up through the groove in the roof to the left of Gone Bimbo. FA: Tony Burnell | 25 | 12m, 6 | |||
| 6 |
★★★ Gone Bimbo
Warning Fixed Gear: Damaged perma draw The obvious line on the L end of the roof. Often wet. Pull to the fourth bolt then traverse R along the crack. Previously required a cam at the end of the traverse; now there's an extra bolt. There's also a new anchor to the left of the original anchor, which has rusted badly. Numerous variations exist. FA: Ton Snelder, 1989 | 27 | 12m, 7 | |||
| 7 |
★ Gone Bimbo Direct Finish
Climb the standard version of Gone Bimbo, but at the first permadraw on the traverse, instead of continuing right go straight through the roof on good holds to finish at a separate anchor. Using the original (low) beta to get established on the traverse gets you 26 points, whilst the new (high) beta only warrants 25. FA: Peter Carter, 1990 | 25/26 | 12m, 5 | |||
| 8 |
★ Alternative Traverse
FA: Andy Cockburn, 1993 | 28 | 12m, 6 | |||
| 9 |
Gone Bimbo Direct Start
FA: Lionel Clay, 1989 | 27 | 12m, 5 | |||
| 10 |
★ Carnivore
FA: Peter Taw, 1993 | 27 | ||||
| 11 |
★★ Mysterious Swine Disease
Gymnastic and steep moves almost directly out the wall, going slightly left to finish at top of Gone Bimbo. Good edges if a bit sharp, and plenty of bolts! FA: Pete Taw, 1992 | 27 | 12m, 7 | |||
| 12 |
★ Swine Fever
Start as for Mysterious Swine Disease. At the second bolt, instead of breaking out left, continue straight up over the roof and into a right facing corner. Surmount another roof to reach easy ground and the anchor. FA: Tony Burnell | 26 | 11m, 5 | |||
| 13 | ★ Mega Pump | 27 | 7 | |||
| 14 |
★ Pump Cake
Climb Mega Pump but instead of going straight up at the left end of the Gone Bimbo traverse, continue left to link into Layer Cake. | 27 | 8 | |||
| 15 |
★ Kublai Khan
FA: Sefton Priestley, 2004 | 29 | 15m, 4 | |||
| 16 |
★★ Creatures of Power
Start in the permanently oozy, mossy corner to the right of Kubla Khan. Surmount the first roof by pulling a hard boulder problem, then continue up and slightly right past two additional overhangs. Easier but slopey ground leads to the anchor. FA: Peter Taw | 28 | 15m, 5 | |||
| 17 |
★ The Power of Khan
Climb the first 3 bolts of Powerless Creatures, then traverse left across Creatures of Power to finish up Kublai Khan. | 26 | 6 | |||
| 18 |
★ Powerless Creatures
An easier variant start to 'Creatures of Power' Start in the corner right of the aforementioned route and boulder your way up through 3 bolts and turn the lip off the roof. From here, join 'CoP' and finish as for that route. NB This is not the route's original name, which appears to have been lost to time. FA: Michael Karnick, 2010 | 26 | 15m, 6 | |||
| 19 |
Scud Muscles
FA: Dave Fearnley | 23 | 10m, 2 | |||
| 20 |
★★ Powerless Jockey
Climb the first 3 bolts of Powerless Creatures, then head right, clipping the first bolt of Scud Muscles, to link into Jug Jockey at its crux. Combines the best parts of both routes. | 25 | 8 | |||
| 21 |
★★ Jug Jockey
Steep and hard before you get to the jugs and then easier terrain. A spicy final jaunt leads you to the anchors. FA: Tony Burnell, 1997 | 24 | 12m, 4 | |||
| 22 |
Frank's In A Frenzy
FA: Damian Carroll | 23 | 10m, 5 | |||
| 23 |
★★ Mystery
FA: Tony Burnell | 24 | 15m, 5 | |||
| 24 |
★ Art for Art's Sake
FA: Tony Burnell, 1996 | 21 | 15m, 5 | |||
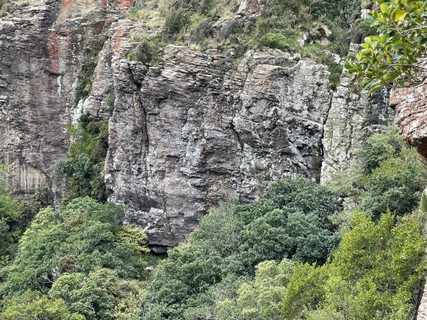
1.8. Ataturk Wall 28 routes in Cliff
- Summary:
-
Mostly Sport climbing
Lat / Long: -43.588947, 172.724534
description
A big chossy wall with a few choice routes! Maybe dry after rain as it gets a bit of sunshine in the afternoon.
approach
Last wall along the Lyttleton Rock face
| Route | Grade | Style | Selected ascents | |||||
|---|---|---|---|---|---|---|---|---|
| 1 |
★ Easter Riding
FA: Tony Burnell, 2002 | 21 | 20m, 8 | |||||
| 2 |
★ Stu Allan Memorial Roof
FA: Joe Arts, 1989 | 23 | 20m, 3 | |||||
| 3 |
★ Location, Location, Location
FA: Tony Burnell, 2003 | 24 | 20m, 6 | |||||
| 4 |
★★ Stemming Over Stu
Climb past the first 3 bolts of the Stu Allen Route / Location…, then traverse right at the ledge to join Bridging Over Lyttelton. | 25 | 20m, 7 | |||||
| 5 |
★★ The Lyttelton Arms
Climb the crux of Bridging Over Lyttelton, then at the second bolt above the roof, head left to pass the final two bolts of Location… and finish as for that route. More sustained than the original, with a sting in the tail! | 27 | 18m, 7 | |||||
| 6 |
★★ Bridging Over Lyttelton
FA: Rod Newburn, 1996 | 26 | ||||||
| 7 |
Michael Karnick Mystery
FA: Michael Karnick, 2010 | 26 | ||||||
| 8 |
Timberland
FA: Tony Burnell, 1997 | 24 | 15m, 5 | |||||
| 9 |
★ Striking Distance
FA: Tony Burnell, 1997 | 27 | 4 | |||||
| 10 |
★ Jack of All Grades
Start up Timberlands then traverse right into the corner after the second bolt. From there, follow the right-most line of bolts to the top. FA: Tony Burnell, 21 Jan | 24 | 20m, 7 | |||||
| 11 |
Dead Men Don't Lie
FA: Lindsay Main, 1989 | 18 | ||||||
 |
||||||||
| Route | Grade | Style | Selected ascents | |||||
| 12 |
★ Diablo
FA: Grant Piper, 2002 | 21 | 24m, 9 | |||||
| 13 |
Avant Garage
FA: Joe Arts, 1989 | 22 | 24m, 2 | |||||
| 14 |
Sneg Field
FA: Joe Arts, 1989 | 19 | ||||||
| 15 |
★ A Futile Campaign
FA: Joe Arts, 1989 | 20 | 24m, 7 | |||||
| 16 | ★ A Sport Route | 19 | 22m, 6 | |||||
| 17 |
★ Ataturk Strikes Again
FA: Joe Arts, 1989 | 19 | 18m, 6 | |||||
| 18 |
★ Dream of White Elephants
Warning Rock: Loose block in roof, 4th(?) bolt FA: Grant Piper, 2016 | 19 | 22m, 6 | |||||
| 19 |
★ Rock Shock
FA: Kynnan Bazley, 1997 | 23 | 18m, 4 | |||||
| 20 |
★ Mother Of All Session Routes
FA: Lionel Clay & Tony Stempa | 20 | 2 | |||||
| 21 |
★★ Disillusions of Grandeur
Follow line of bolts up the (very) vague prow towards the right of the face. After a spicy run out to the third bolt, and a bit of grovelling to avoid the guano cave, you reach the chains. FA: Grant Piper, 2011 | 20 | 18m, 7 | |||||
| 22 |
★ Name Unknown
FA: Tony Burnell, 1996 | 23 | 5 | |||||
| 23 |
★★ Salome Maloney
Easily reach rooflet (can clip low first bolt to the left to avoid some rope burn falling off the roof), and continue up to the steep finish! FA: Tony Burnell, 1997 | 23 | 16m, 5 | |||||
| 24 |
★★ Colonel Malone
FA: Joe Arts, 1989 | 22 | 18m, 4 | |||||
| 25 |
Pimple On The Arse Of The Universe
FA: Joe Arts, 1989 | 18 | 15m, 3 | |||||
| 26 | ★ Stainless Sproutings | 15 | 15m, 4 | |||||
| 27 |
★ Bush Tucker
FA: Tony Burnell, 25 Jan | 17/18 | 10m, 4 | |||||
| 28 |
★ Bush Telegraph
FA: Tony Burnell, 2023 | 22 | 10m, 4 | |||||