A Crag Guide gives an extensive view of all sub areas and climbs at a point in the index. It shows a snapshot of the index heirachy, up to 300 climbs (or areas) on a single web page. It shows selected comments climbers have made on a recently submitted ascent.
At a minor crag level this should be suitable for printing and taking with you on a climbing trip as an adjunct to your guidebook.
This guide was generated anonymously. Login to show your logged ascents against each route.
Warning
Rock climbing is extremely dangerous and can result in serious injury or death. Users acting on any information directly or indirectly available from this site do so at their own risk.
This guide is compiled from a community of users and is presented without verification that the information is accurate or complete and is subject to system errors. By using this guide you acknowledge that the material described in this document is extremely dangerous, and that the content may be misleading or wrong. In particular there may be misdescriptions of routes, incorrectly drawn topo lines, incorrect difficulty ratings or incorrect or missing protection ratings. This includes both errors from the content and system errors.
Nobody has checked this particlular guide so you cannot rely on it's accuracy like you would a store bought guide.
You should not depend on any information gleaned from this guide for your personal safety.
You must keep this warning with the guide. For more information refer to our:
Usage policy
Contributors
Thanks to the following people who have contributed to this crag guide:
Cormac Tooze
Scurvy
Marc dM
Hugo
Nicola Clementel
Jeffrey Denning
The size of a person's name reflects their Crag Karma, which is their level of contribution. You can help contribute to your local crag by adding descriptions, photos, topos and more.
Table of contents
- 1.
Ledges
28 in Sector
-
1.1.
Silverstream Ravine 17 in Area
- 1.1.1. Silverstream Lower 6 in Sector
- 1.1.2. Five Sixteen Crag 11 in Sector
- 1.2. Spring Ledge 11 in Sector
-
1.1.
Silverstream Ravine 17 in Area
- 2. Index by grade
1. Ledges 28 routes in Sector
- Summary:
-
All Trad climbing
Lat / Long: -33.961955, 18.423645
description
Situated on the East of Table Mountain. Above the saddle between Devils Peak and Table Mountain
approach
Via Newlands Ravine on Newlands side or from Platteklip Road on the CBD side.
ethic
No bolting.
1.1. Silverstream Ravine 17 routes in Area
- Summary:
-
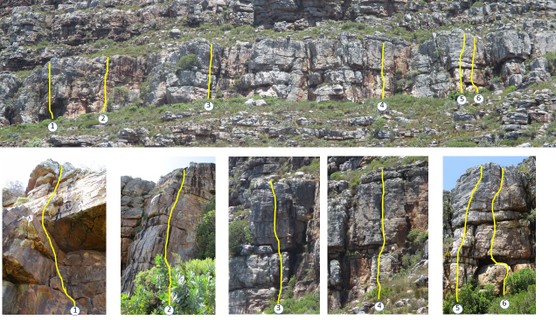
1.1.1. Silverstream Lower 6 routes in Sector
- Summary:
-
All Trad climbing
approach
Short walk to the base of cliff band along the Silverstream buttress trail, but a wee bit of a bunda bash along the base. Best to set up a rap, and only walk off at end of the session (to the climbers right down the Silverstream Buttress trail).
 |
||||||||
| Route | Grade | Style | Selected ascents | |||||
|---|---|---|---|---|---|---|---|---|
| 1 |
★★ Squeakzilla
Fiesty start (need tiny cams), then lekker to top. FA: Richard Halsey & R. Strate, Dec 2020 | 21 | ||||||
| 2 |
★ Akward Sauce
You will need to walk about the length of the route along the ledge to find anything resembling an anchor. FA: Richard Halsey & R. Strate, Dec 2020 | 15 | ||||||
| 3 |
★ Covid Alley
FA: Richard Halsey & R. Strate, Dec 2020 | 18 | ||||||
| 4 |
★★ The Christmas Star
FA: Richard Halsey & R. Strate, Dec 2020 | 16 | ||||||
| 5 |
★ Une Autre Année
Spacey gear at the top. FA: Richard Halsey & R. Strate, Dec 2020 | 18 | ||||||
| 6 |
★★ Sun Orbit
Tricky take off, then pleasant. FA: Richard Halsey & R. Strate, Dec 2020 | 18 | ||||||
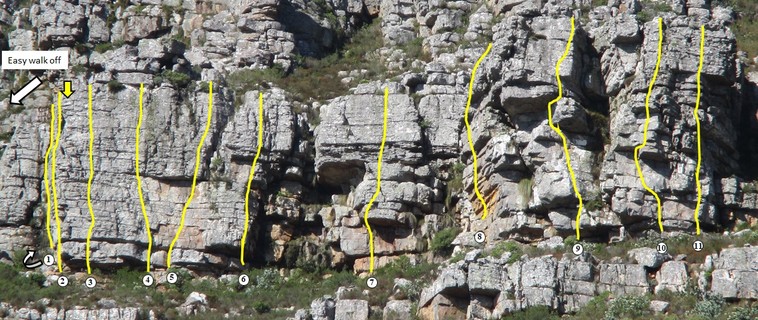
1.1.2. Five Sixteen Crag 11 routes in Sector
- Summary:
-
All Trad climbing
description
Pleasant crag with moderate routes, easy approach and descent.
approach
Follow the Silverstream Ravine path until about level with the crag which is visible across the ravine. Split from the main path and follow a line of cairns to the ravine and cross over the other side below the huge yellow boulder. Contour round below some shorter cliffs to reach the crag.
 |
||||||||
| Route | Grade | Style | Selected ascents | |||||
|---|---|---|---|---|---|---|---|---|
| 1 |
★★★ Alina
Up the centre of the face perpendicular to the front face. FA: Richard Halsey & R. Strate | 16 | 20m | |||||
| 2 |
★★★ Zoya
The blunt Arête. FA: Richard Halsey & R. Strate | 16 | 20m | |||||
| 3 |
★★★ Same Yet Different
FA: Richard Halsey & R. Strate | 16 | 20m | |||||
| 4 |
★★ Double Trouble
The gear at the start is a bit tricky. FA: Richard Halsey & R. Strate | 16 | 20m | |||||
| 5 |
★ Delicate Daisies
The second half has some fragile flakes. FA: Richard Halsey & R. Strate | 16 | 20m | |||||
| 6 |
★ Adaption
The gear at the start is a bit tricky. FA: Richard Halsey & R. Strate | 18 | 20m | |||||
| 7 |
★★★ Resilience
FA: Richard Halsey & R. Strate | 18 | 20m | |||||
| 8 |
★★★ The Big Guns
FA: Richard Halsey & R. Strate | 19 | 20m | |||||
| 9 |
★★ Wriggle Worm
Start is harder if you are short. FA: Richard Halsey & R. Strate | 21 | 20m | |||||
| 10 |
★★ Female Flag Bearer
FA: Richard Halsey & R. Strate | 17 | 20m | |||||
| 11 |
★ Birthday Blooms
FA: Richard Halsey & R. Strate | 15 | 20m | |||||
1.2. Spring Ledge 11 routes in Sector
- Summary:
-
| Route | Grade | Style | Selected ascents | |||||
|---|---|---|---|---|---|---|---|---|
Main Sector | ||||||||
| 2 | ★★ Jigsaw Crag | 18 | ||||||
| 3 | ★ Chock-a-Block | 14 | ||||||
| 4 | ★★★ Wandkappel Crag | 10 | 60m | |||||
| 5 | ★★ Variation Crag | 16 | ||||||
| 6 | ★★ Saddle Overhang | 13 | ||||||
| 7 | ★★ Simian Street | 14 | ||||||
| 8 |
★★ Coin de Rocher
Classic. FA: A. Killick & G. Moseley, 1968 | 14 | 63m, 4 | |||||
| 9 |
Slot Machine
Starts right of 'Coin de Rocher' The start of the first pitch is a tad bold. Technically more like grade 22, but fairly intimidating. The second pitch also starts off in a fiesty manner.
FA: Richard Halsey & M. Thilo FFA: Richard Halsey & S. Jack., Oct 2015 | 23 | 50m, 2 | |||||
| 10 |
★★ Block and Tackle
FA: M. Mamacos, M. Anderson & C. Butler, 1949 | 19 | 120m, 7 | |||||
| 11 | ★★★ Spring Overhang | 10 | 60m | |||||
| 12 | ★★ Equinox | 8 | 60m | |||||