
Seasonality
Summary
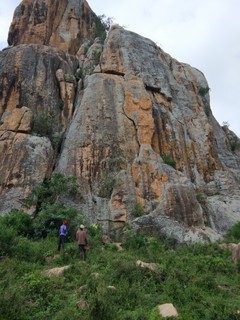
This incredible granite plug is a bit hard to reach, but once you are there, you'll be happy you came. Only trad climbed once, so a chance for second ascent and new lines abound.
©Description
About a 20 minute drive outside of Kaabong is the rock of Naita. We climbed it in four pitches, though it could have been done in less (see below). There was no evidence that anyone had climbed it before. We saw no pitons or tack at the top or anywhere along the way. Locals also told us that nobody has ever been on top. The top of pitch two and part of pitch three are accessible by a difficult walk and scramble up a chimney, so a local boy or two may join you along this section. One joined us, collected firewood and threw it down past us as we climbed. You can walk down from pitch two or three if you decide to turn around, though the hardest pitch is the first pitch, so if you send that one, you might as well go for the summit. We did this in rainy season and it wasn’t too hot or too bushy.
©Access issues
Free and unrestricted however expect to be asked for money. Only climbed once so access negotiations would be ongoing. We gave a small gift of rice.
The local community was very friendly, but unlike some other places in Uganda, it felt as though this community had experienced very few outside visitors. They greeted us with a mixture of excitement, expectation and fear. As leaving, we gifted some dried beans to a local woman and gave two men a lift to Kaabong. We were repeatedly asked for money, but didn’t give any. We departed with mostly good feelings all the way around, though a couple folks were clearly disappointed with our refusal to give cash. However, a local man assured us that we would be welcome back to climb again.
©Approach
Naita Rock, Village of Yorun outside of Kaabong, Lat 3.56607 Lon 34.14223
Drive and walk up: Leave Kaabong on the road to Kidepo, just outside of town, turn right by small mountain with the large radio tower, continue straight for awhile and then turn right. You will be able to see Naita Rock on your right. Decent village roads get you about 200m from the rock. There is an impressive local settlement manyatta called Yorun at the base of the rock, so there are trails all around the rock making scouting and access quite easy.
©Where to stay
There is a guest house in Kaabong or camp nearby, with local permission, of course.
©Ethic
This community seems to have encountered very little outside visitors. Be very careful not to alarm or quarrel with the locals. Naita and Yorun is their world. Be on your best behavior as very little is known about this community.
I took photos of local children and an aerial view into the manyatta from the top of Naita. I showed these photos to many local people who were nothing short of amazed.
©History
First Ascent by U Pitsche and M Battani July 16th 2017
On the Geology: These (Naita and the row of connected rocks) appear to be plutons (plutonic stocks or diapirs of some sort to be more precise), which are igneous intrusions. Had they fully extruded through the ground from magmatic activity then they would have been volcanic, but these stocks form from magma welling up and cooling beneath the surface and their linkage may be expressed along what are called dikes which have left their expression as the long linear boulder remains between the stocks and which form from cooled magmas forming vertical walls along fractures. Erosion has brought the stocks to their current prominence (looks to be granite), which makes for great climbing. Volcanic rocks tend to not be very good for climbing since they tend to weather quickly into clay mostly, whereas granite is a crystalline matrix, which has lots of the durable mineral quartz. For more information you can Google plutons, plutonic diapers, and batholiths, which are related and are world known for great rock climbing. –Matt McCullough Geologist
©Plan your Trip
Some content has been provided under license from: © Matt Battani (Matt Battani)
Hello!
First time here?
theCrag.com is a free guide for rock climbing areas all over the world, collaboratively edited by keen rock climbers, boulderers and other nice folks.You can log all your routes, connect and chat with other climbers and much more...» go exploring, » learn more or » ask us a question

Accommodations nearby more Hide
Share this
Photos Browse all photos
U Pitsch at Naita Rock - First and Second Pitch.jpeg

Naita Rock - Manyatta Yorun.jpeg

U Pitsch at Naita Rock - Marking the 1st Ascent.jpeg

Naita Rock - Naita Cover Photo.jpeg
Wed 19 Apr
Check out what is happening in Naita Rock.
Get a detailed insight with a timeline showing
- Ticks by climbers like you
- Discussions of the community
- Updates to the index by our users
- and many more things.
Login to see the timeline!