A Crag Guide gives an extensive view of all sub areas and climbs at a point in the index. It shows a snapshot of the index heirachy, up to 300 climbs (or areas) on a single web page. It shows selected comments climbers have made on a recently submitted ascent.
At a minor crag level this should be suitable for printing and taking with you on a climbing trip as an adjunct to your guidebook.
This guide was generated anonymously. Login to show your logged ascents against each route.
Warning
Rock climbing is extremely dangerous and can result in serious injury or death. Users acting on any information directly or indirectly available from this site do so at their own risk.
This guide is compiled from a community of users and is presented without verification that the information is accurate or complete and is subject to system errors. By using this guide you acknowledge that the material described in this document is extremely dangerous, and that the content may be misleading or wrong. In particular there may be misdescriptions of routes, incorrectly drawn topo lines, incorrect difficulty ratings or incorrect or missing protection ratings. This includes both errors from the content and system errors.
Nobody has checked this particlular guide so you cannot rely on it's accuracy like you would a store bought guide.
You should not depend on any information gleaned from this guide for your personal safety.
You must keep this warning with the guide. For more information refer to our:
Usage policy
Contributors
Thanks to the following people who have contributed to this crag guide:
Mark Dvorak
Campbell Gome
Simon Dale
Graham Sanders
David Jefferson
rick
Pavel Burov
Camron Dovalina
Benjamin Poirier
lucky chance
The size of a person's name reflects their Crag Karma, which is their level of contribution. You can help contribute to your local crag by adding descriptions, photos, topos and more.
Table of contents
- 1.
Eagle Creek Canyon / Emerald Bay
133 in Crag
- 1.1. Mayhem Cove 34 in Cliff
- 1.2. Eagle Lake Buttress 9 in Cliff
-
1.3.
Eagle Lake Cliffs 30 in Crag
- 1.3.1. Eagle Lake Cliff 23 in Cliff
- 1.3.2. Punk Rock 3 in Cliff
- 1.3.3. Upper Eagle Creek Cliff 1 in Cliff
- 1.3.4. Three Stooges Wall 3 in Cliff
- 1.3.5. Eagles Nest 0 in Cliff
- 1.4. Bay Area Cliff 6 in Cliff
- 1.5. God Wall 6 in Cliff
- 1.6. Smoke Rock 7 in Cliff
- 1.7. Ninety-Foot Wall 20 in Cliff
- 1.8. The Stomach 2 in Cliff
- 1.9. Venturi Wall 2 in Cliff
-
1.10.
Emerald Point 6 in Cliff
- 1.10.1. Lower Section Routes 4 in Sector
- 1.10.2. The Plectrum 2 in Sector
- 1.11. Crag Peak 5 in Crag
- 1.12. Indian Rock 6 in Crag
- 1.13. Jakes Peak 0 in Crag
- 2. Index by grade
1. Eagle Creek Canyon 133 routes in Crag
- Summary:
-
Rock climbing, Trad climbing and other styles
Lat / Long: 38.952146, -120.113610
description
Tahoe area rock climbers refer to anything destination commonly approached from the Eagle Lake trailhead as "Eagle Lake Canyon," even though some crags in the area are physically outside of the Eagle Creek watershed.
1.1. Mayhem Cove 34 routes in Cliff
- Summary:
-
Rock climbing, Sport climbing and Bouldering
Lat / Long: 38.953350, -120.114764
description
Mayhem Cove features some of the best sport climbing in the Tahoe area, ranging in difficulty from 5.9 to low-end 5.13 on vertical to overhanging, heavily-featured granite. The access is easy (as long as you can find parking) and there are excellent views of Emerald Bay and Lake Tahoe.
Spring to fall is the best time to climb here, although you'll want to time your visit around whether you are chasing sun (colder seasons) or shade (summer). The right side faces east and goes into the shade around noon, while the left side has a more southeasterly aspect and goes into the shade around 2 PM.
Most routes are equipped with mussy hooks or other lower-off hardware, there are often perma-draws on harder routes (or harder sections of routes), and the climbs are generally well-bolted. True sport climbing!
approach
Mayhem Cove can be seen from the parking lot several hundred yards distant by looking in the foreground to the northwest. Approach time: 10 minutes.
From the parking lot, instead of heading up the main path to Desolation Wilderness, go right into the pine trees (left of the bathroom). Head uphill on a faint trail then take a right on an old road. After about 50 yards, look for a trail on the left that goes uphill. Follow for a couple of minutes, then scramble through talus to the base of Mayhem Cove.
| Route | Grade | Style | Selected ascents | |||||
|---|---|---|---|---|---|---|---|---|
| 1 | Physical Evidence | 5.10d | ||||||
| 2 | Fatal Attraction | 5.12a | ||||||
| 3 | India Ink | 5.12b | ||||||
| 4 | ★★ The Coroner | 5.11d | ||||||
| 5 | Mandatory Suicide | 5.12a | ||||||
| 6 | ★ Mutilated Corpse | 5.11c | ||||||
| 7 |
Malice in Chains
Begin with very enjoyable technical face climbing on incut edges to a decent rest. Following the rest stance, climb the crux bulge using underclings, gastons, and sloper side pulls. The crux is followed by really fun jug climbing for 30 feet. This is a really nice route; well bolted and longer than the 11- routes to the right. My only complaint would be that you can clip bolts for routes on your right and left at one point. 4th bolt-line from the right (Car Jacker being the first line) on the lower, west facing cliff. 8 bolts + anchors | 5.11c | 59ft, 8 | |||||
| 8 |
★★ Temporary Insanity
The line squeezed in just left of DWI shares some holds through the lower portion and has some interesting features of it's own higher on the wall. 7 bolts to 2 bolt anchor | 5.11b/c | 49ft, 7 | |||||
| 9 |
★★ DWI
This route is located on the face of the lower section of Mayhem Cove, which is the first section of rock you will get to taking the main path. It starts on the second line of bolts from the right, and where the climb hits a bulge about 20 feet off the ground, you continue up the line of bolts that go straight up, instead of out over the bulge. The climb over the bulge is called Overkill (5.11c). Climb the tough sustained face to a convoluted rest at the left side of the bulge, then continue up through chimney-esque moves to the top. 6 bolts to a 2 bolt top anchor. | 5.11b | 39ft, 6 | |||||
| 10 |
★★ Overkill
Same start as DWI but go right out the roof to the arete / prow excellent upper section | 5.11c | 39ft | |||||
| 11 |
★ Car Jacker
Climb the rightmost line of bolts on the lower section of Mayhem Cove. Being the only existing 5.9 in Mayhem Cove, this is a great warmup, A tricky interesting move gets you up over the bulge about 20 feet up. Climbing after the first bulge is pretty straighforward, but well worth the climb. This route is pretty pumpy for a 5.9. It's a fairly long ways to the first bolt, but the climbing up to this point is easy. 7 bolts to a 2 bolt top anchor (mussys) and a poor-quality open shut. | 5.9 | 39ft, 7 | |||||
| 12 | Jumbolia | 5.13a | ||||||
| 13 | Black Rain | 5.13a | ||||||
| 14 | Verbal Abuse | 5.12c | ||||||
| 15 | Slander | 5.13a | ||||||
| 16 | Cajun Hell | 5.13a | ||||||
| 17 |
★★★ Huntin' Gator
Huntin' Gator is the first pitch of the infamous test piece Cajun Hell. Take the class 4 scramble up the long diagonal ramp cutting leftward up Mayhem Cove. It begins within the cave as the second route from the right and fourth from the left although the bolted lines for the other routes are sporadic at best. 7 bolts lead to a 2 bolt hanging belay anchor system on the headwall. Find the fixed bolt on the ramp for the belay person. The second through fourth bolts have fixed chains so you'll know you're on the right route. Through the first four bolts you're treated to wildly overhanging powerful moves rightward out to the overhanging face. The next 2 bolts offer big holds and a chance to catch your breath, but the technical redpoint crux awaits as you move up and left towards the anchors. If you continue up and left past the anchors following the diagonal seam along the overhanging headwall, this is Drinkin' White Lightning, the 5.12c second half of Cajun Hell. 7 bolts to a 2 bolt wire cable and fixed biner anchor system | 5.12b | 39ft, 7 | |||||
| 18 | Drinkin' Wite Lightning | 5.12c | ||||||
| 19 | Tar Babies | 5.12c | ||||||
| 20 |
★★★ Gator Bait
Awesome alternative before the business on Cajun Hell. A dicey lay back leads to a slopy hand traverse and a pumpy finish. One of the best on the wall FFA: Graham Sanders, 2003 FA: Graham Sanders, 2003 Set: Graham Sanders, 2003 | 5.13a | 82ft, 9 | |||||
| 21 | Riddler | 5.11c | ||||||
| 22 |
Florida Man
Head up through the mini roof and onto the face. A couple of tricky sequencing leads to a double crack and chains. Very well protected. Second route on ramp. 15 bolts plus mussy hooks for anchors | 5.11b | 98ft, 15 | |||||
| 23 |
The Guillotine Direct
Start up the right-facing corner. A couple of easy moves gets you to the first bolt. Climb through a series of roofs and blocks leading to a clean corner capped with a small roof. A few more bolts of climbing leads you to the first anchor. *New extension: From the anchors climb straight up into the Gulliontin to a small shelf above for a great view. 3 Bolts (10a) - Still Dirty, Beware. 12 bolts + mussy hooks | 5.11a | 79ft, 12 | |||||
| 24 |
★★ Skullduggery
The lowest climb on the ledge that cuts diagonally up and left across Mayhem Cove, Skullduggery ascends numerous overhaning blocks with many hand-to-fist-sized cracks between them. 9 bolts to a 2 bolt anchor. There's a bolt up and right of the first bolt that is completely off route, as the following bolt is left of the first. | 5.11a | 69ft, 9 | |||||
 |
||||||||
| Route | Grade | Style | Selected ascents | |||||
| 25 |
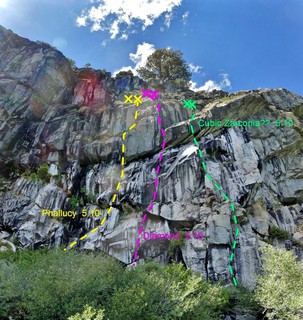
★★ Phallucy
To the left of the diamond. It is right at the base of the large ramp that heads up left to harder routes. Start at some large blocky terrain. It's safer to come in from the left if leading, but a direct start is possible. Follow some blocks for about 5 bolts through a few powerful moves with good pro. Then surmount an overhanging bulge and finally there are a few smooth ramps with face climbing. This route has it's own anchors and it's easy to reach Diamond's anchors as well. 12 bolts + anchor bolts FA: Kenny Thompson 1993 | 5.10a/b | 100ft, 12 | |||||
| 26 | ★★ Diamond | 5.10b | ||||||
| 27 | Psycho II | 5.12b | ||||||
| 28 | Disturbing the Priest | 5.12a | ||||||
| 29 | Unknown | 5.12b | ||||||
| 30 | ★ Pigs in a Blender | 5.10d | ||||||
| 31 | Coma Sutra | 5.10d | ||||||
| 32 | Distand Early Warning | 5.12a | ||||||
| 33 | Gumby Goes to Hollywood | 5.10b | ||||||
| 34 | Lizard Man | 5.10b | ||||||
1.2. Eagle Lake Buttress 9 routes in Cliff
- Summary:
-
All Trad climbing
Lat / Long: 38.950164, -120.136412
| Route | Grade | Style | Selected ascents | |||
|---|---|---|---|---|---|---|
| 1 | Mountaineer's Route | Class 4 | ||||
| 2 | A Line | 5.9 | ||||
| 3 |
★ I'm a Gumby Dammit
FA: Craig Morgan, Grahm Kent & Mark Dvorak | 5.9 | ||||
| 4 | Wind Tree | 5.9 | ||||
| 5 | ★★ Eagle Route | 5.5 | ||||
| 6 | Monkey Business | 5.10a | ||||
| 7 | ★ Orange Book | 5.8 | ||||
| 8 | ★★★ Orange Sunshine | 5.9 | ||||
| 9 | East Ridge Route | 5.7 | 3 | |||
1.3. Eagle Lake Cliffs 30 routes in Crag
- Summary:
-
Rock climbing, Trad climbing and other styles
Lat / Long: 38.942657, -120.125141
1.3.1. Eagle Lake Cliff 23 routes in Cliff
- Summary:
-
Rock climbing, Trad climbing and other styles
Lat / Long: 38.940194, -120.121786
| Route | Grade | Style | Selected ascents | |||
|---|---|---|---|---|---|---|
| 1 | Wild at Heart | 5.12b | ||||
| 2 | The Criterion | 5.11a | ||||
| 3 | ★★ Thrust is a Must | 5.10d | ||||
| 4 | ★★★ Seams to Me | 5.10c | ||||
| 5 | ★★ The Nagual | 5.10c | ||||
| 6 | Barney Rubble | 5.10a | ||||
| 7 | ★★ Quest for Power | 5.11a | ||||
| 8 |
★★ Quest for Glory
This might be the same as QFP but listed differently in the supper topo guide | 5.10d | ||||
| 9 | ★★★ Space Truckin' | 5.10b | ||||
| 10 | ★★★ Space Walk | 5.11d | ||||
| 11 | Separated Reality | 5.8 | ||||
| 12 | ★ Off the Wall | 5.10c | ||||
| 13 |
★★ Unknown Chimney
This climb is pretty fun for the novelty alone. A progressively widening chimney finally leads to face moves at the very top. Well, for the shorties it does, at even a mere 6' in height I was able to use the back wall all the way up to get my full stem's worth. Bolts make this climb very accessible. This climb is located in the obvious chimney formed by the detached pillar that is directly in front of the wall forming the famous Spacewalk crack system. Bolts to wrap anchor. | 5.8 | 79ft | |||
| 14 | Polecat | A3 | ||||
| 15 | The Vulture | 5.10a | ||||
| 16 | The Buzzard | 5.11b | ||||
| 17 | Changeling | 5.8 | ||||
| 18 | ★ Cracula | 5.10a | ||||
| 19 | ★★★ Buster Brown | 5.10b | ||||
| 20 | Block Buster | 5.9 | ||||
| 21 | Master Race | 5.11c | ||||
| 22 | Der Fuhrer | 5.11d | ||||
| 23 | ★ Master of Disaster | 5.10a | ||||
1.3.2. Punk Rock 3 routes in Cliff
- Summary:
-
All Rock climbing
| Route | Grade | Style | Selected ascents | |||
|---|---|---|---|---|---|---|
| 1 | Moon Raker | 5.10a | ||||
| 2 | Lost and Found | 5.9 | ||||
| 3 | Atomic Punk | 5.10c | ||||
1.3.3. Upper Eagle Creek Cliff 1 route in Cliff
- Summary:
-
All Rock climbing
Lat / Long: 38.938679, -120.124823
| Route | Grade | Style | Selected ascents | |||
|---|---|---|---|---|---|---|
| 1 | Gold Mettle | 5.12a | ||||
1.3.4. Three Stooges Wall 3 routes in Cliff
- Summary:
-
All Rock climbing
| Route | Grade | Style | Selected ascents | |||
|---|---|---|---|---|---|---|
| 1 | The Manny | 5.12a | ||||
| 2 | The MO Crack | 5.10a | ||||
| 3 | The Jack Crack | 5.10d | ||||
1.3.5. Eagles Nest 0 routes in Cliff
1.4. Bay Area Cliff 6 routes in Cliff
- Summary:
-
Top roping and Rock climbing
| Route | Grade | Style | Selected ascents | |||
|---|---|---|---|---|---|---|
| 1 | The Jester | 5.6 | ||||
| 2 | The Emerald Beyond | 5.9 | ||||
| 3 | Thin Fingers | 5.10b | ||||
| 4 | Sandbagged | 5.11c | ||||
| 5 | Delbert's Diagonal | 5.9 | ||||
| 6 | Delbert's Direct | 5.9 | ||||
1.5. God Wall 6 routes in Cliff
- Summary:
-
All Rock climbing
| Route | Grade | Style | Selected ascents | |||
|---|---|---|---|---|---|---|
| 1 | Unknown | 5.11 | ||||
| 2 | Holy Moses | 5.11c | ||||
| 3 | Light Years | 5.12a | ||||
| 4 | Hail Mary | 5.11d | ||||
| 5 | Godsend | 5.11d | ||||
| 6 | Race with the Devil | 5.10d | ||||
1.6. Smoke Rock 7 routes in Cliff
- Summary:
-
All Rock climbing
| Route | Grade | Style | Selected ascents | |||
|---|---|---|---|---|---|---|
| 1 | Unnamed 1 | 5.11+ | ||||
| 2 | Unnamed 2 | 5.11+ | ||||
| 3 | ★ Unnamed 3 | 5.7 | ||||
| 4 | ★★ Unnamed 4 | 5.10 | ||||
| 5 | Unnamed 5 | 5.11a | ||||
| 6 | Unnamed 6 | 5.10c | ||||
| 7 | Unnamed 7 | 5.11b | ||||
1.7. Ninety-Foot Wall 20 routes in Cliff
- Summary:
-
Mostly Top roping
Lat / Long: 38.950611, -120.116518
| Route | Grade | Style | Selected ascents | |||
|---|---|---|---|---|---|---|
| 1 | ★ Shunman the Human | 5.7 | 66ft | |||
| 2 | ★ Rentier | 5.7 | ||||
| 3 | ★ Lost in Space | 5.11a | ||||
| 4 | ★ Strontium 90 | 5.8 | ||||
| 5 | Bastille | 5.11b | ||||
| 6 | ★★ Relativity | 5.10b | ||||
| 7 | Casual Observer | 5.2 | ||||
| 8 | ★★ Alias Emil Bart | 5.10c | ||||
| 9 | ★★ Rip-off | 5.10 | ||||
| 10 | Never Ending Story | 5.11 | ||||
| 11 | ★★ Fallout | 5.9 | ||||
| 12 | Bachar's Line | 5.11 | ||||
| 13 | ★ Holdless Horror | 5.6 | 400ft | |||
| 14 | ★★ Vintage 95 | 5.9 | ||||
| 15 | ★★ Lightning Bolt | 5.10b | ||||
| 16 | ★★ Ice Nine | 5.10a | ||||
| 17 | Polar Circus | 5.11b | ||||
| 18 | ★★ Ti-si-ack | 5.10d | ||||
| 19 | Dave's Run | 5.11b | ||||
| 20 | ★★ One More for the Road | 5.10d | ||||
1.8. The Stomach 2 routes in Cliff
- Summary:
-
All Rock climbing
Lat / Long: 38.952668, -120.117922
| Route | Grade | Style | Selected ascents | |||
|---|---|---|---|---|---|---|
| 1 | Stomache Ache | 5.9 | ||||
| 2 | Regular Route | 5.11 | ||||
1.9. Venturi Wall 2 routes in Cliff
- Summary:
-
All Rock climbing
| Route | Grade | Style | Selected ascents | |||
|---|---|---|---|---|---|---|
| 1 | Venturi | 5.9 | ||||
| 2 | High Velocity | 5.11c | ||||
1.10. Emerald Point 6 routes in Cliff
- Summary:
-
Rock climbing, Aid climbing and Trad climbing
Lat / Long: 38.957917, -120.123629
1.10.1. Lower Section Routes 4 routes in Sector
- Summary:
-
Rock climbing and Trad climbing
Lat / Long: 38.955211, -120.122970
| Route | Grade | Style | Selected ascents | |||
|---|---|---|---|---|---|---|
| 1 | White Wall | 5.8 | ||||
| 2 | Diversions | 5.8 | ||||
| 3 | ★★★ All American Finger Crack | 5.9 | 180ft, 2 | |||
| 4 | Section 20 | 5.7 | ||||
1.10.2. The Plectrum 2 routes in Sector
- Summary:
-
All Aid climbing
| Route | Grade | Style | Selected ascents | |||
|---|---|---|---|---|---|---|
| 1 | East Face | A1 | ||||
| 2 | West Face | 5.6 A1 | ||||
1.11. Crag Peak 5 routes in Crag
- Summary:
-
Trad climbing and Aid climbing
Lat / Long: 38.978350, -120.152389
| Route | Grade | Style | Selected ascents | |||
|---|---|---|---|---|---|---|
| 1 | Black Abyss | 5.8 | ||||
| 2 | Ivory Book | 5.9 | ||||
| 3 | Ivory Book Variation | 5.7 A1 | ||||
| 4 | Poop-out Pinnacle | 5.7 | ||||
| 5 | Coney Corner | 5.8 | ||||
1.12. Indian Rock 6 routes in Crag
- Summary:
-
Mostly Trad climbing
Lat / Long: 38.868719, -120.076303
| Route | Grade | Style | Selected ascents | |||
|---|---|---|---|---|---|---|
| 1 | White Lightning | 5.9 | ||||
| 2 | Doolagoga Dihedral | 5.7 | ||||
| 3 | Orange Marmalade | 5.10b | ||||
| 4 | Rare Gem | 5.10b | ||||
| 5 | Indirect Route | 5.10b A3 | ||||
| 6 | Indian Head | 5.9 | ||||