Showing all 25 routes.
| Grade | Route | Gear style | Popularity | ||
|---|---|---|---|---|---|
| South Africa Limpopo Blouberg North Wall Wall Of White Light | |||||
| 20 A2 | ★★ You Only Live Twice (The Original Route)
1
12
30m
2
17 A1
30m
3
17 A1
-
4
19 A1
5
17
6
15 A1
7
20 A1
8
17 A2
9
20
10
19 A1
11
15 A2
12
19 A2
13
19 A1
FA: Eckhard Druschke & Dave Cheesmond, 1979 | 60m, 13 | |||
| South Africa Northwest Province Magaliesberg Kranskloof | |||||
| 14 A1 | The Rock Mechanic And The Artist
1
A1
30m
2
14
25m
From the meeting spot, walk about 100m upstream until a break in the pipe is reached, just below 'Zimbabwe Face'. 20m above this, on the true right, there is a steep gully up which one can scramble to reach the top. Just upstream of this again, there is a small amphitheatre, with a small cave at ground level. Scramble up 10m to the start of the open slabs. In the corner on the right, there is a continuously overhanging corner. Left of the corner, there is a slightly on-angle slab, with two steps of roofs. The route takes the obvious crack line through these roofs.
Notes:
FA: D. Morgan & M. Pretorius, 1998 | 55m, 2 | |||
| 19 A2 | ★★★ Asterisk
1
19 A2
35m
2
15
25m
On the opposite side of the kloof to the 'Punchline' buttress is a smooth pink slightly overhanging face, which faces downstream. The climb goes up the crack line in this face. Scramble 5m up to a large ledge with a deep chimney at the back of it.
FA: P. Fatti & D. Peters, 1981 | 60m, 2 | |||
| South Africa Northwest Province Magaliesberg Mhlabatini True Right | |||||
| 17 A0 | ★ Indoctrination
1
17 A0
22m
2
15
30m
3
10
20m
The climb starts on the opposite side of the huge boulder marking the start of THE LESSON. It is on the true right hand side of the kloof, at the same level as KLOOF DESCENT.
FA: L.P. Fatti & R.H. Smithers, 1977 | 72m | |||
| South Africa Kwa-Zulu Natal Monteseel Western Buttress Near Western Buttress Pieces of the Sky to Angel Dust Wall | |||||
| A3 | Rampant
An aid route that takes an unobvious line through the large, blocky overhangs. It is doubtful whether this route has had a second ascent. Start five metres to the right of Gates of Delirium. Break through several routes, taking a fairly direct line to the top. FA: Tony Dick & Roger Fuggle, 1973 | ||||
| South Africa Kwa-Zulu Natal Monteseel Western Buttress Far Western Buttress The Utopia Area | |||||
| 15 A2 | ★ Cardiac Arrest
1
15
2
A2
3
13
FA: Mike Roberts, Roy Gooden & Rodney Owen, 1976 | 3 | |||
| South Africa Free State Swinburne The Lower Road Boulders Kite Boulder | |||||
| A1 | Kite Rescue (Midnight Mission)
FA: Dylan Morgan, 2000 | ||||
| South Africa Western Cape Cape Town Lion's Head Granite | |||||
| 19 A1 PROT:R | ★★ Blue Max
or 25 R free FA: C. Lomax FFA: A. deKlerk, 1984 | 1 | |||
| Morocco Haut Atlas Gorges du Todgha Main Gorge Pilier Du Couchant | |||||
| 6c+ A2 | Trepia Vertical | 290m | |||
| Morocco Haut Atlas Gorges du Todgha Upper Tier Elephant | |||||
| {AU} FR:6c+ AID:A1 | Unknown 6 | ||||
| {AU} FR:6c+ AID:A2 | Unknown 7 | ||||
| Morocco Haut Atlas Taraxa | |||||
| Alfonso's roof
Insane roof cracks... FA: Alfonso Usobiaga | |||||
| Kenya Mt Kenya Point John | |||||
| {UIAA} A3 | South West Face
| ||||
| {UIAA} 5 A4 | West Face
| ||||
| {UIAA} 6 A2 | North West Arete
| ||||
| {UIAA} 5 A4 | North Face
| ||||
| Kenya Mt Kenya Midget Peak | |||||
| {UIAA} 5 A2 | West Face
| ||||
| {UIAA} 5 A1 | Nek Line
| ||||
| Kenya Mt Kenya Point Peter | |||||
| {UIAA} 6 A1 | Window Ridge
| ||||
| {UIAA} 5 A1 | West Ridge
| ||||
| Madagascar Tsaranoro Massif Mitsonjoarivo | |||||
| 7a+ A3 | Tremblements hilarants
1
7a+ A0
43m
2
6b+
42m
3
6a+
42m
4
6c A3
58m
Pitches info:
Route diagram: FA: Martin Froidevaux, Guilarme Maric & Mater Fresard, 2005 | 190m, 4 | |||
| Madagascar Tsaranoro Massif Tsaranoro Tsaranoro Nord | |||||
| 6a A3+ | The Zoze | 450m, 7 | |||
| Madagascar Tsaranoro Massif Karambony | |||||
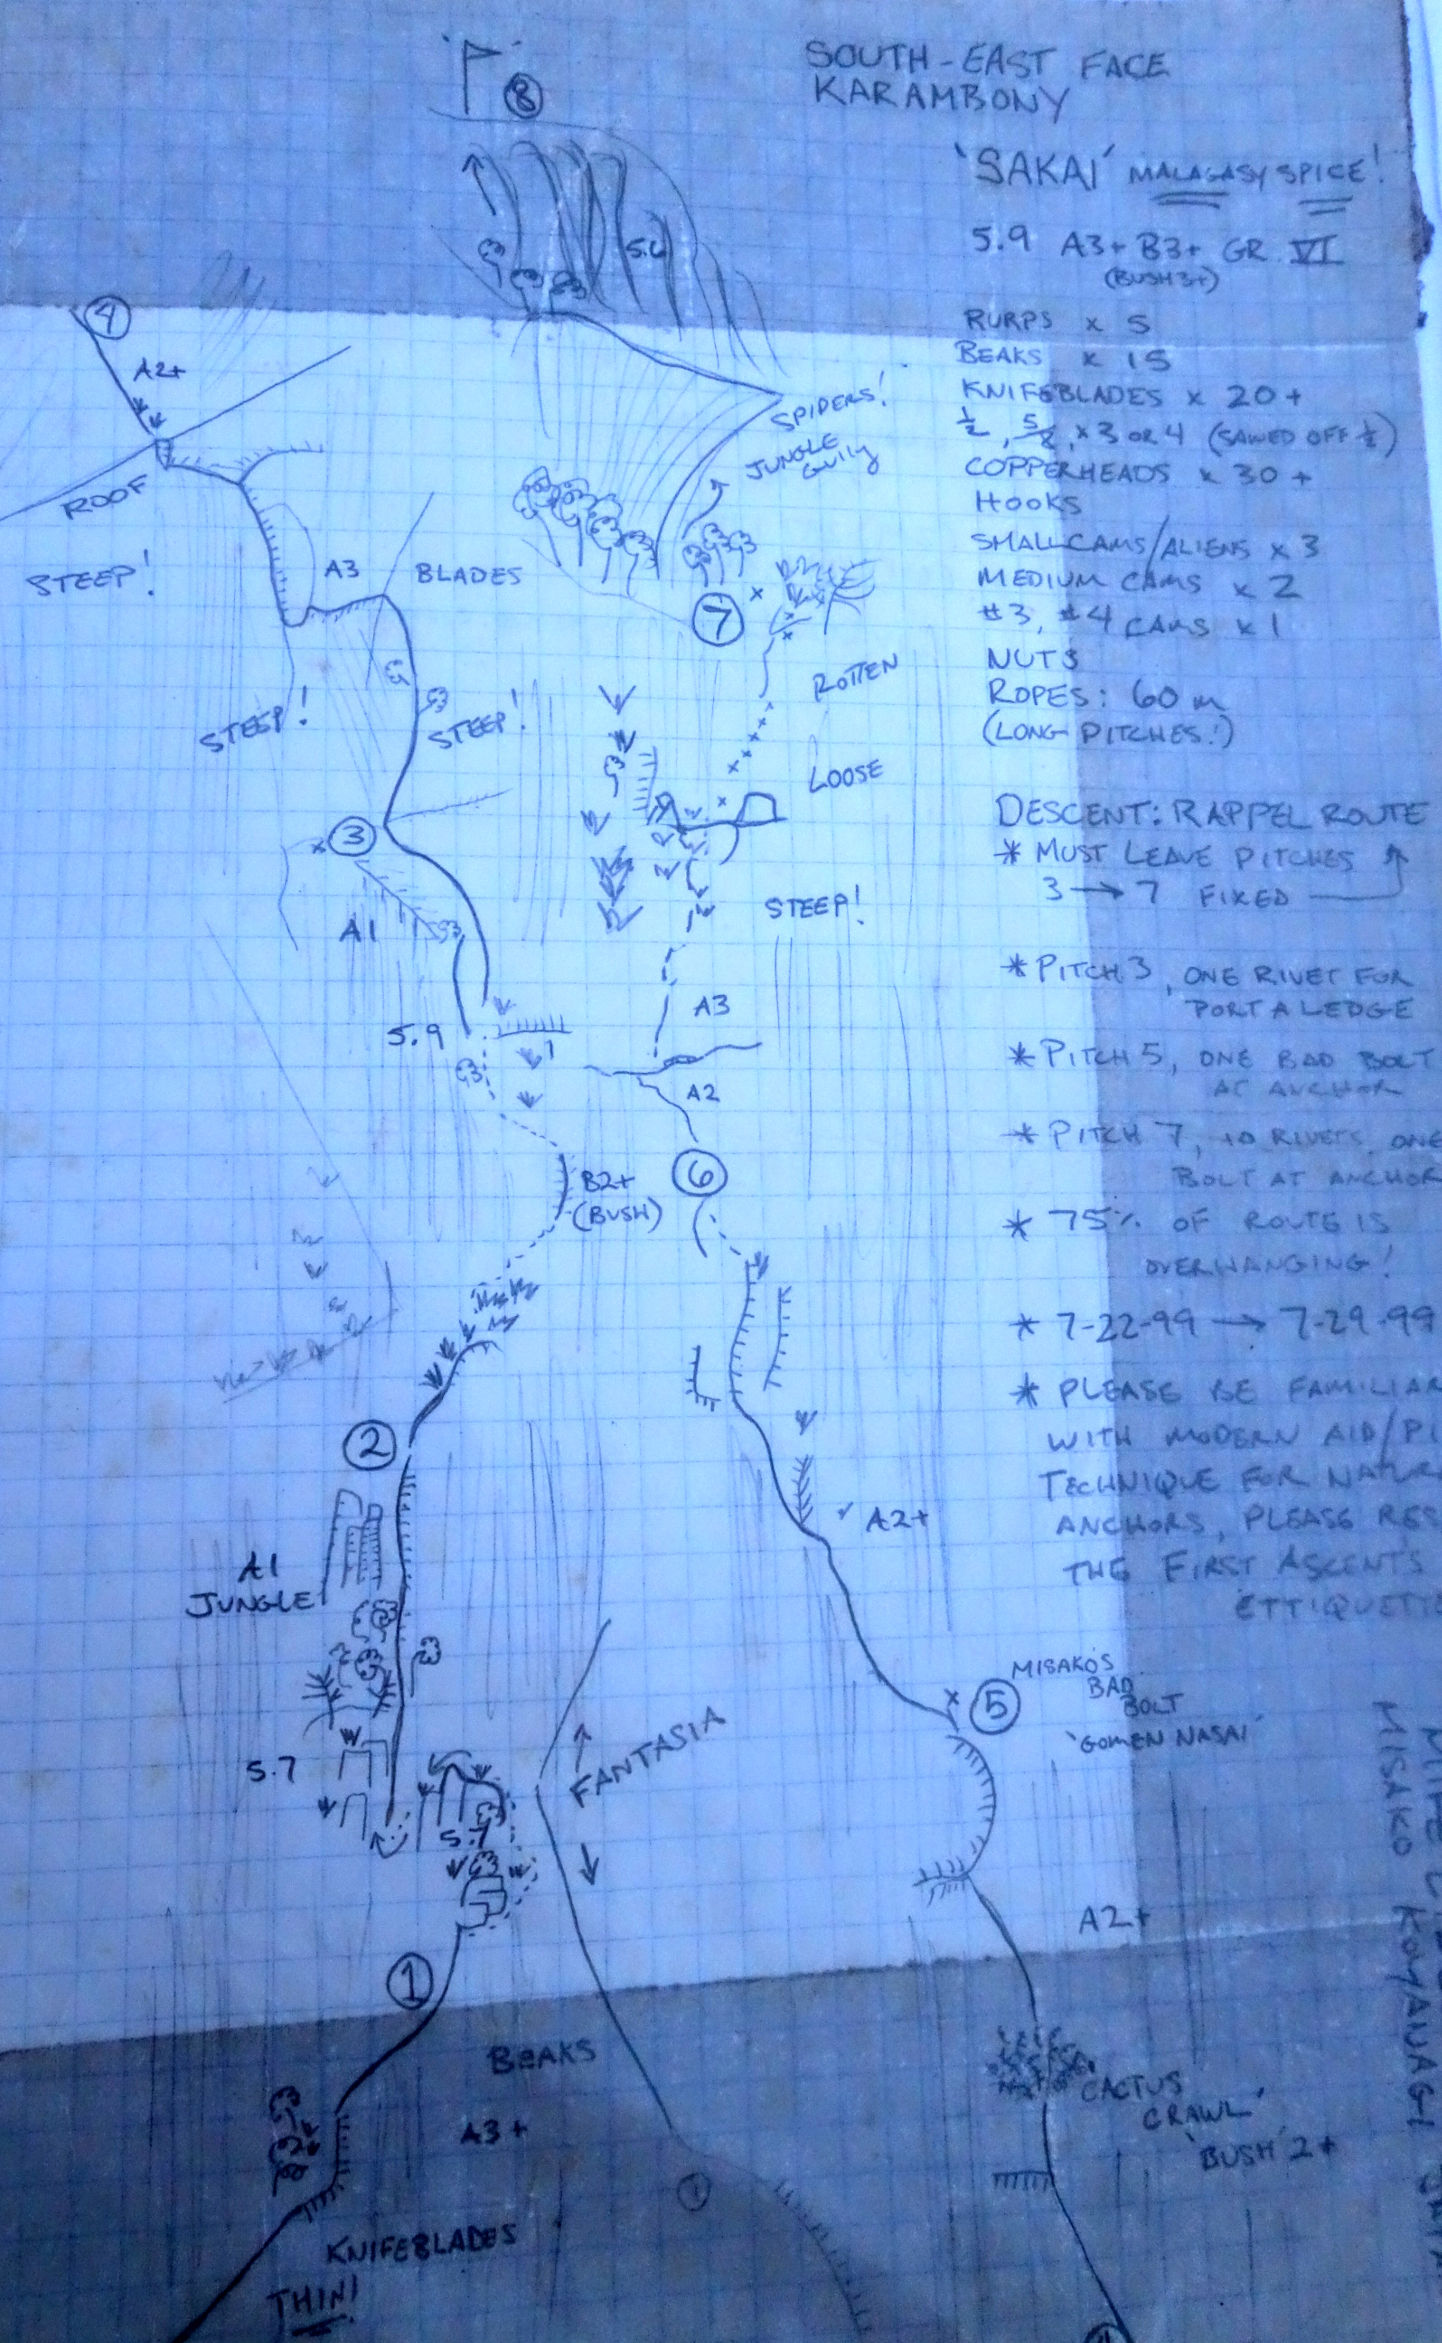
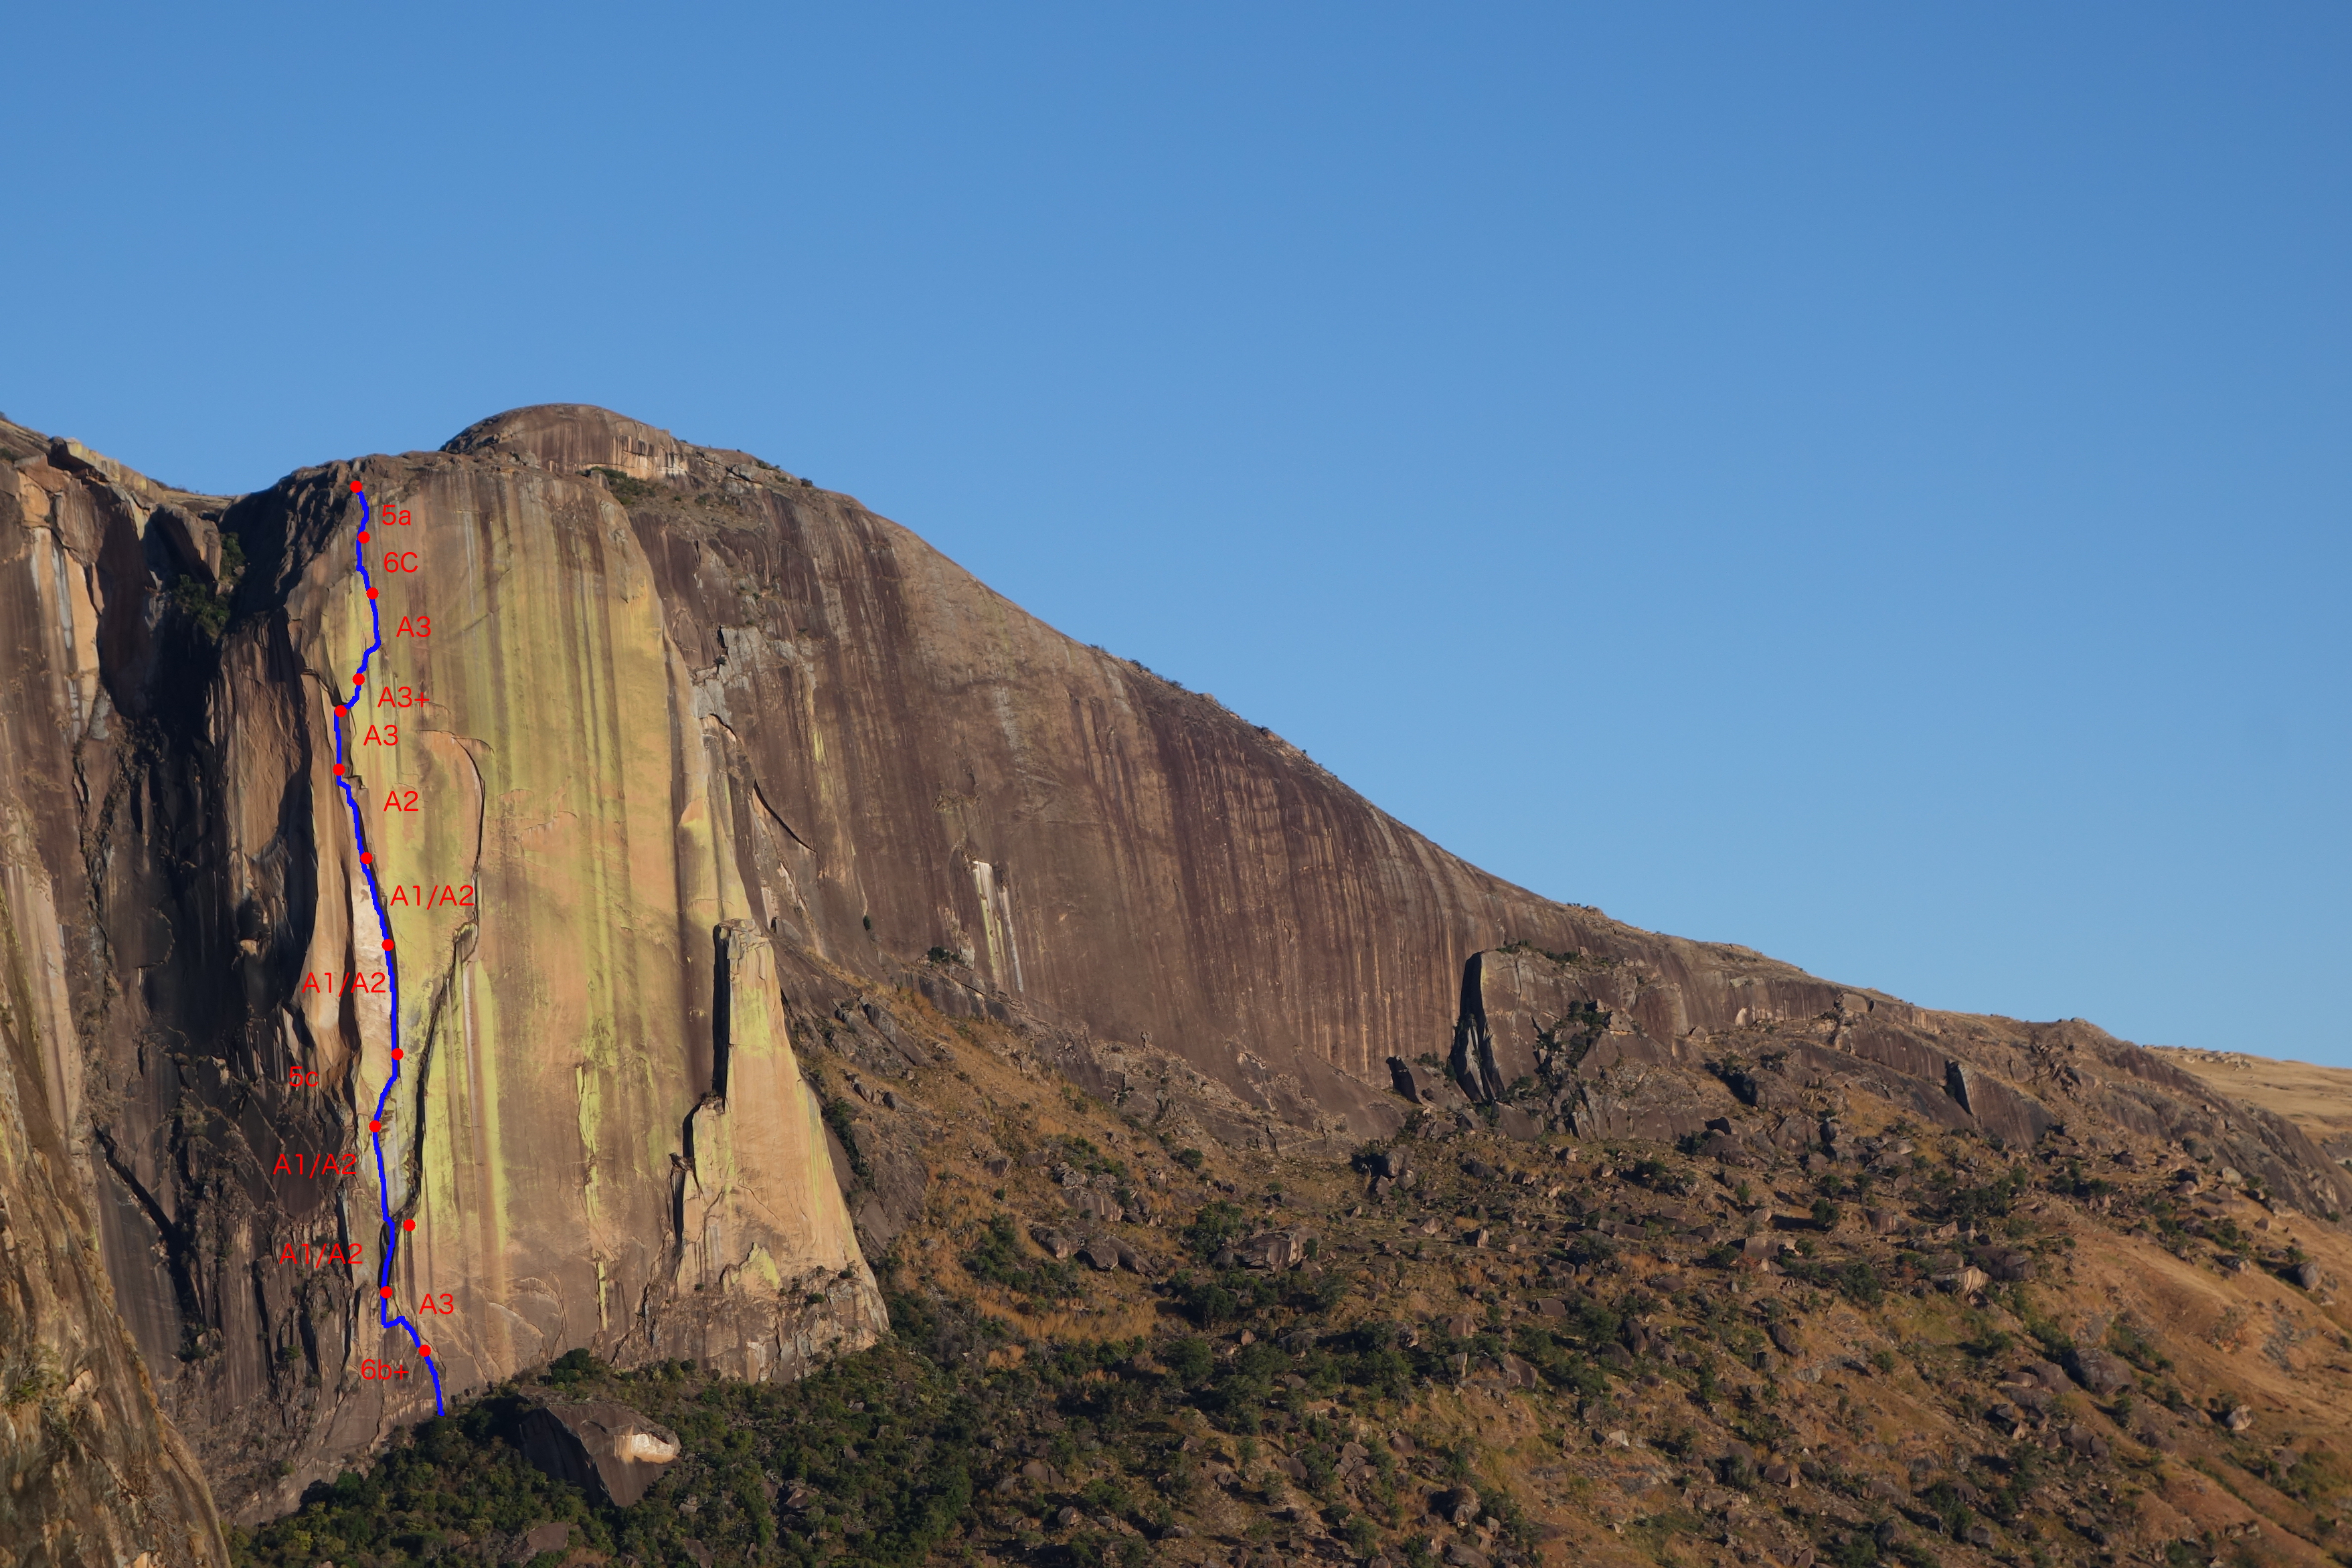
| 5c A3+ | Sakai
Climbing notes: 75% of the route is overhanging! Abseil notes: Abseil via route. Must leave pitches 3 -> 7 fixed. Walk down the small Karambony corridor. Recommended equipment:
Route diagram: Set: Mike Libecki, Jim Haden & Misako Koyanagi, 1999 | 450m, 8 | |||
| 6c A3 | Fantasia
Abseil notes: Abseil via route or hike down the Karambony trail. Read more about abseiling on CampCatta page (link below). Recommended equipment: Read more about it on CampCatta page (link below). Route diagram: Set: Michel Piola, Benoit Robert, Manlio Motto & Emanuele Pellizzari, 1998 | 450m, 13 | |||
| A3 | Bijou | 190m | |||
")
Showing all 25 routes.