A Crag Guide gives an extensive view of all sub areas and climbs at a point in the index. It shows a snapshot of the index heirachy, up to 300 climbs (or areas) on a single web page. It shows selected comments climbers have made on a recently submitted ascent.
At a minor crag level this should be suitable for printing and taking with you on a climbing trip as an adjunct to your guidebook.
This guide was generated anonymously. Login to show your logged ascents against each route.
Warning
Rock climbing is extremely dangerous and can result in serious injury or death. Users acting on any information directly or indirectly available from this site do so at their own risk.
This guide is compiled from a community of users and is presented without verification that the information is accurate or complete and is subject to system errors. By using this guide you acknowledge that the material described in this document is extremely dangerous, and that the content may be misleading or wrong. In particular there may be misdescriptions of routes, incorrectly drawn topo lines, incorrect difficulty ratings or incorrect or missing protection ratings. This includes both errors from the content and system errors.
Nobody has checked this particlular guide so you cannot rely on it's accuracy like you would a store bought guide.
You should not depend on any information gleaned from this guide for your personal safety.
You must keep this warning with the guide. For more information refer to our:
Usage policy
Contributors
Thanks to the following people who have contributed to this crag guide:
Campbell Gome
benwiessner
Brendan Heywood
Mark Wood
Nick McKinnon
Dick Lodge
Adam Bramwell
Philip Armstrong
Sam Thompson
Simon Dale
The size of a person's name reflects their Crag Karma, which is their level of contribution. You can help contribute to your local crag by adding descriptions, photos, topos and more.
Some content has been provided under license from: © Australian Climbing Association Queensland (Creative Commons, Attribution, Share-Alike 2.5 AU)
Table of contents
- 1.
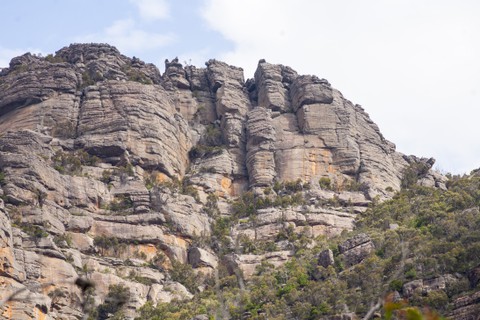
Asses Ears
80 in Crag
- 1.1. Main Face 52 in Cliff
- 1.2. Summit Track Wall 2 in Cliff
- 1.3. Dead Ahead Cliff 3 in Cliff
- 1.4. Schroeders Cliff 13 in Cliff
- 1.5. Top of the Range Wall 1 in Cliff
- 1.6. Range Wall 3 in Cliff
- 1.7. Southern Face 6 in Cliff
- 2. Index by grade
1. Asses Ears 80 routes in Crag
- Summary:
-
Mostly Trad climbing
Lat / Long: -37.093099, 142.329293
Find out about and observe access restrictions and agreements.
Use existing access tracks to minimise erosion - keep to hard ground & rock surfaces.
Do not disturb nesting birds or other wildlife.
Protect all native vegetation, especially at the base of cliffs. Wire brushing to remove mosses and 'gardening' in cracks and gullies is not permitted. Use slings to protect trees while belaying or abseiling if belay anchors are not provided.
Respect sites of geological, cultural, or other scientific interest. Do NOT develop new climbs in or near Cultural Heritage sites.
Chalk has high visual impact - minimise your use of it. Parks Victoria have requested the use of coloured chalk in Gariwerd.
Minimise the placement of fixed equipment, especially where Trad gear is available. Respect any "no bolting" areas.
Do not leave any rubbish - take it home with you.
Dispose of human waste in a sanitary manner (bury, or even better pack it out). Do not pollute water supplies.
Off-road driving is illegal in Gariwerd.
Keep campsites clean, and do not light campfires outside of official metal fire pits.
access issues
Part of the "NV4" SPA (Natural Values), which is a designation for the "potential release" of the Brush Tailed Rock Wallaby, although there are no immediate plans to do this. The area was investigated as a list of "potential sites" in a report to PV in 2012.
approach
There is still an old 4WD trail that somehow goes 2/3 the way up the mountain.
ethic
Grampians / Gariwerd access issues have emerged (2019) due to potential risk to the environment and cultural sites. Climbers need to be aware that there are significant Aboriginal sites in the Grampians, especially in cave areas. Please take time to understand the access situation. Leave no trace and climb responsibly.
Please note that due to the fact that the Grampians is a National Park, dogs and other pets are not allowed in the park except in vehicles on sealed roads and in sealed car parks.
===Cliffcare Climber’s Code===
For more detailed information visit https://www.cliffcare.org.au/education
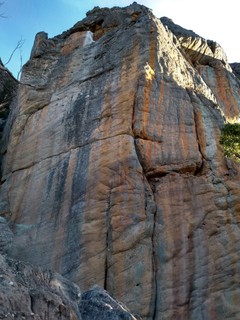
1.1. Main Face 52 routes in Cliff
- Summary:
-
Mostly Trad climbing
Lat / Long: -37.092900, 142.330800
| Route | Grade | Style | Selected ascents | |||||
|---|---|---|---|---|---|---|---|---|
|
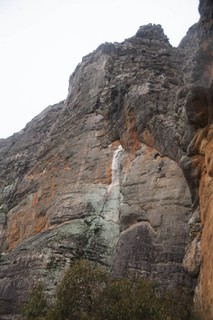
The first routes are located on a high terrace, left and above Triptych. Scramble up left from that route through a series of short rock steps, staying away from the main wall about 30m. On the left end of this wall is a fantastic lookout ledge with a nasty drop beneath. | ||||||||
| 2 |
★★ Golden Delicious
An exposed face route up the left edge of the orange wall that rarely gets an ascent. Start at left end of the wall, just left of the bolted route Valencia. Follow the line of discontinuous cracks and breaks keeping to the left side of the wall until the angle eases towards the top. Set: Steve Monks & Louise Shepherd, 1989 | 23 | 30m | |||||
| 3 |
★★ Valencia
Start as for Golden 'Delicious' then traverse directly right to camo FH (stickclip recommended). Fingery moves (BR) lead to thin crux and horizontal. Through small bulge and up on spaced holds to small ledge and U-bolt anchor. Takes plenty of medium wires. A loose second pitch is possible up 20m grade 15 wall above. FA: Neil Monteith, 2001 | 23 | 17m, 2 | |||||
| 4 |
★ Harvey Wallbanger
Starts about 6m right of Golden 'Delicious'. A bouldery thin start past a BR gains a short rounded crack. From above this the climbing eases and heads slightly left to finish at U-bolt anchor (as for Valencia). FA: Neil Monteith & Marcel Geelen, 2001 | 22 | 16m, 1 | |||||
| 5 |
Cox's Orange
An audacious arete about 10m right of Valencia. Climb the gully to gain the arete from the left side. Head up and rightwards to gain the arete proper and follow it with dramatic positions and only occasional trad runners. Set: Steve Monks & Jane Wilkinson, 1989 | 19 | 40m | |||||
| 6 |
Steph And The Boys
Strenuous jamming. The crack in the centre of the orange wall to the right of the prominant prow (Cox's Orange?). 1. 18m The crack to the large ledge. 2. 14m Up the wall and through the roof to belay the bird poo. 3. 14m To exit, step down and traverse rightwards down and across the wall to the rock in the gully. Set: John Pawson & Wayne Maher (alt), 1983 | 19 | 46m, 3 | |||||
|
THE PIT - A very obscure area! This totally shady chamber is hidden away in a ravine halfway up the Descent Chasm. The rock is coarse grained and heavily featured with a similar feel to the Blue Mountains. ACCESS - Chimney up the Descent Chasm to behind Triptych Pinnacle. Keep climbing up the chasm to the first ‘room’ which is just past the first vertical section. On the left a big chockstone blocks the entrance to The Pit. Scramble either under or around this chockstone (you should be able to see the bolts now) and chimney down past two other chockstones to the base of the routes. Alt access by roped scrambling up the gully just to the left of Cox’s Orange. | ||||||||
| 8 |
★★ Can't Stop Progress
The prominent slightly overhung arête in an exposed position. Sustained and absorbing climbing with some spaced bolts up high. Six rings and one optional large wire. Lower-off anchors. FA: Neil Monteith Kent Paterson, 2004 | 21 | 18m, 6 | |||||
| 9 |
★ Pinch and a Punch
Line up heavily featured wall 2m right of Can't Stop Progress. Climb into the route from the right (trad) and onto the face (RB). Weave up the slightly overhung wall above which gets harder and steeper near the finish. The end moves feature some great pinch ribs and large pockets. Five RB's in all. Lower-off same anchor as CSP. FA: Neil Monteith Kent Paterson, 2004 | 20 | 18m | |||||
 |
||||||||
| Route | Grade | Style | Selected ascents | |||||
|
MAIN FACE - The next routes are on the main face that the approach track reaches. Routes listed from left to right. On the left side of the cliff is the landmark fingercrack Triptych. | ||||||||
| 11 |
★★ Bush Comes To Shove
Reachy. A hidden gem on steep pocketed grey rock. Located aprox 50m around left of Old Masters on the right wall of a chimney. The climb is hidden from view behind some trees. Scramble up 5m mossy gully to chimney and spot FH's on right wall. Reachy moves on tendon and finger friendly rock and some of the biggest bomber jugs lead to the top. Three FH's and wires. Double bolt lower-off. FA: Neil Monteith Kent Paterson James Pfrunder, 2004 | 20 | 15m, 3 | |||||
| 12 |
★★ Old Masters
This searing cracked arete is the best line at Asses Ear. Unfortunately hard trad routes are remarkably unfashionable and this has had minimal if any repeats. Start as for Triptych but instead of bailing off right at 15m keep climbing the crack direct. The crack fades and difficulty escalates at the top. FA: Steve Monks & Louise Shepherd, 1989 | 28 | 27m | |||||
| 13 |
★★★ Triptych
Death by fingercrack. This is a love it or hate it route depending on how much you enjoy jamming your fingers into slippery splitters. At the left end of the main cliff is this splitter crack. 1. 12m (22) Up tough finger crack until you can hand traverse 5m right to stance below next crack. Belay here or link into next pitch. 2. 11m (22) Short fingercrack then right and up to belay stance. 3. 27m (18) Fantastic easy fingercrack in a great position. FFA: Mike Stone, Dave Gairns & Chris Baxter (var), 1980 | 22 | 50m, 3 | |||||
| 14 |
★★ New Materialism
Takes the wall in between Triptych and PR with 2 FH. After the thin start, easier climbing leads to steep slab. Straight over juggy roof and instead of finishing up easy corner, veer R over the roof and up compact headwall. Gear to size 2 Camelot. FA: Goshen Watts & Dick Lodge, 26 May 2017 | 22 | 45m, 2 | |||||
| 15 |
★ Picture Rail
An impressive roof on the second pitch. 1. 30m Start as for Roger Over and Out and continue up the wall to belay below a shallow, open-book corner capped by a roof. 2. 30m Up with difficulty into the corner, which is followed to the roof. Hand traverse right along the picture rail to finish up a crack. FA: Keith Lockwood & Steve Monks (alt), 1988 | 20 | 60m, 2 | |||||
| 16 |
Roger Over And Out
A fun juggy ramble sharing the same start as Picture Rail. 1. 45m Follow the right trending ramp flake to belay on the arete below the roof. 2. 5m Bail off right into the gully and exit up over the chockstones into the descent route. FFA: Wayne Maher & Rodger Palmer, 1980 | 8 | 50m, 2 | |||||
| 17 |
Brighton Beach
Chossy for a Grampians route. New South Wales climbers would call it classic. Starts 15m right of Rodger Over and Out on the vague arete opposite The Infinite Sadness. Weave your way through line of least resistance, taking care not to remove all the holds. FA: Chris Shepherd & Nez Watters, 1999 | 14 | 35m | |||||
| 18 |
Don Keyote
Loose and scary. Still on the Triptych pinnacle, starting 4m right of Brighton Beach on the wall opposite Wirilda on the left side of the descent chasm. Up to threaded keyhole at 8m then crack and corner system Set: Greg Aimer & Christina Freestone, 1993 | 16 | 40m | |||||
|
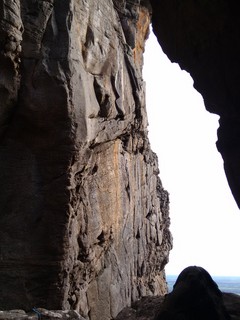
The large and foreboding Descent Chasm splits the cliff at this point. Routes on either side of it are shady for most of the day. The lower part of this chasm is a hairy chimney, which guards the entrance to the Golden Chamber. | ||||||||
| 20 |
Light Flight
Anyone for a free ascent? The vertical crack below the start of Cold Stone & Sober and halfway down the lower section of the Descent Chasm. Free up to thin crack in the small roof, aid this, then finish up left of the chockstone capping roof. FA: Wayne Maher & Phillip Coleman, 1980 | 17 M3 | 23m | |||||
 |
||||||||
| Route | Grade | Style | Selected ascents | |||||
| 21 |
★ Cold Stone & Sober
A quality first pitch hidden away. Starts from the right end of the ledge above the first section of chimney of the Descent Chasm (right of Steph and the Boys). 1. 20m (17) Up the series of weaknesses on the grey wall for 5m then traverse right until the difficulty eases. Continue up to belay on top of a small corner, as for Melancholia and Wirilda. 2. 45m (11) Left and up the twin chimneys (as for Melancholia pitch 2). FA: Wayne Maher & Craig Peacock, 1980 | 17 | 65m, 2 | |||||
| 22 |
★★ Above the cold stone void
Starts up Cold Stone & Sober, but head straight up over rooflet, then back left via an funky and intimidating mantle. Straight up easier finish, which is more solid than it appears. Up to double rings on L to rap back into chasm. FA: Goshen Watts & Chris Leidy, 15 Sep 2015 | 20 | 25m | |||||
| 23 | ★★ Cold Stone & Sober-Wirilda-The Infinite | 18 | 48m | |||||
|
Back on ground level - the following routes finish at the top of the cliff. Descent notes: The walk down through the chasm is a 'must do'; but there is now also a rap chain located at the far Eastern end of the final terrace. A full 60m abseil with stretch will get you to the very bottom of Wirilda, or just 20m to the large ledge, where some rings over the higher ledge will land you in the chasm (another 25m). | ||||||||
| 25 |
★★ Strong Signal
Features good climbing on exceptional rock. Plenty of good gear; take small wires to a number 3 cam, and double ropes might help. Up Wirilda for about 8m, clip bolt and head up leaning arete, which gets rather close to the Triptych buttress (avoid bridging), make a move back right to gain the diagonal line which is followed easily. When the holds seem to run out, a couple of small wires protects some tricky moves left to gain layback crack (and small/med cam). Straight through final overlap and up to belay on small bushy ledge (slings). Finish up P2 of Wirilda, or do a short pitch up to large ledge and rap rings (lands you in descent chasm). FA: Goshen Watts & Aiden Beer, 28 Aug 2016 | 23 | 45m, 1 | |||||
| 26 |
★★★ Wirilda
This classic short mutl-pitch is the most popular route at the crag. A great mix of gritty jugs and exposure. Take a bunch of slings for lassoing the jugs on pitch 1. Starts about 30m right of Triptych, at ground level on the right side of the Descent Chasm at a juggy grey rounded arete. 1. 35m (18) Up for 10m, step right then back left to surmount a smooth bulge. Up keeping to the left. Finish via a crack in the smooth wall just right and below a bush on the belay ledge. 2. 35m (19) Up ramp right to BR. Traverse 3m right to arete and up ramp diagonally left (as for Infinite Sadness). At top of ramp, step left to hanging prow which is followed direct to the top. Stay on steepest part of headwall for best climbing and pro. FA: Pitch 1 - Keith Lockwood & Norm Booth, 1989 FFA: Pitch 2 - Keith Lockwood, 1996 | 19 | 70m, 2, 1 | |||||
| 27 |
★★★ The Infinite Kindness
Excellent sustained climbing - a technical crux followed by slope after slope. Starts as for Infinite Sadness, moving left into left leaning seam. Follow seam to bulge, snatch what rest you can then up past 2 FHs until wall relents. Easily to rap chains below juggy overhang. FA: Chris Shepherd, Tim Marsh & Megan Osborne, 1999 | 25 | 26m, 2 | |||||
| 28 |
★★ The Infinite Madness
An easier finish to Infinite Kindness. Climb that route into left leaning seam and up to bulge. Traverse 2m right then up to jugs and rest. Take a deep breath, arrange some pro then up through slopers until the wall relents. Rap off shared rap chain. FA: Chris Shepherd & Tim Marsh, 1999 | 23 | 26m | |||||
| 29 |
★★ The Infinite Sadness
Takes a direct line through the roofs and orange rock at the top of the cliff. Start 10m right of Wirilda at a thin seam at the right hand fin of rock. 1. 30m (22) Follow the rightward rising line past a horn of rock. Step right at the steepening to jugs. Up to belay on stance at the right hand end of roof. 2. 25m (16) Through the roof at right hand end then the wall trending right to belay on the traverse of Melancholia. 3. 30m (18) Up the wall to the left leading ramp at the edge of the orange rock. The ramp then back right to the corner and up until beneath the roof. Outrageous climbing through the left hand end of the roof with exposure and holds to match. FA: Wade Stevens (pitch 1), Tim Day (pitches 2 & 3), 1996 | 22 | 85m, 3 | |||||
| 30 |
Composto
Very lichenouos, plenty of loose rock and suspect holds. Get up early to avoid the queues. Starts 5m right of The Infinite Sadness at juggy groove. Up the groove following the weakness all the way to belay on the Melancholia traverse. FA: Tim Day & Ylva Wakefield, 1996 | 17 | 50m | |||||
| 31 |
★ Melancholia Direct
Makes Melancholia independent of Bullfrog. Climb arete left of Bullfrog's corner, moving onto wall left of arete as soon as possible. Up delightful juggy grey wall to belay at left end of roof. FA: Keith Lockwood, Chris Abernethy, Shaun Casey, Brendon Abernethy & Peter Canning., 1998 | 12 | 30m | |||||
| 32 |
★ Melancholia
A popular easy route, but be warned the protection is spaced on the first pitch. Start on top of a boulder at the landmark corner at the top of the approach track. 1. 30m (11) Up the corner then up and left to belay under the left end of the roof. This is same as pitch 1 of Bullfrog. 2. 30m Up and across diagonally left around arete. Traverse left on exposed jugs until below a small mossy corner. 3. 50m Up corner then across large ledge. Left to twin chimneys and up these to top. FA: Wayne Maher & Phillip Coleman, 1980 | 12 | 110m, 3 | |||||
| 33 |
★★ Bullfrog
The original route on the cliff. A classic corner. The final pitch is like an extended Resignation.
FFA: Keith Lockwood & Athol Fraser (var.), 1977 | 14 | 100m, 3 | |||||
| 34 |
★★ Don't Croak
The top pitch up the overhanging headwall is one of the best around. 1. 30m Up the nice arete immediately right of Bullfrog. 2. 20m Step right then up through the overhang and up the wall to good ledge. 3. 50m Straight up. A short crack, overhanging jugs, bulge then the seam split in the centre of the smooth grey headwall. Continue more easily. FA: Norm Booth, Keith Lockwood & Sharon Kinnison (alt), 1993 | 15 | 100m, 3 | |||||
| 35 |
★ Pearly Gates
Another top quality headwall on the final pitch. Start about 15m right of Bullfrog and 7m right of a deep cleft a the first pine tree beside the cliff. 1. 40m Up to a small rock pedestal then thinly up to jugs. Continue up the vertical wall until the angle eases then up to belay in the niche at the base of the prominent crack (the second belay of Flying Feeling). 2. 40m Up the crack (Flying Feeling) for 3m then take the rising traverse out right to the vertical crack. Up this to the pale grey horizontal bulge. Move right and up steeply. The drama continues until a good belay ledge appears 3m to the left. 3. 20m Move back right and up prominent patch of white rock to corner which leads to the top. FFA: Louise Shepherd & Keith Lockwood, 1993 | 18 | 100m, 3 | |||||
| 36 |
The Unknown Americans Route
The awesome upper headwall between Pearly Gates and La Petite Mort. First ascent was by three unknown Americans who thought they were on La Petite Mort. Grade is a rough guess and protection looks rare. FFA: Unknown Americans, 1993 | 20 | 40m | |||||
| 37 |
Flying Feeling
A great third pitch. Bold and a little dirty. Starts 10m right of Pearly Gates at a casurnia tree growing against the cliff in the centre of the wall. 1. 40m Climb the tree (!), traverse right 4m then up the crack and face to belay at a tree. 2. 30m Traverse 20m left, ascending slowly to the base of a prominent crack. 3. 30m Climb the crack until holds forces a traverse left for about 10m. Climb the easiest section in the juggy wall above below two horns of rock. FFA: Phillip Coleman & Wayne Maher, 1980 | 16 | 100m, 3 | |||||
 |
||||||||
| Route | Grade | Style | Selected ascents | |||||
| 38 |
★★ La Petite Mort
Amazing wall climbing on the second pitch. Bring slings and a full rack. 1. 40m (16) Start up Flying Feeling and move further right (8m in total) to the next crack. Up crack and prow then left and up past tree to base of mighty headwall. 2. 40m (19) Blast straight up the outstanding overhung headwall finishing just right of vague prow. Gear is spaced on this pitch. FFA: Keith Lockwood, Steve Monks (alt) & Jane Wilkinson, 1988 | 19 | 80m, 2 | |||||
| 39 |
La Petite Mort - Big 0 Start
A tree-free start that evens out the pitches on this classic route. Start on top of the highest flake right of the original start. Surmount the overhang (crux), step right then face directly to join crack and first belay of La Petit Mort. FFA: Dayle Gilliatt & Anthony Pattison, 1997 | 19 | 40m | |||||
| 40 |
★★ Snow Flurries
The controversial bolting of this route warranted an editorial in Rock magazine! 'Steep' wall climbing perfection. A harder and more sustained version of La Petit Mort with bolts protecting the crux moves. First ascent was in a snow storm.
FA: Neil Monteith Kent Paterson, 2004 | 20 | 64m, 2, 9 | |||||
| 41 |
★★ A Northern Soul
Super! The line of most resistance up the main face and a harder second pitch to 'Snow Flurries'. Reachy and atmospheric climbing with great protection. Belay as for 2nd pitch of 'Snow Flurries'. Climb straight up from the belay aiming for the two FH's on the blank wall above. Five metres above the second FH step left and join up with 'Snow Flurries' for its final 15m of pumpy conclusion. Direct finish possible with a few more bolts? DRB rap anchor will JUST reach the belay on a 60m rope. Bring a full sized rack including 12 long quickdraws. FA: Kent Paterson & Neil Monteith, 2004 | 23 | 30m, 7 | |||||
| 42 |
★ Die Young
This corner is the most prominent line on the right side of the face. Starts about 20m right of La Peitite Mort at corner below large white bird poo stain. 1. 35m Easy corner to belay on the face before the steeping. 2. 35m Negotiate the corner above by climbing out right immediately below a small roof then up to the bird poo niche. Traverse 2m left then up the overhanging wall for about 20m until it is possible to exit right onto a ledge. To descend, traverse right along ledge system and then rap off slings (42m) FA: Phillip Coleman, Wayne Maher & Robert Harrison, 1980 | 17 | 70m, 2 | |||||
| 43 |
★★★ Die Young Direct Finish
A better more direct finish - the natural line. From first belay continue as for Die Young but tend left to large chickenhead (ignore traverse right). Steeply overhanging groove to more chickenheads then wide groove to ledge. FFA: Greg Aimer & Dave Brasch (alt), 1994 | 19 | 40m | |||||
| 44 |
★★ Grey Power
A good alternative first pitch for Die Young. Start at the flake 5m left of Euthanasia. 1. 40m Climb the flake and weakness above to stance in middle of wall. Follow line to left side of wall. Up and right a bit to belay a few metres above the Euthanasia bucket stance (next to bolt on Euthanasia Direct Finish). Finish as for Die Young. FFA: Michael Hampton & Geoff Butcher (alt), 1998 | 17 | 40m | |||||
| 45 |
★★ Euthanasia
Excellent climbing taking in the crux of Die Young whilst adding a much improved first pitch. Start at the entrance to the large chasm at the right side of the face. 1. 35m Up and left to a shallow corner 2m right of the arete. Go up this to a curving corner line leading left across the face. Follow the closed corner, at times on the face, to the bucket stance. 2. 30m Continue up and step left (old piton) into the bird poo niche of Die Young. Continue as for Die Young. FFA: Peter Cunningham & Wayne Maher, 1983 | 17 | 65m, 2 | |||||
| 46 |
Euthanasia Direct Finish
A sensationally overhung route using two aids (one is a bolt) which would no doubt go free. Start as for pitch 2 of Euthanasia.1. 10m Gain the bolt above the belay and traverse right to a nut placement then continue up to ledge. 2, 12m Up the broken line above to easier ground. Set: Wayne Maher & Brendon O'Leary, 1983 | 17 M1 | 22m, 2 | |||||
| 47 | ★ Mexican Wave | 24 | 25m | |||||
| 48 |
★ Nacho Man
Seam right of Mexican wave. FA: Graham Dick, 2014 | 26 | 20m, 2 | |||||
| 49 |
Hogans Goat
Strenuous. Orange corner 3m L of CD. Delicately crank past rotten piece of rock (essential) to gain thin crack. Up, then traverse L 2m and up overhung arete (be careful of more lose stuff on ledge). Up corner above. Exit L, and traverse back R to belay. To descend, lower to next ledge and walk off. FA: Goshen Watts, 1997 | 21 | 30m | |||||
| 50 | ★ Capricorn Dancer | 18 | 25m | |||||
|
TURKEY BOULDER - This is the large boulder with vertical east face directly behind the Chicken Boulder, about 50m downhill from the Triptych. The two routes are very gritstone in appearance and style. | ||||||||
| 52 |
★★ Cold Turkey
Thin, right leading weakness. Start at tree growing at base. FA: Nick McKinnon & Neil Monteith, 2001 | 21 | 7m | |||||
| 53 |
★★ Gobbler
Same start off tree as 'Cold Turkey' but instead fire straight up flakes and jugs on perfect marbled rock. FA: Neil Monteith, Nick McKinnon & Andrew Thompson (Ireland), 2001 | 21 | 7m | |||||
|
THE CHICKEN BOULDER - This large boulder with a steep orange overhanging north face is located about 50m downhill from the Wirilda. You walk close to it on the approach track but it's hidden behind trees. Look for ringbolts. | ||||||||
| 55 |
Chicken Run
On the far left side of The 'Chicken' Boulder. An easy leftwards hand traverse along flake leads to juggy vertical wall. FA: Neil Monteith (solo), 2000 | 11 | 20m | |||||
| 56 |
★ Rings Around
Little sport plaything with a tough finish. Reasonably weather protected. Run-out start as for 'Tarred and Feathered' to first ringbolt, then hard traverse left past another ring then up overhung rib past 2 rings to double ring lower-off. Extend first bolt with sling to avoid ropedrag. FA: Neil Monteith & Jono Schmidt, 2001 | 21 | 13m, 4 | |||||
| 57 |
★ Tarred and Feathered
Three ringbolts blasting up orange overhung wall to the left of 'The Pecking Order'. Shares first bolt of 'Rings Around'. The route features long moves between good holds and finishes at twin rings. FA: Neil Monteith, 2001 | 24 | 13m, 3 | |||||
| 58 |
The Pecking Order
Right leaning weakness in the middle of the 'Chicken' Boulder. Pro is a bit tricky to place. FA: Chris Peisker & Simon Mentz 1980s | 22 R | 10m | |||||
|
DUCK BOULDER - Two boulders downhill from the Chicken Boulder. | ||||||||
| 60 |
Gently
Climbs the highest, slabby west face with limited protection. FA: Neil Monteith (solo), 2000 | 13 | 7m | |||||
1.2. Summit Track Wall 2 routes in Cliff
- Summary:
-
All Trad climbing
| Route | Grade | Style | Selected ascents | |||
|---|---|---|---|---|---|---|
| 1 | ★ Nova | 19 | 30m | |||
| 2 | Toad | 13 | 73m | |||
1.3. Dead Ahead Cliff 3 routes in Cliff
- Summary:
-
All Trad climbing
| Route | Grade | Style | Selected ascents | |||
|---|---|---|---|---|---|---|
| 1 | Dead Ahead | 24 | 80m | |||
| 2 | Dead Head | 17 | 12m | |||
| 3 | Mocking in the Mirror | 16 | 15m | |||
1.4. Schroeders Cliff 13 routes in Cliff
- Summary:
-
Mostly Trad climbing
Lat / Long: -37.093444, 142.327353
description
Gritstone like rock but at a much larger scale! A good assortment of sustained and well protected mixed and sport routes with stupendous views.
approach
This remote wall is located to the west of the Main Asses Ears face. Start walking up the track as for the normal cliff. About a 100m after the 4WD road turns to a walking track take a right turn at a cairned intersection in the track. Another couple of hundred metres up the track take a right turn off the summit track at a large cairn and bush bash (some cairns) across to the bottom of the large orange 'Dead Ahead Cliff'. Follow the rock upwards to find 'Schroeders Cliff' located on the top of the mountain on the left side.
 |
||||||||
| Route | Grade | Style | Selected ascents | |||||
|---|---|---|---|---|---|---|---|---|
| 1 |
The Green Man
Right leaning juggy line on far right side of cliff. Angle eases considerably after first 8m. Step left across line and up wall to finish via headwall right of corner. FA: Keith Lockwood & Richard Smith, 1991 | 12 | 48m | |||||
| 2 |
★★ Tokinese
Start as for 'The Green Man', about 5m right of 'Battered Flake'. Up easy crack for 5m then traverse left across break to flake in steepness above. Up flake on big jugs (FH), traverse right (crux) to hard vertical transition move and then into good crack. When the angle gets easier step left on the arete and up this juggy wall to the BF anchor. FA: Neil Monteith & Marcel Geelen, 2001 | 22 | 45m, 1 | |||||
| 3 |
★ Battered Flake
A good central line on the main face which suffers from some loose rock. Approach the orange right facing corner by climbing in from the left. Up the corner (crux), with some small and hard to place gear – bring RP's. From under the roof, traverse right a few metres then up the flake crack above on good jugs. Rap rings are located on the belay ledge. FA: Neil Monteith & Jono Schimdt, 2001 | 21 | 45m | |||||
| 4 |
★ The Ember Attack
A long and sustained wall climb on featured grey rock. Bring a full rack, long slings and several RPs for the opening corner of 'Battered Flake'. Climb 'Battered Flake' for 15m to roof. Traverse left for two metres across horizontal then bust through roof (FH) and up sustained and absorbing wall above past a further two FHs and plenty of trad gear. Rap 38m off double rings on ledge (requires two ropes). FA: Neil Monteith & Hannah Lockie, 2006 | 22 | 40m, 3 | |||||
| 5 |
★★ Memento
Blasts up the prominent orange flakes and groove in the center of the main face five metres left of BF. Up to shallow right facing flake, then direct up past two FH's. Step left after 2nd bolt to gain black groove and up. Run up final slab to rap rings. Loses a star because of bad natural pro. FA: Nick McKinnon, Jono Schmidt & Neil Monteith, 2001 | 23 R | 25m, 2 | |||||
| 6 |
★★ Felix
Awesome thin climbing on grit-like rock. Blank looking wall with five FH's just left of 'Memento'. Boulder problem start, middle and end with the occasional good hold thrown in to ward off the pump. At small ledge boulder through rooflet and slab easily up to twin rings. FA: Neil Monteith, 2001 | 23 | 25m, 5 | |||||
| 7 |
★★ Fat Cat
The best of a great trio. Ignore the FH and climb pocketed right side of chimney (wires) then traverse right to BR. Up superb textured slab past two more BR's to break (medium SLCD). Finish easily up slab to twin rings high on ledge. FA: Neil Monteith, Marcel Geelen & Jono Schimdt, 2001 | 20 | 25m, 3 | |||||
| 8 |
★ Fat Cat Direct
The desperate crank past the FH steps the grade up quite considerably. FA: Marcel Geelen & Neil Monteith, 2001 | 24 | 25m, 4 | |||||
| 9 |
Schroeder
Start at the chimney flanking the left side of the impressive wall with bolts.
FA: Athol Fraser & Keith Lockwood, 1977 | 14 | 70m, 2 | |||||
| 10 |
Woof
Megaline. Good climbing. Start up S (which soon wanders off right). Continue up corner-chimney passing three big overhangs and through a hole behind the fourth. FA: Chris Baxter, Greg Aimer & Geoff Gledhill, 1996 | 14 | 40m | |||||
| 11 |
Prison Camp
Around the left side of the buttress left of Woof. Start just right of chimney gully. Can be done in one pitch with twin ropes - watch out for rope drag.
FA: Nick McKinnon. Marcel Geelen (alt), 2001 | 16 | 16m, 2 | |||||
| 12 |
★ Siamese Corner
Orange corner with blocky roof about 6m left of 'Prison Camp'.
FA: Neil Monteith & Jono Schmidt, 2001 | 19 | 35m, 2 | |||||
| 13 |
★ Cheshire
Start about 60m left of SC at rock cairn. The route follows a left trending line then climbs an overhung corner. A boulder problem start gets the blood flowing for the pumpy overhung middle section which is protected by excellent wires. Natural pro belay on small ledge. Rap off slings around small bollard (may need to be replaced). FA: Neil Monteith & Jono Schimdt, 2001 | 20 | 25m | |||||
1.5. Top of the Range Wall 1 route in Cliff
- Summary:
-
All Trad climbing
| Route | Grade | Style | Selected ascents | |||
|---|---|---|---|---|---|---|
| 1 | Top of the Range | 20 | 25m | |||
1.6. Range Wall 3 routes in Cliff
- Summary:
-
All Trad climbing
| Route | Grade | Style | Selected ascents | |||
|---|---|---|---|---|---|---|
| 1 | The Judge's Decision | 16 | 20m | |||
| 2 | Range Rover | 17 | 20m | |||
| 3 | Free Range | 16 | 20m | |||
1.7. Southern Face 6 routes in Cliff
- Summary:
-
All Trad climbing
| Route | Grade | Style | Selected ascents | |||
|---|---|---|---|---|---|---|
| 1 | Twice Shy | 19 | 43m | |||
| 2 | Twice Shy Variant | 20 | ||||
| 3 | Kiwi Corner | 17 | 50m | |||
| 4 | The Corner | 12 | 40m | |||
| 5 | The Slab | 9 | 40m | |||
| 6 | Arrested Development | 15 | 55m | |||