A Crag Guide gives an extensive view of all sub areas and climbs at a point in the index. It shows a snapshot of the index heirachy, up to 300 climbs (or areas) on a single web page. It shows selected comments climbers have made on a recently submitted ascent.
At a minor crag level this should be suitable for printing and taking with you on a climbing trip as an adjunct to your guidebook.
This guide was generated anonymously. Login to show your logged ascents against each route.
Warning
Rock climbing is extremely dangerous and can result in serious injury or death. Users acting on any information directly or indirectly available from this site do so at their own risk.
This guide is compiled from a community of users and is presented without verification that the information is accurate or complete and is subject to system errors. By using this guide you acknowledge that the material described in this document is extremely dangerous, and that the content may be misleading or wrong. In particular there may be misdescriptions of routes, incorrectly drawn topo lines, incorrect difficulty ratings or incorrect or missing protection ratings. This includes both errors from the content and system errors.
Nobody has checked this particlular guide so you cannot rely on it's accuracy like you would a store bought guide.
You should not depend on any information gleaned from this guide for your personal safety.
You must keep this warning with the guide. For more information refer to our:
Usage policy
Contributors
Thanks to the following people who have contributed to this crag guide:
Peter Jeavons
Mattias Braach-Maksvytis
Chris
Murray
Pete
Brendan Heywood
Jason Capenecas
Diego Lopez Iturralde
Zac Schofield
Ryan Holmes
The size of a person's name reflects their Crag Karma, which is their level of contribution. You can help contribute to your local crag by adding descriptions, photos, topos and more.
Table of contents
- 1. Wedderburn Cave 30 in Crag
- 2. Index by grade
1. Wedderburn Cave 30 routes in Crag
- Summary:
-
All Bouldering
Lat / Long: -34.117373, 150.811631
description
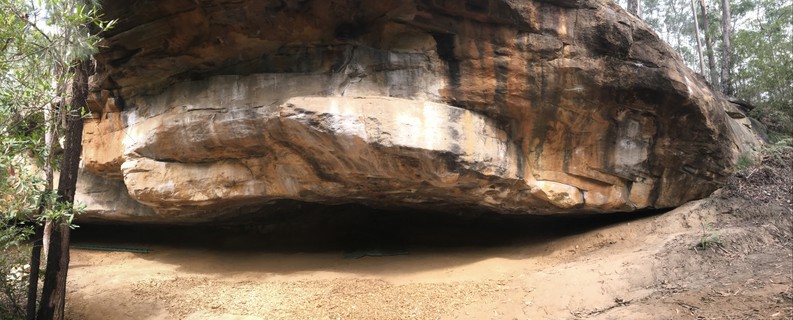
The Wedderburn Cave boasts some of the longest and best roof climbs in the Sydney area. Most of the bouldering is steep technical roof climbing with exciting top outs and is not a recommend area for people relatively new to climbing. The crag gets full sun from autumn to spring from about 11am-3pm and stays dry in wet weather, however all the top outs will be wet until the sun comes out.
access issues
Please keep noise to a minimum when walking in and out of the Cave. Stick to the path, staying away from any properties and be friendly to any locals who might be curious. Keep the cave Clean and Tidy. Please do your part in maintaining hassle free access and enjoyment for all.
approach
https://goo.gl/maps/NHQZ1JgZxLieyNE88 Park on Wedderburn Rd. 1.2km after the bridge where the road straightens out, park on the left side of Wedderburn Rd just before property number 253, but not too close to their driveway (50 metres minimum!). https://drive.google.com/open?id=1l_69hOi4I-olIh0-mKZYATgSmpzUiaU5&usp=sharing.Across the road on the other side you will see a white X on a tree. Enter this here and follow the blue arrow track markers all the way. Weaving through the trees for about about 80m onto a ridgeline. Follow this down and take a sharp right at Cairn. Continue to follow to follow this trail under the top cliffline until you get to a big tree with a rope.
ethic
Please minimise all impact
   |
||||||||
| Route | Grade | Style | Selected ascents | |||||
|---|---|---|---|---|---|---|---|---|
| 1 |
★★ Baby Bonus
Furthest Line on the left of the cave away from all the rest. Sit start matched on the round hold about a meter and a half towards the back of the cave. Make some burly moves directly out the cave to gain a hug jug before mantling the face. FA: Byron Glover, 2011 | V10 | ||||||
| 2 |
★★ Tiptoe
Stand start in the crack corner near the end of Anger Management. Right hand on the shelf, left hand at the bottom of the crack below it. Move up into the undercling crack and traverse up and left until an easy topout around the corner. FA: Peter Jeavons, 3 Jan 2020 | V8 | ||||||
| 3 |
★★ The Danger Zone
Up Tiptoe to the jug, then back out around the bulge and across into the last jugs of the Anger Management topout. Minor dabbing on the tree is not an issue but shouldn’t aid the climber. Stay safe. FA: Peter Jeavons, 9 Jan 2020 | V8 | ||||||
| 4 |
★★ Short Fuse
From good double underclings punch up to the sloper rail and finish as for Anger Management. FA: Mattias Braach-Maksvytis, Jul 2020 | V10 | ||||||
| 5 |
★★★ Vertical Outburst
Short Fuse exiting via the final Persistence Boulder. Radical! FA: R. Hofmann, 19 Jul 2020 | V11 | ||||||
| 6 |
★★★ Anger Management
Sit start matched on a large jug at the far right end of the cave. Traverse about a meter left on some crimps to meet the Sloper Rail line running along the roof. Follow this to the crack and all the way out the cave traversing right along the face before a scary top out. FA: Byron Glover, 2011 | V11 | ||||||
| 7 |
★★ Wrong Way Go Back
Climb Anger Management to the ledge then exit left through Danger Zone. | V11 | ||||||
| 8 |
★★★ Persistence
Sit start as for Anger Management, following the right side of holds leading to a big move to a crimpy blob/shield like feature and then a good jug rest. Connect back into "Anger Management" following its sloppy crack line, turning about a meter before the crack opening. Then head directly out towards the front of the cave via a large jug and some sharp underlings. Top out as for "Anger Management". FA: Byron Glover, 2011 | V12 | ||||||
| 9 |
★★★ Yo Mama
Start and climb as for Anger Management, exit as for Persistence. Spicy finish and hard for the grade. FA: R. Hofmann, 12 Jul 2017 | V12 | ||||||
| 10 |
★★ The Long Weakender
Start as for Persistence, climb this to finish out the crack as for Anger Management. FA: Mattias Braach-Maksvytis, 26 Apr 2017 | V11 | ||||||
| 11 |
★★★ From Dust Till Dawn
Start at the big Hueco at the back right hand side of the cave. Climb diagonally left joining Persistence after about 12+ moves, finishing as per this. Long and pumpy!! FA: R. Hofmann, 25 Jul 2017 | V13 | ||||||
| 12 |
★★★ Dust Management
Start as From Dust Till Dawn, head through Persistence and finish as per Anger Management. Another obvious fun enduro classic!! FA: R. Hofmann, 23 Aug 2019 | V12 | ||||||
| 13 |
★★★ Thunder Down Under
Start as for 'From Dust Till Dawn, head back to the start of Anger Management and climb this all the way. Adds a fair bit more decent climbing. FA: R. Hofmann, 20 Sep 2019 | V12 | ||||||
| 14 |
★★★ Welcome to Valhalla
Sit-Start at the Letterbox Slot on the right hand entrance of the cave just before the end of Rodeo Clown. Reverse Rodeo Clown, into Persistence and finishing as for Anger Management. A fair bit of climbing involved. Could be V12? 8b+/c Route FA: R. Hofmann, 25 Sep 2019 | V13 | ||||||
| 15 |
★★★ The Sanctuary
Reverse Rodeo Clown to the start of Anger Management, get a decent rest and the finish as per Anger Management. Fun Power Endurance. Could be V12. 8b+/c Route FA: R. Hofmann, 16 Apr 2020 | V13 | ||||||
| 16 |
★★★ Necessary Evolution
Reverse Rodeo Clown into Yo Mama (Anger Management exiting Persistence) Some decent power endurance! Easy V14? 8c/+ Route FA: R. Hofmann, 19 Jun 2020 | V13/14 | ||||||
| 17 |
★★★ Perseverance
Reverse Rodeo Clown direct into Persistence finishing as per this. Epic Power Endurance!! 8c+ Route FA: R. Hofmann, 2 Jun 2020 | V14 | ||||||
| 18 |
Dishonour
Starting on the slot under Major Lightweight, climb into the hueco where From Dust Til Dawn starts, finishing right hand in the 2 finger pocket, left hand on the mega side pull jug. Not a pretty climb, but one of the last sectors left unclimbed. FA: Peter Jeavons, 16 Jul 2020 | V11 | ||||||
| 19 |
★★ Dress Rehearsal
Dishonour into Dust Management. 50 moves of hard v13. FA: Peter Jeavons, 15 May 2023 | 34 | ||||||
| 20 |
★ Centerlink Sponsorship
Start as for "Persistence", following the right side of holds approximately 2 meters. Just after the deep two finger pocket climb towards the big Hueco on the lower right side of the cave. Climb the far right side of the cave to finish on the start rail of "Major Lightweight". FA: Byron Glover, 2011 | V12 | ||||||
| 21 |
★★ Rodeo Clown
Start as for Persistence climbing this for about 2m before breaking off via an obvious perfect deep 2 finger pocket heading straight out to the cave entrance via some good holds. Then make a huge span move between 2 good holds heading right. Release the span via the Rodeo move and finish matched on the starting rail of Major Lightweight on the outside of the cave. Easier if you are taller. FA: R. Hofmann, 17 Jul 2017 | V11 | ||||||
| 22 |
★ Death Trap
Start on the two incut edges to the right of the Persistence ledge. Up and right to escape just left of Major Lightweight. Careful of the hollow edge and thin flake at the halfway point. FA: Peter Jeavons, 17 May 2020 | V7 | ||||||
| 23 |
★★ Seppuku
As for Death Trap but exiting straight up the middle once you obtain the upper lip. FA: Peter Jeavons, 25 Jul 2020 | V7 | ||||||
| 24 |
★ Wedderburn Campus
Start as for Death Trap. Campus directly up to the large slopey rail and match. Hold the finish and try not to slide off. | V7 | 1m | |||||
| 25 |
★★★ Major Lightweight
Start matched on the large block. Make a couple of huge moves to a pocket, then big span out left to crimp side pull, head straight up the face before a scary mantle to top out. Powerful and big moves. Deceptive and seems to be rather solid for the grade. FA: Thomas Farrell, 2011 | V11 | ||||||
| 26 |
★ The Great Houdini
Start on the right of Major Lightweight on a left hand side pull and right hand edge. Big move to the pocked with the left hand, right hand crimp intermediate then to the gnarly 2 finger pocket, hand foot match the left and hold tight to pull over the bulge to small edge via sloper. Top out "RIGHT" via slopers and edges. Gymnastic and Powerful. FA: R. Hofmann, 25 Jul 2018 | V11 | ||||||
| 27 |
★★★ Turbo Deluxe
"THE LINE" at the Cave. What may initially appear to be pretty straight forward soon becomes a realisation of clarity! Climb Rodeo Clown into Major Lightweight. FA: R. Hofmann, 16 Sep 2020 | V14 | ||||||
| 28 |
★★★ Activate The Hyperdrive
9a Route. 44+ Moves. Start as for Short Fuse, reversing Anger Management finish as for Turbo Deluxe (Rodeo Clown into Major Lightweight). Some serious climbing and next level power endurance needed. FA: R. Hofmann, 8 Jun 2022 | V14/15 | ||||||
| 29 |
★★★ Supercharged
Original Vision by Byron Glover. Another epic quest now complete.
Centrelink Sponsorship into Major Lightweight.
FA: R. Hofmann, 18 May 2022 | V14 | ||||||
| 30 |
★★★ Thermonuclear Fusion
9a+ Route. 44+ Moves. Start as for Short Fuse, reversing Anger Management finish as for Supercharged (Centrelink Sponsorship into Major Lightweight). Some serious nec level climbing. FA: R. Hofmann, 7 Sep 2022 | V15 | ||||||
 Byron Glover
 2. Index by grade
| Grade | Stars | Name | Style | Pop | |
|---|---|---|---|---|---|
| V7 | ★ | Death Trap | |||
| ★★ | Seppuku | ||||
| ★ | Wedderburn Campus | 1m | |||
| V8 | ★★ | The Danger Zone | |||
| ★★ | Tiptoe | ||||
| V10 | ★★ | Baby Bonus | |||
| ★★ | Short Fuse | ||||
| V11 | ★★★ | Anger Management | |||
| Dishonour | |||||
| ★★★ | Major Lightweight | ||||
| ★★ | Rodeo Clown | ||||
| ★ | The Great Houdini | ||||
| ★★ | The Long Weakender | ||||
| ★★★ | Vertical Outburst | ||||
| ★★ | Wrong Way Go Back | ||||
| 34 | ★★ | Dress Rehearsal | |||
| V12 | ★ | Centerlink Sponsorship | |||
| ★★★ | Dust Management | ||||
| ★★★ | Persistence | ||||
| ★★★ | Thunder Down Under | ||||
| ★★★ | Yo Mama | ||||
| V13 | ★★★ | From Dust Till Dawn | |||
| ★★★ | The Sanctuary | ||||
| ★★★ | Welcome to Valhalla | ||||
| V13/14 | ★★★ | Necessary Evolution | |||
| V14 | ★★★ | Perseverance | |||
| ★★★ | Supercharged | ||||
| ★★★ | Turbo Deluxe | ||||
| V14/15 | ★★★ | Activate The Hyperdrive | |||
| V15 | ★★★ | Thermonuclear Fusion |