A Crag Guide gives an extensive view of all sub areas and climbs at a point in the index. It shows a snapshot of the index heirachy, up to 300 climbs (or areas) on a single web page. It shows selected comments climbers have made on a recently submitted ascent.
At a minor crag level this should be suitable for printing and taking with you on a climbing trip as an adjunct to your guidebook.
This guide was generated anonymously. Login to show your logged ascents against each route.
Warning
Rock climbing is extremely dangerous and can result in serious injury or death. Users acting on any information directly or indirectly available from this site do so at their own risk.
This guide is compiled from a community of users and is presented without verification that the information is accurate or complete and is subject to system errors. By using this guide you acknowledge that the material described in this document is extremely dangerous, and that the content may be misleading or wrong. In particular there may be misdescriptions of routes, incorrectly drawn topo lines, incorrect difficulty ratings or incorrect or missing protection ratings. This includes both errors from the content and system errors.
Nobody has checked this particlular guide so you cannot rely on it's accuracy like you would a store bought guide.
You should not depend on any information gleaned from this guide for your personal safety.
You must keep this warning with the guide. For more information refer to our:
Usage policy
Contributors
Thanks to the following people who have contributed to this crag guide:
Murray
Marcus Loane
Dylan Hill
lkmrrs
Elijah Aquilina
Sandon Joubert
Scott Murray
Nicholas Poelczer
Brett H
Evan Robinson
The size of a person's name reflects their Crag Karma, which is their level of contribution. You can help contribute to your local crag by adding descriptions, photos, topos and more.
Table of contents
- 1. Lower Boulders 40 in Field
- 2. Index by grade
1. Lower Boulders 40 routes in Field
- Summary:
-
All Bouldering
Lat / Long: -34.406349, 150.854132
- The Wollongong area has a historical mix of sport, trad, and bouldering, with fully bolted sport routes emerging as the dominant form in the last decade
- Do not bolt or rebolt existing trad or bouldering routes
- No chipping of the rock to alter the difficulty of a route or create new routes. Loose or dangerous rock may be removed with careful discretion
- Top rope and lower-off through your own gear. Fixed anchor protection to be used for final lower off only to minimise wear
- Minimise excessive chalk usage and make brushing of holds a regular routine. Consider using alternative chalk colours to minimise visual impact
- Do not bush-bash new access trails, stick to existing marked trails where possible
- Do not remove vegetation, both from around cliff bases and on the cliff. Brushing down built-up lichen, dirt and chalk off existing routes is acceptable maintenance
- Do not leave rubbish or gear at the crag. Gear left may be confiscated by NPWS
- Respect any announced closures of tracks, cliffs and areas in the region
- Don’t play loud music at the crag, consider the amenity of nearby climbs and non-climbers alike
- Speak up against anti-social behaviour, unsafe behaviour, or other activities that threaten access – contact your local advocacy association - ACANSW
- Rebolting shall only be carried out by suitably competent and trained persons. The minimum standard is 316 stainless U-bolt or ring eye-bolts with pure epoxy glue. Refer to http://www.safercliffs.org
- Remember you are responsible for your own safety, and the safety of your friends!
description
The lower boulders is a fairly flat area south of the Mt Keira plateau. It consists of a number of varying size boulders that have fallen down from the plateau eons ago. The area is traversed via a mountain bike trail and is well protected under tree canopy.
access issues
Many of the Wollongong crags are located in the Illawarra Escarpment State Conservation Area (IESCA). This region has had a chequered history in recent times, with large swathes of popular crags having to be closed after it was missed that a new NSW National Parks and Wildlife Service (NPWS) Plan of Management (PoM - 2018) had incidentally banned climbing along most of the escarpment. After a lobbying effort and a stroke of coincidental good luck an amended plan of management has been published (2023), modifying the plan to allow rock-climbing “… on the west- and south-facing cliffs of Mount Keira and on cliffs north of Bulli Pass."
Access comes with caveats and all climbers should be aware that that “… new bolts or anchors may only be installed with NPWS consent, and park infrastructure such as safety railing may not be used as anchor points as they have not been designed for this purpose. NPWS will not install, assess or guarantee bolts or other fixed protection points. Participants in these activities are solely responsible for their own safety.”
Given the pressures many rock-climbing areas have been under around Australia and the plethora of access issues that have followed it is imperative that climbers respect and heed the access requirements. Access granted can easily be access taken, noting from the PoM: “Locations where rock climbing and abseiling are allowed may be reviewed and altered to address safety issues, risks to visitors or impacts on cultural values or environmental values. Temporary closures of rock climbing and abseiling locations may be applied to limit impacts. Permanent closure of sites may also be necessary. NPWS will consult with representatives of the local climbing community before implementing any permanent closures.”
Please refer to the ‘Ethic” section for more notes on how to be a good steward for the climbing community.
approach
Park at the Mt Keira Road hairpin. Walk up the road for ~200m. Follow the mountain bike trail that hits the road on the right. After about 100m there is the first (East) boulder up on your right, keep following the left path for 80m to get to the next (Middle) boulder, keep following the path 100m for the last (West) boulder.
ethic
The modern climbing scene and all the access issues that go with it requires modern ethic and all climbers should familiarise themselves with general good crag etiquette to ensure access is maintained into the future.
The following is a short summary for the area:
Learn more at https://www.cliffcare.org.au/education
 |
||||||||
| Route | Grade | Style | Selected ascents | |||||
|---|---|---|---|---|---|---|---|---|
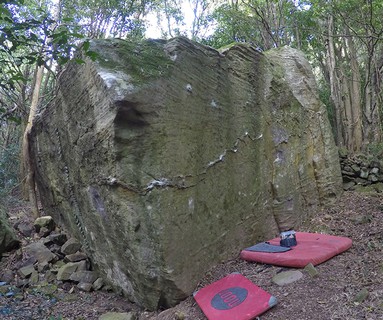
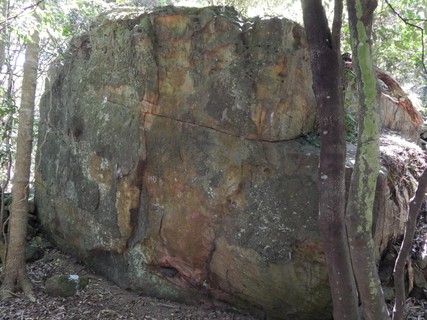
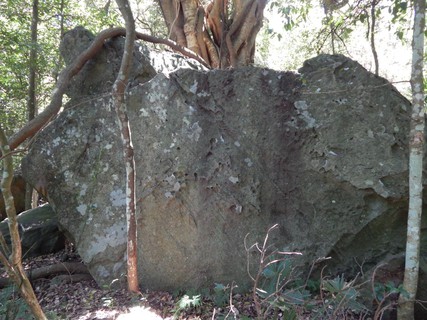
East BoulderThe first boulder you reach following the bike track from the East. | ||||||||
| 2 |
★★★ Jungle Jugs
Straight up small crimps, big move to finish. FA: Jayden Shepherd, 16 Nov 2021 | V10 | ||||||
| 3 |
★★★ Jungle Cat
Sit start on the arete. Head up the arete. Originally a crouch start but goes as a sit start at the same grade. FA: Brett H, 14 Jun 2015 | V6 | 4m | |||||
| 4 |
★ Jungle Kitten
Starting at the left arete as per Jungle cat traverse along the rail to the right before exiting up the right arete as per climb #4 (the V2) | V3 | 4m | |||||
| 5 |
★ 1
Stand start on crimp rail, up and left to sidepull then top. | V3 | 3m | |||||
| 6 |
★ 2
Stand start on crimps, straight up the wall left of the flake. | V4 | 4m | |||||
| 7 |
★ 3
Stand start on the flake, head straight up without using any of the chips/cuttings. | V1 | 4m | |||||
| 8 |
★ 4
The right arete from a crouch. | V2 | 4m | |||||
   |
||||||||
| Route | Grade | Style | Selected ascents | |||||
Lower East SideSmall boulder just downhill from East Boulder | ||||||||
| 10 |
★ 1164 New Cases
Sit Start into big move to the left side pull. Up to sloper and over. Set: Mark, 29 Aug 2021 FA: Dylan Hill, 31 Aug 2021 | V2 | 3m | |||||
| 11 |
★★ 1218 New Cases
Sit Start with big pockets/edges for hands. Head Right to arete then up and left to manky mossy mantle. FA: Mark, 29 Aug 2021 | V1 | 3m | |||||
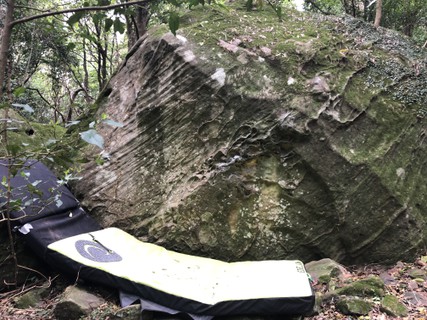
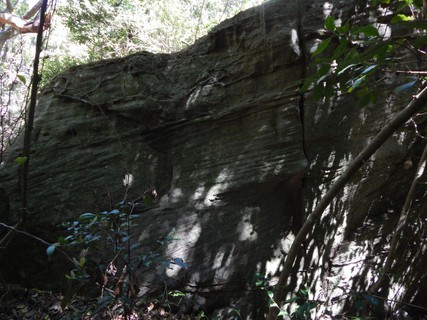
Shark tooth BoulderLocated 20m directly right of Middle Boulder, routes on the backside. | ||||||||
| 13 |
★ Mantle Ray
Sit start on left arete and crimp. Power right and traverse the sloper lip to mantle at the peak. Very little foot holds. | V3 | 4m | |||||
| 14 |
★ Barb
Sit start as far right as possible. Shuffle up the sloper arete and mantle. | V2 | 3m | |||||
| 15 |
Left Slab
Slab around to the right of Barb. Climb left side of slab following vague line of holds. Downclimb route. FA: Mark, 29 Aug 2021 | V0 | 5m | |||||
/52/a3/52a343a1cc4d0091f513361c19abb6442eb5303f) |
||||||||
| Route | Grade | Style | Selected ascents | |||||
| 16 |
★ Right Slab
Climb Right side of slab. Downclimb route. FA: Mark, 29 Aug 2021 | V0 | 5m | |||||
| 17 |
★ Up up and away
Start on very left hand side of face behind tree. Climb up trending right to top. Downclimb route. FA: Cez, 12 Sep 2021 | VB | 3m | |||||
| 18 |
★ Love Heart Climb
Up left side of very featured wall around to the right of Right Slab. Downclimb route. FA: Maisie, 29 Aug 2021 | V0 | 5m | |||||
| 19 |
★ High top climbing holds
Climb straight up the middle of this featured face. Downclimb route. FA: Mark, 29 Aug 2021 | V0 | 5m | |||||
| 20 |
★ Right to Left
Start on right side of this face and traverse left along lip all the way to the top. Downclimb this or any other route. FA: Marcus Loane, 29 Aug 2021 | V0 | 6m | |||||
| 21 |
★ Head-height traverse
Traverse face with feet about the head-height of someone standing on ground. FA: Tilly, 29 Aug 2021 | V0 | 3m | |||||
 |
||||||||
| Route | Grade | Style | Selected ascents | |||||
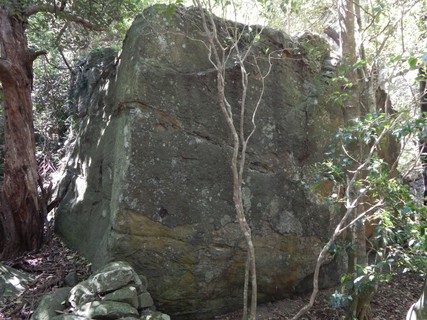
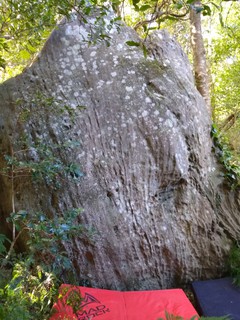
Middle Boulder | ||||||||
| 23 |
★ Pull-kun
Start of the 'Middle Boulder' Start low, go for the lower ledge, then use the arete for pulling up. FA: Murray, 10 Dec 2017 | V2 | 3m | |||||
| 24 |
★★★ Infinity Wars
Start low at Pull-kun, traverse left into Pullman, then join into Hail to the crimp. FA: Mark McGivern | V8 | 4m | |||||
| 25 |
★★ The stinging tree
Sit start as for 'Pull-kun', traverse left along the obvious horizontal crack using holds along and around, then finishing up 'Hail to the crimp'. Mega-jugs near the top of the boulder are out, as are the large face-pockets right of the final flake. FA: Chris G, Apr 2024 | V6 | 4m | |||||
| 26 |
★★ An Ode to Murray
Sit start at low crimp in the middle of the wall. Big move right to gain the crimpy ear, then join Pull-kun. FA: Brett H, 26 Oct 2018 | V5 | 3m | |||||
| 27 |
★ Pullman
Start left hand at the small picket then follow up for some solid pulling action. FA: Murray, 10 Dec 2017 | V3 | 4m | |||||
| 28 |
★ Pullman Sit Start
Bum is the last thing to leave the ground. Climb into Pullman and follow to top. Set: Luke, 22 Aug 2021 FA: Marcus Loane, 22 Aug 2021 | V3 | 4m | |||||
| 29 |
★ Hail to the crimp
Start left hand at the side pull inside of the circle feature and right hand on the undercrimp, then straight to the crimp crack, follow crimp crack to the left and top out. Besides the starting undercrimp, the holds on and to the right of the large flake feature that runs up the Boulder are eliminated. | V4 | 4m | |||||
  |
||||||||
| Route | Grade | Style | Selected ascents | |||||
| 30 |
★ Undercrimp
Start around the undercrimp, move up to a couple more small holds, then up to the ledge to top out. FA: Murray, 10 Dec 2017 | V4 | 4m | |||||
| 31 |
★★ Hail to the Undercrimp
Match start in the undercling. Big move out right before topping out as per hail to the crimp. FA: Dylan Hill, 3 Sep 2021 | V4 | 4m | |||||
| 32 |
★ Pull-chan
Pull the arete, with right hand crimps, don't use the rock pile. FA: Murray, 10 Dec 2017 | V2 | 3m | |||||
| 33 |
★ Echo Corner
Up the easier side of the arete to top out FA: Murray, 10 Dec 2017 | V1 | 3m | |||||
| 34 |
Moe's stretch
Straight up the slab with no arete. Left of Echo Corner. FA: lkmrrs, 28 Mar 2021 | V1 | 3m | |||||
  |
||||||||
| Route | Grade | Style | Selected ascents | |||||
| 35 |
Derailleur
Around the backside of the 'Middle Boulder' Start left hand low on the arete and right hand on the crimp rail. Follow the crimp rail along and around without using the top ledge. Adjust difficulty as required with your feet. FA: Murray, 10 Dec 2017 | V2 | 2m | |||||
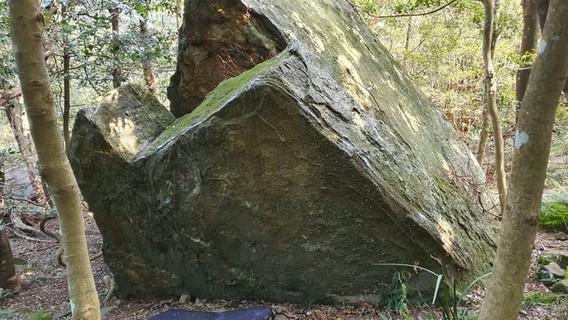
West Boulder | ||||||||
| 37 |
★★ Mark's Mad Mantle
Cramped Sit Start as for Headstone to lip then head left to awkward mantle trying not to dab or fall onto boulder just behind you. Set: Mark, 15 Aug 2021 FA: Marcus Loane, 15 Aug 2021 | V2 | 2m | |||||
| 38 |
Headstone
At the 'West Boulder' Up to the lip then follow the ledge right then up. Mind the tree! FA: Murray, 10 Dec 2017 | V1 | 2m | |||||
| 39 |
Boxy Knoxy
Sit start directly next to tree, straight up, finish same as other climbs FA: Nicholas Poelczer, 31 Aug 2021 | V2 | 2m | |||||
| 40 |
Poxy Knoxy
Start at the lowest pocket crimps, straight up and out. FA: Murray, 10 Dec 2017 | V2 | 2m | |||||
| 41 |
Foxy Knoxy
Start lower pockets and head up leftwards and out. FA: Murray, 10 Dec 2017 | V2 | 2m | |||||
| 42 |
★ Left To Your Own Devices
Sit start similar to Foxy Knoxy, then up to the right along the arete, finishing with the rest of the climbs. Set: 28 Mar 2021 | V1 | 3m | |||||
 /1a/1b/1a1b2f1075e85d2df364ad067068bb0c32aa343c) |
||||||||
| Route | Grade | Style | Selected ascents | |||||
Ribbed BoulderAbout 15 metres further along the bike trail from the West Boulder, on the left. Circle around to the side opposite the track to climb. | ||||||||
| 44 |
Bam
Sit start with left hand in large pocket and right hand in great low pocket, awkward feet. Pull off the ground and throw to the arete, then continue up to top out over the boulder. FA: LiamWilson.jpeg & Elijah Aquilina, 25 Jul 2021 | V0+ | 3m | |||||
| 45 |
★★ Chungsta
Sit start with left hand on the sidepull and right hand in the obvious pocket, move up to a slopey left hand pocket and then adjust feet to go into the crescent shaped pocket with either left or right hand, then pull up to a slopey topout. FA: Alvin Chung, 29 Jul 2021 | V3 | 3m | |||||
| 46 |
★ Sticky BBQ Ribs
Sit start on the south eastern corner of Ribbed Boulder. Left hand on crimp, right in pocket. Couple of moves up to slopey lip and follow it along to the right keeping your feet on the slab. Top out at the the same spots as Bam and Chungsta. FA: Sandon Joubert, 4 Aug 2021 | V1 | 3m | |||||
2. Index by grade
| Grade | Stars | Name | Style | Pop | |
|---|---|---|---|---|---|
| VB | ★ | Up up and away | 3m | ||
| V0 | ★ | Head-height traverse | 3m | ||
| ★ | High top climbing holds | 5m | |||
| Left Slab | 5m | ||||
| ★ | Love Heart Climb | 5m | |||
| ★ | Right Slab | 5m | |||
| ★ | Right to Left | 6m | |||
| V0+ | Bam | 3m | |||
| V1 | ★★ | 1218 New Cases | 3m | ||
| ★ | 3 | 4m | |||
| ★ | Echo Corner | 3m | |||
| Headstone | 2m | ||||
| ★ | Left To Your Own Devices | 3m | |||
| Moe's stretch | 3m | ||||
| ★ | Sticky BBQ Ribs | 3m | |||
| V2 | ★ | 1164 New Cases | 3m | ||
| ★ | 4 | 4m | |||
| ★ | Barb | 3m | |||
| Boxy Knoxy | 2m | ||||
| Derailleur | 2m | ||||
| Foxy Knoxy | 2m | ||||
| ★★ | Mark's Mad Mantle | 2m | |||
| Poxy Knoxy | 2m | ||||
| ★ | Pull-chan | 3m | |||
| ★ | Pull-kun | 3m | |||
| V3 | ★ | 1 | 3m | ||
| ★★ | Chungsta | 3m | |||
| ★ | Jungle Kitten | 4m | |||
| ★ | Mantle Ray | 4m | |||
| ★ | Pullman | 4m | |||
| ★ | Pullman Sit Start | 4m | |||
| V4 | ★ | 2 | 4m | ||
| ★★ | Hail to the Undercrimp | 4m | |||
| ★ | Hail to the crimp | 4m | |||
| ★ | Undercrimp | 4m | |||
| V5 | ★★ | An Ode to Murray | 3m | ||
| V6 | ★★★ | Jungle Cat | 4m | ||
| ★★ | The stinging tree | 4m | |||
| V8 | ★★★ | Infinity Wars | 4m | ||
| V10 | ★★★ | Jungle Jugs |