A Crag Guide gives an extensive view of all sub areas and climbs at a point in the index. It shows a snapshot of the index heirachy, up to 300 climbs (or areas) on a single web page. It shows selected comments climbers have made on a recently submitted ascent.
At a minor crag level this should be suitable for printing and taking with you on a climbing trip as an adjunct to your guidebook.
This guide was generated anonymously. Login to show your logged ascents against each route.
Warning
Rock climbing is extremely dangerous and can result in serious injury or death. Users acting on any information directly or indirectly available from this site do so at their own risk.
This guide is compiled from a community of users and is presented without verification that the information is accurate or complete and is subject to system errors. By using this guide you acknowledge that the material described in this document is extremely dangerous, and that the content may be misleading or wrong. In particular there may be misdescriptions of routes, incorrectly drawn topo lines, incorrect difficulty ratings or incorrect or missing protection ratings. This includes both errors from the content and system errors.
Nobody has checked this particlular guide so you cannot rely on it's accuracy like you would a store bought guide.
You should not depend on any information gleaned from this guide for your personal safety.
You must keep this warning with the guide. For more information refer to our:
Usage policy
Contributors
Thanks to the following people who have contributed to this crag guide:
Bucher
Alberto Sanchez
MexBN
Ali S.
Oscar "Slingshot" GC
GadiBuddy
Martijn Eikelboom
Hugo Esteban
Sergio Etxeberria
Isaac López
The size of a person's name reflects their Crag Karma, which is their level of contribution. You can help contribute to your local crag by adding descriptions, photos, topos and more.
Table of contents
- 1.
Alcocer
102 in Area
-
1.1.
The School Wall 47 in Crag
- 1.1.1. Chilaquiles 8 in Sector
- 1.1.2. Headwall 7 in Unknown
- 1.1.3. Martemorfosis 9 in Unknown
- 1.1.4. Bodeguita del Medio 6 in Unknown
- 1.1.5. Principal 17 in Sector
- 1.2. Wild West Pillars 8 in Area
-
1.3.
Middle Buttresses 23 in Area
- 1.3.1. The Mission Bell 3 in Cliff
- 1.3.2. The Pulpit 3 in Cliff
- 1.3.3. Twin Fins 11 in Cliff
- 1.3.4. Hawk's Perch 4 in Cliff
- 1.3.5. Rapter Ridge 1 in Cliff
- 1.3.6. The Flower Tower 1 in Cliff
-
1.4.
Upper West Canyon 19 in Area
- 1.4.1. Road Runner Rocks 10 in Cliff
- 1.4.2. Big Red Buttress 9 in Cliff
-
1.5.
Upper East Canyon 5 in Area
- 1.5.1. El Dedo 4 in Cliff
- 1.5.2. The Stash Pillar 1 in Cliff
- 1.6. Lower East Buttress 0 in Crag
-
1.1.
The School Wall 47 in Crag
- 2. Index by grade
1. Alcocer 102 routes in Area
- Summary:
-
Sport climbing, Trad climbing and Top roping
Lat / Long: 20.858026, -100.702627
description
Interesante zona de deportiva situada a tan solo 10 minutos de San Miguel de Allende. Las rutas son cortitas pero de alta calidad, tanto por la fricción y solidez de la roca (riolita) como por la belleza de secuencias de mivimientos. Hay 42 rutas de entre 8 a 20 metros y los grados van del 5.8 al 5.13 . Las rutas son más buenas y duras de lo que aparentan.
approach
Desde San Miguel de Allende dirigirse a Alcocer. la carretera se encuentra justo detrás del Liverpool. Cruzar el pueblo hacia arriba.Bien arriba pasaran por la Telesecundaria (lado izquierdo), seguir de frente y tras cruzar un pequeño arroyo estacionar el auto en una esplanada. Del estacionamiento caminar de regreso por la pista unos 20 metros y tomar un sendero a la derecha. Cruzar una alambrada y dirigirse al lado derecho del gran bloque en la explanada. Del lado derecho del bloque verán unos hitos de piedra indicando el sendero de ascenso a la zona. 5 minutos
where to stay
La explanada bajo la pared es una zona ideal para acampar. la zona es terreno ejidal y ya tenemos permiso para escalar y acampar. Pero sobretodo ser respetuosos con la comunidad y no dejar basura. En Alcocer hay dos tiendas de abarrotes. Se puede acampar en la explanada bajo la zona de escalada donde hay un enorme bloque con más de 10 problemas de boulder.
ethic
Ser respetuosos con la comunidad y no dejar basura.
1.1. The School Wall 47 routes in Crag
- Summary:
-
All Sport climbing
Lat / Long: 20.861403, -100.705708
description
Nueva zona de escalada recién salida del horno. Cuenta con 42 rutas con amplia variedad de grados (5.8 - 5.13b) por lo que es una zona interesante tanto para los escaladores principiantes como los de grado medio avanzado. Para los que quieran rutas de dificultad hay variosde 12's y tres 13's. La calidad de la roca es excepcional, de tipo riolita (origen volcánico) rojiza y gris muy sólida, con excelente fricción y generalmente regeletas netas y algun que otro agujero. Las rutas son más bien cortas, de 8 a 20 metros, pero de gran calidad (excelentes lineas bien protegidas). La zona se divide en 5 sectores en una misma franja rocosa. La orientación de la pared es Oeste y una parte del sector Chilaquiles es casi Norte por lo que es un buen lugar para las horas más calurosas. Hay un gran bloque en la explanada bajo el sector con interesantes problemas de boulder hasta V10. Se localiza a tan solo 10 minutos en auto de San Miguel de Allende y la caminata de aproximación es de tan solo 5 minutos
approach
Acercarse a la escuela es extremadamente fácil. Desde el área de estacionamiento del sudoeste (o si estaciona cerca de Telesecondaria) simplemente mire hacia el este. El muro es detrás de la Telesecondaria y ligeramente cuesta arriba. Camine directamente hacia él siguiendo cualquier camino obvio que le permita pasar por encima de la cerca de alambre de púas y Dirígete directamente a la pared. 250m, + 40m de elevación, 5 minutos.
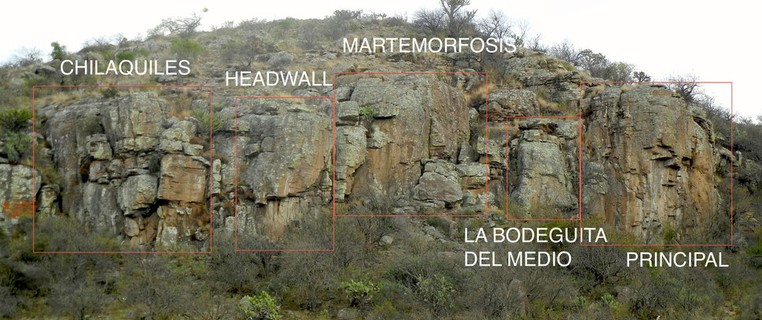 |
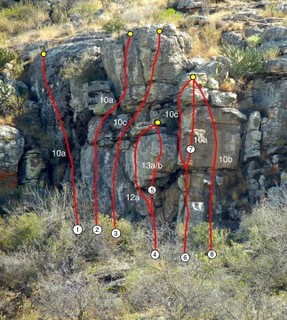
1.1.1. Chilaquiles 8 routes in Sector
- Summary:
-
Lat / Long: 20.861755, -100.705567
 |
||||||||
| Route | Grade | Style | Selected ascents | |||||
|---|---|---|---|---|---|---|---|---|
| 1 | La Enrampada | 5.10a | ||||||
| 2 | Chilaquiles Rojos | 5.10a | ||||||
| 3 | Chilaquiles Verdes | 5.10c | ||||||
| 4 | Rocky Balboa | 5.12a | ||||||
| 5 | La Panxa del Bou | 5.13a/b | ||||||
| 6 | ★★ Que No Neva Ni Plou | 5.10c | ||||||
| 7 | Col D' Hivern | 5.10a | ||||||
| 8 | La Chaparrita Vergonzosa | 5.10b | ||||||
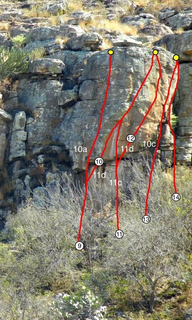
1.1.2. Headwall 7 routes in Unknown
- Summary:
-
Lat / Long: 20.861521, -100.705746
description
Rutas cortas, boulderosas. Super buena calidad de roca
 |
||||||||
| Route | Grade | Style | Selected ascents | |||||
|---|---|---|---|---|---|---|---|---|
| 1 | ★★ Stairway to Heaven | 5.10a | ||||||
| 2 | Mr Hook | 5.11d | ||||||
| 3 | Jalathé | 5.11c | ||||||
| 4 | ★★★ Brown Wall | 5.11d | ||||||
| 5 | ★★ Alcocer Free | 5.10c | ||||||
| 6 |
★★★ ??? Connection
Connecta la ruta de Alcocer free con la de Brown wall (Alcocer free y porkishead no tienen reunion) | 5.11a | ||||||
| 7 |
Porkishead
Esta ruta no tiene la reunión (hay tornillos pero faltan los bolts y la cadena) | 5.11a | ||||||
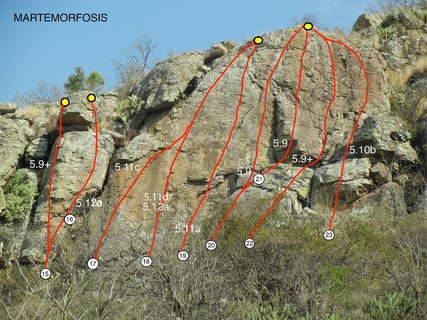
1.1.3. Martemorfosis 9 routes in Unknown
- Summary:
-
Lat / Long: 20.861331, -100.705823
 |
||||||||
| Route | Grade | Style | Selected ascents | |||||
|---|---|---|---|---|---|---|---|---|
| 1 | La Arista Posible | 5.9 | ||||||
| 2 |
Royal Parches
Warning Fixed Gear: Se rompió un bloqueo de la mano derecha, se cree que ahora es 12.c | 5.12a | ||||||
| 3 | La Travesía Maldita | 5.11c | ||||||
| 4 | ★★ Martemorfosis | 5.11d/12a | ||||||
| 5 | ★★ La No Vale Pared Derecha | 5.11a | ||||||
| 6 | Paseo Espacial | 5.9 | ||||||
| 7 | Paseo Existencial | 5.9 | ||||||
| 8 |
Panamuri
Warning Flora and Fauna: Wasp hive warning | 5.9 | ||||||
| 9 | Paseo Ecológico | 5.10b | ||||||
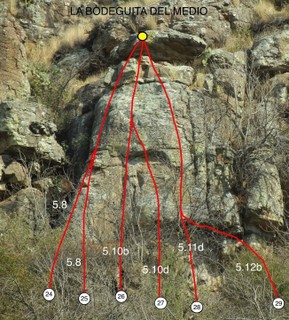
1.1.4. Bodeguita del Medio 6 routes in Unknown
- Summary:
-
Lat / Long: 20.861192, -100.705811
 |
||||||||
| Route | Grade | Style | Selected ascents | |||||
|---|---|---|---|---|---|---|---|---|
| 1 |
★★ Adniel
Warning Fixed Gear: Se eliminaron las Primeras dos placas | 5.8 | ||||||
| 2 | ★★ Andenay | 5.8 | ||||||
| 3 | ★★ Afro Cuban All Stars | 5.10b | ||||||
| 4 | Compai | 5.10d | ||||||
| 5 | Buena Vista Social Roof | 5.11d | ||||||
| 6 | ★★ La Bodeguita Del Medio | 5.12b | ||||||
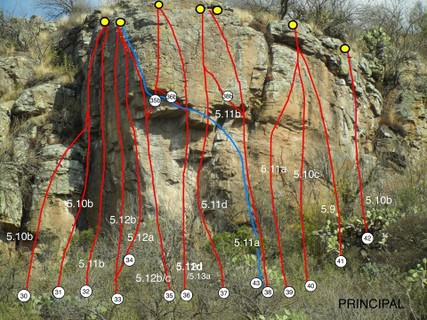
1.1.5. Principal 17 routes in Sector
- Summary:
-
Lat / Long: 20.861042, -100.705772
 /c4/92/c4928baf46d6a824719cb8c776662e859f80e901) |
||||||||
| Route | Grade | Style | Selected ascents | |||||
|---|---|---|---|---|---|---|---|---|
| 1 | ★ La Inadaptada | 5.10b | 19m, 7 | |||||
| 2 | ★★★ El Gran Xoxo | 5.10b | 19m, 8 | |||||
| 3 | ★★ Lasaña | 5.11b | 20m | |||||
| 4 | ★★★ Pau-xi-Pau | 5.12b | ||||||
| 5 | ★★★ Habanera | 5.12a | ||||||
| 6 | ★★ Magic Line | 5.12b/c | ||||||
| 7 | ★★★ Magic Line Direct | |||||||
| 8 | Funky Punky | 5.13a/b | ||||||
| 9 | Funky Punky Variante | |||||||
| 10 | ★★ El Planeta de Los Simios | 5.11d | ||||||
| 11 | ★★ Inlakesh | 5.11b | ||||||
| 12 | ★★ Terra Lliure | 5.11a | ||||||
| 13 | Variante Itaca | 5.11b | ||||||
| 14 | ★★ La Chidita | 5.11a | ||||||
| 15 | ★★ La Chula Loca | 5.10c | ||||||
| 16 | ★★ Bailando | 5.9 | ||||||
| 17 | ★ Pompitas Sabrosas | 5.10b | ||||||
1.2. Wild West Pillars 8 routes in Area
- Summary:
-
Sport climbing and Trad climbing
Lat / Long: 20.855968, -100.708857
approach
From the southwest parking area, take a path down to the arroyo and head south/southeast, crossing the arroyo and then following a path that follows the arroyo south. The pillars will be visible to the southwest. After about 250 meters, a faint path crossed the arroyo to the west (you will crawl under a barbed wire fence). Look for and follow a faint path uphill to the west that turns left (south) and continues uphill heading pretty much straight to the towers. A bit of bushwhacking may be necessary depending upon the season. 800m, +100m elevation, 20 minutes.
| Route | Grade | Style | Selected ascents | |||||
|---|---|---|---|---|---|---|---|---|
| 1 |
Bo’s Arete
Starts on the south side of this pillar and heads straight up the orange, overhanging face. Don’t panic – it’s pumpy and overhanging, but there is always a beautiful jug right where you want it. Four bolts to the anchor on top. 14 meters. | 5.10a | 14m, 4 | |||||
| 2 |
Bo's Backside
Climb up the dark, featured rock to a huge ledge, then move to the steep orange face and climb up on thin, crimpy holds to the anchors. Five bolts. 14 meters. | 5.10c | 14m, 5 | |||||
| 3 |
Ambush Ridge
Start at the base of the obvious narrow ridge and climb all the way to the top, staying on the arête. Anchors are on the face to the right. Five bolts. 15 meters. | 5.9 | 14m, 5 | |||||
| 4 |
Circle the Wagons
Start 1.5 meters to the right of the arête and climb straight up the face. Requires some gymnastic moves and balanced postures. Finishes at the same anchors for Ambush Ridge. Four bolts. 15 meters. | 5.10b | 15m, 4 | |||||
| 5 |
Train Robbers
Climbs up the obvious big dihedral on beautiful black rock to a ledge with a big tree. Sling the tree for protection then move up the wall on the right of the dihedral plugging cams all the way to anchors at the very top. Do NOT touch the huge chockstone! It moves and may come loose! 18 meters. GEAR: Cams to #3, slings. | 5.8 | ||||||
| 6 |
Blazing Saddles
Starts directly above the two intimidating huge barrel cactuses. Climb to the bolt and don’t fall or your saddle will never be the same. Ascend the crack then reach a bolt beneath the overhanging huge block. Surmount the block, clip another bolt, and mantle up to the anchors. Three bolts. 14 meters. GEAR: draws and a #1 cam for the crack. | 5.10b | 14m | |||||
| 7 |
Wild Horses
Climb the arête of the pillar on steep, delicate holds through two bolts, then head up and left to a third bolt beneath the huge block. Head straight up through and onto the block and to the anchors. 14 meters. Four bolts. The first bolt is high, so most will plug a cam in the big crack to the right (#2 or #3 Camelot). | 5.10c | 14m | |||||
| 8 |
Boots & Spurs
Climbs the crack and dihedral on the right side of the pillar. A 5.8 start leads to an alpinestyle scramble around the top of the pillar. This is the shortest path to top of the pillar. Best to lower or rap off the Train Robbers anchors. 15 meters. GEAR: Cams from .5” to 3”, a sling for a chockstone, & a hex or two. | 5.8 | 15m | |||||
 |
||||||||
1.3. Middle Buttresses 23 routes in Area
- Summary:
-
Trad climbing, Sport climbing and Top roping
Lat / Long: 20.856354, -100.702161
approach
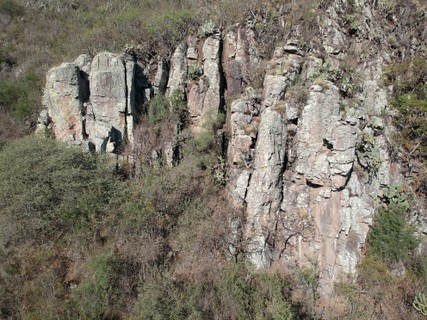
These areas can be approached from either parking area. The southwest parking area is both closer and higher, making for an easier approach. Begin the same as for approaching the Wild West Pillars, but after crossing the arroyo and hiking about 100 meters, head southeast up through the grassy field, aiming for the obvious saddle between the bluffs to your left (south of the School Wall) and a bluff due south. Obvious animal trails lead up and onto a large plateau. Upon reaching the plateau, the buttresses will be in clear view to the southeast (see the photo below). The base of the pulpit is an easy hike from here. [900m, +150m elevation, 20 minutes]. To hike to the top of the Mission Bell and Pulpit, simply aim right of the buttress and hike to the top. (an extra 100m distance, +20m elevation, +5 minutes). If you park in the northeast parking area, hike due south aiming for the canyon. The first few hundred meters can be hiked on the road, or you can turn off onto animal trails to the left so as not to lose too much elevation. Either way, follow trails due south, crawl under a barbed wire fence, and you will come to the large arroyo draining the canyon to the south and a huge bowl to the left (east). Head due south, cross the arroyo, and hike cross-country straight to the Pulpit, which is always clearly visible. 1.3km, +200m elevation, 30 minutes.
 |
1.3.1. The Mission Bell 3 routes in Cliff
- Summary:
-
All Sport climbing
Lat / Long: 20.856718, -100.702522
description
This buttress is located just to the west of the Pulpit.
| Route | Grade | Style | Selected ascents | |||
|---|---|---|---|---|---|---|
| 1 |
Tiffany-Twisted
Ascend the face just left of the obvious pillar, keeping on the face (no stemming out to the right!) and using the positive left-hand edge holds along the line of vegetation. Use good footwork on the tiny ledges to reach the overhang, then use the under-cling beneath the huge upper block (the “bell”) to reach up to clip the fourth bolt. Pull the overhang, finishing on the featured face to the huge, right-slanting ledge to the anchors. 5 bolts. 16 meters. | 5.10b | 16m, 5 | |||
| 2 |
Dark Desert Highway
Ascend the pillar, then head up just right of the central dihedral (clipping bolts out to the left) directly towards the loose blocks wedged beneath the “bell” (these are the “ball” of the “mission bell”). Delicately move up onto the huge block, heading straight up to the anchors. 16 meters. 5 Bolts. One or two extended draws are useful. | 5.10a | 16m, 5 | |||
| 3 |
Mercedes Bends
Start on top of the small slab base and move up to the first bolt on some delicate, small crimps or pinches. Then head straight up, take a break beneath the “bell”, pull the overhang, and head slightly left to the chains at the top. 5 bolts. 15 meters. OPTION: Stay directly in line or to the right (not the left) of the final two bolts for a more difficult finish that goes approx. 5.11a. | 5.10c | 15m, 5 | |||
1.3.2. The Pulpit 3 routes in Cliff
- Summary:
-
Trad climbing and Sport climbing
Lat / Long: 20.856792, -100.702321
| Route | Grade | Style | Selected ascents | |||
|---|---|---|---|---|---|---|
| 1 |
Pillar of Salt
Climb knobby pillar through three bolts then head up the slabby ridge around the right side of the huge hanging block, then trending left above to a bolt above the block (upper route A). Work left to another bolt then up the SE face of the upper headwall through two more bolts, finishing at anchors (two bolts and chains). Slightly run-out after the second bolt; can plug cams (#.75 to #2) in a small crack system if needed. 30 meters. | 5.9 | 30m | |||
| 2 |
Prodigal Son
Climb the crack system up to and around the huge hanging block to a sloping ledge, then head straight up the central upper face (upper route B) placing creative gear, with the best placement being a thread you can sling midway up. GEAR: Brown tri-cam, a sling for the thread, and cams to plug in pockets (#1 and #3). If feeling a bit prodigal with your gear, you can clip the bolt above the hanging block with an extended sling before taking on the upper headwall. Finishes at same top anchor as Preacher Man (two bolts and chains). 30 meters. | 5.10a | 30m | |||
| 3 |
Preacher Man
Climb up steep face on crimpers (crux between bolts one and two) to a hand ledge up and left, then move up and slightly right to the big ledge with anchors (two bolts and chains). Move straight up the steep and thin pink ramp (upper route C), find a creative way to pull over onto the N face, then head up the juggy face to the top anchors (two bolts and chains). 30 meters. | 5.10b | 30m | |||
1.3.3. Twin Fins 11 routes in Cliff
- Summary:
-
Trad climbing, Sport climbing and Top roping
approach
For approaching the base of the Twin Fins, The Hawk’s Perch, Rapter Ridge, and The Flower Tower (in that order), simply follow trails south up the canyon. Be sure to aim to the right, staying up-hill (do not be tempted to take easier, clearer paths that head downhill into the canyon – these make for much harder up-hill bushwhacking to reach the bases of the walls). Each of the areas are roughly 25 to 50 meters further from the previous ones, and perhaps 5 or 10 minutes of additional hiking.
| Route | Grade | Style | Selected ascents | |||
|---|---|---|---|---|---|---|
| 1 |
Moon Walk
Climb up the central crack for 5 meters, then sling knobs and horns all the way to the top. No anchor at top. Can build a trad anchor at the top for top rope or to bring up a second. Approx. 30 meters. Can also walk off the top. GEAR: Small to medium cams, slings. | 5.7 | 30m | |||
| 2 |
La Vida Loca
Follows start of Pura Vida for three bolts then heads up and left to the fourth bolt, with a run-out to the top that can be protected by placing a #1 cam in the crack above. Ends at the same anchors for Pura Vida. 20 meters. | 5.10b R | 20m | |||
| 3 |
Pura Vida
Climb up the line of five bolts to an anchor on a small ledge (two bolts and chains at the anchor). Can plug a small cam between bolt 4 and 5 for added protection if feeling the “pura vida”. 20 meters. | 5.10b | 20m | |||
| 4 |
Low Life
Climb straight up the dihedral, plugging gear in the dihedral’s crack, the step right to get over the large block, finishing with a brushy scramble to the top. No top anchors. Best to walk off. GEAR: cams and nuts. 25 meters. | 5.8 | 25m | |||
| 5 |
La Vida Directa
Start at the base of the short, steep face 2 meters north of the dihedral and head straight up the arête, staying to the right along the edge, plugging gear where you can find it (it’s sparse but there when needed). Head up to the big block at the top, traverse up its left sloping edge, then plug a piece in the big dihedral and move to the anchors of Pura Vida. 25 meters. GEAR: Small cams up to #2, nuts, slings. | 5.9 | 25m | |||
| 6 |
Cheesecake
Start just right of the black dihedral, climbing the smooth rock on thin holds, straight up the arête thru four bolts to a small ledge for a short rest, then continuing up the arête thru four more bolts until it backs off to a ridge and runs out (can plug a cam) to the anchors (two bolts & chains) on top of the North Fin. 30+ meters. Watch your rope length! FA: | 5.10c/d | 40m | |||
| 7 |
Bullet Tooth Tony
Starts on the featured face four meters north of LA COLUMNA. Climb up to the featured short face to the ledge, stepping over the cactuses to get onto the upper wall staying two meters to the right of the arête, then directly up the overhanging face via jug holds, topping out at anchors on the North Fin. GEAR: Top rope for now – we plan to bolt this route. 30+ meters. Watch your rope length! | 5.9 | 40m | |||
| 8 |
Gorgeous Gorge
From the anchor on the ledge beneath the Fins climb up the vertical and overhanging bolt line toward the tip of the North Fin through five bolts, then up a short, low-angled ridge to the anchors at the top of the North Fin. 20 meters to anchors from ledge. | 5.10c | 20m | |||
| 9 |
Franky Four Fingers
From the ledge beneath the Fins, climb the black dihedral at the north end of the ledge, stemming if needed, up to a small dirty ledge beneath a big chockstone. Go over the chockstone and into the wide chimney, finishing either up to the right to the anchors for SAMBA and DOCTOR LOVE or up and to the left to the anchors on the top of the North Fin. GEAR: Cams from #.5 to #3 and a small nut or two. 20 meters to anchors from ledge. | 5.8 | 20m | |||
| 10 |
Samba
Starts just to the north of the bottom of the Fins, up easy ground to the first bolt, then up over a big step to a second bolt beneath a tiny cave. Climb up and left, following a crack system to the large, sloping ledge. Step up onto the ledge and toward the large chimney and chockstone above FRANKIE FOUR FINGERS, finishing the same as that route. GEAR: Cams from .5 to #1, a #3, and/or some medium nuts. Variation: Upon reaching the large sloping ledge, you can move to the right beneath the small roof, clip the bolt, and finish up through the roof as for DOCTOR LOVE. 30+ meters. Watch your rope length! | 5.8 | 40m | |||
| 11 |
Mister Simmons
Climb through the first bolt of Samba, moving right to the obvious crack system. Ascend the cracks straight up, lying back off the big flake, then up to the sloping ledge to a bolt beneath the small roof. Move up and grab the big tongue of rock (Gene Simmons-sized) on the roof, puling the roof to a small ledge and another bolt. Step left and up the bulging rock onto the ridge and to the anchors (two bolts and chains). GEAR: small to medium sized cams and nuts. Save the #.75 for protecting the move to get over the roof. 30+ meters. Watch your rope length! | 5.10b | 40m | |||
1.3.4. Hawk's Perch 4 routes in Cliff
- Summary:
-
All Trad climbing
approach
Hike up the canyon past The Pulpit and the Twin Fins Buttress, following animal trails as closely to the rock walls on your right as possible. The first route here is approximately 20 meters south of the Moon Walk and 30 meters south of the Twin Fins.
| Route | Grade | Style | Selected ascents | |||
|---|---|---|---|---|---|---|
| 1 |
Counter Offer
Starts just south of the obvious gully and heads up a slab to a bolt beneath the roof to the right. Step into the steep gully, plugging small cams, and head up to another bolt at top of the ridge, then climb over the big block . Sling huge boulders above for an anchor. 15 meters, two bolts. There are no bolted anchors at the top, so bring enough gear to build an anchor. GEAR: Small to medium cams, nuts, slings. | 5.10b | 15m, 1 | |||
| 2 |
Red Zone
Climb the big slab just right of the gully, up to a left-sloping ramp beneath a small overhang where the ramp ends. Then head straight up and slightly to the left, following the crack system that tops out between the gully and the huge vertical block (the “Perch”). Head further up on easy ground and build an anchor in blocks to the left of the Perch. There are no bolted anchors at the top. GEAR: Small to medium cams, nuts, slings. | 5.10a | ||||
| 3 |
Mellow Yellow
Follows the start of The Red Zone to the end of the ramp, then head straight up and slightly to the right, following a winding crack system all the way to the top. The crux is the last there meters beneath the top-out below the Perch. Build and anchor up and left of the Perch. GEAR: Small to medium cams, nuts, slings. | 5.10b | ||||
| 4 |
Purple Rain
Climb the slab plugging gear in the crack to the right while avoiding the serious barrel cactuses. Continue up the steeping face to beneath the small tree, plug a good piece, and make a move up and to the right of the tree (without grabbing it!). Then follow the slabby arête up to a two-bolt anchor at the base of the Hawk’s Perch. GEAR: Cams from .5” to 3”, nuts. | 5.9 | ||||
1.3.5. Rapter Ridge 1 route in Cliff
- Summary:
-
All Trad climbing
approach
Hike further up canyon, again staying as closely to the rock walls on your right as possible. It’s approximately 30 meters from the Hawk’s Perch, but seems longer thanks to some moderate bushwacking.
| Route | Grade | Style | Selected ascents | |||
|---|---|---|---|---|---|---|
| 1 |
Rapter Ridge
Climb up the ramp to the obvious crack that leads to an orange overhang. Get good hands to lean out and step up, plug a solid piece or two in the good crack in the dihedral, then pull up on some overhanging jugs to a small ledge. Sling a horn or two, and move up the easier ground to some big huge blocks. From here, the route becomes and alpinestyle scramble, interrupted with occasional bushy areas, following the ridgeline as high as it goes. Most will feel comfortable soloing this ridge. See the photo for the upper portion. | 5.9 | ||||
1.3.6. The Flower Tower 1 route in Cliff
- Summary:
-
All Trad climbing
approach
This tower just up-canyon from Rapter Ridge. To find it, stay as far west and up high as possible as you move up the canyon. There is an animal trail that meandersalong the base of the various slabs and walls. It’s approximately 50 meters up-canyon (south) of the start of Rapter Ridge.
| Route | Grade | Style | Selected ascents | |||
|---|---|---|---|---|---|---|
| 1 |
Flower Power
This “ballsy” route starts up the north angling ramp and into the steep system of short cracks and pockets, then heads straight up (pick your own way) to the top, where the angle backs off. Protection on this route is spotty, and the rock quality is marginal in spots. Climb this route carefully and beware of loose rock!!! There are no bolts or anchors on this pillar. Create a belay or top-rope anchor up on top with gear. There is an easy walk-off from the top. GEAR: A set of nuts, cams up to #2 (single stem are better to fit into pockets), and slings for knobs and horns. Tri-cams are useful in the pockets. FA: | 5.10a | ||||
1.4. Upper West Canyon 19 routes in Area
- Summary:
-
Trad climbing, Sport climbing and Top roping
Lat / Long: 20.854008, -100.701816
approach
To these areas, approach as per the Middle Buttresses and hike up above the Mission Bell and Pulpit. From here, continue hiking due south, up-hill, aiming for the top which is clearly visible. You will crawl under a barbed wire fence (easiest by aiming for the exposed rock to the left, where there is a large opening in the fence). Continue up on faint paths and rock ridges. At the final ridge of rock, where you will be able to clearly see the Road Runner Rocks walls and the brush-filled bowl at the base. From here you can scramble down into the bowl and take a path to the base of the Road Runner climbs, or you can continue up to the top where anchors can be safely (if carefully done) reached to set up top-ropes or to rappel to the base of the climbs. The top of the climbs on Big Red are a further 20 meters or so past the oak tree on top of the Road Runner Rocs. From the southwest parking to the top: 1.25km,+250m, 30 minutes. To approach the base of the climbs on Big Red, follow the approach description for the Middle Buttresses and hike to the small plateau on top of the Mission Bell and the Pulpit. From this point, hike due south straight toward Big Red, staying level (not ascending). A faint path and some light bushwhacking will lead to a narrow gully that you will traverse and climb onto a ramp of rock. Scramble along the rock, continuing due south, with some steep walls on your right and the canyon below on your left. This leads to a some brushy spots, some more scrambling on steep slabs, and eventually into a small bowl beneath Big Red where you will be at the base of all the climbs. From the top of the Pulpit, it’s approximately 300m in distance and the same elevation.
1.4.1. Road Runner Rocks 10 routes in Cliff
- Summary:
-
Trad climbing, Sport climbing and Top roping
Lat / Long: 20.854007, -100.702106
 |
||||||||
| Route | Grade | Style | Selected ascents | |||||
|---|---|---|---|---|---|---|---|---|
| 1 |
Gravity & Anvils
Start just north of the arête at the south end of the pillar, moving up on small ledges and crimps. The start is harder the closer you stay on the true arête, and easier if you climb a meter from the arête. Either way, climb through two bolts to the overhanging bulge, clip the third bolt pull onto the bulge. Then move up and pull the second bulge, then take advantage of the big features moving up and left to the anchors at the top on the south (left) side of the arete. 15 meters. Five bolts. | 5.10d | 15m | |||||
| 2 |
★★ Ícaro
Pretty line in the middle of the cliff. | 5.11b | 15m, 6 | |||||
| 3 |
Coyote Rocket Ride
Starts near the north edge of the southern-most pillar of rock. Climb up the steep bottom face, plugging gear in short cracks, and head to the hammered-in knife-blade beneath the big block. Move up the left side of the block, then step out right onto the face of the block and pull up for a short rest on top of the block. Step up and move left on thin holds to plug gear in a pocket, then head straight up to some short thin cracks, plug a piece, and climb the overhanging jugs to anchor. GEAR: Small to medium cams, nuts, a medium hex or a 2” single-stem cam (Trango #7) for the pocket (Camelots don’t fit). And balls. 14 meters. | 5.10b | 14m | |||||
| 4 |
Crack Me Like a Whip
This is a spicy alternate finish to Acme Suction Cups. After clipping the third bolt, traverse left to the arête. Climb up the overhang, plugging a big cam in the crack, then take a rest on the big ledge. Traverse left on the ledge deep into the huge dihedral to the bottom of a big flake with a crack. Climb the crack all the way to the top, plugging cams. GEAR: cams ½” to 2”. 17 meters. Note: this route is not shown in the topo photo, but it’s easy to see once you go left around the corner. | 5.10c | 17m | |||||
| 5 |
Acme Suction Cups
Climb straight up as close to the arête as possible through the first three bolts of Super Speed Vitamins. Extend the third bolt with a sling to prevent rope drag (clip it with an alpine draw). After the third bolt, traverse left to the arête. Head straight up straddling the arête, finding the big holds while making bouldering moves to the top. Anchors are around the corner on the south face at the very top of the pillar. GEAR: Draws for six bolts and one alpine draw or sling for the third bolt. 17 meters. | 5.10b | 17m | |||||
| 6 |
Super Speed Vitamins
Starts one meter to the right of the south edge of the block and heads straight up the bolt line on the face, staying one meter to the right of the arête, to a two bolt anchor at the top. Five bolts. 16 meters. | 5.10a | 16m | |||||
| 7 |
Chariots of Fur
Start in the dead center of the face and move straight up through loads of features. You have the option of finishing at the Fast and Furry-ous anchors to the right (14 meters) or at the Super Speed Vitamins anchors to the left (16 meters). Both options are rated 5.9. | 5.9 | 16m | |||||
| 8 |
Fast & Furry-ous
Starting just left of the corner, climb up the steep face to a bolt, then head straight up to a short slanting crack approx.. 2.5 meters above the bolt and slightly to the right. Plug a small cam or nut, then head straight up through three more bolts to anchors. Climbing upper half just left of the bolt line goes at 5.10b, while just right of the bolt line goes 5.10c. GEAR: Draws for four bolts and one ½” cam or nut placement (BD Camelot .5 or Yellow Alien/Totem). 14 meters. | 5.10b | 14m | |||||
| 9 |
Invisible TNT
Head straight up the south arête through heavily featured yet steep terrain, staying north (right) of the true arête and angling up and right to the anchors. 14 meters. | 5.10a | 14m | |||||
| 10 |
Earthquake Pills
Start beneath the obvious overhanging bulge, moving up and around the left of it, then swing right onto the bulge and move up, sling the big chicken head, and move up to a left slanting crack (takes a #2 cam) and onto a small ledge, then straight up to anchors. GEAR: Small to medium cams, nuts, slings. 14 meters. | 5.10a | 14m | |||||
1.4.2. Big Red Buttress 9 routes in Cliff
- Summary:
-
Sport climbing, Trad climbing and Top roping
Lat / Long: 20.854067, -100.701483
approach
Hike up to and above the Pulpit, then follow animal trails all the way up to the top of the bluff to rappel to the base of the routes. It’s approx 1.5 km and 300m of altitude gain from the parking lot across from the School Wall. You can approach from down in the canyon, hiking up staying as close to the west-side bluffs as possible, but it involves some bushwacking.
| Route | Grade | Style | Selected ascents | |||
|---|---|---|---|---|---|---|
| 1 |
War Hammer
A steep and crimpy ride up the base of Big Red’s south face. Five bolts to the anchors of Button Up. 20 meters. You can continue up the buttress via Southpaw and T’Arete’s Syndrome all the way to the top. | 5.10d | 20m | |||
| 2 |
Button Up
It might be a 5.8 move off the ground, but once you get up 3 meters to the sloping ramp, it’s a low 5th class ride up to the anchors. Two bolts. 15 meters. | 5.7 R | 15m, 2 | |||
| 3 |
Southpath
From the anchors at the top of Button Up, head up and slightly left through the steep pink face, turning the corner onto the south face, then head straight up and slightly right through a few bolts to the anchors at the big ledge. Those uncomfortable with the run-out after the third bolt can plug a small cam in a pocket. 15 meters. | 5.8 R | 15m | |||
| 4 |
Cracker Jacked
From the anchors atop Button Up step up and right, clipping one bolt, then climb into the finger crack and fight your way up through 5 meters of pain. Skirt right around the huge block and climb up to the anchors. GEAR: Small to medium sized cams & nuts. | 5.10c A1 | ||||
| 5 |
Tarete's Syndrome
An alpine adventure that offers the easiest route off climbs #1 thru #4 (and the preferred way to rap into them). From the P2 anchors climb over and down the pillar then head up the ramp toward the airy arête. Sling the obvious pyramid horn , then traverse left and upward toward the top, plugging small cams. Pull a 5.10b/c move to the anchors if you avoid grabbing the little tree. GEAR: Small cams, slings. 25 meters. | 5.8 | 25m | |||
| 6 |
Red Feather
Head up the ramp aiming for the crack in the dihedral and follow that crack as is steepens, moving up to a small roof where the crack peters out. Step out left to move up and around the overhang, then continue up and slightly right to a big, sloping ledge and move toward the base of the big, vertical crack that heads up the steep dihedral. A two bolt anchor is above a big pyramid flake at the base of the dihedral. GEAR: Cams from .5” to 3”, nuts. Pitch 2 - 5.10b Trad – Head straight up the dihedral crack, stemming and jamming and fighting your way to the big ledge 15 meters up. GEAR: Medium to large cams up to #4. | 5.10b | 2 | |||
| 7 |
★★★ Garden of Eden
Pitch #1: Head up the dihedral with a crack in the solid black rock. Climb up to the cactus then step right onto a ledge, then move up and back left, following the finger crack in the dihedral on your left all the way up to a ledge beneath blocky black rock and a two-bolt anchor. This is a long pitch, approx. 30+ meters. If you lower off or rappel from here, WATCH YOUR ROPE LENGTH & CLOSE THE SYSTEM WITH KNOTS IN THE ROPE ENDS!!! Pitch #2: Climb up the short, steep face above the anchor bolts. Place a small cam or nut in the groove above the bolts to protect the move off the belay, then pull up onto a small ledge and place a tiny nut in a crack near your right hip. Traverse left and slightly up, placing another small nut to protect the second from a pendulum fall. Move to the base of the steep pink wall and build a gear belay in the excellent cracks (there are no bolts). Pitch #3: Move up the cracks, onto the huge boulder, then ascend the grey pillar, best done by moving out right onto the pillar’s north face (enjoy the exposure!). Then head straight up, working through steep, blocky terrain (the rock is better quality than it appears), until you can pull over the edge into the brush and to the two-bolt anchor on the big boulder on top. 25 meters. Do NOT move left onto the orange and grey rock below the brushy finish – that section contains loose blocks and flakes. To top completely out, climb the short face to the west up to a big ledge with bolts and chain anchors. GEAR: Double set of cams (small to #3, or add a set of hexes) and a set of small nuts. | 5.10b | 3 | |||
| 8 | Toasted | 5.10c | 20m | |||
| 9 |
Red Heads Rule
Rap in from the top to the huge ledge and a set of anchors. Climb straight up the arête, occasionally getting into the deep dihedral, climbing up on crimpers and steep but solid rock. Watch out for wasp nests. Take a rest at the anchors on the nice ledge 2/3 of the way up, then climb easier terrain all the way to the top. 24 meters. An intermediate, two-bolt anchor is at the ledge 2/3 of the way up. | 5.10a | 20m | |||
1.5. Upper East Canyon 5 routes in Area
- Summary:
-
Sport climbing and Trad climbing
Lat / Long: 20.855620, -100.699594
approach
The climbs in this area are best reached from the northeast parking area. They can be reached from the other parking area, but it is a longer hike that involves gaining and then losing elevation. There is a well-worn, large animal path between the slope beneath the Middle Buttresses and the slope on the east side of the canyon. From the parking area, hike due south aiming for the canyon. The first few hundred meters can be hiked on the road, or you can turn off onto animal trails to the left so as not to lose elevation. Either way, follow trails due south, crawl under a barbed wire fence, and you will come to the large arroyo draining the canyon to the south and a huge bowl to the left (east). From here, it is best to aim southeast, left of the bottom of the canyon, and hike up the grassy slopes to the top of The Stash Pile. From there, scramble down on one of the many animal trails to the base of the Stash Pile or, if headed to El Dedo, stay high and traverse the slope so as to reach the top of El Dedo. Once there, scramble down around the south and west side of El Dedo for the easiest access to the base of the climbs. From the northeast parking area: 1.4km, +250m, 30 minutes.
1.5.1. El Dedo 4 routes in Cliff
- Summary:
-
Sport climbing and Trad climbing
Lat / Long: 20.855633, -100.699548
approach
It’s best to park at the north-east parking area (see front page “Directions”). From the parking, hike due south cross country, keeping the steep bluff on your left, and head down the road to the arroyo, where a path along the stream bed leads south and southeast, eventually crossing the stream as you head south into the main canyon. Stay east (left) of the stream bed in the main canyon, and hike upward (south) on animal trails until you reach the Dedo, which is visible on nearly the entire approach. Approx. 1.5 km, 200m of elevation gain, and about 20-30 minutes.
| Route | Grade | Style | Selected ascents | |||
|---|---|---|---|---|---|---|
| 1 |
Dedito
This is the climb to access the anchors on top of El Dedo. From the highest boulder on the south side of the pillar, step up and out to the right, clip a bolt, then swing onto the little ledge up and to the right, then it’s low angled, easy climbing to gain the top. One bolt. 5 meters. | 5.8 | 5m, 1 | |||
| 2 |
Hangnail
Starts at the bottom of the pillar’s northeast corner, heading up a thin slab of pink rock through three bolts to an overhanging flake and corner. Find a sharp pocket on the right side of the flake and swing out left, letting it all hang out as you aim for a good left hand to save you. If you find it, pull up and through an overhanging crack (plug a #2 Camelot, and yard on it if you must), then surmount the overhang. It’s juggy smooth sailing from there to the anchors. 20 meters. | 5.10d A1 | 10m | |||
| 3 |
Hammer & Thunder
Starts at the northwest base of the formation, climbing onto the big boulder then traversing left to get to the base of the crack separating the pink and grey rock. Climb the crack, plugging gear, and mantel onto a ledge. From the ledge, finish the route via the upper half of Under My Thumb. GEAR: Small to medium cams. 20 meters. | 5.10 | 20m | |||
| 4 |
Under My Thumb
Climbs the NW arête through three bolts to a sloping ledge. From the ledge, step out left and up and climb the overhanging face until it backs off, then head straight up to the anchors. A bit runout, so you may want to plug a #2 cam in the big crack on the slab beneath the anchors, but the climbing there is low fifth class. 20 meters. | 5.10a | 20m | |||
1.5.2. The Stash Pillar 1 route in Cliff
- Summary:
-
All Trad climbing
Lat / Long: 20.855949, -100.699518
approach
This tower is located just down-hill (north) and slightly east of El Dedo. It can easily be approached from the top when hiking into the canyon from the north-east parking area.
history
This pillar gets its name from the fact that Miguel stashed his rope on the top of this pillar, deep inside the big crack, to save having to carry it up when we decided to explore it a few days later. Fortunately, the rope was still there, unbothered by any people or critters.
| Route | Grade | Style | Selected ascents | |||
|---|---|---|---|---|---|---|
| 1 |
Stash & Flash
Start on the west side of the base of the pillar, in the corner, beneath a shallow crack and groove. Move up, plugging some creative pieces in the groove, then scramble up to the sloping ledge beneath the big, obvious fist-sized crack. Plug big cams in the crack and climb your way all the way to the top. It is an easy walk-off on the back side (east) of the top. There are no anchors or bolts on this pillar. GEAR: Big cams up to #5 (or #4). Big hexes are useful too. | 5.9 | ||||
1.6. Lower East Buttress 0 routes in Crag
approach
The easiest and shortest approach is to park in the northeast parking area. To get there, upon entering the village of Alcocer and arriving at the first intersection with the white school on your left and the pre-school with the Whinnie The Poo characters on your right, turn left. The road comes to a T in front of the old stone church. Turn left onto the dirt road and follow it around to the right, going down hill and past the dam on your right, through the cattle gate (usually wide open), then follow the cobblestone road past a few houses until it ends and becomes a dirt road heading up a steep hill to the right. Keep going, following the dirt road for about another 300 meters past several homes. Eventually the road becomes impassable. Park here. To get to the routes, follow what is left of the road up east, then it turns and heads south and downhill. Before you reach the last house on the left, leave the road and follow a well defined cattle path off left. Hike cross-country (the path may peter out) heading south east, trying to stay level in elevation. Crawl under the barbed wire fence, then continue south east and slightly uphill to another defined path. Follow the path and keep aiming south east and east. The buttress will appear up and to your left. Bushwack your way to the base of the wall.
history
Developed by Oriol Anglada (along with The School Wall), this buttress has approximately forty sport routes, ranging from 5.9 to 5.12? Unfortunately, no topo or specific route info is available. The climbs here are generally hard and short (no more than 20 meters; most are less than 15 meters). The rock is in general very sound and the routes are well-bolted with good anchors.
  |