A Crag Guide gives an extensive view of all sub areas and climbs at a point in the index. It shows a snapshot of the index heirachy, up to 300 climbs (or areas) on a single web page. It shows selected comments climbers have made on a recently submitted ascent.
At a minor crag level this should be suitable for printing and taking with you on a climbing trip as an adjunct to your guidebook.
This guide was generated anonymously. Login to show your logged ascents against each route.
Warning
Rock climbing is extremely dangerous and can result in serious injury or death. Users acting on any information directly or indirectly available from this site do so at their own risk.
This guide is compiled from a community of users and is presented without verification that the information is accurate or complete and is subject to system errors. By using this guide you acknowledge that the material described in this document is extremely dangerous, and that the content may be misleading or wrong. In particular there may be misdescriptions of routes, incorrectly drawn topo lines, incorrect difficulty ratings or incorrect or missing protection ratings. This includes both errors from the content and system errors.
Nobody has checked this particlular guide so you cannot rely on it's accuracy like you would a store bought guide.
You should not depend on any information gleaned from this guide for your personal safety.
You must keep this warning with the guide. For more information refer to our:
Usage policy
Contributors
Thanks to the following people who have contributed to this crag guide:
Campbell Gome
Kate Ferguson
Brendan Heywood
Nick Clow
Kieran Loughran
Derek Bredl
Diego DeDiana
Bradley Ransom
Andreas Aachen
Matt King
The size of a person's name reflects their Crag Karma, which is their level of contribution. You can help contribute to your local crag by adding descriptions, photos, topos and more.
Table of contents
- 1. Brain Death Boulder 14 in Boulder
- 2. Index by grade
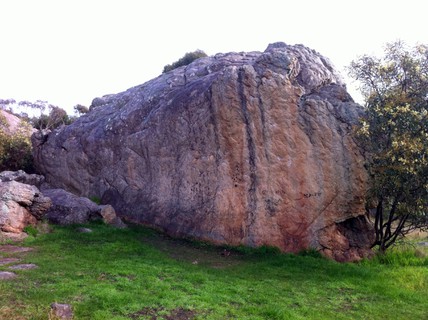
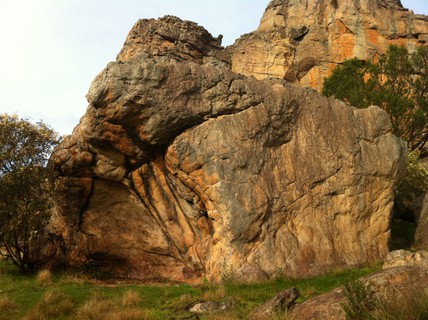
1. Brain Death Boulder 14 routes in Boulder
- Summary:
-
All Bouldering
Lat / Long: -36.766490, 141.851686
Stick to the paths.
Don't disturb the wildlife.
Routes near peregrine falcon nesting sites are closed in the spring.
Minimise the impact of your camping (fuel stoves not fires, take your rubbish with you, etc).
description
Emergency Location: Mount Arapiles, Declaration Crag Area
access issues
On Tuesday (3/12/19), Barengi Gadjin Land Council (BGLC) informed The Rockclimbing Roundtable (just in advance of public release) that rock art has been rediscovered at Declaration Crag (also known as Taylor’s rock), at Mt Arapiles.
Temporary Restricitons are in place from December 4th while the “Traditional Owners decide what they would like to do with this discovery and how to manage the site”.
ethic
Mount Arapiles is first and foremost a trad climbing area. The few sport climbs tend to be in the higher grades where no natural pro is available.
Bolting, particularly retro-bolting, is discouraged and should only be undertaken after extensive consultation with the local climbers, first ascensionists, etc. Inappropriately placed bolts have been chopped.
Do not chip the rock.
Look after the park.
 |
||||||||
| Route | Grade | Style | Selected ascents | |||||
|---|---|---|---|---|---|---|---|---|
| 1 |
V0 problem on left
Sit start | V0 | 2m | |||||
| 2 | V1 Problem (a) | V1 | 3m | |||||
| 3 | ★ Traverse | V3 | 10m | |||||
| 4 | ★ V4 Problem | V4 | 5m | |||||
| 5 | ★★ V3 pocket problem | V3 | 5m | |||||
| 6 | ★ V1 Problem (b) | V1 | 4m | |||||
| 7 | ★ V0 Juggy Arete | V0 | 4m | |||||
 |
||||||||
| Route | Grade | Style | Selected ascents | |||||
| 8 | V0 Problem | V0- | 4m | |||||
| 9 |
★★★ Brain Death
Follow the wide crack the whole way up. FA: Henry Barber | 23 | 5m | |||||
| 10 | ★ Brain Death - Piker's Variant | V3 | ||||||
| 11 | ★★ L | V3 | 6m | |||||
| 12 | ★★ S | V2 | 6m | |||||
| 13 | ★★ D | V3 | 6m | |||||
| 14 | ★★ The Big E | V5 | 5m | |||||
2. Index by grade
| Grade | Stars | Name | Style | Pop | |
|---|---|---|---|---|---|
| V0- | V0 Problem | 4m | |||
| V0 | ★ | V0 Juggy Arete | 4m | ||
| V0 problem on left | 2m | ||||
| V1 | V1 Problem (a) | 3m | |||
| ★ | V1 Problem (b) | 4m | |||
| V2 | ★★ | S | 6m | ||
| V3 | ★ | Brain Death - Piker's Variant | |||
| ★★ | D | 6m | |||
| ★★ | L | 6m | |||
| ★ | Traverse | 10m | |||
| ★★ | V3 pocket problem | 5m | |||
| 23 | ★★★ | Brain Death | 5m | ||
| V4 | ★ | V4 Problem | 5m | ||
| V5 | ★★ | The Big E | 5m |