A Crag Guide gives an extensive view of all sub areas and climbs at a point in the index. It shows a snapshot of the index heirachy, up to 300 climbs (or areas) on a single web page. It shows selected comments climbers have made on a recently submitted ascent.
At a minor crag level this should be suitable for printing and taking with you on a climbing trip as an adjunct to your guidebook.
This guide was generated anonymously. Login to show your logged ascents against each route.
Warning
Rock climbing is extremely dangerous and can result in serious injury or death. Users acting on any information directly or indirectly available from this site do so at their own risk.
This guide is compiled from a community of users and is presented without verification that the information is accurate or complete and is subject to system errors. By using this guide you acknowledge that the material described in this document is extremely dangerous, and that the content may be misleading or wrong. In particular there may be misdescriptions of routes, incorrectly drawn topo lines, incorrect difficulty ratings or incorrect or missing protection ratings. This includes both errors from the content and system errors.
Nobody has checked this particlular guide so you cannot rely on it's accuracy like you would a store bought guide.
You should not depend on any information gleaned from this guide for your personal safety.
You must keep this warning with the guide. For more information refer to our:
Usage policy
Contributors
Thanks to the following people who have contributed to this crag guide:
alex
benjamin james eichler
Doug McConnell
Kieran Loughran
Alex Trnovsky
Campbell Gome
Ben Eichler
ACAV
DodB
Brendan Heywood
The size of a person's name reflects their Crag Karma, which is their level of contribution. You can help contribute to your local crag by adding descriptions, photos, topos and more.
Some content has been provided under license from: © Australian Climbing Association Queensland (Creative Commons, Attribution, Share-Alike 2.5 AU)
Table of contents
- 1. Crag X 96 in Crag
- 2. Index by grade
1. Crag X 96 routes in Crag
- Summary:
-
Bouldering, Sport climbing and other styles
Lat / Long: -37.228184, 142.267627
Find out about and observe access restrictions and agreements.
Use existing access tracks to minimise erosion - keep to hard ground & rock surfaces.
Do not disturb nesting birds or other wildlife.
Protect all native vegetation, especially at the base of cliffs. Wire brushing to remove mosses and 'gardening' in cracks and gullies is not permitted. Use slings to protect trees while belaying or abseiling if belay anchors are not provided.
Respect sites of geological, cultural, or other scientific interest. Do NOT develop new climbs in or near Cultural Heritage sites.
Chalk has high visual impact - minimise your use of it. Parks Victoria have requested the use of coloured chalk in Gariwerd.
Minimise the placement of fixed equipment, especially where Trad gear is available. Respect any "no bolting" areas.
Do not leave any rubbish - take it home with you.
Dispose of human waste in a sanitary manner (bury, or even better pack it out). Do not pollute water supplies.
Off-road driving is illegal in Gariwerd.
Keep campsites clean, and do not light campfires outside of official metal fire pits.
description
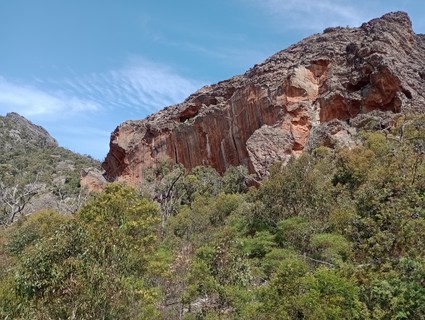
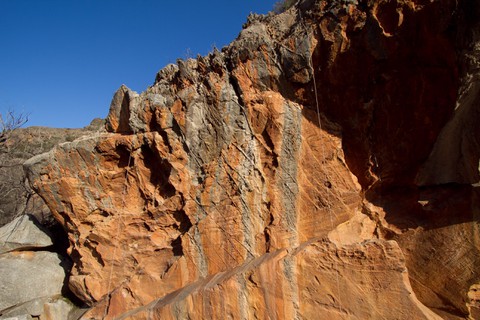
Crag X is a north-facing crag on the south side of Red Rock Creek with a distinctive orange wall streaked with black and white.
Scattered around this magnificent wall are a number of smaller outcrops, and these routes are also listed below (however it would probably make more sense if they were listed under a different area altogether, such as Red Rock Ck crags?). The valley is littered with boulders. It appears most have been climbed and named but which is which is anyone’s guess at this stage.
access issues
To be reviewed, although it should be noted that Crag X was listed as banned in the Draft GGLMP. It is within CV35, and the Crag-X Valley generally is known to contain Cultural Heritage sites.
ACAV Note: Parks Victoria has advised that rock climbing restrictions may apply at this location. Formal advice has changed several times during 2019. Please refer to the following link for current and detailed advice: https://parkweb.vic.gov.au/explore/parks/grampians-national-park/plans-and-projects/rock-climbing-faq
approach
Park 200 metres south of the bridge over Red Rock Creek on Red Rock Road. You can spy Crag X from the road: it is the magnificent cliff on the south side of the Red Rock Creek Valley (don't get it confused with 'Queensland Cliff', which is located closer to the road but higher than Crag X and has two salient left-leaning diagonals).
A cairned track leads into the valley from the far side of the paddocks about 100m south of the creek. The track passes some small cliffs before a big blank wall is reached. The closer you get to the main wall of Crag X, the more the track becomes horrendously overgrown and impossible to follow.
Below are some historical notes about how access was once described, after the above mentioned "big blank wall". It's possible this might help you unearth the path. Good luck.
Just to the left is a short wall with some trad routes (19-22) upon it, and down by the creek is the Rivendell boulder. The next cliff is Sweet Dude block, with 3 sport routes. From here, the track veers down towards, and then along, the creek. It then passes through (!) a boulder and swings uphill past the Beard Boulder (some mega hard highball plus a few slabby sport routes) and up to the main cliff, arriving at its left hand end. The Empire of the Sun cave is just around the corner. From here the track branches off – heading down across the creek to the X Blox (2 minutes), or by continuing up the cliff line to the Solarium (10 minutes).
ethic
Grampians / Gariwerd access issues have emerged (2019) due to potential risk to the environment and cultural sites. Climbers need to be aware that there are significant Aboriginal sites in the Grampians, especially in cave areas. Please take time to understand the access situation. Leave no trace and climb responsibly.
Please note that due to the fact that the Grampians is a National Park, dogs and other pets are not allowed in the park except in vehicles on sealed roads and in sealed car parks.
===Cliffcare Climber’s Code===
For more detailed information visit https://www.cliffcare.org.au/education
| Route | Grade | Style | Selected ascents | |||||
|---|---|---|---|---|---|---|---|---|
| 1 |
★★ Scenes From Highways
Arapiles like face you see on the left when entering crag x. Located adjacent to Red Rocks, the key is to access from other side of creek via cairns. Climb up gully to reach base of route. Bridge initial blankness. Pumpy! FA: Kent Paterson, 2017 | 27 | 20m, 9 | |||||
X Blox2 great face climbs (with two easier aretes upon which to warm up) are the attraction here. From the far end of Crag X (Empire of the Sun cave) follow the cairned track down across the creek and a short distance up the other side of the valley, to arrive at the cliff after passing through a shady chasm. It faces west so stays shaded until about 2. | ||||||||
| 3 |
Econo-babble
Climb the left hand arête past 4 FH to anchors. FA: Bill Begg & Alex Trnovsky, Feb 2016 | 12 | 18m, 4 | |||||
| 4 |
★ Hard Love Cowboys
A shameless linkup. Climb past the first two bolts of Econo-babble, then step right onto the face and climb past three more bolts to the anchors. FA: Andrew 'my love is hard' Clements & Alex Trnovsky, Jul 2016 | 19 | 18m, 5 | |||||
| 5 |
★ *Unnamed*
Sustained climbing on small holds up the thin seam leads to better holds with big moves to the ‘best hold in the Grampians’, followed by a delicate face to gain the jugs to the top. It looks slightly contrived to stay away from the arête but the nature of the climbing dictates your ethical purity. FA: Alex Trnovsky & Ball Bagg, Feb 2016 | 22 | 18m, 6 | |||||
| 6 |
★★ sanitize review
According to a bunch of yobbos who directed this insightful social observation at poor old Bill whilst he was jogging through Flinders Uni one afternoon. Technical and sustained climbing up the middle of the face with a steep juggy finish. FA: Alex Trnovsky & Bill Begg, Feb 2016 | 22 | 18m, 6 | |||||
| 7 |
★ Tryroxine
Follow the line of bolts just right of the arête to anchors FA: Bilbo Beggins & Brett Dodemaide, Feb 2016 | 17 | 15m, 5 | |||||
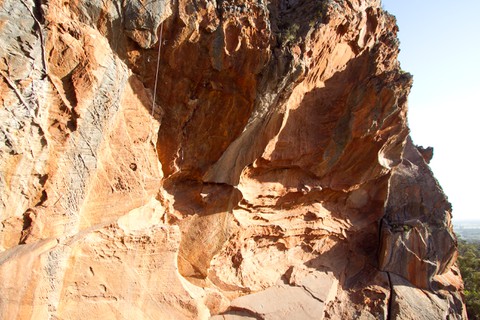
Empire of the SunThe big cave at the far left end of Crag X originally contained one trad route but has been recently modernised with lots of stainless. | ||||||||
| 9 |
★ Solar Flare
Up and right after the 2nd bolt on the "ledge" traverse. FA: Doug McConnell & Kerrin Gale, 10 May 2015 | 23 | 18m, 6 | |||||
| 10 |
★★★ Interstellar
The next line right of Solar Flare. Tricky slab, amazing jugs and a spicy finish. FA: Doug McConnell & Kerrin Gale, 10 May 2015 | 22 | 25m, 10 | |||||
| 11 |
★ Off the Grid
Traverse the "ledge" to the final grey streak. Up this to rest in PNtT before a bouldery finale up and right on scoopy Taipan rock. FA: Doug McConnell, 6 Jul 2016 | 28 | 35m, 12 | |||||
| 12 |
★ Traversty
The full "ledge" traverse finishing at the ledge between pitches of PNtT. Trickier than it looks but interesting climbing on great rock. Either finish up that route or bring second across and rap off single (massive) U bolt. Take mid sized cams to belay 0.5 to 2 inch. Or finish up PNtT FA: Doug McConnell & Kerrin Gale, 10 May 2015 | 25 | 25m, 7 | |||||
| 13 |
★★ Promise Not to Tell
The improbable-looking left-leaning crack on the far left-hand side of Crag X, behind a huge free-standing pinnacle.
FA: Simon Mentz & Louise Shepherd (alt), 1989 | 22 | 45m, 2 | |||||
| 14 |
★★★ Steeped in Sunshine
The awesome steep red wall above the ledge on PNtT. Start up that route (3 camalot and small cams and wires) to ledge. Build an anchor and extend to over lip of ledge for rope drag. (Double length sling). A small camalot (0.3/0.4) protects clipping the first bolt (placed high to not impact PNtT). Very pumpy, steep climbing on jugs leads to a powerful finale on immaculate rock. A 1 camalot can be placed between the last bolt and the double ring bolt lower off. A 60m rope can be used to climb in a pitch and lower to the ground. FA: Kerrin gale, 29 May 2018 | 27 | 28m, 6 | |||||
| 15 |
★★★ Orbital Drift
The line out the middle of the big red cave. Three sections with increasing difficulties separated by good rests. Rock quality is second to none at the top. Glory jugging up final corner to double U bolt belay. FA: Doug McConnell, 31 May 2018 | 32 | 30m, 10 | |||||
| 16 |
★ Romancing the Stone
Climbs the wall to the right of the huge cave. Great rock and pro. To access, traverse carefully across the slabby rock at the right hand end of the cave (easy but exposed) to the base of the wall and double bolt belay. Climb straight up to the ledge (where the Misty Wall routes start) then straight up wall above to double bolt anchors. FA: Bill Begg & Alex Trnovsky, 2016 | 15 | 20m | |||||
Misty WallFollow the natural ramp up the right side of the Empire of the Sun cave. The three routes lie on the wall above, requiring a committing scramble up the short corner. | ||||||||
| 18 |
★★★ Misty
An exciting spacey route with great climbing. Start on the steep arete. An exposed traverse past RB leads to a run out and delicate face with natural gear. Climb past a 2nd RB to join Misty Variant, arrange gear and top out. A yellow and green alien are useful to protect the top shallow break. FA: Benjamin Eichler, 2005 | 23 | 25m, 2 | |||||
| 19 |
★★ Misty [Variant]
Starting on the ledge, climb the right hand wall (on the detached block). Clip the RB on the main wall and make an exciting traverse left to gain the vertical seam. Arrange good wires and commit to a tough run out crux sequence. Place a green and yellow alien before reaching jugs as crack widens to the top. Rap from double bolts. FA: Ben Eichler & B Abernethy | 22 | 30m, 1 | |||||
| 20 |
★★ Alecto
A classic face climb. Start as for Misty Variant. From the first RB head straight up wall past a 2nd RB, some good natural gear (small to medium wires) and a 3rd RB which protects the crux. A powerful, run out crux sequence leads to jugs and good gear. FA: B Abernethy | 25 | 28m, 3 | |||||
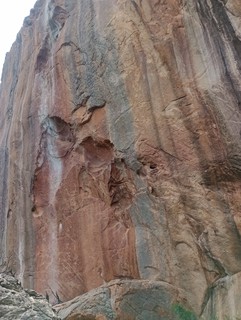
Main WallA gobsmacking wall (with barely any routes on it). To the right of the main wall are some smaller offerings. | ||||||||
| 22 |
★★★ Labyrinths
Start: Start at the left end of the main wall
FA: Steve Monks, Louise Shepherd (alt) & Parrish Robbins., 1989 | 25 | 50m, 2, 2 | |||||
| 23 |
Unknown 1
A line of rings. Might be Chris Coppard's project? | |||||||
| 24 |
Unknown 2
Line of fixed hangers that comes out of Unknown 1. | |||||||
| 25 | Unknown 3 | 2 | ||||||
| 26 |
A Visit From The Footbinder
The only slab for miles. Start on a detached flake 8 metres left of an arête on the large free standing block below the right end of the main cliff. FA: Louise Shepherd, Jane Wilkinson, Steve Monks & Simon Mentz, 1989 | 23 | 30m, 1 | |||||
| 27 |
★★★ Mysterious Journey
The left arete of the huge block leaning against the cliff about 50 metres left of "Don't Count Your X Before They Hatch"
FA: Steve Monks & Louise Shepherd, 1989 | 26 | 55m, 2, 1 | |||||
| 28 |
unknown
Line of old dodgy eye bolts up striking flake feature on detached block. Probably unclimbed, very hard at the top. Needs rebolting, new anchor bolts in place but no hangers. | 5 | ||||||
| 29 | Counting Your X Before They Hatch Direct Finish | 21 | ||||||
| 30 |
Counting Your X Variant Finish
Instead of exiting right at the top, launch out left along a superb hand traverse. There are two lines; one under the roof, and one two metres below, so who knows which one to take. They both look juggy albeit with a touch of loose rock and no pro, so make sure you're second isn't you... FA: Steve Monks, Louise Shepherd & Keith Lockwood, 1989 | 21 | ||||||
| 31 |
★ Counting Your X Before They Hatch
The big corner at the far right-hand side of the cliff. An unheralded classic in the climb-a-line-to-the-top-of-the-cliff-adventure vein. To descend, first follow your nose up the fragile chicken heads to the top, walk back from the edge, and follow an easy gully to the right. Scramble up the easy ramp to the base of the corner to start.
FA: Louise Shepherd, Steve Monks (alt) & Keith Lockwood, 1989 | 18 | 60m, 2 | |||||
| 32 |
Ramble On
Enjoyable, easy ramble. To get off - back climb down and right to step onto huge rock (which forms the right hand side of the aforementioned tunnel/cave). *Tricky Bouldering to get off this on the south side, or very exposed nth side (not recommended). Start: Starts just right of "Counting Your X Before They Hatch", just left of small cave/tunnel at detached block leaning onto face. FA: Joe Goding, Lawrie Cowley & Paul Tailien, 2005 | 10 | 18m | |||||
Beard BoulderA large freestanding boulder in the valley just below the main cliff. | ||||||||
| 34 | ★★ Bees Knees (Sit Start (S)) | V5 | ||||||
| 35 |
Bite The Bullet [Open Project]
An impossible looking line up the middle of the face past 3 ring bolts. | |||||||
| 36 |
★ Russian Roulette
Vertical slabbing. Follow the thin line up a great closed seam past 3 RB to DBB. FA: Brendon Abernethy, 2004 | 24 | 10m, 3 | |||||
| 37 |
★ Culture Shock
Obvious natural crack on the east face. Tricky, pumpy start to slabby top out. FA: N Smith & Ben Eichler, 2005 | 17 | 10m | |||||
| 38 |
★ Chained to the Massess (s)
Sit start on left of roof. Traverse left to right to finish on jug. | V3 | ||||||
| 39 |
★★★ Jumping Jack Flash (s)
Under the roof of Pixie. Out and right via a sloper, then left via crimps on lip to slope, and match up to jug. | V8 | ||||||
| 40 |
★★ Pixie
Start right of the arête on the north-east corner, climb up to RB an then traverse left to arête. Follow arête past 3 RB to tricky top out. Rap off (either dodgy dead tree or the DBB above Russian Roulette). FA: 2004 | 20 | 10m, 4 | |||||
| 41 | ★ Mosquito (S) | V3 | ||||||
| 42 |
★ Dirty Sanchez (s)
Sit start for eye candy. | V5 | ||||||
| 43 |
★ Eye Candy (s)
On the north face. The black wall and seam up and right. | V3 | ||||||
Sweet Dude BlockWell before the main cliff, this orange scooped cliff appears immediately after the big smooth red wall. The routes are perfect for warming up, or even as a worthwhile destination for a quick easy-access session. | ||||||||
| 45 |
★ Dude
Climb the left arête to chains. Can be climbed sport, or with an optional medium cam to eliminate the runout to the last bolt. | 21 | 12m, 3 | |||||
| 46 |
★ I heard the word dude and I became unglued
A much better way to sample Dude's start. From the 2nd RB head up and right past 3FH to chains. FA: Alex Trnovsky & Bill Begg, 2016 | 21 | 15m, 5 | |||||
| 47 |
★★ Sweet
Climb the right arête past 4 RB to no anchor. It's possible to traverse left to chains, or to climb diagonally left from the last RB to chains. | 21 | 12m, 4 | |||||
Small trad wallA small trad wall with 4 short trad routes in the 19-22 range. When you reach the big blank red/orange wall, look left, and there it is. A little further towards the creek lies the Rivendell boulder with some amazing-looking hard problems upon it's overhangs. | ||||||||
| 49 | Mixed Lollies | 13 | 30m | |||||
| 50 | Mase | 16 | 20m | |||||
| 51 | ★ Dead Beat Traverse | V3 | ||||||
| 52 | ★★★ Point Blank | V4 | ||||||
| 53 | ★★★ Shifty (s) | V5 | ||||||
| 54 | ★★★ Scorched Fingers (s) | V7 | ||||||
| 55 | Kang (s) | V4 | ||||||
| 56 | Mini Mon | V5 | ||||||
| 57 | ★ Mezzagade | V4 | ||||||
| 58 | ★ Mary Poppins | V3 | ||||||
| 59 | ★★ Butterfly Effect ( s) | V5 | ||||||
| 60 |
★★★ Nogan (s)
FA: Benjamin Eichler | V6 | ||||||
| 61 | ★★ Black Jack | V1 | ||||||
| 62 | Sumba | V1 | ||||||
| 63 | ★★ Anti Freeze | V3 | ||||||
| 64 | ★★ Honey Smacks | V2 | ||||||
| 65 | ★★★ Sub Zero | V3 | ||||||
| 66 | ★★ Mr Grace | V1 | ||||||
| 67 | Society Overload | V0 | ||||||
| 68 | Ocean Linear | V5 | ||||||
| 69 | ★★ Cadence | V2 | ||||||
| 70 | ★ Grabbing at Stars | V1 | ||||||
| 71 | ★★★ Shaddowfax (s) | V6 | ||||||
| 72 | Besiden | V6 | ||||||
| 73 | Velour (s) | V11 | ||||||
| 74 | ★★ Time Lord (s) | V2 | ||||||
| 75 | Neighbours in Space (s) | V1 | ||||||
| 76 | ★★ The Tardis (S) | V3 | ||||||
| 77 | Light Speed (s) | V3 | ||||||
| 78 | Another Planet (s) | V1 | ||||||
| 79 | ★ 400-Light years (s) | V2 | ||||||
| 80 | ★ Night Sky (s0 | V2 | ||||||
| 81 | ★ G-Force (s) | V2 | ||||||
| 82 | Korendor | V2 | ||||||
| 83 |
★★★ Miggerra (s)
Located in Cave at right side of main wall. Sit start out R) to dyno from poor crimp to jug FA: 2005 | V8 | ||||||
| 84 |
★★ Medossa (s)
Traverse L) out of Miggerra | V7 | ||||||
| 85 | ★★ Snoop | V5 | ||||||
| 86 | ★ MightyMouse (s) | V3 | ||||||
| 87 | Spontaneous Combustion (s) | V4 | ||||||
| 88 | ★ Dryreach (s) | V0 | ||||||
| 89 | Steam Machine (s) | V6 | ||||||
| 90 | ★ Wound socket (s) | V2 | ||||||
| 91 | AC Joint (s) | V3 | ||||||
| 92 | Heavens Above | V1 | 6m | |||||
| 93 | ★ My Mumma says (s) | V0 | ||||||
| 94 | ★ Shopping Trolley | V1 | ||||||
| 95 | Isle Number 6 (s) | V2 | ||||||
| 96 | Check out chick (s) | V2 | ||||||
| 97 | Price Check (s) | V1 | ||||||
| 98 | Police Station (s) | V1 | ||||||
| 99 | ★ Jail Break (s) | V4 | ||||||
| 100 | ★ Caterpualt (s) | V2 | ||||||
| 101 | ★★ Bobet | V3 | ||||||
| 102 | ★★★ Ambers (s) | V5 | ||||||
| 103 | ★★★ Acid Jazz | V3 | ||||||
    /bf/ce/bfce9818dfe31ead36b58842ce158a8a210e252a) 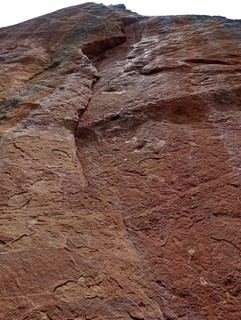 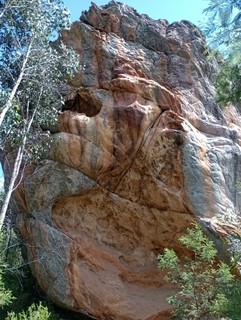 |
||||||||