A Crag Guide gives an extensive view of all sub areas and climbs at a point in the index. It shows a snapshot of the index heirachy, up to 300 climbs (or areas) on a single web page. It shows selected comments climbers have made on a recently submitted ascent.
At a minor crag level this should be suitable for printing and taking with you on a climbing trip as an adjunct to your guidebook.
This guide was generated anonymously. Login to show your logged ascents against each route.
Warning
Rock climbing is extremely dangerous and can result in serious injury or death. Users acting on any information directly or indirectly available from this site do so at their own risk.
This guide is compiled from a community of users and is presented without verification that the information is accurate or complete and is subject to system errors. By using this guide you acknowledge that the material described in this document is extremely dangerous, and that the content may be misleading or wrong. In particular there may be misdescriptions of routes, incorrectly drawn topo lines, incorrect difficulty ratings or incorrect or missing protection ratings. This includes both errors from the content and system errors.
Nobody has checked this particlular guide so you cannot rely on it's accuracy like you would a store bought guide.
You should not depend on any information gleaned from this guide for your personal safety.
You must keep this warning with the guide. For more information refer to our:
Usage policy
Contributors
Thanks to the following people who have contributed to this crag guide:
Hisa
Brendan Heywood
Dylan Tubaro
Daniel da Silva
Ryan Sklenica
Phillip Booth
Murray
Dave Hoyle
Gen Giddings
Emmanuel Madayag
The size of a person's name reflects their Crag Karma, which is their level of contribution. You can help contribute to your local crag by adding descriptions, photos, topos and more.
Table of contents
- 1. Cheesedale bouldering 26 in Area
- 2. Index by grade
1. Cheesedale bouldering 26 routes in Area
- Summary:
-
All Bouldering
Lat / Long: -34.854274, 150.591284
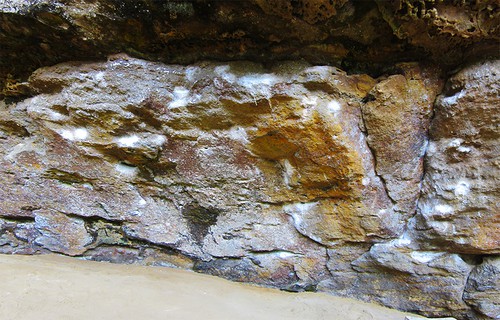
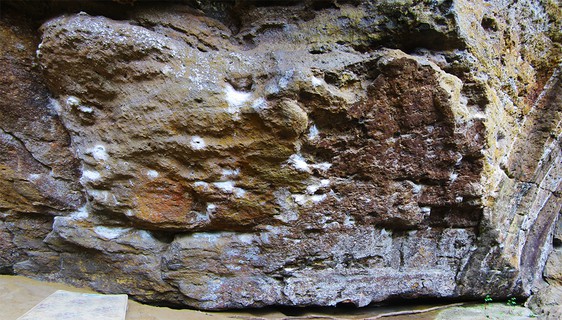
description
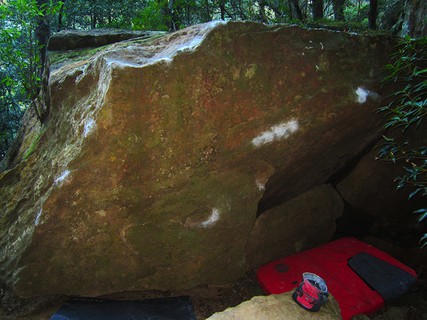
The cave faces South and is so large that it never actually gets the sun on it making it great for summer and winter alike but it is notoriously "greasy" outside of winter so add a few grades. The cave is large enough to not get wet in the rain but it does seep occasionally. The rock is sandstone and almost all of the holds are chipped so if you're not in to that sort of thing then head to Lot 33 instead. Many of the chipped holds have been filled in since this info was written on the old ausbouldering site. Take grades with a pinch of salt... They may be much harder now...
access issues
This climbing area has recently become a focus spot for tension between climbers and the local Aboriginal community. Be informed and respect closures. Clean up chalk and rethink adding additional new routes to crags with access issues.
approach
Turn into Illaroo Rd off the Princes Highway at North Nowra, just north of the Shoalhaven River. Take the 2nd right which is Philip Rd opposite the church and just after the school. Take the first left, Castle Glen Rd, and at the end turn right into Jamieson Rd. Park at the end off Jamieson Rd, North Nowra and head down the path at the end into the Bomaderry Creek Bushland. Follow the track downhill for 100m until you find a small track heading left and crossing the creek just after a small waterfall. Be careful crossing the creek and follow the track another 50m until you hit a big cave with bolted climbing, this is known as South Central. Walk through South Central and follow the path for about 100m until you reach a t-intersection. Turn right and follow the path down the hill and head left before you get to the creek. About 50m further along take the vague left track that heads up the hill to the big cave, this is Cheesedale.
ethic
Mostly developed as a sport climbing and bouldering area. Some trad climbing exists, mainly the pure cracks. If developing new areas keep an eye and and ear out for Aboriginal cultural heritage, including cave art.
  |
||||||||
| Route | Grade | Style | Selected ascents | |||||
|---|---|---|---|---|---|---|---|---|
| 1 |
★ Easy
Sit start and climb the arete on its right side. FA: Jack Folkes, 29 Jun 2014 | VB | 2m | |||||
| 2 |
★ As
Cramped sit start on big jug. Move straight up via sloper to top out. FA: Jack Folkes, 29 Jun 2014 | V0 | 2m | |||||
| 3 |
★ Pi
Cramped sit start on big jug. Head out right on slopers before topping out. FA: Jack Folkes, 29 Jun 2014 | V1 | 3m | |||||
| 4 |
★★ Curves
Sit start and traverse right to top out over the bulge. | V5 | 4m | |||||
| 5 |
★ Easy As It Gets
Sit start under the small roof. Move right through honeycombs to top out over the bulge. | V3 | 2m | |||||
| 6 |
★ Locked & Loaded (Direct)
Contrived but how i believe it was originally climbed, Without using the lefthand underling. lock it and load it! | V8 | 3m | |||||
  |
||||||||
| Route | Grade | Style | Selected ascents | |||||
| 7 |
★★ Locked & Loaded
Sit start and up left on slopers & underling to finish at break. going direct is a v8 | V6 | 2m | |||||
| 8 |
★ Pack Your Guns
Sit start and up right on slopers to finish at break. | V5 | 2m | |||||
| 9 |
★★ Lever Action
Up the right trending flake. | V6 | 2m | |||||
| 10 |
★ Draw Back LHV
Start on the undercling and move up to the two crimps, then a long move to the first break. Head left to the rail then back right to the break it's "only" V10. FA: Steve Bullen | V10 | 3m | |||||
| 11 |
★★★ Draw Back
Start on the undercling and move up to the two crimps, then a long move to the first break. Go straight up from here to the next break it's Australia's first V11. FA: Steve Bullen | V12 | 3m | |||||
  |
||||||||
| Route | Grade | Style | Selected ascents | |||||
| 12 |
★★ Syncope
Start from obvious jug. Right hand to crimp and Left hand to side-pull pocket to finish at break. (please edit the name if you know the name of this line). | V9 | 2m | |||||
| 13 |
★★ Guns & Ammo
Sit start and up then left to finish at the break out left. | V8 | 3m | |||||
| 14 |
★★ Reload
Sit start and up right to finish at the break. | V8 | 3m | |||||
| 15 |
★★★ Bumpy Boys
Start as for Jug to Jug to the LH slot but then head left across Turbo Guns via two difficult cross overs to finish left of that problem. FA: Sam Edwards | V12 | 4m | |||||
| 16 |
★★★ Turbo Guns
Start on the big break then LH cross-over to pocket and bust RH to break. Match and then long move with RH to gaston the slot, LH up to the 3 finger pocket and jump around the bulge, control the swing and finish matched on the jug just up and right. Australia's first V10 and still the benchmark. FA: Steve Bullen | V10 | 3m | |||||
| 17 |
★ Jug to Jug
Start as for Turbo Guns but from the first break go with the LH to the gaston slot of Turbo Guns then a super long move around the bulge and finish as per Turbo Guns. FA: Steve Bullen | V11 | 3m | |||||
| 18 |
★★ Bumpy Girls
Start on the starting holds of Pearl Necklace but head left via shallow underclings and pockets to finish up Bumpy Boys. FA: Ryan Sklenica | V12 | ||||||
 |
||||||||
| Route | Grade | Style | Selected ascents | |||||
| 19 |
★★ Pearl Necklace
Start on the good holds below the seam and head up via the enhanced slots and the "potato" hold and match on the finishing sloper. | V7 | 3m | |||||
| 20 |
★★ Two Fingered Destiny
Start on the good holds, head up to the shallow pocket and throw around the bulge to the good hold and match to finish. | V6 | 3m | |||||
| 21 |
★★ Don't Get Huge, Get Arthritic
Sit start as for the "Two Fingered Destiny" but head right to join Mr Olympia and finish as per that problem. FA: Steve Bullen | V8 | 3m | |||||
| 22 |
★ Mr Olympia
(The line no longer exists) aka Don't Get Huge, Get Massive Sit start on the RH undercling and go up left to some shallow crimps, then back up right to the better holds. Take the pinch with your RH and long move around the bulge to match on the finishing hold. FA: Steve Bullen | V9 | 3m | |||||
| 23 |
★ Blowing Blood Through Monstrous Guns
(The line no longer exists) Sit start just right of Mr Olympia and go up RH to the pocket and head left to join Mr Olympia and finish up that problem. FA: Steve Bullen | V9 | 3m | |||||
| 24 |
★★★ Monkey Grip
Sit start on the same hold as Blowing Blood but head right and finish up quite high as per Gorilla Grip. FA: Paul Westwood | V9 | 4m | |||||
| 25 |
★★ Gorilla Grip
Start way right on the two obvious holds, traverse left to join Monkey Grip, and finish up the problem. FA: Steve Bullen | V10 | 4m | |||||
| 26 |
Human Grip
Start as for Monkey Grip (V9), finished matched in hueco above and left of start holds of Gorilla Grip (V10). | V7 | ||||||
2. Index by grade
| Grade | Stars | Name | Style | Pop | |
|---|---|---|---|---|---|
| VB | ★ | Easy | 2m | ||
| V0 | ★ | As | 2m | ||
| V1 | ★ | Pi | 3m | ||
| V3 | ★ | Easy As It Gets | 2m | ||
| V5 | ★★ | Curves | 4m | ||
| ★ | Pack Your Guns | 2m | |||
| V6 | ★★ | Lever Action | 2m | ||
| ★★ | Locked & Loaded | 2m | |||
| ★★ | Two Fingered Destiny | 3m | |||
| V7 | Human Grip | ||||
| ★★ | Pearl Necklace | 3m | |||
| V8 | ★★ | Don't Get Huge, Get Arthritic | 3m | ||
| ★★ | Guns & Ammo | 3m | |||
| ★ | Locked & Loaded (Direct) | 3m | |||
| ★★ | Reload | 3m | |||
| V9 | ★ | Blowing Blood Through Monstrous Guns | 3m | ||
| ★★★ | Monkey Grip | 4m | |||
| ★ | Mr Olympia | 3m | |||
| ★★ | Syncope | 2m | |||
| V10 | ★ | Draw Back LHV | 3m | ||
| ★★ | Gorilla Grip | 4m | |||
| ★★★ | Turbo Guns | 3m | |||
| V11 | ★ | Jug to Jug | 3m | ||
| V12 | ★★★ | Bumpy Boys | 4m | ||
| ★★ | Bumpy Girls | ||||
| ★★★ | Draw Back | 3m |