A Crag Guide gives an extensive view of all sub areas and climbs at a point in the index. It shows a snapshot of the index heirachy, up to 300 climbs (or areas) on a single web page. It shows selected comments climbers have made on a recently submitted ascent.
At a minor crag level this should be suitable for printing and taking with you on a climbing trip as an adjunct to your guidebook.
This guide was generated anonymously. Login to show your logged ascents against each route.
Warning
Rock climbing is extremely dangerous and can result in serious injury or death. Users acting on any information directly or indirectly available from this site do so at their own risk.
This guide is compiled from a community of users and is presented without verification that the information is accurate or complete and is subject to system errors. By using this guide you acknowledge that the material described in this document is extremely dangerous, and that the content may be misleading or wrong. In particular there may be misdescriptions of routes, incorrectly drawn topo lines, incorrect difficulty ratings or incorrect or missing protection ratings. This includes both errors from the content and system errors.
Nobody has checked this particlular guide so you cannot rely on it's accuracy like you would a store bought guide.
You should not depend on any information gleaned from this guide for your personal safety.
You must keep this warning with the guide. For more information refer to our:
Usage policy
Contributors
Thanks to the following people who have contributed to this crag guide:
Scurvy
Cormac Tooze
Wian van Zyl
Bruce McD
Wesley Williams
Hugo
Marc dM
David
Kai
Alta Lourette
The size of a person's name reflects their Crag Karma, which is their level of contribution. You can help contribute to your local crag by adding descriptions, photos, topos and more.
Table of contents
- 1.
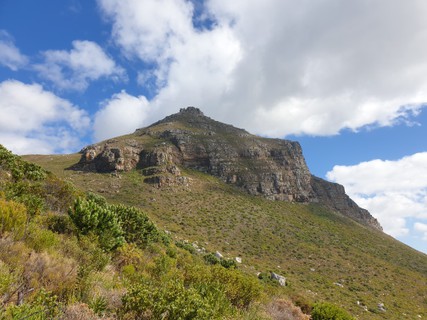
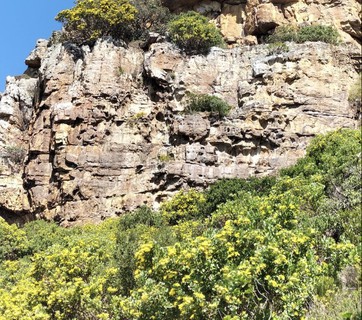
The Hole
52 in Crag
- 1.1. Sunset Wall 14 in Sector
- 1.2. The Sideline 6 in Sector
- 1.3. The Hole / Main Wall 32 in Sector
- 2. Index by grade
1. The Hole 52 routes in Crag
- Summary:
-
All Sport climbing
Lat / Long: -34.104136, 18.460902
summary
Endurance climbing through big roofs
description
Big moves off good holds. Great venue if you climbing grade 25
access issues
Crag open year round, no permits required. Routes severely affected by the SE (i.e. don't climb here if the SE is blowing hard).
approach
Drive south along Boyes Drive. After the Old Boyes Drive turnoff on your left, continue over the hill and down the other side. At the bottom of the dip is a fixed speed camera (painted yellow). Park about 50 to 80m after this. Remember to leave space for pedestrians to pass on the sidewalk.
The start of the footpath is through a doorway (with no door) in the stone wall on the right hand side of the road. It is marked "Peck's Valley". Follow the steep path up to a contour path (5mins). Turn right and follow the contour, which very soon starts turning up into the valley.
After about 10mins on this main hiking path, look out for a cairn marking the start of the approach to the crag (on your right hand side). Don't turn off the main path until you see this cairn, otherwise you will be bundu bashing. Follow the ever steepening path towards the crag (15mins). Note: this path takes you to the Sideline initially, but it is very easy to get to the main crag once here.
ethic
No camping at the crag
 |
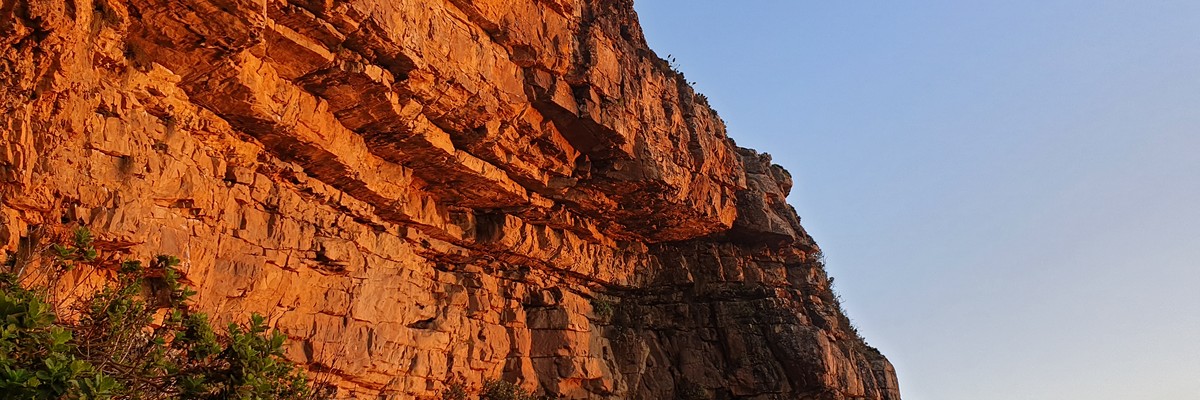
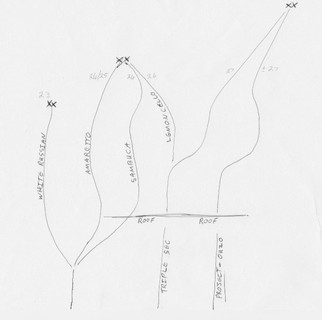
1.1. Sunset Wall 14 routes in Sector
- Summary:
-
Lat / Long: -34.104670, 18.460465
approach
From The Hole, head towards the Sideline. On the extreme lefthand edge of the Sideline is a path that leads around the corner and eventually slightly downwards. After about 10mins you will see Sunset Wall on your right hand side. The crag has a lovely clean rockshelf for a base on the one side. Routes range from about 22 to 27
descent notes
Instead of heading back towards The Hole, you will find a path that leads into the valley and onto the main hiker's path. Follow this down towards Boyes Drive
| Route | Grade | Style | Selected ascents | |||||
|---|---|---|---|---|---|---|---|---|
| 1 |
★ White Russian
FA: J. Temple-Forbes, Nov 2014 | 23 | ||||||
| 2 |
★★ Ameretto
FA: J. Temple-Forbes, Nov 2014 | 25 | ||||||
| 3 |
★ Sambuca
FA: J. Temple-Forbes, Nov 2014 | 24 | ||||||
| 4 |
★★ Lemon Cello
FA: J. Temple-Forbes, 2014 | 26 | ||||||
| 5 |
★★ Triple Sec
FA: J. Temple-Forbes, Nov 2014 | 27 | ||||||
| 6 |
★★ Ouzo
FA: J. Temple-Forbes, Nov 2014 | 26 | ||||||
| 7 |
★★ Flatliner
FA: G. Holwill, 1997 | 22 | 20m, 9 | |||||
| 8 |
★★ First Round's on Me
FA: J. Temple-Forbes, Jan 2015 | 21 | 9 | |||||
| 9 |
★★★ Tequila Sunrise
FA: P. Schlotfeldt, 1997 | 25 | 20m, 9 | |||||
| 10 |
★★ Billy
FA: J. Samson, 1997 | 27 | 18m, 7 | |||||
| 11 |
★★ Billy Sunrise
Composite. Climb the first couple of meters of Billy before breaking left onto Tequila Sunrise. Move back right onto Billy (bypassing Billy's crux). | 27 | ||||||
| 12 |
★★ Shark Attack
FA: P. Schlotfeldt, 1997 | 25 | 15m, 6 | |||||
| 13 |
★★ More Euro's than Locals
FA: G. Holwill, 1997 | 25 | 12m, 4 | |||||
| 14 |
★★ Tequila Sunset
FA: P. Schlotfeldt, 1997 | 24 | 12m, 4 | |||||
  |
||||||||
1.2. The Sideline 6 routes in Sector
- Summary:
-
Lat / Long: -34.103969, 18.461085
description
The line of easy climbs next to the main crag of the Hole. Perfect for beginners.
approach
As for The Hole
 |
||||||||
| Route | Grade | Style | Selected ascents | |||||
|---|---|---|---|---|---|---|---|---|
| 1 |
★★ Quake
FA: D. Wiemar, 1997 | 19 | 15m, 6 | |||||
| 2 |
Hash
FA: S. Maasch, 1997 | 16 | 12m, 4 | |||||
| 3 |
Jarastafa
FA: S. Maasch, 1997 Maint: Mountain Club of South Africa, 27 Feb 2016 | 17 | 14m, 5 | |||||
| 4 |
★ Dube
FA: D. Wiemar, 1997 Maint: Mountain Club of South Africa, 27 Feb 2016 | 18 | 14m, 5 | |||||
| 5 |
★★ Reggae
Set: Elle & Mountain Club of South Africa FA: Elle | 21 | ||||||
| 6 |
★ Eiri
FA: D. Wiemar, 1997 | 20 | 14m, 5 | |||||
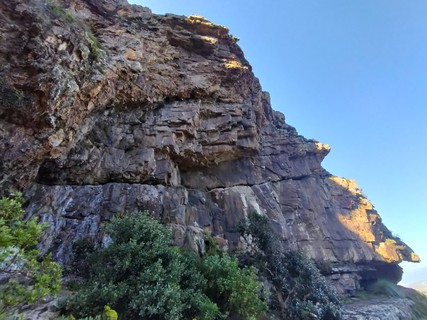
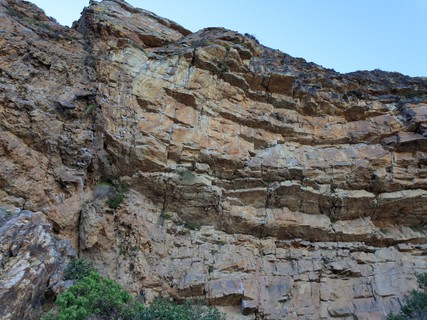
1.3. The Hole 32 routes in Sector
- Summary:
-
Lat / Long: -34.103627, 18.461209
description
The main sector/cliff. Great setting and steep pumpy & powerful sport climbing.
approach
From Cape Town CBD head on the M3 towards Muizenberg. On the way to Muizenberg, find Boyes Drive and follow this for a few kilometers. After the Old Boyes Drive turnoff on your left, you will reach the crest of a hill and dip down the other side. There is a fixed speed camera painted yellow at the bottom of the hill. Park after this, on the uphill under a row of trees on the left hand side of the road. On your right is a stone retaining wall with a doorway (no door). This is the start of the Pecks Valley hiking trail.
Enter the doorway and follow some concrete steps for the first few meters. Continue up the trail steeply for about 5 minutes until you get to a T-junction, by some old ruins. Turn right and follow the contour path, which starts to curve up into the valley. You will see the Hole high up on the hill on your right hand side. Continue following the main path for another 5 minutes or so, UNTIL YOU SEE A CAIRN on a rock. This marks the turnoff to the Hole (don't veer off the main path until you see the cairn!!) Follow the ever steepening path for 10 to 15 mins to reach the crag. The path takes you directly to the Sideline crag first, but it is only a few steps away from the Hole, the main crag.
Approximately 20 to 30 minutes of hiking from where you park your car.
| Route | Grade | Style | Selected ascents | |||||
|---|---|---|---|---|---|---|---|---|
| 1 |
★ The Thing
Warning Fixed Gear: Very old bolts. Why would anyone bolt this? It has never been re-bolted, so good luck on testing them out. Dust off the holds and claim the second ascent. FA: N. Matthews, 1997 | 27 | 20m, 5 | |||||
 |
||||||||
| Route | Grade | Style | Selected ascents | |||||
| 2 |
Jigaboo
Climb scrappy rock and pull through a roof. Continue up through another roof and the overhanging wall to a ledge. A few more moves leads to the chains. Not worth it unless you want to tick off all the 27s at the crag. FA: N. Matthews, 1997 | 27 | 20m, 6 | |||||
| 3 |
Babe Watch
Starts just left of Fleur. Pull through a small roof and climb up to a hanging piece of rock dubbed "the anchor". Perch here for a rest before climbing up and right to join Fleur for the last few moves to the chains. FA: N. Matthews, 1997 | 26 | 20m, 7 | |||||
| 4 |
★★★ Fleur de Mer
Probably one of the most climbed routes at the crag. From the pedestal, a bouldery undercut start leads to a cubby hole rest. From here, prepare for the pumpfest on good holds up the overhanging wall to the chains. FA: J. Fisher, 1991 | 24 | 20m, 9 | |||||
| 5 |
★★★ Fire in the Hole
The only five star route at the crag. Start up Fleur before breaking right at the fifth bolt. The line cuts through a number of routes along the headwall, including Route 66, eventually finishing at the chains of La Nauge Neuf. FA: Jason Temple-Forbes, 2003 | 27 | 9 | |||||
| 6 |
★★★ Fleur d'Afrique
Climb Fleur, breaking right at the sixth bolt. Layback up a crack to a roof. Pull through on the extreme left (keeping feet below the roof) and move right until able to join the last few moves of Poisson Flambé. FA: Unknown | 25 | 20m, 8 | |||||
| 7 |
★★ Afrique de Freak
Climb Fleur before breaking right at the sixth bolt. Where Fleur d'Afrique continues right, this route pulls through the overlap onto the blank wall above to finish at the chains of Megalodon. FA: S. Maasch, 1997 | 30 | 9 | |||||
| 8 |
★★ Megalodon
12mm hangers. Climb what looks like solidified mud to the large "shark-tooth" under the roof. From here, a bouldery move gains the headwall. Continue up for a fantastic finish right of Fleurs chains. FA: A. Davies, 2011 | 26 | 20m, 10 | |||||
| 9 |
★★★ Route 66
Starts just right of Megalodon on slightly better rock. Climb straight up to the roof. A cool move gains the lip. Pull up onto the face above. Rail right once at the overlap and layback to gain a rail. Continue straight up to finish at Poisson's chains (shared last few moves). FA: S. Maasch, 1993 | 27 | 20m, 9 | |||||
| 10 |
★★ Shark Biscuit
This is a composite route. Start on Route 66, breaking right to climb Poisson's pocketed roof. From the ledge, move right and pull through the roof just right of Mystique. Continue diagonally right up the headwall to finish at the chains of Jaws. FA: D. Steyn & J. Temple-Forbes, 2009 | 25 | 9 | |||||
| 11 |
★★★ Poisson Flambé
Fried fish. Pull up onto a ledge just off the deck and climb up to a pocketed roof. Pull through this to a ledge with a large detached block. From here, move around the block until able to pull onto the headwall, continue to the chains. Solid 25 FA: J. Fisher, 1991 | 25 | 20m, 9 | |||||
| 12 |
★★ Le Nauge Neuf
Cloud Nine. This is an independent line. Once you have gained the ledge just off the deck, pull through the small roof above (LEFT of Mystique). Continue up and pull through the break, staying right of the pockets, to gain the ledge with the detached block. Pull up (RIGHT of Poisson) and climb the headwall to the chains above. FA: D. Hugo, 1999 | 25 | 20m, 9 | |||||
| 13 |
★★★ La Mystique Voyeur
From the ledge just off the deck, move to the extreme right to clip the first bolt. Continue up to a roof. Pull through at the crack and then rail left to clip the next bolt. Once through the roof section, you will gain an open book on the face above. Continue straight up to the chains. FA: J. Alexander, 1991 | 25 | 20m, 8 | |||||
| 14 |
★★ Merkin
An independent line starting just right of Mystique. Follow the plum line of expansion bolts to a set of chains left of Jaws' anchor. FA: J. Smith, 2011 | 26 | 20m, 10 | |||||
| 15 |
★★ Zwik
Cool moves lead up to the first roof. Pull through this, rail left to clip the next bolt. Unlock the sequence to turn the roof and gain the ledge above. Climb the headwall to Jaws' anchor. Hard for the grade. FA: G. Holwill, 1994 | 28 | 20m, 10 | |||||
| 16 |
★★★ Jaws
Fun climbing leads up to the big roof. Pull through this, remembering to power-scream as you cut-loose. Continue to climb more or less straight up to the final roof guarding the chains. Figure out the moves and try not to pump-out before you clip the anchor. FA: A. Davies, 2009 | 25 | 20m, 7 | |||||
| 17 |
★★★ Tears for Fears
Start as for Jaws. Veer right immeadiately after pulling the big roof to finish at the chains of Guns & Buckets FA: S. Maasch, 1993 | 26 | 20m, 6 | |||||
| 18 |
★★★ Guns & Buckets
After an interesting start, head up to the twin cracks that break through the big roof. Pull straight through this and onto the headwall above. Easy climbing leads to a small roof and a boulder problem that guards the chains. FA: J. Gordon, 1993 | 25 | 20m, 7 | |||||
| 19 |
★★ Buckets of Tears
Start as for Guns & Buckets. Immediately after the big roof with the twin cracks, veer slightly right and pull through on mega jugs until established on the headwall. Continue easily up to the anchor. FA: S. Maasch, 2003 | 26 | 20m | |||||
 |
||||||||
| Route | Grade | Style | Selected ascents | |||||
| 20 |
★★★ Life Enhancement Program
Enhance your life by climbing this route on trad gear: Or just do it the normal way, and clip the bolts. Climb up to the big roof, find your way through this and into the crux of Germanator. FA: J. Möhle, 2010 | 31 | 20m, 8 | |||||
| 21 |
★★★ The Germanator
Start as for Sweet Prow, breaking left once entering the big roof sequence. Soft for the grade. Set: S. Maasch, 2010 FA: N. Methner, 2016 | 30 | 20m, 12 | |||||
| 22 |
★★★ Sweet Prow of Mine
A bouldery start gains the wall above. Continue up through the roof section to gain the sweet prow. Move right and around the final roof and climb up to the chains. FA: J. Temple-Forbes, 2011 | 27 | 20m, 8 | |||||
| 23 |
★★ Twat Vier
Warning Fixed Gear: Old homemade hangers The first few bolts have been replaced, thereafter it follows old home-made aluminium hangers fixed with allen screws. Head up towards the sweet prow, climbing on its right hand side. Aim for the obvious break in the final roof, pulling through on a jammed block in the crack. FA: M. Roberts, 1991 | 27 | 20m, 9 | |||||
| 24 |
★★ Broken
Twat Vier, Broken, and Stolen Secrets all share the same start. An the big roof, where Stolen Secrets veers right, continue straight, pull through the lip and up to the chains. FA: M. Smigelskis, 2003 | 31 | 20m, 8 | |||||
| 25 |
★★★ Stolen Secrets
After a bouldery start, head up and right. Once in the big roof, you will climb the Cape Fear flake (on its left hand side) to pull through at the obvious break at the lip. A few more moves leads to the anchor. A very fine route. FA: S. Maasch | 26/27 | 11 | |||||
| 26 |
★★★ Cape Fear
Probably the most climbed line on this side of the crag. Surprisingly easy, considering the terrain. After a burly start, climb up and right towards the big flake in the roof. Follow this until able to reach the lip. Pull through on heroic jugs and onto the headwall. Slap the chains and victory whip. Let someone else suffer cleaning the route afterwards. FA: S. Maasch, 1992 | 25 | 20m, 9 | |||||
| 27 |
★★ Sheer Boredom
A short and powerful line. Often overlooked, but worth climbing. Many ways to pull the crux. Always seems desperate. FA: J. Temple-Forbes, 2019 | 26 | 5 | |||||
| 28 |
★ Sheer Fear
Composite route. Climb Sheer Boredom into Cape Fear. FA: Scurvy, 30 Mar 2021 | 26 | 11 | |||||
| 29 |
★★★ Virus
Be crowned the cutloose king, or find a way to finesse the roof sequence and keep your feet on the rock. A fun line with a surprising amount of jugs through the mega-roof. Classic. FA: J. Fisher, 1992 | 28/29 | 20m, 8 | |||||
| 30 |
Mic Drop
Composite route. Climb Virus up to the big pocket in the middle of the big roof. Move left onto Cape Fear, and further left doing the big move to the lip on Stolen Secrets. Stay under the lip and cross over Broken to a new bolt at the left end of the roof. Pull onto the headwall and climb to the chains of Sweet Prow of Mine. FA: M. Kastner, Dec 2020 | 29 | ||||||
| 31 |
★★★ Dust in the Wind
Start as for Virus. After the 2nd bolt clip brown set of bolts slightly to the right. Basically follows the same line as virus to the roof. Cruxy getting into the roof, followed by ergonomic flowing movement and grips to the lip of the roof with jugs to the top. Loads of options FA: Ebert Nel, 20 Jan | 28 | 10 | |||||
| 32 |
★★★ Fear Factor
Local legend Ningo opened this in 2007, the route only seeing its second ascent in 2022. A bullet hard line pulling through on pockets in the roof. FA: C. Martinengo, 2007 | 33 | 20m, 9 | |||||
 Alta
Alta