
A Crag Guide gives an extensive view of all sub areas and climbs at a point in the index. It shows a snapshot of the index heirachy, up to 300 climbs (or areas) on a single web page. It shows selected comments climbers have made on a recently submitted ascent.
At a minor crag level this should be suitable for printing and taking with you on a climbing trip as an adjunct to your guidebook.
This guide was generated anonymously. Login to show your logged ascents against each route.
Warning
Rock climbing is extremely dangerous and can result in serious injury or death. Users acting on any information directly or indirectly available from this site do so at their own risk.
This guide is compiled from a community of users and is presented without verification that the information is accurate or complete and is subject to system errors. By using this guide you acknowledge that the material described in this document is extremely dangerous, and that the content may be misleading or wrong. In particular there may be misdescriptions of routes, incorrectly drawn topo lines, incorrect difficulty ratings or incorrect or missing protection ratings. This includes both errors from the content and system errors.
Nobody has checked this particlular guide so you cannot rely on it's accuracy like you would a store bought guide.
You should not depend on any information gleaned from this guide for your personal safety.
You must keep this warning with the guide. For more information refer to our:
Usage policy
Contributors
Thanks to the following people who have contributed to this crag guide:
Laurent Martin
Tim Haasnoot
John Hollott
Vanessa Wills
Brendan Heywood
Jake Buchan
Trent Lee
brendan fraser
Luke Yerbury
JJ
The size of a person's name reflects their Crag Karma, which is their level of contribution. You can help contribute to your local crag by adding descriptions, photos, topos and more.
Table of contents
- 1.
The Surge
16 in Crag
- 1.1. The Surgery 5 in Area
- 1.2. The Surge DWS 4 in Area
- 2. Index by grade
1. The Surge 16 routes in Crag
- Summary:
-
运动攀岩, 深水攀石 和 其它类型
Lat / Long: -32.786489, 152.119339
描述
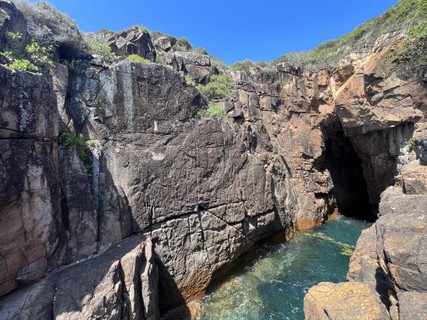
This little area has some good quality sport routes. Although they are only 10-12m in height these climbs are quite pumpy ans sustained. Watch out for the waves coming in in big swells!
准入问题
From the Slot continue another 250m around north along a small goat track. You will pass over the top of the chasm and should be able to see the climbs below. Access is from the sourthern side, or abseil in of carrot bolts. Keep the rock pool water clean, octopuses, starfish, nudibranchs as well as fish and crabs can often be seen.
前往
Park near the NSW National Parks depot at the end of Tomaree Cres and follow the Boat Harbour Track for roughly 1km to the crag
/28/7c/287c4343f97150ed573a9ae78cfa47dd9bc1bf5f)  |
||||||||
| Route | Grade | Style | Selected ascents | |||||
|---|---|---|---|---|---|---|---|---|
| 1 |
★ Vlad the impaler
Double ropes and small wires and C3s handy. Crux well protected. Note that the topo in the Haasnoot guide is incorrect. Vlad goes direct through the towering blocks (the spikes with which one impales). Someone has placed DUB anchor. 首攀: Vanessa Wills & David Gray, 2019 | 21 | 12m | |||||
| 2 |
★★ Stephan the Barbarian
The right line. Nice moves to some thin crimps. 首攀: Leigh Harper | 21 | 10m, 4 | |||||
| 3 |
★★ Power Surge
Start as for STB, but move out left after the first bolt on fixed hangers. 定线/开线: Corey Sawyer 首攀: Brendon Fraser & Tim Haasnoot | 23 | 10m | |||||
| 4 |
Surge'n
The corner in the middle of wall to thin face moves 定线/开线: Jason Piper 首攀: JP, 5 2月 2020 | 28 | 12m, 4 | |||||
| 5 |
★★ Re-surgance
Start up flakes to new second bolt, then past horizontal break to DBB 首攀: Tim Haasnoot | 24 | 12m, 4 | |||||
| 6 |
★ Project
Start as for Resurgence but go left on small RBs. | |||||||
| 7 |
★★ Sir Charge
The left hand route. Tough start then some nice thin moves to top, anchor has 2 figure 8's through U bolt.. 首攀: Jason Piper | 25 | 12m, 5 | |||||
1.1. The Surgery 5 routes in Area
- Summary:
-
运动攀岩, Top roping 和 Rock climbing
Lat / Long: -32.786598, 152.119363
总结
Mini zawn 30m south of The Surge.
前往
As for The Surge. Or abseil in.
 |
||||||||
| Route | Grade | Style | Selected ascents | |||||
|---|---|---|---|---|---|---|---|---|
| 1 |
★★ Insurgents
Hex bolts from platform on north facing wall, just to right of easy corner. Double carrots at top and bottom. Access by jumping across the water, using a plank to cross, or abseiling in. | 18 | 10m, 5 | |||||
| 2 |
★★ Dill Pickles
Fixed Hangers. Abseil in or carefuly walk down the slab on the left hand side | 13 | 12m, 2 | |||||
| 3 |
★★ Surgery
6 Ring bolts. Abseil in or carefuly walk down the slab on the left hand side. Belay from first the two ring bolts on the small platform above water. | 18 | 12m, 6 | |||||
| 4 |
★★ Left of arch
Top rope anchors only. Belay from the two ring bolts on the small platform above water | 18 | 14m | |||||
| 5 |
Right and over arch. JP project.
Access from North side (The Surge side). FHs. | |||||||
1.2. The Surge DWS 4 routes in Area
- Summary:
-
所有 深水攀石
Lat / Long: -32.786615, 152.119516
描述
North facing DWS just East from The Surgery
前往
Same approach as The Surge and The Surgery
 |
||||||||
| Route | Grade | Style | Selected ascents | |||||
|---|---|---|---|---|---|---|---|---|
| 1 |
★★ DWS 1
Climb the left side arete | 17 | 8m | |||||
| 2 |
★★ DWS 2
Start 1M right from 'DWS 1', up the crack and trend right from halfway up | 17 | 8m | |||||
| 3 |
DWS 3
Climb in the middle of the wall, following the crack using the jugs. Be careful of the rocks behind you | 15 | 8m | |||||
| 4 |
DWS 4
Climb the arete on the right side. Be careful of the rocks behind you | 16 | 8m | |||||
2. Index by grade
| Grade | Stars | Name | Style | Pop | Area | |
|---|---|---|---|---|---|---|
| 13 | ★★ | Dill Pickles | 12m, 2 | 1.1. The Surgery | ||
| 15 | DWS 3 | 8m | 1.2. The Surge DWS | |||
| 16 | DWS 4 | 8m | 1.2. The Surge DWS | |||
| 17 | ★★ | DWS 1 | 8m | 1.2. The Surge DWS | ||
| ★★ | DWS 2 | 8m | 1.2. The Surge DWS | |||
| 18 | ★★ | Insurgents | 10m, 5 | 1.1. The Surgery | ||
| ★★ | Left of arch | 14m | 1.1. The Surgery | |||
| ★★ | Surgery | 12m, 6 | 1.1. The Surgery | |||
| 21 | ★★ | Stephan the Barbarian | 10m, 4 | 1. The Surge | ||
| ★ | Vlad the impaler | 12m | 1. The Surge | |||
| 23 | ★★ | Power Surge | 10m | 1. The Surge | ||
| 24 | ★★ | Re-surgance | 12m, 4 | 1. The Surge | ||
| 25 | ★★ | Sir Charge | 12m, 5 | 1. The Surge | ||
| 28 | Surge'n | 12m, 4 | 1. The Surge | |||
| ? | ★ | Project | 1. The Surge | |||
| Right and over arch. JP project. | 1.1. The Surgery |