A Crag Guide gives an extensive view of all sub areas and climbs at a point in the index. It shows a snapshot of the index heirachy, up to 300 climbs (or areas) on a single web page. It shows selected comments climbers have made on a recently submitted ascent.
At a minor crag level this should be suitable for printing and taking with you on a climbing trip as an adjunct to your guidebook.
This guide was generated anonymously. Login to show your logged ascents against each route.
Warning
Rock climbing is extremely dangerous and can result in serious injury or death. Users acting on any information directly or indirectly available from this site do so at their own risk.
This guide is compiled from a community of users and is presented without verification that the information is accurate or complete and is subject to system errors. By using this guide you acknowledge that the material described in this document is extremely dangerous, and that the content may be misleading or wrong. In particular there may be misdescriptions of routes, incorrectly drawn topo lines, incorrect difficulty ratings or incorrect or missing protection ratings. This includes both errors from the content and system errors.
Nobody has checked this particlular guide so you cannot rely on it's accuracy like you would a store bought guide.
You should not depend on any information gleaned from this guide for your personal safety.
You must keep this warning with the guide. For more information refer to our:
Usage policy
Contributors
Thanks to the following people who have contributed to this crag guide:
Laurence Judd
Paul Badenoch
Ben Dickson
Dan millar
Mark Foyle
Brendan Heywood
vicki
pamelalansbury
LJ Nielsen
Thananthorn Suriyasenee
The size of a person's name reflects their Crag Karma, which is their level of contribution. You can help contribute to your local crag by adding descriptions, photos, topos and more.
Table of contents
- 1.
Mount Barker Summit
113 in Crag
- 1.1. Summit Cliff 43 routes in Sector
- 1.2. Little Arapiles 50 routes in Sector
-
1.3.
Lookout Boulders 7 routes in Area
- 1.3.1. Table Top Boulder 4 routes in Boulder
- 1.3.2. Nature's Boulder 1 routes in Boulder
- 1.3.3. Bored Local's Boulder 2 routes in Boulder
-
1.4.
Northern End 13 routes in Sector
- 1.4.1. Isolation Boulder 11 routes in Boulder
- 1.4.2. O&D Boulder 1 routes in Boulder
- 1.4.3. Goosebumps Boulder 1 routes in Boulder
- 2. Index by grade
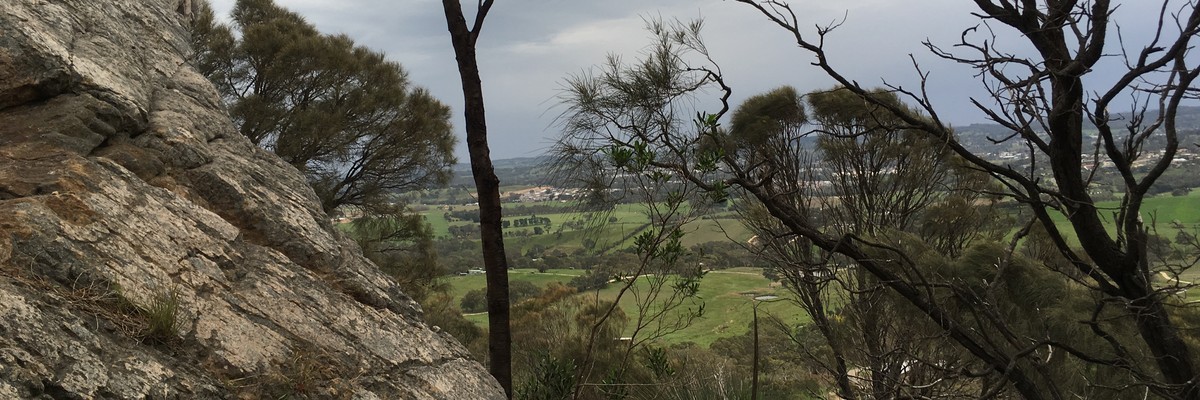
1. Mount Barker Summit
- Summary:
-
Lat / Long: -35.065961, 138.922202
总结
Easy access, solid rock, nice view, tiny climbs, good problems.
描述
The main area comprises short outcrops on a ridgetop. People have been scrambling over them for decades without bothering with write-ups. Route names and descriptions have appeared recently although it's accepted these are somewhat arbitrary.
准入问题
The main area on the ridgetop is council land. The gates to the car park are open from 8am to 6pm (or 8am to 8pm during daylight saving time)
前往
Drive up the signposted summit road on the east of the Mount. There's a 3 minute walk to the summit from the carpark. The main area faces west and is just down to the R of the summit marker (looking out).
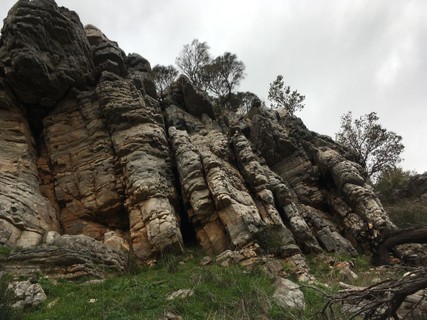
1.1. Summit Cliff
- Summary:
-
Lat / Long: -35.063607, 138.920643
描述
The climbs are laid out from North to South, with Boulder problems being found furthest North.
前往
From the Summit Carpark head North to the lookout (About 300m). Once you reach the lookout continue another 50m North where you will find cliffs to your left. Follow the cliff to a break (Between Jacob's Ladder and Camelot Castle) where you can safely descend to the base. Continue around to the right around the corner and you will find Shock Watch and Small Roof. Around the next corner you will find another larger roof featuring Raging Boner.
 /99/22/9922c95bf7d78b2e159f7a7c120d6b4c8089cb2a) |
||||||||
| Route | Grade | Style | Selected ascents | |||||
|---|---|---|---|---|---|---|---|---|
| 1 |
★★ Raging Boner
Start on edges under the right hand side of overhang. Climb slightly left and finish up the arete. Located in the summit area and not little arapilies. May or may not have been climbed in the past. 首攀: 2017 | V3 | 3m | |||||
| 2 |
★★ Hanging Right
Start as for Raging Boner, head right and make a big move to a great edge around the right arete. LH to small slot in the corner, top out straight up. 首攀: Laurence Judd | V2 | 3m | |||||
| 3 |
Swatch
Around the corner from 'Easy Does It'. Start up an easy slab to a small roof, head up and over this to an easier top section | 14 | 7m | |||||
| 4 |
Easy Does It
Start low on easy edge. Move up to crimps on slab. Head up and out on limited footers. Keep right of easy arete and large incut. 定线/开线: Laurence Judd, 2020 | V0+ | 4m | |||||
| 5 |
★ Inari
Start on jug in corner right of EASY DOES IT. Straight up to ear like side pull and then navigate the wall on pockets and edges. Feet stay on face / boulder and ramp to the right are out of play. 首攀: Dan millar | V1 | 3m | |||||
/c3/82/c382c6201444cb539a5e703b0ff6d33791d8f7d5) /25/c4/25c45446eaec3944da959758ec6e61860f4e486c) |
||||||||
| Route | Grade | Style | Selected ascents | |||||
| 6 |
★ Over the Roof
This group of boulder problems are located 15m Left of Casio G Shock Watch Wall (Can be seen in background of topo photo) Squat Start on juggy ledge with high feet. Move left and up using large side pull. Mantle the Slab using LH positive sloper and low right crimps. Use cracks in the slab to navigate to top out right of the tree. 定线/开线: Laurence Judd, 23 12月 2018 首攀: Laurence Judd & Harry Judd, 11 1月 2019 | V0 | 4m | |||||
| 7 |
★ Warm up the Arete
Squat/ Stand Start on juggy ledge with high feet on good food holds. Head right along big horizontal ledge to the arete. Head up arete onto slab to top out next to tree. 定线/开线: Laurence Judd, 23 12月 2018 首攀: Laurence Judd & Harry Judd, 10 1月 2019 | VB | 4m | |||||
| 8 |
★ Up and Over
Sit Start under the roof on small edges. Keep feet on left wall of boulder. Make a move to the lip and continue up arete. | V1 | 3m | |||||
| 9 | ★ Neurofibromatosis | 16 | 5m | |||||
| 10 | ★★ Casio G Shock Watch | 16 | 8m | |||||
| 11 | ★ Blackberry | 11 | 10m | |||||
| 12 | ★ 'Erik Lock' | 16 | 10m | |||||
| 13 | ★ 'Nick Neagle' | 18 | 10m | |||||
 |
||||||||
| Route | Grade | Style | Selected ascents | |||||
| 14 |
★ Three Blind Mice
Follow the arete up slab. | 15 | 9m | |||||
| 15 | ★ Walking on Sunshine | 13 | 9m | |||||
| 16 | Chloe and Brianna | 13 | 9m | |||||
| 17 | ★ Jacob's Ladder | 6 | 9m | |||||
| 18 |
Smear and Slap
Start 1m right of Jacobs ladder. LH on Crimper and RH on large sidepull, using small footers or smearing move up to LH Edge and head to an easy top out. | V0 | 4m | |||||
/aa/29/aa29e225a5228be0784c92e9441f09cdadd6dd2d) 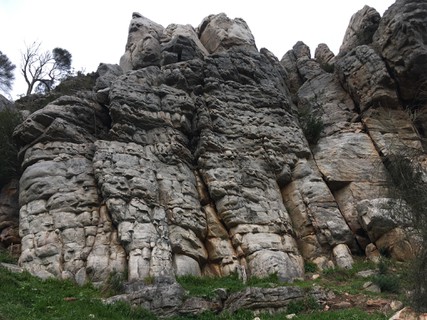 |
||||||||
| Route | Grade | Style | Selected ascents | |||||
| 19 |
★ Quartz Backsplash
Stand Start with very good RH sidepull on arete and low LH sloper crimp on face. Move up to big jug and out left to high gaston and up to top out over the middle of the face. | V1 | 3m | |||||
| 20 |
★ The Mount Barker Traverse Low
Start left of Camelot Castle on big sloper. Head right keeping about 1m off the ground under the great roof below easier breaks all the way right past SSA around the corner to a small roof. Move through this roof to the final vertical seam of the cliff and top out via this seam. Great endurance line with a few tricky moves, found to be harder going Right to Left. | V0+ | 28m | |||||
| 21 |
★ The Mount Barker Traverse High
Start as for Low variant but head up 4-5m and remain high traversing through the lip of The Great Roof and around second bulge at Chocolate Oreo. Continue right around corner and finish up last face of rock. A couple of spicy moves, but loads of great rests and well protected by horizontal crack. | 16 | 28m | |||||
| 22 | ★ Camelot Castle | 5 | 6m | |||||
| 23 | Sir Lancelot | 6 | 6m | |||||
| 24 | John's Crack | 6 | 6m | |||||
| 25 | ★ Wizard's Sleave | 11 | 8m | |||||
| 26 | ★ The Wand | 12 | 8m | |||||
| 27 | ★ Arthur | 11 | 8m | |||||
| 28 |
Miss Bouncy Bouncy
The short crack and corner 1m L of Karl Malden's Nose. | 7 | 9m | |||||
| 29 | ★ Karl Malden's Nose | 15 | 10m | |||||
| 30 |
★★ Steve's Traverse
Start up Karl Marden's Nose to the roof, then hand traverse above the lip of the roof on jugs rightwards to finish up Bristol Stool. Done as a solo so the gear could be interesting. 首攀: Steve Kelly, 2 5月 2015 | 16 | 10m | |||||
| 31 |
Karl Malden's Nose RHS
The ragged corner to the roof. Escape L into KMN. | 15 | 10m | |||||
 |
||||||||
| Route | Grade | Style | Selected ascents | |||||
| 32 | ★★ The Great Roof | 21 | 10m | |||||
| 33 |
Wizard's Sleeve
Wizards Sleeve. UK 5a/b 17-18. 10m. Starts low left under the main overhang and traverses across Grey Paint to finish more directly than Bristol Stool Chart Number 2 up the roof on small holds. An awkward mantelshelf gets you over the top. A really nice climb. | 17 | 10m | |||||
| 34 | ★★ Battleship Grey | 17 | 10m | |||||
| 35 | ★ Bristol Stool Chart Number 2 | 17 | 10m | |||||
| 36 | Quartz Timepiece | 16 | 10m | |||||
| 37 | Camtastic | 10 | 13m | |||||
/c5/40/c540caba854d7d20044142b0f15f157996767d51) |
||||||||
| Route | Grade | Style | Selected ascents | |||||
| 38 |
★ Wound up Toy
The arete just R of Camtastic, finishing to the L 首攀: 2014 | 6 | 10m | |||||
| 39 | ★ Anzac Biscuit | 16 | 10m | |||||
| 40 | ★★ Chocolate Oreo | 16 | 10m | |||||
| 41 | Custard Creme | 13 | 10m | |||||
| 42 | Own-Brand Wafer Biscuit | 13 | 10m | |||||
| 43 |
★★ SSA
Directly up the arete just R of Own-Brand Wafer Biscuit 首攀: 2014 | 14 | 10m | |||||
1.2. Little Arapiles
- Summary:
-
Lat / Long: -35.070133, 138.923912
描述
Very small bouldering area. A maximum of 3 people is recommended at any one time. As usual, keep volume levels to a minimum and take out whatever you bring in. Routes ordered from left to right. Recommended you bring mosquito repellent of some description as they can be quite pesky at this crag. Ground under the boulder can remain damp for several days after rainfall due to lack of sunlight, recommended a tarp or similar be brought if climbing in wet months to keep mud on equipment to a minimum.
前往
Park at Summit Carpark. Head Down entry track to Tee-Off with Shut Gate (For Cars). Follow that path for about 250m where you reach a clearing on your left. Follow a faint trail down the hill for another 150m tending to your right (South East). A path through the dense scrub will lead to the boulder.
历史
First discovered by Paul Kinnane, this area underwent some development in early 2012, with Craig Ingram adding the hardest line of the time (Take a Chance). However, in terms of quality When Your Luck Runs Out took the award, and perhaps is the best V6 in the Adelaide region. SLAGP also vies for best V4. Numerous link ups exist, with the hardest probably being 'Best of Luck'.
| Route | Grade | Style | Selected ascents | |||||
|---|---|---|---|---|---|---|---|---|
| 1 | Puff Pastry | 8 | 8m | |||||
| 2 | Dough | 15 | 9m | |||||
| 3 | ★★ Pop Tart | 15 | 9m | |||||
 /90/ed/90ed36a46a577fd2dc4dc777b297fa140181ec21) |
||||||||
| Route | Grade | Style | Selected ascents | |||||
| 4 |
★ Caveman
Sit start on LH Pinch and RH sloper with feet on the back wall of the cave. Move up on good jugs and incuts. Finish by stepping out left on big break or continue up the slab head wall 首攀: Laurence Judd, 16 1月 2021 | V2 | 4m | |||||
| 5 |
★ Longbow
Start on the SLAGP start hold and move LH to ear under roof, then big span out to lip. Match and surmount headwall, finishing up and right. 首攀: 19 7月 2014 | V1 | 3m | |||||
| 6 |
★★ Warm Up Left
Start on the SLAGP start hold and make a big move RH or LH up and left then traverse left around the arete above the shelf, finishing on the jug directly above the shelf. | V1 | 3m | |||||
| 7 |
★ Warm Up Right
SLAGP start, then up to good pockets, right to the SLAGP jug, then left a move and up. | V0 | 4m | |||||
| 8 |
★ You Know it 'Aint Right
Warm Up Right footless. Finishes on the top jug level with Guinea Pig's final R hander ie. at the start of the mantle. Down climb to get off. 首攀: 10月 2021 | V4 | ||||||
| 9 |
You where right…there’s nothing left
Pull onto the bucket above Lowbows Crimp on the lip. Campus right staying as low as possible. Campus right into - you know it ain’t right and finish for that. Longer but skips the other problems crux. 首攀: Dan millar | V3 | ||||||
| 10 |
★★ Two Coughs
Start up Warm Up Right (SLAGP Start Hold) until you get to the large jug at the breakline. Traverse right along breakline to gain the RH flat edge below final jug of WYLRO, to then finish on that jug. | V4 | 3m | |||||
/dd/3d/dd3d593cf9e4a0e139d3cbea16b3fbd5576c2cdc) |
||||||||
| Route | Grade | Style | Selected ascents | |||||
| 11 |
★★★ Sounds Like a Guinea Pig
Straight off the huge jug (left hand side) under the roof, busting straight out via a crimpy LH pocket and RH L-shaped edge to large jug, then straight up to smaller hold above rooflet with RH and top out. | V4 | 4m | |||||
| 12 |
★ Diagnosis Positive [link up ]
Start as for Take two - finish on WYLRO jug- traverse right to join Are you feeling luckys at the head wall slot holds. Traverse along the break on obvious pockets - exit as for editors 首攀: Dan millar, 3 4月 2022 | V4 | ||||||
| 13 |
★★ Take 2 and Call Me in the Morning
SLAGP to the big jug, but then exit via Two Coughs finish. Never recorded but previously done as an alternative finish to SLAGP, and the precursor to 'Pneumonia'. | V4 | ||||||
| 14 |
★★ Another Bum Scraping Reverse (ABSR)
ABST in reverse (starting as for Guinea Pig and traversing the low break rightwards into the start of 'Are You Feeling Lucky?'. | V4 | 3m | |||||
| 15 |
★★ Debaser
Stand start- sloping crimp of WYLRO and perfect undercling. Bang straight up to obvious crimp - move out left to crimp of Two coughs - and Dyno / pop to the huge rhino horn to an easy top out. 首攀: Dan millar | V5 | ||||||
| 16 |
★★★ When Your Luck Runs Out
Start off middle jug (right of huge jug of 'Guinea pig') then move up to 1st crimpy hold of that route. Bust right to slopey crimp, then left to the right hander L-shaped edge of Guinea Pig. Hold on until the RH flat edge in the midway 'break', then dyno to finish. Mega. 首攀: Craig Ingram, 2012 | V6 | 3m | |||||
/a0/b7/a0b7a40af1c97d63a09d000937a1378376503aa6) |
||||||||
| Route | Grade | Style | Selected ascents | |||||
| 17 |
★★ Jezebel
Sit start with left hand in side pull and right hand on sloper. Make a big move to the sloper and the good edge directly above then move to the finishing jug of 'Burden of Society'. Top out. | V2 | 4m | |||||
| 18 |
★★ ABST (Another Bum Scraping Traverse
Right to left traverse on low break under roof finishing at SLAGP Start. | V3 | 4m | |||||
| 19 |
★ ABST (Another Bum Scraping Traverse) Extension
ABST finishing up Warm Up Left or Right for added Value 首攀: 2012 | V3 | 5m | |||||
| 20 |
★★ Burden on Society
Editor's, but after big 1st move traverse left to the split finger hold and dyno lefthand to the 'nose' jug. Match up and it's done, or topout. | V3 | 3m | |||||
| 21 |
★★ Take a Chance
Burden on Society to split finger hold, then traverse horizontally left into WYLRO then into SLAGP and finish up Warm Up Right. 首攀: Craig Ingram, 2012 | V7 | 5m | |||||
| 22 |
★★★ Are You Feeling Lucky?
Editor's Right to the break then up and left to a big sloper/dish, then make a big lock move to a small sidepull, then make a small pop to a small crimpy pocket beyond it. Aim for jugs and topout above | V5 | 4m | |||||
| 23 |
★★ Editors Right
Sit start then up to breakline, then diagonally right via a few crossovers into a small sharp RH pocket and top out. | V2 | 5m | |||||
| 24 |
Pushing the Boundaries
Eliminate. Start right of Are You Feeling Lucky start (and left of Just Right), and make a move to the big jug. LH into an undercling, then RH to Editor's Right dish/crimp. LH gaston small sharp edge, then RH into better holds in headwall. Topout. | V2 | ||||||
| 25 |
★ Just Right
Sit start on far right (right of the start to Are You Feeling Lucky), starting matched on a down sloping sloper under the roof. Make a move to a RH black crimp, then LH to poor intermediate. Pop again to the good hold in Editors Right, and finish up and right past the 3 finger pocket. 首攀: 19 7月 2014 | V2 | ||||||
| 26 |
★★ Hubble Low
Hubble High starting as for Just Right. | V5 | ||||||
| 27 |
★★ Hubble High
Sit start with two underclings (above the Just Right start holds). Pull on from a sit and go RH to the Editor's Right intermediate crimp, then lock to a sloper and go LH again to the Editor's pocket. Top out. | V4 | ||||||
| 28 |
★★ Scar Tissue
Originally started as for Just Right (V4). Better start is the jug right of Editor's right start (V5). Up to sloper of Just Right, and RH on hold under roof adjacent to it. Move LH to black crimp (RH hold of Just Right), then move to next crimp. Sort a sequence to RH sidepulls via LH ER intermediate, then punch into pocket on ER with LH and top out. 首攀: 22 3月 2021 | V5 | 3m | |||||
| 29 |
★★ Scarred for Life [Link Up]
ABSR + Scar Tissue. One of the best links here. Start on the jugs of Warm Up Right, traverse right into the start of Editor's, then do the first two moves of that problem and traverse right again into the start of ST and finish as for that. 首攀: 2 8月 2021 | V6 | 7m | |||||
| 30 |
★ Pneumonia [Link Up]
SLAGP + Bronchitis. 首攀: 23 12月 2014 | V5 | ||||||
| 31 |
★★ TB [Link Up]
ABST + Pneumonia. 首攀: 26 12月 2014 | V5 | ||||||
| 32 |
★ Tough Luck [Link Up]
SLAGP to the big jug, then traverse right all the way into 'Editors Right' without using finishing jugs of WYLRO/Burden ie reverse Take a Chance crux. 首攀: Steve Kelly, 2012 | V7 | ||||||
| 33 |
★★★ Magnum Force [Link Up]
ABSR + Are You Feeling Lucky | V6 | 5m | |||||
| 34 |
★★ Unnecessary Burden [Link Up]
ABSR + Burden on Society. | V5 | 6m | |||||
| 35 |
★★ Chief Editor [Link Up]
ABSR + Editor's Right. | V5 | 7m | |||||
| 36 |
★★ Shoshin [Link Up]
ABSR + 'Take a Chance'. 首攀: 5 10月 2016 | V7 | ||||||
| 37 |
★ Better Luck Next Time [Link Up]
Links WYLRO to the flat RH edge (2nd to last move) then traverses right into 'Editors Right' via the midway 'break'. 首攀: Steve Kelly, 5 7月 2014 | V6 | ||||||
| 38 |
★★ Best of Luck [Link Up]
WYLRO to the 2nd to last move (flat RH edge) then TAC crux move into Are You Feeling Lucky. | V8 | ||||||
| 39 |
★★★ Take a Guinea Pig from Behind [Link Up]
ABST + Sounds Like a Guinea Pig. | V5 | 4m | |||||
| 40 |
★★ When Your Tank Runs Out [Link Up]
ABST + When Your Luck Runs Out. | V6 | ||||||
| 41 |
Phlegm [Link Up]
Burden on Society + Two Coughs reverse + Warm Up Left. | V5 | 6m | |||||
| 42 |
★★ Phlegm Cycle [Link Up]
Burden On Society + Two Coughs reverse + ABSR. | V5 | 10m | |||||
| 43 |
COPD [Link Up]
Phlegm Cycle + Burden on Society 首攀: 10 7月 2021 | V5 | ||||||
| 44 |
Coughing Fit [Link Up]
Phlegm Cycle + Editor's Right 首攀: 7 7月 2021 | V6 | 12m | |||||
| 45 |
★★ The Weakest Link
Take Phlegm Cycle into all of Scarred for Life. About 38 moves. 首攀: Redanon, 8 4月 2022 | V7 | ||||||
| 46 |
★★ Bronchitis [Link Up]
Two Coughs to its finish jugs then across to the sloper on Are You Feeling Lucky, drop down to the lower breakline and finish as for Editor's Right. 首攀: 14 12月 2014 | V5 | 6m | |||||
| 47 |
★ Take a Pig [Link Up]
Take a Chance + Warm Up Right reverse + SLAGP. | V7 | ||||||
| 48 |
Full Circle [Link Up]
Take a Chance + Warm Up Right reverse + ABSR | V7 | ||||||
| 49 |
★ Long Shot [Link Up]
Start matched on the sloper of Just Right, then traverse left and drop down to the start of Editors Right (reverse its first 2 moves). Continue as for ABST + Longbow | V4 | 5m | |||||
 |
||||||||
| Route | Grade | Style | Selected ascents | |||||
| 50 |
First Time Desire
Located on the small boulder 2m right of the main boulder, a good warm up. Sit Start in gap under small roof. Move up to lip and mantle before topping out easier upper section. Chad Step Out. 首攀: Stacy | V0 | 3m | |||||
1.3. Lookout Boulders
- Summary:
-
Lat / Long: -35.064904, 138.920669
描述
A band of boulders between the two lookouts on Mount Barker Summit. There are a few more around nearby yet to be established/climbed.
准入问题
The main area on the ridgetop is council land. The gates to the car park are open from 8am to 6pm (or 8am to 8pm during daylight saving time)
前往
Park at the summit car park and follow the designated track heading down the hill, where it loops around below the lookouts. There you will find two separate paths to the located boulders. A cairn has been placed at the start of each track. Please keep to these paths to limit impact on environment.
住宿
No camping on summit. Closest Towns are Mount Barker and Nairne.
历史
Discovered in March 2021. Appeared to be un-established featuring several loose rocks on faces and uncleared surroundings. Only found by chance as the recent windy Spring/Summer resulted in many trees falling on the hillside exposing the boulders from the walking track.
1.3.1. Table Top Boulder
- Summary:
-
4 routes in Boulder
Lat / Long: -35.064804, 138.920593
描述
A stack of two boulders of differing rock types creating a unique climbing experience.
前往
Approach from below boulder from summit circuit track.
/44/d0/44d022de5e920ac0897cecbe617bf7da6cad2362) |
||||||||
| Route | Grade | Style | Selected ascents | |||||
|---|---|---|---|---|---|---|---|---|
| 1 |
★★ Step Ladder
Sit Start on edges at base of boulder. Move up and left to arete via nice ladder style edges. Once you are hugging the arete using nice line of edges to the left and sloping right of arete move up to the boulder above where you will find some really nice jugs. Mantle out. 首攀: Laurence Judd, 3月 2021 | V3 | 4m | |||||
| 2 |
★★ Top Deck
Sit Start on nice edges and head straight up the face and onto jugs of top boulder to a spicy mantle top out. 首攀: Laurence Judd, 3月 2021 | V0 | 4m | |||||
| 3 |
★ Comp Dyno
Sit start as for 'Step Ladder' or Crouch start on massive jug sidepull. Move up to opposing jug side pull then dyno to the top and mantle out. 首攀: Laurence Judd, 10月 2022 | V1/2 | 4m | |||||
| 4 |
★ Embrace the Pinch
Sit Start matched just right of large protruding block on nice edge rail. Make a move to a really good pinch then up to break and continue up to top out. 首攀: Laurence Judd, 3月 2021 | V1 | 4m | |||||
1.3.2. Nature's Boulder
- Summary:
-
1 route in Boulder
Lat / Long: -35.064886, 138.920626
描述
A boulder 10m right of Table Top Boulder nestled next to some trees that need to be watched out for while climbing. As of March 2021 there is a large loose block at head height left of Tarzan problem, this should be avoided when climbing on the boulder.
前往
Approach via a track marked with a cairn.
 |
||||||||
| Route | Grade | Style | Selected ascents | |||||
|---|---|---|---|---|---|---|---|---|
| 1 |
★ Tarzan
Sit start on LH sloping edge and RH on sloping side pull or on large horizontal edge for those less vertically challenged. Moved right and up to face on crimpers and edges to an easy top out. 首攀: Laurence Judd, 3月 2021 | V1 | 4m | |||||
1.3.3. Bored Local's Boulder
- Summary:
-
2 routes in Boulder
Lat / Long: -35.065069, 138.920665
描述
Southern Most Boulder in the area featuring a little roof and great holds.
前往
Approach via summit circuit track to path below boulder.
/af/7d/af7d85603649c023cf051b76aacf20aa64006637) |
||||||||
| Route | Grade | Style | Selected ascents | |||||
|---|---|---|---|---|---|---|---|---|
| 1 |
★ Ride the Donkey
Sit Start With RH on large edge and LH on good edge in between the two boulders. Make a move to the lip and continue up the arete and top out. Boulder to the left of start is out. 首攀: Laurence Judd, 3月 2021 | V2 | 3m | |||||
| 2 |
Eeyore
Start as for 'Ride the Donkey' but bail out right and head up the slab and top out. 首攀: 3月 2021 | V0 | 3m | |||||
1.4. Northern End
- Summary:
-
所有 Bouldering
Lat / Long: -35.062276, 138.920990
描述
Some bouldering approximately 200-250m North of the summit.
前往
Approach as for Isolation boulder or simply follow the faint track along the ridgeline.
1.4.1. Isolation Boulder
- Summary:
-
Lat / Long: -35.061862, 138.921056
描述
Steep, crimpy boulder with superior rock quality for the area and ok landings.
前往
From the car park take the first track headed North east and follow for approximately 700 meters. When you get to the loan Yakka bush on the right side of the path head immediately left for approximately 50 meters. Slight scramble will land you at the base of the boulder
历史
A chequered history. Climbed on back in the '90's (when a dubious hold was added), then later rediscovered in early 2012. A couple of lines were established then (what is now called Isolation and Escape from Isolation), and only recently rediscovered again. The majority of the face is blank (central section), hence the previous lack of interest.
/21/57/215712be99965dccf1b042b12267081385eeacc4) /54/74/547446fea98d7cc05546faf67da2393fe451407c) |
||||||||
| Route | Grade | Style | Selected ascents | |||||
|---|---|---|---|---|---|---|---|---|
| 1 |
★ Bushido
Start in the cave next to A little bit extra. LH on deep side pull RH Gaston on A little bit extra's LH start hold. Straight up the arete to an awkward exit. 首攀: Dan millar | V1 | 2m | |||||
| 2 |
★ A Little Bit of Something
Start LH at base of good 2nd sidepull left of arete and RH on protruding pinch. Move up to good sloper at the lip, then traverse up and right to top out on good jug of 'Isolation'. 首攀: | V3 | 3m | |||||
| 3 |
★★ Isolation
Start left hand in the manufactured slot on far left of boulder and right hand on the good edge. Bump left to rail before making a big move into a high in-cut right hand. Place your right foot high on the sloping rail before making a dynamic move with the left hand to a high jug above right hand. top out to finish 首攀: Paul Kinnane, 2012 | V3 | 3m | |||||
| 4 |
★★ Isolation Direct
Start matched on Isolation's RH crimper, then make a big move RH to a finger jug at 1 o'clock. Top out (effectively Isolation minus two holds). Strangely easier. 首攀: Redanon | V2 | ||||||
| 5 |
★★ Escape from Isolation
Start matched on Isolation's RH crimp. Make a big lock/dynamic move with RH to a pocket/finger jug at 2 o'clock (right of the Isolation hold), then LH to a good edge/finger jug, and top out. 首攀: Craig Ingram, 2012 | V4 | ||||||
| 6 |
★★ Extra Isolation
As for isolation however after gaining the in-cut right hand cross through left to a side pull and traverse out right avoiding the jugs over the lip. Match on a good hold just below the lip before cutting feet to gain an orange footer on the far right of the boulder. top out to finish 首攀: Mark Foyle, 19 5月 2020 | V3 | ||||||
| 7 |
[Project]
Start matched on sloping diagonal rail and make a big lock move via intermediate crimp to the start hold of 'Escape from Isolation'. Finish up that. Will be an Adelaide classic. | |||||||
| 8 |
A sweet extension
Open Project. Possible left extension to S&S on harder central holds | 2m | ||||||
| 9 |
★★★ Quarantine Project
A very impressive line when complete. Sit start on the large edge on the right hand side. Move into the undercling then the small edge before making a big move to the prominent side pull on the left. Match this then join 'Isolation' at it's right hand starter. Climb 'Isolation' to the top. If you're bouldering double digits check this gem out! 定线/开线: | |||||||
| 10 |
★ Short n Sweet
Sit start on low juggy edge, with foot far right on arete. Make a move to a solid edge then bump to top sloping jug and top out. 首攀: Laurence Judd, 2020 | V2 | 1m | |||||
| 11 |
★ Avoiding Isolation
Traverse boulder from right to left on jugs above lip. Top out as for Isolation 首攀: Tom Kane, 19 5月 2020 | V1 | 5m | |||||
1.4.2. O&D Boulder
- Summary:
-
1 route in Boulder
Lat / Long: -35.062616, 138.920976
描述
An isolated section of cliff featuring a short roof.
前往
Approx 80m south of Isolation boulder along ridge line.
/db/0e/db0e7ff8424b748046488a47c8f0f21c491a9d85) |
||||||||
| Route | Grade | Style | Selected ascents | |||||
|---|---|---|---|---|---|---|---|---|
| 1 |
★ One & Done
Sit Start on high LH crimp and low RH sloper sidepull. Head straight up on good holds to the lip, then over the bulge on good sloping edge. 首攀: Laurence Judd, 8月 2022 | V1 | 4m | |||||
1.4.3. Goosebumps Boulder
- Summary:
-
1 route in Boulder
Lat / Long: -35.062540, 138.921005
描述
A small overhung wall 10m north of O&D.
前往
70m South of Isolation Boulder.
/08/4e/084e34008b0b1e37608d724c06c5875a5c6cebbb) |
||||||||
| Route | Grade | Style | Selected ascents | |||||
|---|---|---|---|---|---|---|---|---|
| 1 |
Goosebumps
Sit Start on good edge and sidepull. Head straight up to big break, head right and up the arete to find some good slopers, or head straight up the face for some harder crimping, the choice is yours. 首攀: Laurence Judd, 8月 2022 | V1/2 | 4m | |||||