A Crag Guide gives an extensive view of all sub areas and climbs at a point in the index. It shows a snapshot of the index heirachy, up to 300 climbs (or areas) on a single web page. It shows selected comments climbers have made on a recently submitted ascent.
At a minor crag level this should be suitable for printing and taking with you on a climbing trip as an adjunct to your guidebook.
This guide was generated anonymously. Login to show your logged ascents against each route.
Warning
Rock climbing is extremely dangerous and can result in serious injury or death. Users acting on any information directly or indirectly available from this site do so at their own risk.
This guide is compiled from a community of users and is presented without verification that the information is accurate or complete and is subject to system errors. By using this guide you acknowledge that the material described in this document is extremely dangerous, and that the content may be misleading or wrong. In particular there may be misdescriptions of routes, incorrectly drawn topo lines, incorrect difficulty ratings or incorrect or missing protection ratings. This includes both errors from the content and system errors.
Nobody has checked this particlular guide so you cannot rely on it's accuracy like you would a store bought guide.
You should not depend on any information gleaned from this guide for your personal safety.
You must keep this warning with the guide. For more information refer to our:
Usage policy
Contributors
Thanks to the following people who have contributed to this crag guide:
Jason Lammers
Peatey
Richard Pattison
Brendon Flanagan
Rene Provis
Macciza a.k.a. Macca
Niall Doherty
Jamie Spencer
james ritchie
Nick Murphy
The size of a person's name reflects their Crag Karma, which is their level of contribution. You can help contribute to your local crag by adding descriptions, photos, topos and more.
Some content has been provided under license from: © Australian Climbing Association Queensland (Creative Commons, Attribution, Share-Alike 2.5 AU)
Table of contents
- 1. Bellbird Wall area 9 in Crag
- 2. Index by grade
1. Bellbird Wall area 9 routes in Crag
- Summary:
-
Sport climbing and Trad climbing
Lat / Long: -33.620573, 150.329275
summary
Crag temporarily closed to allow bushfire vegetation recovery and reconstruction of damaged tourist track and lookouts.
description
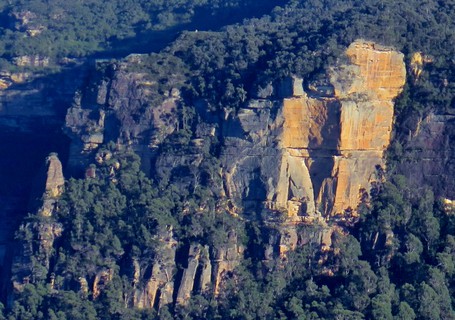
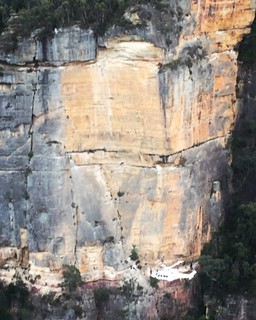
Steep North East facing wall, 100m high, and a 50m high lower cliff.
access issues
The Blue Mountains are a World Heritage listed area. The Grose Valley, the cliffs around Katoomba and much of the Narrow Neck peninsula are part of the Blue Mountains National Park which is managed by the NPWS. The Western Escarpment - where most of the climbing is - is Crown Land managed by the BMCC. While the NPWS Plan of Management nominates several locations in the National Park where rock climbing is deemed appropriate, the majority of the climbing remains unacknowledged. To maintain access our best approach is to 'Respect Native Habitat, Tread Softly and Leave No Trace'. Do not cut flora and keep any tracks and infrastructure as minimal as possible.
Practically all crags are either in National Park or in council reserve: dog owners are reminded that dogs are not allowed in National Parks at any time and fines have been issued, while for crags on council reserve the BMCC leash law requires that dogs be on-leash.
For the latest access related information, or to report something of concern, visit the Australian Climbing Association NSW Blue Mountains page at https://acansw.org.au/blue-mountains/
approach
A good wall for hot afternoons (take a jumper, it can be very cold if the wind picks up) and cold mornings (we've climbed in t-shirts while it's snowing there). There are also some older routes described in the Warwick Williams Grose Guide on the wall below the lookout and on the actual 'Pulpit' Rock below the lookout, and a modern mixed route on the lower cliff directly below Bellbird wall area.
Access: Park at 'Pulpit' Rock (Hat Hill Rd, Blackheath) carpark and walk down towards the 'Pulpit' Rock lookouts. Turn off left at the 12th drain (wide wooden drains cross this track) about 200m down the track. Follow the evident track that trends right leading you to the cliff top. The left most rap station is over 'Stone Poem'. The rap station over the Next Doctor (also used for Bellbird) is to the right and further down hill. A single bolt can be seen and clipped as a safety to help reach around to the two RB anchors. There is a third anchor at the top of Bellbird but this is not recommended for rapping unless you were to leave extended slings
BellBird Wall is in Red, other routes as marked on Topo. BellBird and 'The Next Doctor' have shared rap station.
'Under the Influence' is accessed from the base of the 'Bellbird Wall' double raps, then by walking around sandy alcove (climbers left) to short rap off bolts down gully, and another rap from the routes belay bolts to base of lower cliff. See topo for this route.
GPS co-ordinates for the top cliff rap point are S33 37.244 E150 19.739
ethic
Although sport climbing is well entrenched as the most popular form of Blueys climbing, mixed-climbing on gear and bolts has generally been the rule over the long term. Please try to use available natural gear where possible, and do not bolt cracks or potential trad climbs. If you do the bolts may be removed.
Because of the softness of Blue Mountains sandstone, bolting should only be done by those with a solid knowledge of glue-in equipping. A recent fatality serves as a reminder that this is not an area to experiment with bolting.
If you do need to top rope, please do it through your own gear as the wear on the anchors is both difficult and expensive to maintain.
At many Blue Mountains crags, the somewhat close spacing of routes and prolific horizontal featuring means that it is easy to envisage literally hundreds of trivial linkups. By all means climb these to your hearts content but, unless it is an exceptional case due to some significant objective merit, please generally refrain from writing up linkups. A proliferation of descriptions of trivial linkups would only clutter up the guide and add confusion and will generally not add value to your fellow climbers. (If you still can't resist, consider adding a brief note to the parent route description, rather than cluttering up the guide with a whole new route entry).
If you have benefited from climbing infrastructure in NSW, please consider making a donation towards maintenance costs. The Sydney Rockclimbing Club Rebolting Fund finances the replacement of old bolts on existing climbs and the maintenance of other hardware such as fixed ropes and anchors. The SRC purchases hardware, such as bolts and glue, and distributes them to volunteer rebolters across the state of New South Wales. For more information, including donation details, visit https://sydneyrockies.org.au/rebolting/
It would be appreciated if brushing of holds and minimisation/removal of tick marks becomes part of your climbing routine. Consider bringing a water squirt bottle and mop-up rag to better remove chalk. Only use soft (hair/nylon) bristled brushes, never steel brushes.
The removal of vegetation - both from the cliff bases and the climbs - is not seen as beneficial to aesthetics of the environment nor to our access to it.
Remember, to maintain access our best approach is to 'Respect Native Habitat, Tread Softly and Leave No Trace'. Do not cut flora and keep any tracks and infrastructure as minimal as possible or risk possible closures.
For the latest access related information, or to report something of concern, visit the Australian Climbing Association NSW Blue Mountains page at https://acansw.org.au/blue-mountains/
| Route | Grade | Style | Selected ascents | |||||
|---|---|---|---|---|---|---|---|---|
| 1 | ★★ The Next Doctor Pitch 1 | 22 | 35m | |||||
   |
||||||||
| Route | Grade | Style | Selected ascents | |||||
| 2 |
★★ The Next Doctor
Grand arete, shade by 1pm in Summer. 2 x 50m raps to tree on ledge. Start: Marked in Blue on topo
FA: Niall Doherty, Vanessa Peterson & Mike Law, 2009 | 23 | 100m, 3 | |||||
| 3 |
★★★ YAKs in Space
Out there variant 3rd pitch to The Next Doctor. Up and launch out to the right with 100m+ of air below you to arete, then up to anchors. Either lower off back to the belay, or top out and bring a 2nd up to clean. FA: Bundy & Doddy, 2009 | 21 | 16m | |||||
| 4 |
★★ Beggars Belief / Bellbird Wall trad variant
Aka the Bellbird Wall trad variant, it beggars belief that it took until now for these splitters to be climbed! Approach and rap in as per Bellbird Wall (BbW).
FFA: Rene Provis & Julie Pon, Sep 2018 | 18 | 100m, 3, 2 | |||||
| 5 |
★★ Bellbird Wall
Park at 'Pulpit' Rock carpark and walk down towards 'Pulpit' Rock (take care if using Google maps, there are two or three pulpit rock lookouts/carparks. Use the link provided to get the correct one). Turn off left at the 12th drain (wide wooden drains cross this track) after about 200m. Follow the evident trail trending right for about 60m leading to the ridge line. At this point turn L and look for a single RB. Hook in here with your safety line and set up your ropes off the 2RB's around the corner. Rap down 46m passing FH's and RB's to the ledge.There's a belay on the left and on the right, use the ones on the left. Set up your ropes off draws (as there is a lot of friction, hard to pull ropes otherwise) on these RB's and rap 46m to the base. Best to belay to the tree and belay the next climber on the exposed 'walk' to the right. Facing the cliff walk 20m right taking care and up to the tree in the corner where the route starts (single ring belay, and good tree on right). Take 16 draws, and a couple for the anchors.
FA: Niall Doherty, Jason Lammers, Vanessa Peterson, Veronica Trainor, Althea Arguelles-Ling, Chris Ling & Mike Law, 2009 | 18 | 100m, 3, 16 | |||||
| 6 |
★★ The Side Hussle - Closed Project
Closed project - stay off. Steep line up the guts of the overhung wall right of Next Doctor. Starts as for Bellbird wall. 15 or so draws required.
| 100m | ||||||
| 7 |
★★ Hippocampus
Thin crack (with bolts) 2m right of Bellbird Wall.
FA: Mikl Law, jeff crass, monique Foreister & simon carter, 2010 | 26 | 95m, 3 | |||||
| 8 |
Stone Poem
2 Beautiful arêtes separated by a short punchy haiku. The wall faces north east and is well protected on winter mornings, and gets afternoon shade in summer. Take 15 draws. Rap 30m to a stance 10m below the ledge, then either 20m to belay #3 (hanging) or 30 to belay #2 (good ledge but leave slings to pull ropes). Rap 40m and left slightly to hanging stance at a small ledge on lip of choss. On all raps you must bounce to be able to reach anchors. Take prussics. If you're not cruising 27 arêtes, you might leave a rope or 2 fixed.
FA: Adrian Laing & Mike Law | 27 | 100m, 4 | |||||
| 9 |
Under the Influence
A fantastic mixed route on the lower cliff. Perfect finger crack with great (natural) pro, then bolt protected face and exposed arête climbing. One long pitch (take 15 draws plus gear) or use midway double-bolt belay to split pitches. From the base of the Bellbird Wall double rap, walk left (facing in) around the alcove on loose, dusty ground, hugging the cliff (caution - slack belay off the big tree near rap-touchdown recommended. From the end of the alcove the cliff-top heads out perpendicular to the main Bellbird wall. Traverse around the slope while dropping slightly, to where the cliff-top swings back parallel to the main upper cliff. At the top of an obvious blocky gully (only 50m or less from the alcove) downclimb or rap (25-30m?) from double U-bolts, down gully past a few bolts (used as runners for the exit scramble) to a flat block on the cliff edge proper. Rap again (double U-bolts) to climber’s right of small tree (2 ropes, or single fixed is better - about 35m?) to start of route on the short flat-topped pinnacle next to a tree fern. Pitch 1 (20): (single 0.3-0.75 Camalots; 5 bolts to semi hanging DBB). Finger crack with small cams, then bolts on rising traverse up and left to blunt arête (double bolt belay). Semi-hanging belay or continue. Pitch 2 (21): (9 bolts to DBB). Thin and delicate climbing on, and just left of, the arête. Stay left of small tree on final short block). After bringing up your second you can scramble/climb back up the blocky rap gully. There are 4 optional bolt runners to the rap anchors, if staying roped up, but take care – they will only help you so much on this low-angled terrain. Then up to alcove on half-way ledge and around to base of Bellbird wall and top-out routes. FA: Tom & Hannah Hepner, 2010 | 21 | 45m, 2, 18 | |||||
2. Index by grade
| Grade | Stars | Name | Style | Pop | |
|---|---|---|---|---|---|
| 18 | ★★ | Beggars Belief | 100m, 3, 2 | ||
| ★★ | Bellbird Wall | 100m, 3, 16 | |||
| 21 | Under the Influence | 45m, 2, 18 | |||
| ★★★ | YAKs in Space | 16m | |||
| 22 | ★★ | The Next Doctor Pitch 1 | 35m | ||
| 23 | ★★ | The Next Doctor | 100m, 3 | ||
| 26 | ★★ | Hippocampus | 95m, 3 | ||
| 27 | Stone Poem | 100m, 4 | |||
| ? | ★★ | The Side Hussle - Closed Project | 100m |