A Crag Guide gives an extensive view of all sub areas and climbs at a point in the index. It shows a snapshot of the index heirachy, up to 300 climbs (or areas) on a single web page. It shows selected comments climbers have made on a recently submitted ascent.
At a minor crag level this should be suitable for printing and taking with you on a climbing trip as an adjunct to your guidebook.
This guide was generated anonymously. Login to show your logged ascents against each route.
Warning
Rock climbing is extremely dangerous and can result in serious injury or death. Users acting on any information directly or indirectly available from this site do so at their own risk.
This guide is compiled from a community of users and is presented without verification that the information is accurate or complete and is subject to system errors. By using this guide you acknowledge that the material described in this document is extremely dangerous, and that the content may be misleading or wrong. In particular there may be misdescriptions of routes, incorrectly drawn topo lines, incorrect difficulty ratings or incorrect or missing protection ratings. This includes both errors from the content and system errors.
Nobody has checked this particlular guide so you cannot rely on it's accuracy like you would a store bought guide.
You should not depend on any information gleaned from this guide for your personal safety.
You must keep this warning with the guide. For more information refer to our:
Usage policy
Contributors
Thanks to the following people who have contributed to this crag guide:
Richard Pattison
Vanessa Wills
Chalten Mountain Guides
Tom
Alejandro
El Nahue Climb
Nicholas Salzano
Karsten Fuchs
jpmg
Danny Waugh
The size of a person's name reflects their Crag Karma, which is their level of contribution. You can help contribute to your local crag by adding descriptions, photos, topos and more.
Table of contents
- 1. La Nueva Escuelita / River School Wall 12 in Cliff
- 2. Index by grade
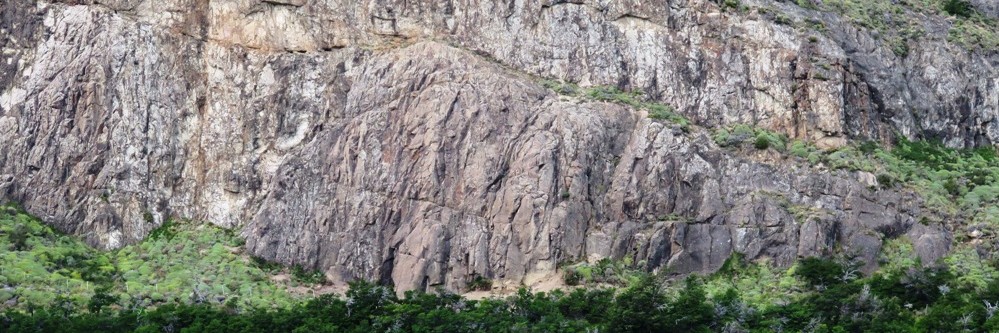
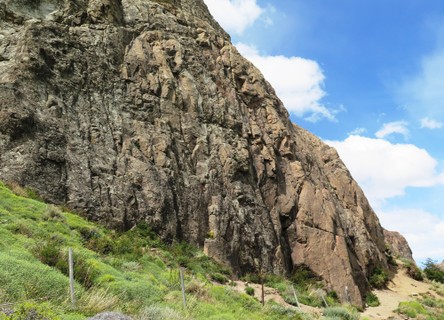
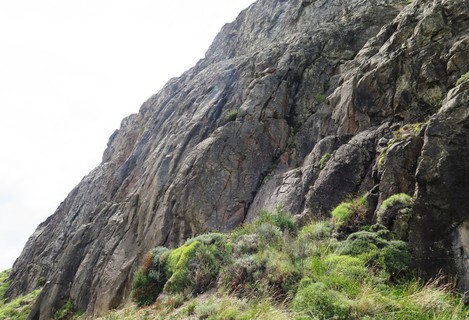
1. La Nueva Escuelita 12 routes in Cliff
- Summary:
-
Mostly Sport climbing
Lat / Long: -49.325050, -72.883631
description
A small sector right on the private road with easier routes.
approach
From main street, walk down "Trevisan" past Chalten Suites and Lunajuim Hotel to cross the river on wodden bridge to Pared de los Condores climbing area. Turn left through gate (sometimes locked) and follow the road for 150 metres. The crag is immediately adjacent to the road on a small dirt terrace. The Hosteria Fitz Roy Inn is directly opposite on the other side of the river.
descent notes
All routes have lower offs
  |
||||||||
| Route | Grade | Style | Selected ascents | |||||
|---|---|---|---|---|---|---|---|---|
| 1 |
★ Slab left of main wall 1
16m up and left of fence post, diagonal staircase up and right past 6 bolts to shared lower-off. Awkward to abseil and clean the route as it wanders ~8m sideways, easiest for 2nd to top-rope and clean. | 4+ | 22m, 6 | |||||
| 2 |
★★ Slab left of main wall 2
Start 8m up and left from fence post at left end of main wall. 7 bolts to shared lower-off, crux is bolt 6 - 7. | 5 | 22m, 7 | |||||
| 3 |
★★ top rope problem 1
Just to the left of the fence posts at overhung corner, only anchor bolts for TR | 18m | ||||||
| 4 |
★★ Main Wall Bolted 1
Start at fence post at left end of main wall. Up past 10 bolts. Crux is getting past the 9th bolt. Previously "Top Rope Problem 2". Set: Leonardo Viamonte | 6a | 22m, 10 | |||||
| 5 |
★★ Main Wall Bolted 2
3m right of fence post (at left end of main wall), starting at a triangular ledge at head height. Up past 9 bolts to lower-offs. Set: Manuel Quiroga & Leonardo Viamonte | 6a | 22m, 9 | |||||
| 6 |
Main Wall Bolted 3
Start 6m right of fence post (at left end of main wall), just right of low roof at wide crack/chimney. Chimney up to 2nd bolt, crux through overlap to 3rd bolt, then more easily to anchors. Middle-third is sandy with broken rock. | 6a+ | 22m, 9 | |||||
| 7 |
★ Main Wall Bolted 4
8m right of fence post (at left end of main wall). Start at dihedral, up and out to 2nd bolt on face, easy slabbing until finish above scoop (protected by 9th bolt). | 6a | 20m, 9 | |||||
 |
||||||||
| Route | Grade | Style | Selected ascents | |||||
| 8 |
★ Main Wall Bolted 5
Diagonal right crack and ramp. Start 5m right of "Main Wall Bolted 4" past bush and crack/groove. Crux is between first 2 bolts with side clings either side. Awkward to clean the route as it wanders ~6m right to shared lower-offs. Set: Roberto Treu | 6a | 15m, 6 | |||||
| 9 |
★ Main Wall Bolted 6
Start at seam into right leaning flake. Option to lower-off at ~9m, or continue to shared lower-offs 2 bolts higher. 2m of dirt erosion at cliff base has made the start harder and put the first bolt about 5m above the ground with tricky moves. Set: Roberto Treu | 6b | 12m, 6 | |||||
| 10 |
Main Wall Bolted 7
At far right of main wall, up slightly overhung hand and finger crack, then left-ish to shared lower-offs.Probably harder start now given the 2m of dirt erosion at cliff base. First bolt is ~5m up. Black Diamond 0.5 or 0.75 cam useful to protect the heinous start. Set: Roberto Treu | 6a+ | 13m, 5 | |||||
| 11 |
★ Slab right of main wall 1
Starts just to right of main wall up on 1m dirt ledge. Start up right facing corner past 2 bolts on left wall, then transition to right face past 2 bolts to shared lower-off. | 4 | 15m, 4 | |||||
| 12 |
★ Slab right of main wall 2
Right of main wall up on 1m dirt ledge. Climb the middle of slab past 6 bolts. Scramble 4m to large ledge and first bolt (redundant) at knee height, then nice side cling moves from bolt 2 to 3. Easy to top. | 4+ | 16m, 6 | |||||
2. Index by grade
| Grade | Stars | Name | Style | Pop | |
|---|---|---|---|---|---|
| 4 | ★ | Slab right of main wall 1 | 15m, 4 | ||
| 4+ | ★ | Slab left of main wall 1 | 22m, 6 | ||
| ★ | Slab right of main wall 2 | 16m, 6 | |||
| 5 | ★★ | Slab left of main wall 2 | 22m, 7 | ||
| 6a | ★★ | Main Wall Bolted 1 | 22m, 10 | ||
| ★★ | Main Wall Bolted 2 | 22m, 9 | |||
| ★ | Main Wall Bolted 4 | 20m, 9 | |||
| ★ | Main Wall Bolted 5 | 15m, 6 | |||
| 6a+ | Main Wall Bolted 3 | 22m, 9 | |||
| Main Wall Bolted 7 | 13m, 5 | ||||
| 6b | ★ | Main Wall Bolted 6 | 12m, 6 | ||
| ? | ★★ | top rope problem 1 | 18m |