A Crag Guide gives an extensive view of all sub areas and climbs at a point in the index. It shows a snapshot of the index heirachy, up to 300 climbs (or areas) on a single web page. It shows selected comments climbers have made on a recently submitted ascent.
At a minor crag level this should be suitable for printing and taking with you on a climbing trip as an adjunct to your guidebook.
This guide was generated anonymously. Login to show your logged ascents against each route.
Warning
Rock climbing is extremely dangerous and can result in serious injury or death. Users acting on any information directly or indirectly available from this site do so at their own risk.
This guide is compiled from a community of users and is presented without verification that the information is accurate or complete and is subject to system errors. By using this guide you acknowledge that the material described in this document is extremely dangerous, and that the content may be misleading or wrong. In particular there may be misdescriptions of routes, incorrectly drawn topo lines, incorrect difficulty ratings or incorrect or missing protection ratings. This includes both errors from the content and system errors.
Nobody has checked this particlular guide so you cannot rely on it's accuracy like you would a store bought guide.
You should not depend on any information gleaned from this guide for your personal safety.
You must keep this warning with the guide. For more information refer to our:
Usage policy
Contributors
Thanks to the following people who have contributed to this crag guide:
Jake Forker
Richard Pattison
Dayle Gilliatt
Vanessa Wills
Andrew Connolly
Philip C
Tiburonny
Luen Warneke
Dylan Tubaro
Kai
The size of a person's name reflects their Crag Karma, which is their level of contribution. You can help contribute to your local crag by adding descriptions, photos, topos and more.
Table of contents
- 1. South-East Face 8 in Cliff
- 2. Index by grade
1. South-East Face 8 routes in Cliff
- Summary:
-
Mostly Trad climbing
Lat / Long: -42.270487, 145.829346
description
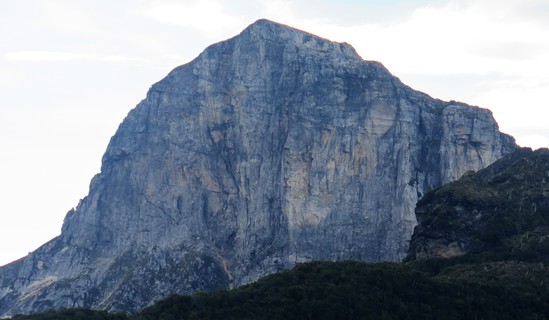
Dark, somewhat more broken than it appears from a distance, and often vert wet, this wall contains 2 important routes - The Sydney Route (the first route to breach the main cliffline in 1964), and The Chimes of Freedom (a rite of passage for grade 17 leaders and one of the great climbs in the state).
Like most other areas, the potential for new routes is limitless, with 100's of metres of cliffline, and a number of key pillars yet to have a single pitch on it. There is a lot of loose rock, particularly on The Sydney Route, although clean areas (with no routes on them yet) abound.
access issues
It's a 25km hike from the Lyell Highway.
approach
Follow the access notes to the East Face, continue to traverse around the base. For the Sydney Route Direct, head for the high mound directly beneath the route, around 30m L of the nose that marks the L end of the east face. For other routes, stay lower and follow the cliff around. For Chimes of Freedom, stay lower again, before ascending a dangerous couloir (ensure adequate spacing between members of your group and wear a helmet)
descent notes
Walk up to the summit, and then down the tourist track to Tahune Hut
ethic
Trad, but some bolts exist where trad is not possible.
Frenchmans Cap is in The Franklin - Gordon Wild Rivers National Park and subject to the Tasmanian Wilderness Heritage Area Management Plan. Climbing is addressed on pages 143-14 of the plan. Some of the presceriptions related to climbing are:
• The area will be predominantly maintained as a traditional climbing area. • The establishment or maintenance of routes that are protected primarily or exclusively using fixed anchors (i.e. ‘sport’ climbs) is generally prohibited. • Existing routes in the 2013 minor boundary extension that use fixed anchors may be maintained. New routes may be established in existing locations where fixed anchors are utilised subject to approval by PWS. • Based on historical precedence, the occasional limited installation (or replacement) of permanent anchors at Mt Geryon, The Acropolis, Frenchmans Cap and Mt Anne is permitted. • Written authority must be obtained from the PWS before using power-driven equipment to install or replace any permanent anchor in the TWWHA.
   |
||||||||
| Route | Grade | Style | Selected ascents | |||||
|---|---|---|---|---|---|---|---|---|
| 1 |
★ Southern Parapet
The route starts just below the South Col. Follow obvious ridge up and once it steepens go straight up to the summit. FA: R Sykes & M Douglas, 1963 | 10 | 200m | |||||
| 2 |
★★★ The Chimes of Freedom
By no means a thorough description. For further information buy a guidebook. No idea about pitch lengths. This route eats hexes. Otherwise single rack from smallest c-3's to #3, with double #1 and double #2 for pitches 4 and 5. Depart hikers track to summit on faint trail leading to base of walls, head over spur and down across big wall all the way to loose scree chute, up this with care, under detached pinnacle at top, across with care until under right leaning ramp creating left facing corner. Approx 1.5hr approach from Tahune hut. The lines infamous traverse pitch can be spied from here as the piece of rock between two respective crack systems.
FA: John Ewbank & John Moore, 1968 FFA: C Dewhirst & D Neilson, 1970 | 17 | 270m, 10 | |||||
| 3 |
Valerie
FA: C Dewhirst, John Ewbank, J Moore & P Stranger, 1968 | 16 M4 | 390m, 14 | |||||
| 4 |
★★ The Sydney Route / Thine is the Glory
To get to the start, walk up main scree couloir below SE Face, from its base scramble up and right to belay on bollard below vegetated crack just left of small buttress
FA: Bryden Allen † & Jack Pettigrew, 1965 | 16 | 380m, 13 | |||||
| 5 |
★★ The Sydney Route Direct Start
The preferred start for most parties as it avoids most of the vegetation of the original route.
FA: Bryden Allen † & Reg Williams, 1972 | 14 | 62m, 2 | |||||
| 6 |
★ The Melbourne Variant
Variant finish to the Sydney Route. Pitches 1-7 as for The Sydney Route
Pitches 12-13 as for The Sydney Route FA: C Baxter & C Dewhirst, 1968 | 16 | 370m, 13 | |||||
| 7 |
★ Brisbane Line
FA: Dayle Gilliatt & Phil Dolan, 1989 | 18 | 300m, 13 | |||||
| 8 |
★ The Newcastle Expressway
A very direct start to the Sydney route, starting to the north. Pitch 1 50 m Just to the left of the lowest part of the cliff, which coincides with E face changing to SE face is a grassy knoll. Scramble up this from the north to the first sloping terrace. Stepped rock with an incipient line heads up left, nearly meeting with the top of the knoll 2m up-it would be possible to step right from the high part to join the line. Up trending slightly left with spaced gear, back right at 15 m above a threader, then left aiming for a fused open book corner under a roof. Near the roof at 40 m step left around a blunt arete for 2 m to belay in a small alcove on small cams . Good quality rock. Spaced gear. P2 30 m straight up from belay to short corner (small wires) then step right onto featured slab . Up into stemming groove exiting left then step right onto wall and straight up to arrive at top of chasm where P 3 of Sydney route starts. FA: Vanessa Wills & David Gray, Feb 2021 | 19 | 80m, 2 | |||||
2. Index by grade
| Grade | Stars | Name | Style | Pop | |
|---|---|---|---|---|---|
| 10 | ★ | Southern Parapet | 200m | ||
| 14 | ★★ | The Sydney Route Direct Start | 62m, 2 | ||
| 16 | ★ | The Melbourne Variant | 370m, 13 | ||
| ★★ | The Sydney Route | 380m, 13 | |||
| 16 M4 | Valerie | 390m, 14 | |||
| 17 | ★★★ | The Chimes of Freedom | 270m, 10 | ||
| 18 | ★ | Brisbane Line | 300m, 13 | ||
| 19 | ★ | The Newcastle Expressway | 80m, 2 |