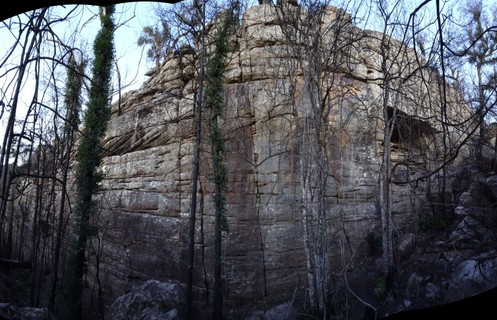
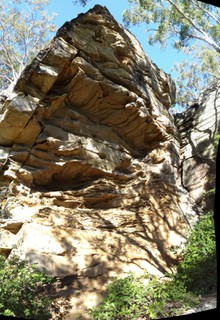
A Crag Guide gives an extensive view of all sub areas and climbs at a point in the index. It shows a snapshot of the index heirachy, up to 300 climbs (or areas) on a single web page. It shows selected comments climbers have made on a recently submitted ascent.
At a minor crag level this should be suitable for printing and taking with you on a climbing trip as an adjunct to your guidebook.
This guide was generated anonymously. Login to show your logged ascents against each route.
Warning
Rock climbing is extremely dangerous and can result in serious injury or death. Users acting on any information directly or indirectly available from this site do so at their own risk.
This guide is compiled from a community of users and is presented without verification that the information is accurate or complete and is subject to system errors. By using this guide you acknowledge that the material described in this document is extremely dangerous, and that the content may be misleading or wrong. In particular there may be misdescriptions of routes, incorrectly drawn topo lines, incorrect difficulty ratings or incorrect or missing protection ratings. This includes both errors from the content and system errors.
Nobody has checked this particlular guide so you cannot rely on it's accuracy like you would a store bought guide.
You should not depend on any information gleaned from this guide for your personal safety.
You must keep this warning with the guide. For more information refer to our:
Usage policy
Contributors
Thanks to the following people who have contributed to this crag guide:
Murray
Mark Ashmore
Jason Lammers
Jakob Kapelj
Matt Tranter
Simon Vaughan
oliver kerr
Thomas Maxted
Grant Stewart
Brendan Heywood
The size of a person's name reflects their Crag Karma, which is their level of contribution. You can help contribute to your local crag by adding descriptions, photos, topos and more.
Some content has been provided under license from: © Australian Climbing Association Queensland (Creative Commons, Attribution, Share-Alike 2.5 AU)
Table of contents
- 1.
Babylon Areas
115 in Crag
-
1.1.
Babylon 33 in Area
- 1.1.1. Eastern Cliffline 11 in Area
- 1.1.2. Western Cliffline 15 in Area
- 1.1.3. Babbling Wall / Big Orange Wall 5 in Sector
- 1.1.4. Jumjuma 2 in Area
-
1.2.
The Gaza Strip 30 in Area
- 1.2.1. Dead Cat Wall 6 in Area
- 1.2.2. Little White Wall 6 in Area
- 1.2.3. Big White Wall 6 in Area
- 1.2.4. Falafel Wall 6 in Area
- 1.2.5. Orange Wall 1 in Area
- 1.2.6. The Green Wall 5 in Area
- 1.3. The West Bank 12 in Area
-
1.4.
Occupied Territories 40 in Area
- 1.4.1. Scoop Wall 12 in Area
- 1.4.2. Slabs 10 in Area
- 1.4.3. First Canyon 12 in Area
- 1.4.4. Holy Wall 1 in Area
- 1.4.5. Second Canyon 5 in Area
-
1.1.
Babylon 33 in Area
- 2. Index by grade
1. Babylon Areas 115 routes in Crag
- Summary:
-
Mostly Sport climbing
Lat / Long: -34.828504, 150.456825
summary
The 'Wild West' climbing of Nowra. No crowds, all bush.
access issues
These crags are remote from civilisation. Be prepared for NO phone reception in and around the Babylon crag areas!
approach
Head West out of North Nowra along Illaroo Road.
where to stay
Some of the areas allow bush camping (check).
ethic
Mostly developed as a sport climbing and bouldering area. Some trad climbing exists, mainly the pure cracks. If developing new areas keep an eye and and ear out for Aboriginal cultural heritage, including cave art.
1.1. Babylon 33 routes in Area
- Summary:
-
Sport climbing and Trad climbing
Lat / Long: -34.840485, 150.473056
approach
Navigate to (-34.84705, 150.47955).
There is now a locked gate on the access track due to misuse of the area. Park near the gate and walk, taking the right route past the gate for 1km to arrive at the power line tower.
For the Western cliff line follow the worn track towards the cliff line, West of the power line, follow the cliff line right to find a way to scramble down (not great access!).
For the Eastern clifflines go from the power line tower through the bush to the right of the power line corridor - use theCrag OSM map overlay for a route hint. Do not attempt to cross from the Western to the Eastern areas below the cliff line - only pain and frustration awaits!
history
Brogan Bunt and others from 1993 onwards.
1.1.1. Eastern Cliffline 11 routes in Area
- Summary:
-
Sport climbing and Trad climbing
Lat / Long: -34.838952, 150.474457
description
Routes are described RIGHT to LEFT.
approach
There is a locked gate 900m from the carpark. There is space to park and walk in for an extra 10 minutes. More concerningly, there is a sign that says access prohibited - but it is likely directed at the dirtbag camping area and the dirt bike tracks. It's crown land and as such it's public access.
    |
||||||||
| Route | Grade | Style | Selected ascents | |||||
|---|---|---|---|---|---|---|---|---|
| 1 |
Ningishzida
FA: Mark Baker, 1994 | 25 | 15m | |||||
| 2 |
Juliet
FA: Tara Sutherland, 1993 | 24 | 15m | |||||
| 3 |
Project
Rings up arete above four pronged tree. | |||||||
| 4 |
★★ Ishtar
FA: Brogan Bunt & Robyn Cleland, 1993 | 23 | 20m | |||||
| 5 | Unknown sport route | 20m | ||||||
 |
||||||||
| Route | Grade | Style | Selected ascents | |||||
| 6 |
Freshkigal
FA: Brogan Bunt, Wade Margetts & Brett Miller, 1993 | 9 | 20m | |||||
| 7 |
Namtaru
FA: Brogan Bunt, 1993 | 22 | 20m | |||||
| 8 |
Namtaru Variant
FA: Brogan Bunt, Wade Margetts & Brett Miller, 1993 | 19 | 20m | |||||
| 9 |
Namtaru Direct
Take SLCD's for slab then rings to top. 2RB anchor. FA: Bogan Bunt, 1994 | 24 | 20m | |||||
| 10 |
★★ Babylon By Bus
No apparent loweroff anchor, 1 carrot over top? FA: Tony Barton & Brogan Bunt, 1994 | 24 | 20m | |||||
| 11 |
Babylon By Bike
2 chain anchor. FA: Tony Barton & George Fieg, 1994 | 25 | 20m | |||||
1.1.2. Western Cliffline 15 routes in Area
- Summary:
-
Sport climbing and Trad climbing
Lat / Long: -34.840465, 150.472747
approach
There is a locked gate 900m from the carpark. There is space to park and walk in for an extra 10 minutes. More concerningly, there is a sign that says access prohibited - but it is likely directed at the dirtbag camping area and the dirt bike tracks. It's crown land and as such it's public access.
 |
||||||||
| Route | Grade | Style | Selected ascents | |||||
|---|---|---|---|---|---|---|---|---|
| 1 |
★ Kadimirra / Ka-Dimirra
FA: Brogan Bunt, 1993 | 19 | 15m, 3 | |||||
| 2 |
★★ Bel Merodach
Optional friend through runout. FA: Brogan Bunt & Richard Watts, 1993 | 21 | 15m, 5 | |||||
| 3 |
Don't Look Back / Marouse de Watt
Direct start to BM FA: Unknown, 2000 | 27 | 15m, 5 | |||||
| 4 |
Gomorrah
FA: Richard Watts, 1993 | 26 | 18m, 9 | |||||
| 5 |
★★ Sodom
FA: Tara Sutherland, 1993 | 25 | 18m, 9 | |||||
   |
||||||||
| Route | Grade | Style | Selected ascents | |||||
| 6 |
To Much Salt
FA: Tara Sutherland, 1994 | 24 | 8m, 2 | |||||
| 7 |
Muielliba
FA: Brogan Bunt & Jamie McCready, 1994 | 23 | 20m, 2, 4 | |||||
| 8 |
★ Waramsin / Naram-Sin
FA: Brogan Bunt & Tony Barton, 1994 | 22 | 15m, 4 | |||||
| 9 |
★ Dintir
FA: Brogan Bunt & Richard Watts, 1993 | 20 | 15m, 5 | |||||
| 10 |
★ Balbal
FA: Brogan Bunt & Richard Watts, 1993 | 22 | 20m, 6 | |||||
  |
||||||||
| Route | Grade | Style | Selected ascents | |||||
| 11 |
Zamama
FA: Brogan Bunt & Tony Barton, 1994 | 21 | 15m, 3 | |||||
| 12 |
★ Blowing Gumby
7RB to single U anchor. FA: Brian Rattenbury | 22 | 25m, 7 | |||||
| 13 |
Gumby's Dark Side
9RB to Single U anchor. FA: Brian Rattenbury | 25 | 25m, 9 | |||||
| 14 |
★ The Craic
FA: Unknown, 1999 | 25 | 20m | |||||
| 15 |
Predat-ur
FA: Brogan Bunt (Solo), 1994 | 7 | 10m | |||||
1.1.3. Babbling Wall 5 routes in Sector
- Summary:
-
Sport climbing and Trad climbing
Lat / Long: -34.838771, 150.474365
description
30 Degrees overhanging 18m high awesome orange rock!!
approach
There is a locked gate 900m from the carpark. There is space to park and walk in for an extra 10 minutes. More concerningly, there is a sign that says access prohibited - but it is likely directed at the dirtbag camping area and the dirt bike tracks. It's crown land and as such it's public access.
| Route | Grade | Style | Selected ascents | |||||
|---|---|---|---|---|---|---|---|---|
| 1 |
★★ Something Jumpy
Start from the left side of the wall. Move right on good holds to big dyno then tough moves to the top...stay out of the cave!! | 26 | 15m, 6 | |||||
| 2 |
★★★ Daddy Issues
The direct start to Something Jumpy, begin with the first two bolts of Daddy Cool clipped and then tackle some independent climbing to meet SJ at the dyno. FA: Danny Ewald | 27 | ||||||
| 3 |
★★★ Daddy Cool
The awesome line to the left of Father Figure, starts under the roof and then climbs the orange wall to the right of the cave. FA: Martin Grymel, 2022 | 28 | ||||||
| 4 |
★★★ Father Figure
The right hand route. Sweet moves to good rest then bouldery crux... awesome FA: Graham Fairbairn | 28 | 18m, 8 | |||||
| 5 |
Babbling
FA: Richard Watts & Vera Wong, 1993 | 25 | 20m | |||||
  |
||||||||
1.1.4. Jumjuma 2 routes in Area
- Summary:
-
All Trad climbing
approach
Its apparently further south along the Western Cliffline, past the gully. To be checked and located next visit.
| Route | Grade | Style | Selected ascents | |||
|---|---|---|---|---|---|---|
| 1 |
Assur-Bani-Pal
FA: Brogan Bunt & Richard Watts, 1993 | 19 | 15m | |||
| 2 |
Wallaby
FA: Robyn Cleland, 1993 | 19 | 15m | |||
1.2. The Gaza Strip 30 routes in Area
- Summary:
-
Mostly Sport climbing
Lat / Long: -34.834732, 150.471953
approach
Bugong Road off Illaroo Road out of West Nowra. Navigate to (-34.83297, 150.47324).
The power line access track gate here is now locked, presumably to stop people driving cars off the cliff. You will have to find a spot along Bugong Road to park (limited!) and walk back.
Once along the access track you can either head right to the power lines and the cliff access rungs, or head left for a few hundred meters for the descent scramble gully (reaching 'Dead Cat Wall').
The path along the cliff to the descent gully is not marked, and the way down and through the jungle will be a hassle with a big pack. Be prepared!
Alternatively if you know where you are going you can rappel straight down the route of your choice.
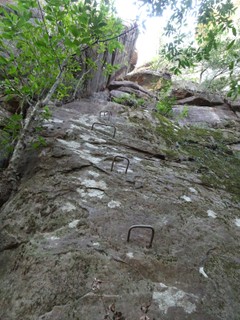
The location of the access rungs has been geolocated on thecrag map for your convenience, and will take you down past the 'Falafel Wall'.
history
Tony Barten, Brogan Bunt, George Fieg, Sarah Fieg - 1990's. Unknown development since then. Remains of carrot bolts and replacement ring bolts.
1.2.1. Dead Cat Wall 6 routes in Area
- Summary:
-
All Sport climbing
Lat / Long: -34.835105, 150.474421
description
Routes are described RIGHT to LEFT.
 |
||||||||
| Route | Grade | Style | Selected ascents | |||||
|---|---|---|---|---|---|---|---|---|
| 1 |
★ Wogpumpa
FA: George Fieg, 1994 | 20 | 10m | |||||
| 2 |
★ Murray
FA: Sarah Fieg, 1994 | 18 | 10m | |||||
| 3 |
★★ China Blue
FA: Sarah Fieg, 1994 | 23 | 15m | |||||
| 4 |
★ Tig
FA: Sarah Fieg, 1994 | 19 | 10m | |||||
| 5 |
★ Au Naturelle
FA: Sarah Fieg, 1994 | 18 | 10m | |||||
 |
||||||||
| Route | Grade | Style | Selected ascents | |||||
| 6 |
★ Difference Of Opinion
FA: Damian Taylor & David Ashmore, 1996 | 17 | 10m | |||||
1.2.2. Little White Wall 6 routes in Area
- Summary:
-
All Sport climbing
Lat / Long: -34.834617, 150.473303
  |
||||||||
| Route | Grade | Style | Selected ascents | |||||
|---|---|---|---|---|---|---|---|---|
| 1 |
★★ Feeling Lucky, Punk?
FA: Sarah Fieg, 1994 | 24 | 20m, 6 | |||||
| 2 |
★★ Shotgun Boogie
FA: Tony Barton, 1994 | 25 | 20m, 6 | |||||
| 3 |
Pale Rider
FA: George Fieg, 1994 | 27 | 15m, 6 | |||||
| 4 | Unknown sport route 1 | |||||||
| 5 | Unknown sport route 2 | 6 | ||||||
| 6 | Unknown sport route 3 | 4 | ||||||
1.2.3. Big White Wall 6 routes in Area
- Summary:
-
All Sport climbing
Lat / Long: -34.834504, 150.472570
description
Routes are described RIGHT to LEFT.
Caution: All routes are 30m long so be careful when lowering.
 |
||||||||
| Route | Grade | Style | Selected ascents | |||||
|---|---|---|---|---|---|---|---|---|
| 1 |
★★ Scuds In My Duds
Climb the big flake. Put a long draw on the bolt at the top. Traverse right into the 'Garden'. Gather your thoughts, then slither your way up the slippery corner then left slightly. Gain an ok rest and punch up the overhung topwall. Impressive line! Start: Start at base of big flake. FA: Tony Barton, 1995 | 25 | 25m | |||||
| 2 |
Dr Destructo
FA: George Fieg, 1994 | 27 | 30m | |||||
| 3 | Unknown sport route 5 | |||||||
| 4 |
★★★ Bozo The Trapeze Artist
WARNING.. Bolt got pulled out while working this 16/07/17. The bolt is the crux bolt just after the no hands rest. The bolt after also looks suspect, take care until this gets rebolted. FA: Tony Barton, 1994 | 26 | 30m | |||||
| 5 |
★★★ Drop Zone
The reason you came here. Half slab, half steep mega jugs. FA: Tony Barton, 1995 | 26 | 30m | |||||
| 6 | Unknown sport route 4 | |||||||
1.2.4. Falafel Wall 6 routes in Area
- Summary:
-
Mostly Sport climbing
Lat / Long: -34.834454, 150.472233
description
Routes are described RIGHT to LEFT.
  |
||||||||
| Route | Grade | Style | Selected ascents | |||||
|---|---|---|---|---|---|---|---|---|
| 1 | ★★★ Access Rungs | 8 | 16m | |||||
| 2 |
Humous & Tabouleh
FA: Brogan Bunt, 1995 | 22 | 22m, 2 | |||||
| 3 |
Swishtawook
Start: Start on ledge with access from rungs. 1st route in from rungs. FA: Brogan Bunt, 1995 | 23 | 10m | |||||
| 4 |
Myxomycetes
Start: Start on ledge with access from rungs. 2nd route in from rungs. FA: Sarah Fieg, 1995 | 23 | 10m | |||||
| 5 |
Shawarma
Start: Start at H&T pitch 2 belay. FA: George Fieg, 1995 | 24 | 10m | |||||
| 6 |
Botulis M
Start: Start at H&T pitch 2 belay. FA: Sarah Fieg, 1995 | 23 | 10m | |||||
1.2.5. Orange Wall 1 route in Area
- Summary:
-
All Sport climbing
Lat / Long: -34.834714, 150.470865
description
Routes are described RIGHT to LEFT.
| Route | Grade | Style | Selected ascents | |||
|---|---|---|---|---|---|---|
| 1 |
Infidel
FA: Brogan Bunt, 1994 | 23 | 25m | |||
1.2.6. The Green Wall 5 routes in Area
- Summary:
-
Sport climbing and Trad climbing
Lat / Long: -34.834855, 150.469447
description
Distinctive green coloured very steep (~35°) wall up on a rock shelf.
| Route | Grade | Style | Selected ascents | |||||
|---|---|---|---|---|---|---|---|---|
| 1 | Untitled Route | |||||||
  |
||||||||
| Route | Grade | Style | Selected ascents | |||||
| 2 |
Green Eggs and Ham
FA: Brogan Bunt, 1995 | 24 | 15m, 7 | |||||
| 3 |
Green Eggs and Ham Direct
FA: George Fieg, 1995 | 27 | 15m | |||||
| 4 | Unknown sport route 6 | |||||||
| 5 |
Green Dream
FA: Sarah Fieg, 1995 | 26 | 20m, 7 | |||||
1.3. The West Bank 12 routes in Area
- Summary:
-
All Sport climbing
Lat / Long: -34.819496, 150.441734
approach
Lower Bugong Road off Bugong Road off Illaroo Road, West from Nowra. Navigate to (-34.81950, 150.44341)
history
Rod Young and others, 1996 onwards
 |
||||||||
| Route | Grade | Style | Selected ascents | |||||
|---|---|---|---|---|---|---|---|---|
| 1 |
Cannibals and Missionaries
FA: Tara Sutherland, 1997 | 23 | 10m, 5 | |||||
| 2 |
★ Unknown Soldier
At the impossible blank section down low climb into W&P and then back on route. FA: Tim Booth, 2000 | 25 | 20m, 6 | |||||
| 3 |
★★ War and Peace
FA: Colin Berry, 1996 | 25 | 20m, 7 | |||||
| 4 |
★★★ Killer Loop
FA: Rod Young, 1996 | 24 | 15m, 7 | |||||
| 5 |
★★ Chemical Warfare
FA: Chris Gregory, 1996 | 21 | 15m, 7 | |||||
| 6 |
★★ Smith & Wesson
FA: Rod Young, 1996 | 22 | 15m, 7 | |||||
 |
||||||||
| Route | Grade | Style | Selected ascents | |||||
| 7 |
★ Ode To Katie
FA: Rod Young, 1997 | 22 | 24m, 2 | |||||
| 8 |
★★ Flesh Mechanic
FA: brian rattenbury | 22 | 24m | |||||
| 9 |
★★★ Duke Nukem
FA: Rod Young, 1996 | 25 | 24m | |||||
| 10 |
★★ Calci Virus
An old Rabbit project.Start 6m right of Duke Nukem on the ledge left of Rodent. From ringbolt belay on ledge follow bolts up sustained wall to anchors under last little roof. Set: Rabbit, 1997 FA: Matt Adams, 2003 | 27 | 20m, 11 | |||||
| 11 |
Rodent
FA: brian rattenbury | 23 | 24m, 8 | |||||
 |
||||||||
| Route | Grade | Style | Selected ascents | |||||
| 12 |
★★ The Shining Path
FA: Tyler Smith, 2000 | 23 | 25m, 9 | |||||
1.4. Occupied Territories 40 routes in Area
- Summary:
-
Mostly Sport climbing
Lat / Long: -34.812054, 150.449263
description
The climbing at OT is varied, from grade 12 slabs to grade 25 pumpers. It is located in a great out of the way place so the usually annoyances that you asscociate with nowra do not exist. Location: From the roundabout at the North Nowra shops head right (instead of left to go to the grotto and camping areas) and follow Illaroo road out of Nowra. At 10.5km there is an intersection (Illaroo road goes left to Babylon) continue on straight ahead and shortly the road will turn to dirt (11.1km from roundabout). You will then pass under some high voltage power lines (13.1Km) and Lower Bugong road (13.9Km) off to the left (Goes to West Bank). Continue straight ahead for another kilometre of so until Abernethy�s Road appears on the left (15.1km from roundabout). Take this road for 1.5km until the road weaves down and left underneath a cliff line. Park at the bottom of the hill off the road and walk 15m to the first climb. Do NOT park in the obvious clearing on the right side of the road opposite the crag in a 2wd as the ground is soft and you will likely get bogged. The road gets a little rough near the crag so take care in a low clearance car.
access issues
Now in Bugong National Park. No dogs.
approach
From the roundabout at the North 'Nowra' shops head right (instead of left to go to the grotto and camping areas) and follow Illaroo road out of 'Nowra'. At 10.5km there is an intersection (Illaroo road goes left to Babylon) continue on straight ahead and shortly the road will turn to dirt (11.1km from roundabout). You will then pass under some high voltage power lines (13.1Km) and Lower Bugong road (13.9Km) off to the left (Goes to West Bank). Continue straight ahead for another kilometre of so until Abernethy�s Road appears on the left (15.1km from roundabout). Take this road for 1.5km until the road weaves down and left underneath a cliff line. Park at the bottom of the hill off the road and walk 15m to the first climb. Do NOT park in the obvious clearing on the right side of the road opposite the crag in a 2wd as the ground is soft and you will likely get bogged. The road gets a little rough near the crag so take care in a low clearance car.
history
2003, 2005 ?
1.4.1. Scoop Wall 12 routes in Area
- Summary:
-
Mostly Sport climbing
Lat / Long: -34.811583, 150.451554
description
The first section of cliff visible from the carpark. climbing varies from steepness to easy slabbing
 |
||||||||
| Route | Grade | Style | Selected ascents | |||||
|---|---|---|---|---|---|---|---|---|
| 1 |
★★ Infiltrator / Infiltrator Part 11
Start up first two bolts of Beit Hadassah and then trend left onto arete. More engaging than it's neighbour For infiltrator Part 11 get up Infiltrator then move up the headwall to the DRB LO. You can Bivy on the ledges for 3 days leading up to the slightly punchy headwall | 15/16 | 12m, 5 | |||||
| 2 |
★ Beit Hadassah
The second climb at the crag. Climb up slab left of crack. Start: 10m from your car under camo bolt FA: J Lammers, 2000 | 14 | 18m, 6 | |||||
| 3 |
Bearded Lady
the crack right of Beit Haddash to lower off as for BH Start: 2m right of BH under crack FA: C Fox, 2000 | 11 | 18m | |||||
| 4 |
Bunkered Down
An old Chris Fox project that stood bolted for many many years until the first ascent. Up through jugs under the roof, at the third bolt punch way out right to gain a way through the blank section up to the break above (possible alt-method going left?), from there a stiff overhung boulder problem on small sharp crimps to reach the anchor. Set: chris fox FFA: Matt Hoschke, 18 Jul 2020 | 25 | 10m, 4 | |||||
| 5 |
★ The Occupied Force
Up steeply to lip of roof then over this to rest. continue up wall to anchors Start: Under roof on ledge in cave 5m right of BH. FA: The great bear | 23 | 14m, 5 | |||||
 |
||||||||
| Route | Grade | Style | Selected ascents | |||||
| 6 |
★ Attention Seeker
Start 5 metres to the right of Occupied Force. Punchy start thru some suspect rock, then keep on paddling past plenty of big holds on good rock to airy finish. A bit run-out, make sure you fall in the right places. FA: C Fox, 2006 | 20 R | 20m, 6 | |||||
| 7 |
★ No Scoop For You
Up scoop nazi then past two bolts then traverse left and up short flake to easier ground Start: as for scoop nazi FA: S Hawkshaw, 2000 | 24 | 15m, 5 | |||||
| 8 |
★★ Scoop Party
easy if you can crimp. Up beautiful wall past thin moves to gain scooped orange wall. lower off under roof. Start: Under middle of scooped orange face FA: S Hawkshaw, 2000 | 24 | 15m, 5 | |||||
| 9 | ★ Six Day War | 18 | 15m, 5 | |||||
| 10 |
★ Seven Day War
A later day extention to Six Day War (18) which makes it all but obsolete. Up burly start and cruise to top of cliff. nice position up high. 3m right of SN off boulder FA: J Lammers | 19 | 18m, 7 | |||||
| 11 |
★ Gazpacho
por favor. stick clip first ring and climb short steep wall on jugs. would be great if it were longer. Start: 2m right of Six day war FA: S Hawkshaw, 2000 | 17 | 8m, 2 | |||||
| 12 |
★ Failed Diplomacy
Climb the steep crack and headwall. Start: Just left of crack 2m right of gazpacho FA: S Martin, 2000 | 20 | 18m, 5 | |||||
1.4.2. Slabs 10 routes in Area
- Summary:
-
Sport climbing and Trad climbing
Lat / Long: -34.811990, 150.451099
description
The slabs offer great easier climbing on (predominantly) awesome orange sandstone. Location: Located about 50m up the hill from Scoop wall
approach
Located about 50m up the hill from 'Scoop' wall
| Route | Grade | Style | Selected ascents | |||||
|---|---|---|---|---|---|---|---|---|
| 1 |
★ TV Girl
Left most route on the slabs. Balancy start to an interesting pull over the small bulge at mid height FFA: Simon Vaughan, 19 Apr | 15 | 10m, 4 | |||||
 |
||||||||
| Route | Grade | Style | Selected ascents | |||||
| 2 |
★ GMA
Start on left side of orange section of slab 3 metres right of 'TV Girl'. Up slab past bulge to lower off. Keep straight on between the 3rd & 4th bolts crux to earn the 16 - going a metre or two left off-route makes it more like a 14. FA: Chris Fox, 2000 | 16 | 10m | |||||
| 3 |
★ Just Right
Up the groove feature past three bolts to DBB under roof. FA: Steve Hawkshaw, 2000 | 13 | 10m | |||||
| 4 |
★ Crunchy Nut
4 metres right of hibernate under flake in roof. Up slab to steeper section of slab and tend left to anchors as for 'Just Right'. | 16 | 10m | |||||
| 5 |
Cereal Offender
Bolted by Steve, stolen by Dod. Climb 'Crunchy Nut', then up to the right and through the roof. FA: Mr David O'Donnell | 22 | 16m | |||||
| 6 |
★ Cereal Killer
Start under orange flake, Up slab to flake and up to anchors under roof FA: Steve Hawkshaw, 2000 | 12 | 10m | |||||
| 7 |
★ The Golan Heights
2 metres right of Cereal Killer, up through gold towards the honeycomb roof. | 17 | 10m, 6 | |||||
| 8 |
Checkpoint Charlie
The leftward slanting crack, starting at The Bridge and ending at the anchors of Cereal Killer. Clip the first (and second if you like you ankles to remain undamaged) bolts on The Bridge and then trad it up to the convenient anchors at the top of the crack. FFA: Matt Tranter & Simon Vaughan, 16 Sep 2018 | 12 | 12m, 1 | |||||
| 9 |
★ The Bridge
Last bolted route on the right facing the cliff, nice start moves and tricky finish, worth doing FA: Simon Vaughan, 12 Sep 2018 | 15 | 10m, 5 | |||||
 |
||||||||
| Route | Grade | Style | Selected ascents | |||||
| 10 |
★ Sweet Goodness
20m to the right of Cereal after all the chossy black wall. Start finger crack at the right end of the black, up the finger crack to gain flake and up to tree. FA: Chris Bentham, 2005 | 18 | 10m | |||||
1.4.3. First Canyon 12 routes in Area
- Summary:
-
Mostly Sport climbing
Lat / Long: -34.812290, 150.450328
description
About 30m right of the slab wall is a grotto feature that has some great steeper walls. It features one of the crag classics Axis of Evil which tackles the impressively overhung buttress in the back of the grotto.
  |
||||||||
| Route | Grade | Style | Selected ascents | |||||
|---|---|---|---|---|---|---|---|---|
| 1 |
★★ Every Holds A Spinner
Start on front of boulder just right of large tree. Up steeply through the slopeyness to the head wall and final arête to anchors. Contains some funky moves as the rock is tilted so none of the breaks are horizontal. FA: Mike Law, 2000 | 23 | 15m, 5 | |||||
| 2 |
★★ Arc de l'Ecce Homo
First route you will find as you enter the canyon. A tree is currently almost touching the black wall which marks the start. A nice sequency start up the short punchy wall to the slab. Tend up and right to final pumpy moves of desert storm and shared anchor. FA: Bundy, 2006 | 22 | 16m, 8 | |||||
| 3 |
★★ Desert Storm
Start on the left of orange wall. Up scooped rock to big flake then climb the steep orange wall to lower off below cave. FA: Steve Hawkshaw, 2000 | 21 | 15m, 6 | |||||
| 4 |
★ Intifada
2m right of Desert Storm below orange arête. A bouldery start leads to a bongo drum bolt and rest. Belayer beware as the leader climbs past the loose, crumbly rock. Finish up the steep orange wall and arête. FA: Chris "Lincoln" Fox, 2005 | 19 | 12m, 5 | |||||
| 5 |
★ Escape Artist
Just right of 'Intifada'. Mantel up to scoops then up to cave. Head out via steep scoop and tend right to anchors. FA: Steve Hawkshaw, 2000 | 19 | 10m, 5 | |||||
| 6 |
★ War Of Aggression
In middle of black wall under big white horn. 'Steep' slopey start past 3 bolts to comfortable rest then continue up the committing crimpy headwall past three more bolts to lower off. FA: Neil Monteith | 23 | 15m | |||||
 |
||||||||
| Route | Grade | Style | Selected ascents | |||||
| 7 |
★★★ Axis of Evil
On left side of the narrow steep scooped wall. Up the scoop on jugs and fantastically solid rock to crimpy face, then continue to rest and launch through final bulge to anchor. Take care when cleaning in order to avoid swinging into boulder behind the belayer. Overhangs 5m in 18m! Crag Classic, a test piece for the grade in 'Nowra'. FA: Steve Hawkshaw, 2000 | 24 | 18m, 8 | |||||
| 8 |
★ Evil Line
A link up but worthwhile as its so long. Head up Axis past the first five bolts (don't clip the sixth or you will get killer rope drag). Hand traverse right and finish up the last five bolts of the Final Solution. FA: Steve Hawkshaw, 2000 | 25 | 25m, 11 | |||||
| 9 |
The Final Line
Start: just right of AoE. Solo up corner to ledge with care as you reach the top. Head up wall to 2nd bolt then do some unlikely thin moves (just right of Axis) to reach break. Tend right through scoops to jugs and launch up steep wall to cave. Sneak Mcdougall rest at cave and continue up final wall to anchors. FA: Steve Hawkshaw, 2000 | 25 | 20m, 8 | |||||
| 10 |
Trench Warfare
Start: on right side of pyramid shaped block Climb right side of block to ledge then up hand crack to off width and up to cliff top. TRAD FA: Howie McGhie & Chris Fox, 2000 | 17 | 22m | |||||
| 11 |
Open Project
Up awkward looking crack | 20m | ||||||
 |
||||||||
| Route | Grade | Style | Selected ascents | |||||
| 12 |
Easter Bunny
Start in back of the canyon. Best for belayer to be down below the start. Up and around blunt prowl thingo. Up and over small rooflet and onto jugs to top of cliff. Maybe take a small cam for the run out section under the roof. FA: Jason Lammers, 2000 | 21 | 20m | |||||
1.4.4. Holy Wall 1 route in Area
- Summary:
-
All Sport climbing
Lat / Long: -34.812330, 150.449878
 |
||||||||
| Route | Grade | Style | Selected ascents | |||||
|---|---|---|---|---|---|---|---|---|
| 1 |
Clip or Whip
FA: Chris Fox | 21 | 18m, 7 | |||||
1.4.5. Second Canyon 5 routes in Area
- Summary:
-
All Sport climbing
Lat / Long: -34.812303, 150.449078
description
Just around the corner from the Card Deck is the second canyon. This wall has some nice long routes.
  |
||||||||
| Route | Grade | Style | Selected ascents | |||||
|---|---|---|---|---|---|---|---|---|
The Card DeckShort steep wall up on a rock ledge, between Canyon 1 and 2. | ||||||||
| 2 |
★★ Subterfuge
On left side of ledge under corner, layback up steep pumpy corner past 5 bolts to final slab top out. FA: Stephen Hawkshaw, 2000 | 22 | 15m, 5 | |||||
| 3 |
★★ The Ace of Spades
Up steep scoop past 3 bolts, then use a long sling on 4th bolt before traversing left to clip the last bolt of 'Subterfuge' and finish as for that route. The guidebook states "despite appearances the rock is very solid", but the rock scars suggest otherwise. FA: Jason Lammers, 2005 | 22 | 15m, 4 | |||||
| 4 |
Open Project
Set: Stephen Hawkshaw | 13m, 4 | ||||||
|
A little past The Card Deck is a long grey wall with a small rock ledge above the ground | ||||||||
| 6 |
★★ Township Rebellion
In the middle of long grey face A burly start past three bolts leads to a break where the route heads right and up to flake. Continue up wall to finish with hands on top of cliff. FA: Steve Hawkshaw, 2000 | 21 | 23m, 8 | |||||
| 7 |
★ Mr Donut Head Man
Start at short flake under obvious arête Up flake and right to 2nd bolt then tricky move to rest. Reachy move through bulge and up the nice technical arête to slopey top. Only single lower off at this stage as continuation up top arête may eventuate. FA: Steve Hawkshaw, 2000 | 23 | 13m | |||||