For those of you who have spent hours finding a crag or boulder based on some description the value of geolocations is obvious.
Finding crags based on their location, seeing the nearest climbing area or gym from your current location or planning a trip involving multiple climbing areas all require geolocations. Everyone is used to Google Maps and its ease of use in finding the nearest petrol station, restaurant or hospital.
theCrag allows you to find all climbing related locations; from regions to sectors of a cliff, from boulder fields to individual routes and your nearest gym. theCrag not only stores specific points but takes into account that climbing areas are actual areas. Meaning they have a certain size and shape and are hierarchically structured, a sector is part of cliff, a cliff is part of a crag and so on.
theCrag overlays this information onto different maps and you may choose to look at it on a street map, satellite images or terrain map and - depending on the region - on maps of different providers. This ensures that you get the best information wherever you are, helping you to plan and find what you are looking for!
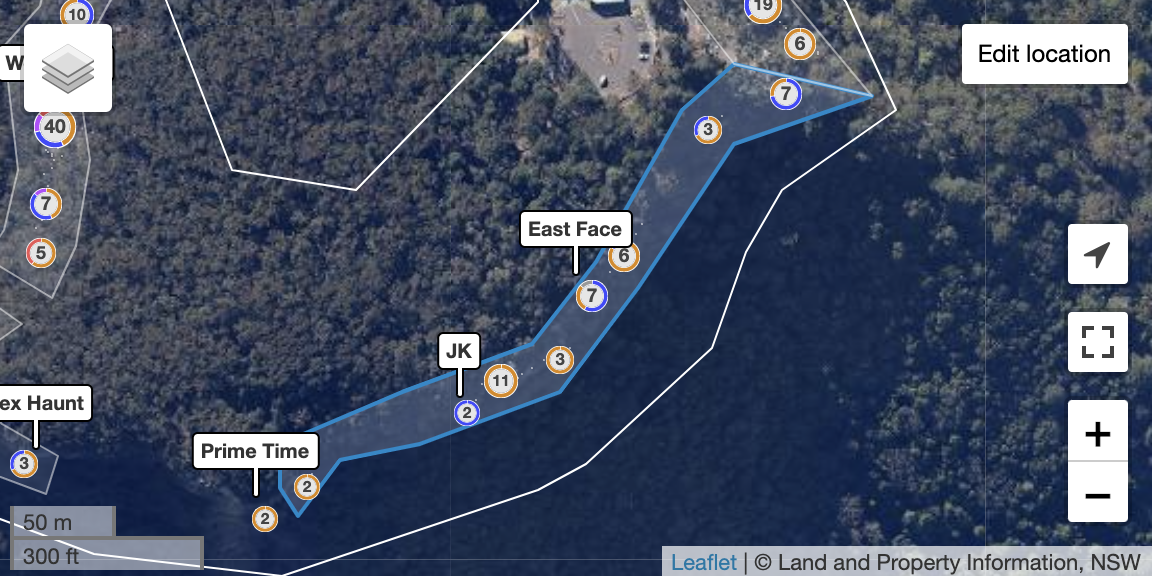
Typical area page map, hover over the buttons for details and switch base maps (top left).
Depending on your preferences, maps on theCrag may be accessed from different places. There is the Maps Tab in the top menu and of course you will find maps on all area pages, provided the area you are looking at is actually geolocated.
Contributing내용으로 돌아가기
Geolocations are community managed. In order to be as useful as possible we rely on you to contribute actual and accurate locations whenever possible. If you see an area without location and you know where it is, please take the time and locate it. It is quick and easy and your fellow climbers will be thankful.
Locating Areas내용으로 돌아가기
Just click on the 'Edit Location' button on the top right corner of an area map (or on the button shown for an unlocated) area to open the editor mode of maps. You might require Editor permissions to edit an existing location. Just click on the Request Permission button for the area if you lack them.

Map editor
Pan and zoom the map so that you can see the required details and click on Draw / edit. Draw or edit the shape by clicking on the map. Double click once you have finished the shape. You may add points by clicking on the light orange points on a line, delete points by hovering over an existing point and pressing 'D' or 'Delete' on your keyboard or drag points with your mouse.
Snap markers내용으로 돌아가기
An excellent way to accurately locate shapes is the use of 'Temporary Snap Markers'. If you have e.g. GPS-positions of corners of the boundaries you may enter them in the field and display them on the map (yellow crosses). You may add as many as you wish to make the drawing easier and more accurate. Enter the GPS-Position in decimal mode with a minus for West and South (e.g. 45.134567, -100.845678 for N45.134567°, W100.845678°).
Once done just click save.
Considerations when locating areas내용으로 돌아가기
- Child areas should always be fully inside parent areas - increase the size of a parent area if needed. e.g. new sub-areas are added or a child is outside of the parent area.
- Sibling areas should not overlap, if they are adjacent to each other please make sure the borders are 'snapped together'.
- If you have a couple areas which overlap because they are ledges systems vertically above and below each other, please consider whether merging them and using 'annotations' would be a better solution instead of sub-areas. See also Structuring a Crag.
- Typically it is easier to start at the lowest level possible and work back up from there. For example if you are adding boundaries for a crag that has 3 cliffs each divided into sectors, it is easier to get the boundaries all neat and tidy by starting with the sectors, then the cliffs and then the crag.
- Avoid having a 'climbing area' and a 'bouldering area' that overlap, just mark each route with the correct type so they can be filtered as needed.
- Avoid a child and parent sharing the same shape, it should be clear that a child area is inside the parent area.
- Each area should have no more than around 20 children, where possible make sub areas to group clusters together.
- You might want to change the sort order of sub-areas based on their location, eg in the order they are approached from the car park. Do so by dragging them in the order you wish in the table below the map.
- Area shapes should generally be a slightly bigger than they are in real life, so that if your GPS location is a few meters away from a cliff or boulder then you are still considered to be 'in' that area.
- A rule of thumb is: imagine you are standing at a particular location and describing to someone on the phone where you are. If you are at the carpark you would probably say 'I am at crag X', or if you are near the descent gully of a cliff you would say 'I am at the YYY cliff', or if you were within 10m of a boulder problem you would say 'I am at problem ZZ'.
- Crag or region shapes should be quite generous and include car parks, and encompass walking tracks and other features that would be considered 'in' that area. A parent area's shape doesn't need to 'shrink wrap' all of its child areas tightly.
- The aspect of the cliff (eg. facing East) is shown in the map label orientation. This makes it easier to understand and can also let the labels be positioned more optimally. Just add the orientation tag for the cliff to use this feature.
Cliff orientation is shown using label position in this example.
- Boundaries for Countries and Regions above the crag level can only be created by system administrators. If you miss one, please contact support.
Locating Routes내용으로 돌아가기
In some cases it might be useful to locate an individual route. This might be the case if routes are far apart from each other or if the start of a route is hard to find in e.g. an alpine setting. Please make sure that your location is very accurate (to a very few meters) if you locate an individual route.
Example of an area with individually located routes.
Click on Edit Route for the route you want to locate and enter the GPS-Position in decimal mode with a minus for West and South (e.g. 45.134567 for N45.134567° and -100.845678 for W100.845678°) and click Save when you are done.
You might want to verify the correct location on the map and make sure the area boundaries include the newly located route.
Points of Interest and Trails내용으로 돌아가기
Currently theCrag does not support the drawing of trails, abseil points and other points of interest. Adding these are on our long term feature road map. If you think it is critical for an area to have this information we encourage you to add them using the editor tools for OpenStreetMaps (OSM). Using OSM as base map will then display the added information on theCrag.
Exporting Location Information as KML or GPX내용으로 돌아가기
You may export location information from theCrag using the 'Download' function on the respective area page. theCrag allows you to export data as KML or GPX file for import into GPS-devices or other map services such as Google Earth.