A Crag Guide gives an extensive view of all sub areas and climbs at a point in the index. It shows a snapshot of the index heirachy, up to 300 climbs (or areas) on a single web page. It shows selected comments climbers have made on a recently submitted ascent.
At a minor crag level this should be suitable for printing and taking with you on a climbing trip as an adjunct to your guidebook.
This guide was generated anonymously. Login to show your logged ascents against each route.
Warning
Rock climbing is extremely dangerous and can result in serious injury or death. Users acting on any information directly or indirectly available from this site do so at their own risk.
This guide is compiled from a community of users and is presented without verification that the information is accurate or complete and is subject to system errors. By using this guide you acknowledge that the material described in this document is extremely dangerous, and that the content may be misleading or wrong. In particular there may be misdescriptions of routes, incorrectly drawn topo lines, incorrect difficulty ratings or incorrect or missing protection ratings. This includes both errors from the content and system errors.
Nobody has checked this particlular guide so you cannot rely on it's accuracy like you would a store bought guide.
You should not depend on any information gleaned from this guide for your personal safety.
You must keep this warning with the guide. For more information refer to our:
Usage policy
Contributors
Thanks to the following people who have contributed to this crag guide:
Tom Bes
Adam Rabjohns
James McRae
Roman
Cam
The size of a person's name reflects their Crag Karma, which is their level of contribution. You can help contribute to your local crag by adding descriptions, photos, topos and more.
Table of contents
- 1.
Alfords 2 Point 0
7 in Area
- 1.1. Alfred's monument 1 in Sector
- 1.2. The Project Wall 6 in Sector
- 2. Index by grade
1. Alfords 2 Point 0 7 routes in Area
- Summary:
-
모두 볼더링
Lat / Long: -33.978913, 151.032326
요약
Two smallish, distinct areas of mostly solid rock with a lovely outlook. Potential for a good few more problems.
설명
A varied but somewhat limited crag made up of two small areas. One, The Project Wall is an excellent wall; decent height, solid rock, bulging... but sadly, pretty featureless. The second area (Alfred's Monument) is a large rock (or several) perched atop another smaller rock, making for decent rooves and hard headwalls. There's plenty more potential here and in the surrounding area. I'm moving away so probably won't add much more. Have a go!
접근 문제들
For over 50 years climbers in the Sutherland Shire have enjoyed free access to many fantastic crags and caves. But as of 2014 there have been access problems emerging at several climbing and bouldering areas due to aboriginal art sites and shell middens in caves. Sutherland Shire Council and the Dept of Enviroment and Heritage have announced closures and sign-posted some of these aboriginal sites, with further closures and signs to be added during summer/autumn 2016/2017. Areas of particular problem are ground level overhangs with flat bases, the type of terrain popular at hard bouldering areas. Whilst the details are sorted out keep a low profile, clean up ALL rubbish (inc removing mattresses in bouldering caves) and avoid climbing at closed areas. In particular treat non-climbers you see at crags with the utmost respect as they could be rangers, archeologists, traditional owners or anyone else with a dim view of climbers and the ability to shut us out. Climbing in Royal National Park has been officially banned for many years - probably due mostly to the Wattamolla 'don't jump off rocks' cliff-diving-into-water ban. For more information about aboriginal sites and rockclimbing please read this link from Sutherland Council: https://drive.google.com/file/d/0B0KxtU2nUQB9cjhHUWE4cE5HWnM/view?usp=sharing
접근
The crag is on the south eastern side of the Alford's point bridge. Park either as for Alford's Point climbing, or if you're game, pull over directly after coming off the bridge. Walk down hill past the locked gate and down the sealed road for about 50m. When you notice the rocky gutter on the right forming a run off (which has a white post at the end) walk down this for a few meters. Then notice a tree on the right with a fork. Walk towards it. You should then pick up a trail of cairns. Follow these up the hill and left towards the sweet looking cliff. On the way across, you'll see Alfred's Monument up above you.
역사
Dan Webster came accross this area in 2012 while living in Revesby. Not sure it's seen any other visits?!
1.1. Alfred's monument 1 route in Sector
- Summary:
-
Lat / Long: -33.979163, 151.031496
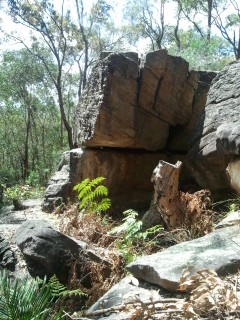
설명
Just to the right of the main project wall is a large split rock perched atop another smaller rock. Rage is the first route here and faces into the crag with more potential for roof routes and hard headwalls.
접근
After you have gone down the track and stepped across the ditch on the right, the monument is obvious up on the hill to the right, with the project wall to the left of this.
| Route | Grade | Style | Selected ascents | |||||
|---|---|---|---|---|---|---|---|---|
| 1 |
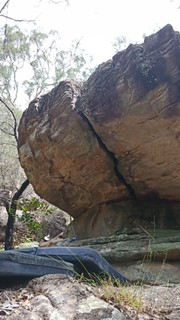
★★ Rage
A fairly burly but surprisingly technical roof fist crack. There are only a few points where it contracts down enough for a jam, so it's big moves between these. You need to get deep so long sleeves are recommended.
Start at base of crack with both feet and hands in crack before first constriction. Stay in crack until rounded flake on top left after lip.
FA: Tom Bes, 2021 | V4 | 3m | |||||
  |
||||||||
 Tom Bes FA
1.2. The Project Wall 6 routes in Sector
- Summary:
-
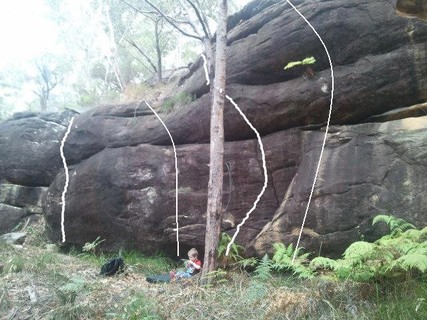
설명
The Project Wall is an excellent wall; decent hight, solid rock, bulging... but sadly, pretty featureless. One for the hard nuts! Around it are one or two other fun (sometimes scary) offerings.
접근
As with the general approch, keep following the cliff line easterward till you see the large cliff line. Can't miss it.
  |
||||||||
| Route | Grade | Style | Selected ascents | |||||
|---|---|---|---|---|---|---|---|---|
| 1 |
King of Wessex
King Alfred, King of Wessex! Butt start just right of ramp and tree. Up and slightly right through nice territory. Then necky to the top. Tough for the grade? FA: dwebster, 2012 | V3 | 7m | |||||
| 2 |
★ Alfred the Great
Butt start between KoW and AP. Up nice moves to break, then more boldly to top. Easiest to stay just left of tree. The big ramp is on for feet only. FA: dwebster, 2012 | V4 | 5m | |||||
| 3 |
★★ Alfred's Point
Butt start just left of tree and KoW. Feet can be jambed low, but not on separate rock. Great hard pulling through pocket, to ledge, then carefully up left. FA: dwebster, 2012 | V5 | 4m | |||||
| 4 |
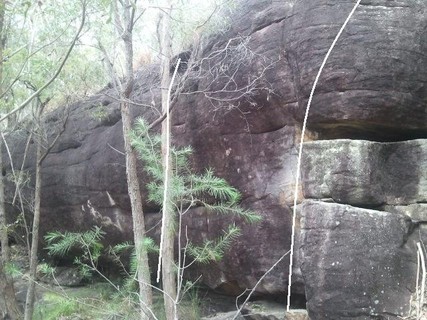
Sam and the Golf Ball
5m left of AP. Standing, just right of the chimney. Take the easiest route up via the pocket. FA: dwebster, 2012 | V2 | 4m | |||||
| 5 |
Have to start somewhere...
First problem done here. Just left of the chimney and the bulging arete type feature. Use the feature on right for feet only (otherwise v2). FA: dwebster, 2012 | V3 | 4m | |||||
| 6 |
★ Sam's Adventure
Hands on ledge and pocket about 3m left of HtSS. Move straight up via little ripples, finishing rightwards. Tough for the grade? FA: dwebster, 2012 | V5 | 4m | |||||
2. Index by grade
| Grade | Stars | Name | Style | Pop | Area | |
|---|---|---|---|---|---|---|
| V2 | Sam and the Golf Ball | 4m | 1.2. The Project Wall | |||
| V3 | Have to start somewhere... | 4m | 1.2. The Project Wall | |||
| King of Wessex | 7m | 1.2. The Project Wall | ||||
| V4 | ★★ | Rage | 3m | 1.1. Alfred's monument | ||
| ★ | Alfred the Great | 5m | 1.2. The Project Wall | |||
| V5 | ★★ | Alfred's Point | 4m | 1.2. The Project Wall | ||
| ★ | Sam's Adventure | 4m | 1.2. The Project Wall |