A Crag Guide gives an extensive view of all sub areas and climbs at a point in the index. It shows a snapshot of the index heirachy, up to 300 climbs (or areas) on a single web page. It shows selected comments climbers have made on a recently submitted ascent.
At a minor crag level this should be suitable for printing and taking with you on a climbing trip as an adjunct to your guidebook.
This guide was generated anonymously. Login to show your logged ascents against each route.
Warning
Rock climbing is extremely dangerous and can result in serious injury or death. Users acting on any information directly or indirectly available from this site do so at their own risk.
This guide is compiled from a community of users and is presented without verification that the information is accurate or complete and is subject to system errors. By using this guide you acknowledge that the material described in this document is extremely dangerous, and that the content may be misleading or wrong. In particular there may be misdescriptions of routes, incorrectly drawn topo lines, incorrect difficulty ratings or incorrect or missing protection ratings. This includes both errors from the content and system errors.
Nobody has checked this particlular guide so you cannot rely on it's accuracy like you would a store bought guide.
You should not depend on any information gleaned from this guide for your personal safety.
You must keep this warning with the guide. For more information refer to our:
Usage policy
Contributors
Thanks to the following people who have contributed to this crag guide:
Herbert Fleisch
HowC
Johannes
Martina Hofmair
The size of a person's name reflects their Crag Karma, which is their level of contribution. You can help contribute to your local crag by adding descriptions, photos, topos and more.
Table of contents
- 1.
Lotta-Wand
9 in Crag
- 1.1. NORD 1 in Sector
- 1.2. MAIN WALL 3 in Sector
- 1.3. ROOF 1 in Sector
- 1.4. VEGETABLE 1 in Sector
- 1.5. LULATSCH 1 in Sector
- 1.6. SMALL SOUTHFACE 1 in Sector
- 1.7. BOULDER AREA 1 in Sector
- 2. Index by grade
1. Lotta-Wand 9 routes in Crag
- Summary:
-
Mostly 고전등반
Lat / Long: 48.374704, 14.168629
요약
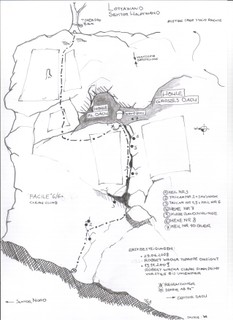
Trad Climbing Area with steep granit rock cliffs up to 25m. Spectacular overhangig roof at the top. Good alternative to overcrowded Burenkogel. Toprope possible.
설명
The "Lotta Wand" (Lotta Wall) is a granit wall typical for the area. Tradclimbing and Drytooling only. Very spectacular wall.
접근 문제들
by car : its about 25min from linz. go to rottenegg and drive the street upstream the Große Rodel Tal till you reach the parking of the burenkogel (see there) by bike : you can take your bike with you in the train to rottenegg for 2 euro hiking : go to rottenegg by train and follow the hiking path upstream till you reach the marked stone (see below) from the other side.
접근
by car : just drive to the parking lot of the burenkogel and park there. then cross the river over the bridge and turn right (by the house). Follow the hiking trail downstream for about 15-20min until you see a stone with red-white-red marks on it. The Lotta Wand is now left of you up in the forest. So climb a small path (if its still there) steep upwards until you see the cliff.
숙박 장소
youthhostel in linz or camping in the area.
윤리문제
For ethic reasons and legal concerns the wall was not bolted. All routes are easy to belay with mobile traditional tools. Even no pegs are needed. On the top you will find several trees with rings and slings, so toproping and headpointing is easy. It is maybe the best tradclimbing spot in the mühlviertel. Also drytooling possible.
역사
Also as big as the famous Burenkogel it was first found and cleaned in 2008, as it seems a bit hidden in the forest. All existing routes were defined and climbed by "fleisch" (Robert Wacha) and friends becomming their favorit tradclimbing playground.
1.1. NORD 1 route in Sector
- Summary:
-
모두 고전등반
설명
Very nice edge and easy vertical climbing
| Route | Grade | Style | Selected ascents | |||
|---|---|---|---|---|---|---|
| 1 |
Kuschelkante (= a hugging cliff)
very nice beginners route. easy to place gear. looking spectacular though. | 5 UK:HS | 17m | |||
1.2. MAIN WALL 3 routes in Sector
- Summary:
-
모두 고전등반
설명
Vertical with many variations possible
 |
||||||||
| Route | Grade | Style | Selected ascents | |||||
|---|---|---|---|---|---|---|---|---|
| 1 |
★★★ Facile
this is the easiest way up the main wall. very nice crack at the beginning. somehow critical for placements at the start. lower part is always dry because of the roof above. there is a wallbook in the cave. | 6 UK:HS | 30m | |||||
| 2 |
★★ Facile direct
The direct line avoiding the crack. More diffcult. Small finger crimps at the start. FA: Martin Schosser, 2010 | 30m | ||||||
| 3 |
★★★ Stonehang
Nice direct line. The Crux are the first 4 moves, the rest is easier. FA: Patrick Leitner, 2010 | 7 UK:HS | 30m | |||||
1.3. ROOF 1 route in Sector
- Summary:
-
모두 고전등반
설명
the main roof ist still waiting for a redpoint clean first ascent ;-)
| Route | Grade | Style | Selected ascents | |||||
|---|---|---|---|---|---|---|---|---|
| 1 |
★★★ Farnfare
Most difficult and spectacular Route at the Lottawand. It is the direct way through the main roof usind a small crack on the right side. FA: Martin Schosser, 2010 | 7+ UK:E1 | 30m | |||||
 |
||||||||
1.4. VEGETABLE 1 route in Sector
- Summary:
-
모두 고전등반
설명
easy beginners area. good for winter training and drytooling
| Route | Grade | Style | Selected ascents | |||
|---|---|---|---|---|---|---|
| 1 |
★★ Verdura aka Vegetable
Easiest way to get up, good for beginners, simple placements, nice in winter with drytooling too, dirty and lots of plants, needs to be cleaned or drytooled | 4+ | 30m | |||
1.5. LULATSCH 1 route in Sector
- Summary:
-
모두 고전등반
설명
overhanging small roof and drytooling area
| Route | Grade | Style | Selected ascents | |||
|---|---|---|---|---|---|---|
| 1 |
★★ LULATSCH
short but nice overhanging route. called "lulatsch" (austrian for big guy) because its good when you can reach far for the crucial placement | 6 UK:MS | 10m | |||
1.6. SMALL SOUTHFACE 1 route in Sector
- Summary:
-
모두 고전등반
설명
nice small routes
| Route | Grade | Style | Selected ascents | |||
|---|---|---|---|---|---|---|
| 1 |
★★★ Bella
nice clean beginners route. a bit short but okay | 5 UK:MS | 17m | |||
1.7. BOULDER AREA 1 route in Sector
- Summary:
-
모두 볼더링
설명
along the base of the wall
| Route | Grade | Style | Selected ascents | |||
|---|---|---|---|---|---|---|
| 1 |
Traverse
Boulder Traverse at the base of the wall. | 7 | 2m | |||
2. Index by grade
| Grade | Stars | Name | Style | Pop | Area | |
|---|---|---|---|---|---|---|
| 4+ | ★★ | Verdura aka Vegetable | 30m | 1.4. VEGETABLE | ||
| 5 | ★★★ | Bella | 17m | 1.6. SMALL SOUTHFACE | ||
| Kuschelkante (= a hugging cliff) | 17m | 1.1. NORD | ||||
| 6 | ★★ | LULATSCH | 10m | 1.5. LULATSCH | ||
| ★★★ | Facile | 30m | 1.2. MAIN WALL | |||
| 7 | ★★★ | Stonehang | 30m | 1.2. MAIN WALL | ||
| Traverse | 2m | 1.7. BOULDER AREA | ||||
| 7+ | ★★★ | Farnfare | 30m | 1.3. ROOF | ||
| ? | ★★ | Facile direct | 30m | 1.2. MAIN WALL |