A Crag Guide gives an extensive view of all sub areas and climbs at a point in the index. It shows a snapshot of the index heirachy, up to 300 climbs (or areas) on a single web page. It shows selected comments climbers have made on a recently submitted ascent.
At a minor crag level this should be suitable for printing and taking with you on a climbing trip as an adjunct to your guidebook.
This guide was generated anonymously. Login to show your logged ascents against each route.
Warning
Rock climbing is extremely dangerous and can result in serious injury or death. Users acting on any information directly or indirectly available from this site do so at their own risk.
This guide is compiled from a community of users and is presented without verification that the information is accurate or complete and is subject to system errors. By using this guide you acknowledge that the material described in this document is extremely dangerous, and that the content may be misleading or wrong. In particular there may be misdescriptions of routes, incorrectly drawn topo lines, incorrect difficulty ratings or incorrect or missing protection ratings. This includes both errors from the content and system errors.
Nobody has checked this particlular guide so you cannot rely on it's accuracy like you would a store bought guide.
You should not depend on any information gleaned from this guide for your personal safety.
You must keep this warning with the guide. For more information refer to our:
Usage policy
Contributors
Thanks to the following people who have contributed to this crag guide:
The size of a person's name reflects their Crag Karma, which is their level of contribution. You can help contribute to your local crag by adding descriptions, photos, topos and more.
Table of contents
- 1.
Gondola Crags
19 in Area
-
1.1.
Ultraviolet Cliff / White Cliff 10 routes in Area
- 1.1.1. South Face 8 routes in Cliff
- 1.1.2. South West Face 2 routes in Cliff
- 1.2. Whirring Wall 9 routes in Area
-
1.1.
Ultraviolet Cliff / White Cliff 10 routes in Area
- 2. Index by grade
1. Gondola Crags
- Summary:
-
고전등반 그리고 스포츠 클라이밍
Lat / Long: 49.670997, -123.131998
요약
A collection of single and multi-pitch crags at the top of the Squamish Gondola.
접근 문제들
There are occasional crags that are on private land (and closed) -- but generally climbing is well accepted and welcomed at the various crags and areas around Squamish.
접근
all crags are accessed by either riding the Gondola up to its top or driving around back on a rough FSR for approximately 9km from the highway and hiking for 1.3km to the gondola peak; 4x4 or high clearance AWD is mandatory for this road.
Gondola passes can be purchased here: "https://www.seatoskygondola.com/"
If you choose to drive around back, turn off the highway at the Mamquam FSR (Apron parking lot) reset your trip odometer here. At approximately 3.8 km take a right turn past a gate. at 5.3Km take a right turn on Shannon Creek Road. Follow this road until you come to a locked gate. Park here and continue walking the next 1.3 km to the gondola peak.
윤리문제
These areas are high traffic with tourists, please pack in what you pack out, including biological waste! Bathrooms are provided at the gondola Peak, about 15 min from Ultraviolet Cliff, and 30 from the Wrinkle Rock area.
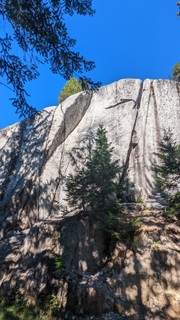
1.1. Ultraviolet Cliff
- Summary:
-
모두 고전등반
Lat / Long: 49.671160, -123.126799
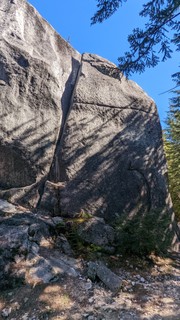 |
1.1.1. South Face
- Summary:
-
8 routes in Cliff
Lat / Long: 49.670751, -123.126518
  |
||||||||
| Route | Grade | Style | Selected ascents | |||||
|---|---|---|---|---|---|---|---|---|
| 1 |
★★ Tipping the Roman Scale
The long right-leaning hand to fist crack on the left side of the cliff. FFA: Nic Vissers, 2015 | 5.10b | 15m | |||||
| 2 |
Nancy's
Just to the right of Nancys, follow a short vertical crack to a long sweeping dihedral. FA: Robin Barley, Nancy Henderson & Bernie Protsch, 1987 | 5.10a | 15m | |||||
| 3 |
Emerald Frond
the vertical crack heading straight up from the start of Nancy's | 5.10a | 15m | |||||
| 4 |
★★ Chunder Dragon
The steep muscular crack line in the center of the cliff face. | 5.11a | 15m | |||||
| 5 |
Thugs to Pooftas
a fun right sweeping corner leads to a few hard, but well-protectred slab moves at the top. | 5.11a | 15m, 2 | |||||
| 6 |
She's the Son of a Logger
q straight-up handcrack, getting a little green at the top. | 5.10b | 12m | |||||
| 7 |
Haley's Vomet
Awkward climbing up a right-leaning crack. | 5.10c | 12m | |||||
| 8 |
Tinkerbell
a crack deep in the trees on the right side of the cliff, it could use a scrub. | 5.8 | 10m | |||||
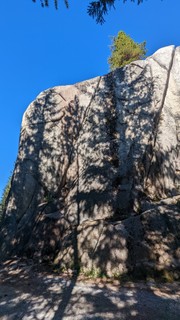
1.1.2. South West Face
- Summary:
-
2 routes in Cliff
Lat / Long: 49.670967, -123.127512
 |
||||||||
| Route | Grade | Style | Selected ascents | |||||
|---|---|---|---|---|---|---|---|---|
| 1 |
Dead Bernardo's Crack
FA: Colin Haley, 2013 | 5.11c | 18m | |||||
| 2 |
Fifteen Kilometer Crack
The grove just left of the Arete. 2 bolts protect a stiff boulder problem to get into the crack. These moves can be aided to make the route go at 5.8 | 5.11a | 12m, 2 | |||||
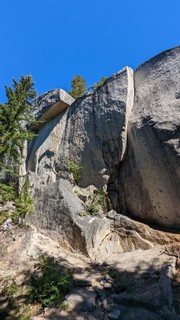
1.2. Whirring Wall
- Summary:
-
Mostly 스포츠 클라이밍
| Route | Grade | Style | Selected ascents | |||
|---|---|---|---|---|---|---|
| 1 | Bolting for Britain | 5.11b | 20m | |||
| 2 | War of adhesion | 5.11b | 30m | |||
| 3 | Snip and go | 5.11d | 25m | |||
| 4 | More whinging than whining | 5.11b | 25m | |||
| 5 | A work of friction | 5.10a | 20m | |||
| 6 | Cohesion | 5.10a | 20m | |||
| 7 | ★ Rather dishy | 5.9 | 20m | |||
| 8 | Woblin wobin | 5.8 | 20m | |||
| 9 | The Yawning | 5.7 | 20m | |||
2. Index by grade
| Grade | Stars | Name | Style | Pop | Area | |
|---|---|---|---|---|---|---|
| 5.7 | The Yawning | 20m | 1.2. Whirring Wall | |||
| 5.8 | Tinkerbell | 10m | 1.1.1. South Face | |||
| Woblin wobin | 20m | 1.2. Whirring Wall | ||||
| 5.9 | ★ | Rather dishy | 20m | 1.2. Whirring Wall | ||
| 5.10a | Emerald Frond | 15m | 1.1.1. South Face | |||
| Nancy's | 15m | 1.1.1. South Face | ||||
| A work of friction | 20m | 1.2. Whirring Wall | ||||
| Cohesion | 20m | 1.2. Whirring Wall | ||||
| 5.10b | She's the Son of a Logger | 12m | 1.1.1. South Face | |||
| ★★ | Tipping the Roman Scale | 15m | 1.1.1. South Face | |||
| 5.10c | Haley's Vomet | 12m | 1.1.1. South Face | |||
| 5.11a | ★★ | Chunder Dragon | 15m | 1.1.1. South Face | ||
| Thugs to Pooftas | 15m, 2 | 1.1.1. South Face | ||||
| Fifteen Kilometer Crack | 12m, 2 | 1.1.2. South West Face | ||||
| 5.11b | Bolting for Britain | 20m | 1.2. Whirring Wall | |||
| More whinging than whining | 25m | 1.2. Whirring Wall | ||||
| War of adhesion | 30m | 1.2. Whirring Wall | ||||
| 5.11c | Dead Bernardo's Crack | 18m | 1.1.2. South West Face | |||
| 5.11d | Snip and go | 25m | 1.2. Whirring Wall |