| Nodo |
|---|
| Antananarivo Antogona Super Bloc |
|
6a
Good look
Tête de moulinette : OK |
|
6b+
Bad taste
Tête de moulinette : OK |
| Antananarivo Antogona |
|
Dalles Vertes
Du Rova, redescendre dans la face Nord en direction du secteur très facile à repérer, 100m plus à l'ouest du Rova. |
| Antananarivo Antogona Dalles Vertes |
| 5+ Tête de poulet |
| 6a Il était une fois dans l’Ouest de Tana |
| 7b Le cercle des poètes disparus |
|
4+
Du fer !
Relais intermédiaire à équiper commun avec A zébu ! et Number 6. |
| 5 A zébu ! |
| 5 Number 6 |
| 4 Descente |
| Antananarivo |
|
Ambohidratrimo
Block field off of RN4. |
|
Andranomena
Major block field north of RN1. |
|
Casque de Behenjy
Le fouillis de blocs et falaises est impressionnant et assez facilement accessible depuis la RN7. |
|
Près de l'usine Beal
Block field near the Beal factory on RN2. |
|
Tsaranoro Massif
Big wall climbing on black and orange streaked cliffs. |
| Tsaranoro Massif |
|
Chameleon
Crag layout is available here: |
| Tsaranoro Massif Chameleon |
|
7a
Scolothomb
Climbing notes: ⚠️ 6c obligatory! Pitches info:
Route diagram: http://ailedescimes.com/wp-content/uploads/2018/11/Scolothom.jpg |
|
6b+
★★ Air Society
Pitches info:
Route diagram: http://ailedescimes.com/wp-content/uploads/2016/09/Air-Society-copie.jpg Other notes: It is possible to scramble to summit (and apparently walk down to camp Catta - not verified!). |
|
6c
Les Vazahamateurs
Climbing notes: ⚠️ 6b obligatory! Route diagram: http://ailedescimes.com/wp-content/uploads/2018/11/Les-Vazahamateurs.jpeg |
|
5+
★ Sweet avocado
I did this route with one of the guides (Faly) but it is not in the topos, bolts were quite new (in summer 2022) so probably is a recently open route. |
| Tsaranoro Massif |
|
Vatovarindry
More info about the crag layout can be found here: |
| Tsaranoro Massif Vatovarindry |
|
6b
Woodstock
Climbing notes: ⚠️ 6a+ obligatory! Route diagram: http://ailedescimes.com/wp-content/uploads/2017/03/Woodstock.jpg |
|
6c
Malagasy Maroto
Climbing notes: ⚠️ 6c obligatory! Abseil notes: ⚠️ Abseil down via 'La croix du sud' to the right. Recommended equipment:
Pitches info:
Route diagram: http://ailedescimes.com/wp-content/uploads/2017/03/Malagasy-maroto.jpg |
|
6b+
Bo-catta
Climbing notes: ⚠️ 6a obligatory! Pitches info:
Route diagram: http://ailedescimes.com/wp-content/uploads/2017/03/bocatta_r.gif |
|
6b+
La croix du sud
Climbing notes: ⚠️ 6a+ obligatory! Abseil notes: ⚠️ Abseil down via the same route, except in the central area. See the route diagram (link at the bottom) for more details. Recommended equipment:
Pitches info:
Route diagram: http://ailedescimes.com/wp-content/uploads/2017/03/croixsud.gif Other notes: Well equipped, classic |
|
7a+
Karma Chameleon
Climbing notes: ⚠️ 6c obligatory! Abseil notes: ⚠️ Abseil down via 'La croix du sud', 25m to the left. Recommended equipment:
Pitches info:
Route diagram: http://ailedescimes.com/wp-content/uploads/2017/03/Karma-Chameleon.jpg |
|
7a+
Baile
Climbing notes: ⚠️ 6c obligatory! Recommended equipment:
Pitches info:
Route diagram: http://ailedescimes.com/wp-content/uploads/2017/03/Baile.jpg |
|
7a+
Mahitsy Volom Bava
Climbing notes: ⚠️ 6c obligatory! Abseil notes: ⚠️ Abseil down via 'Baile' (to the left) for 2 pitches, then abseil down via current route. Look at the route diagram for more info. Recommended equipment:
Route diagram: http://ailedescimes.com/wp-content/uploads/2017/03/Mahitsy-volom-bava2.jpg |
|
7a+
Veloma Madagasikara
Climbing notes: ⚠️ 6c obligatory! Abseil notes: ⚠️ Abseil down via 'La croix du sud' (4 routes to the left, some 40m at least). Recommended equipment:
Route diagram: http://ailedescimes.com/wp-content/uploads/2017/03/Veloma-madagsikava.jpg |
|
7b
Catta Lands
Climbing notes: ⚠️ 6c+ obligatory! Recommended equipment:
Route diagram: http://ailedescimes.com/wp-content/uploads/2017/03/Catta-lands1.jpg |
| Tsaranoro Massif |
|
Mitsonjoarivo
More info about the crag layout can be found here: |
| Tsaranoro Massif Mitsonjoarivo |
|
7b+
Un altro giro di giostra
Climbing notes: ⚠️ 6c+ obligatory! Recommended equipment:
Route diagram: |
|
6c+
Dancing with the world
Climbing notes: ⚠️ 6a+ obligatory! Abseil notes: Abseil via 'Le crabe aux pinces d’or' or just walk down the ridge. Recommended equipment:
Route diagram: Other notes: Well bolted. |
|
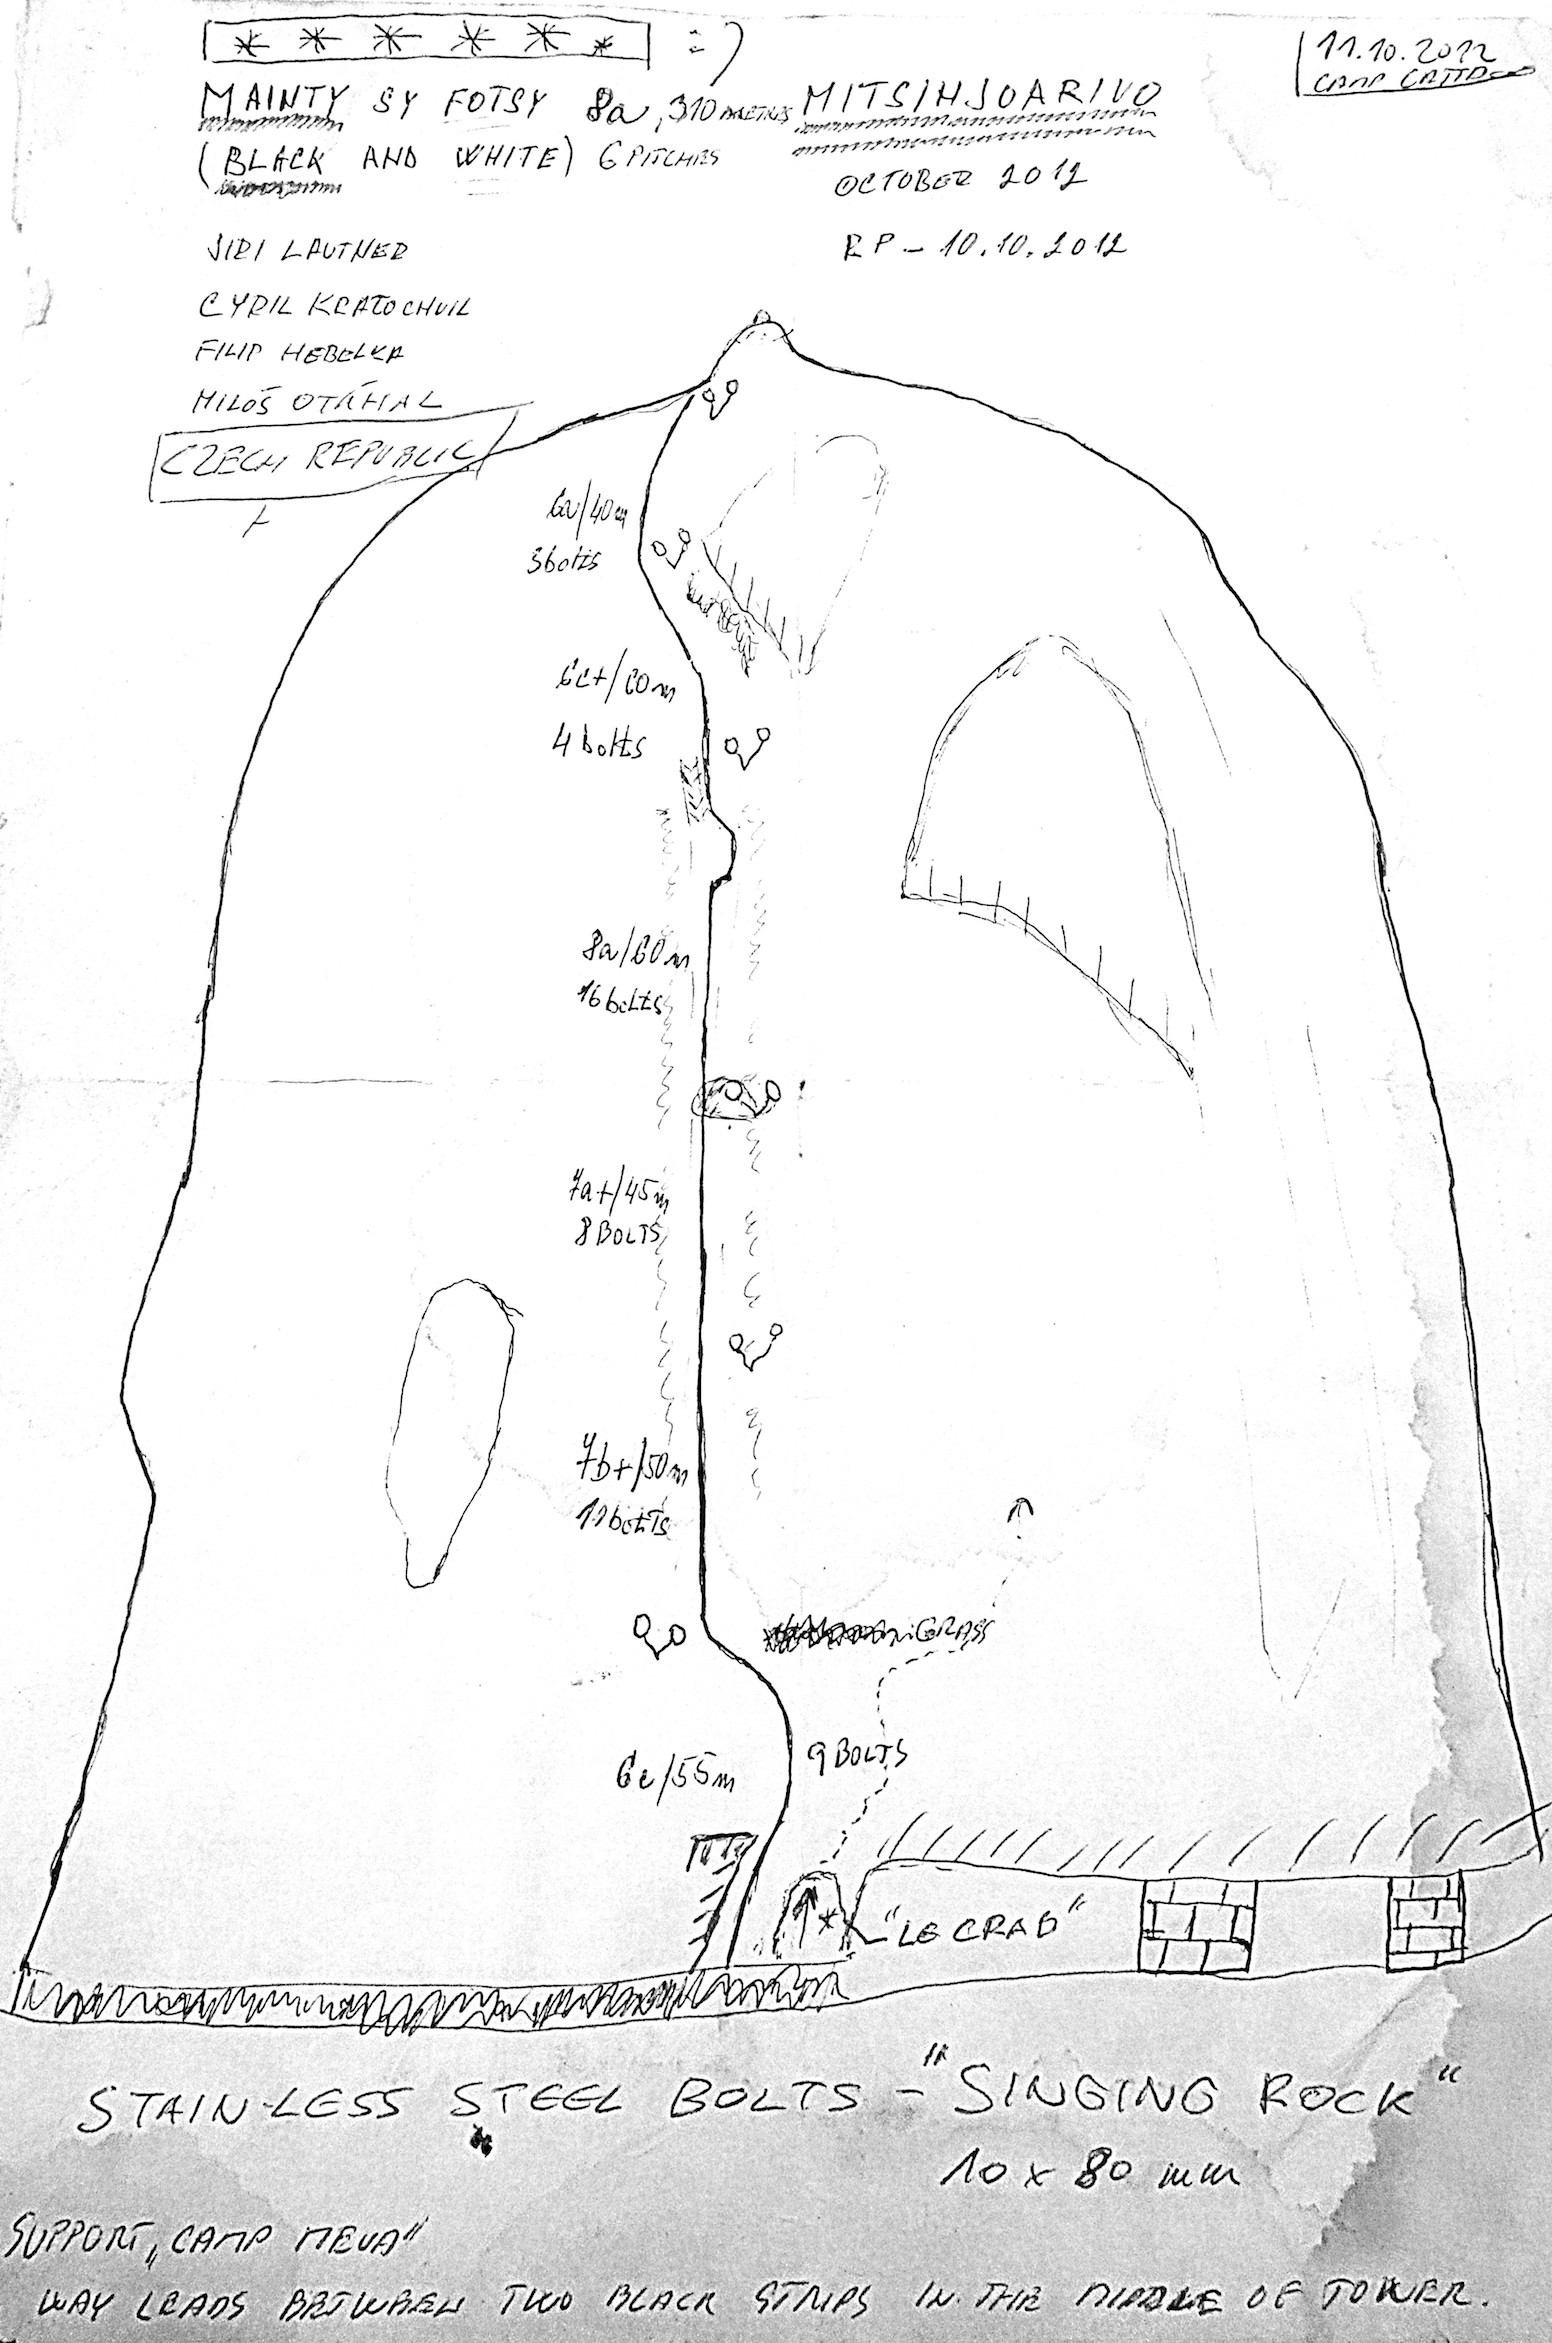
8a
Mainty sy fotsy
Climbing notes: Route leads between two black stumps in the middle of the tower. Recommended equipment:
Pitches info:
Route diagram: |
|
7b+
Le crabe aux pinces d’or
Route diagram: |
|
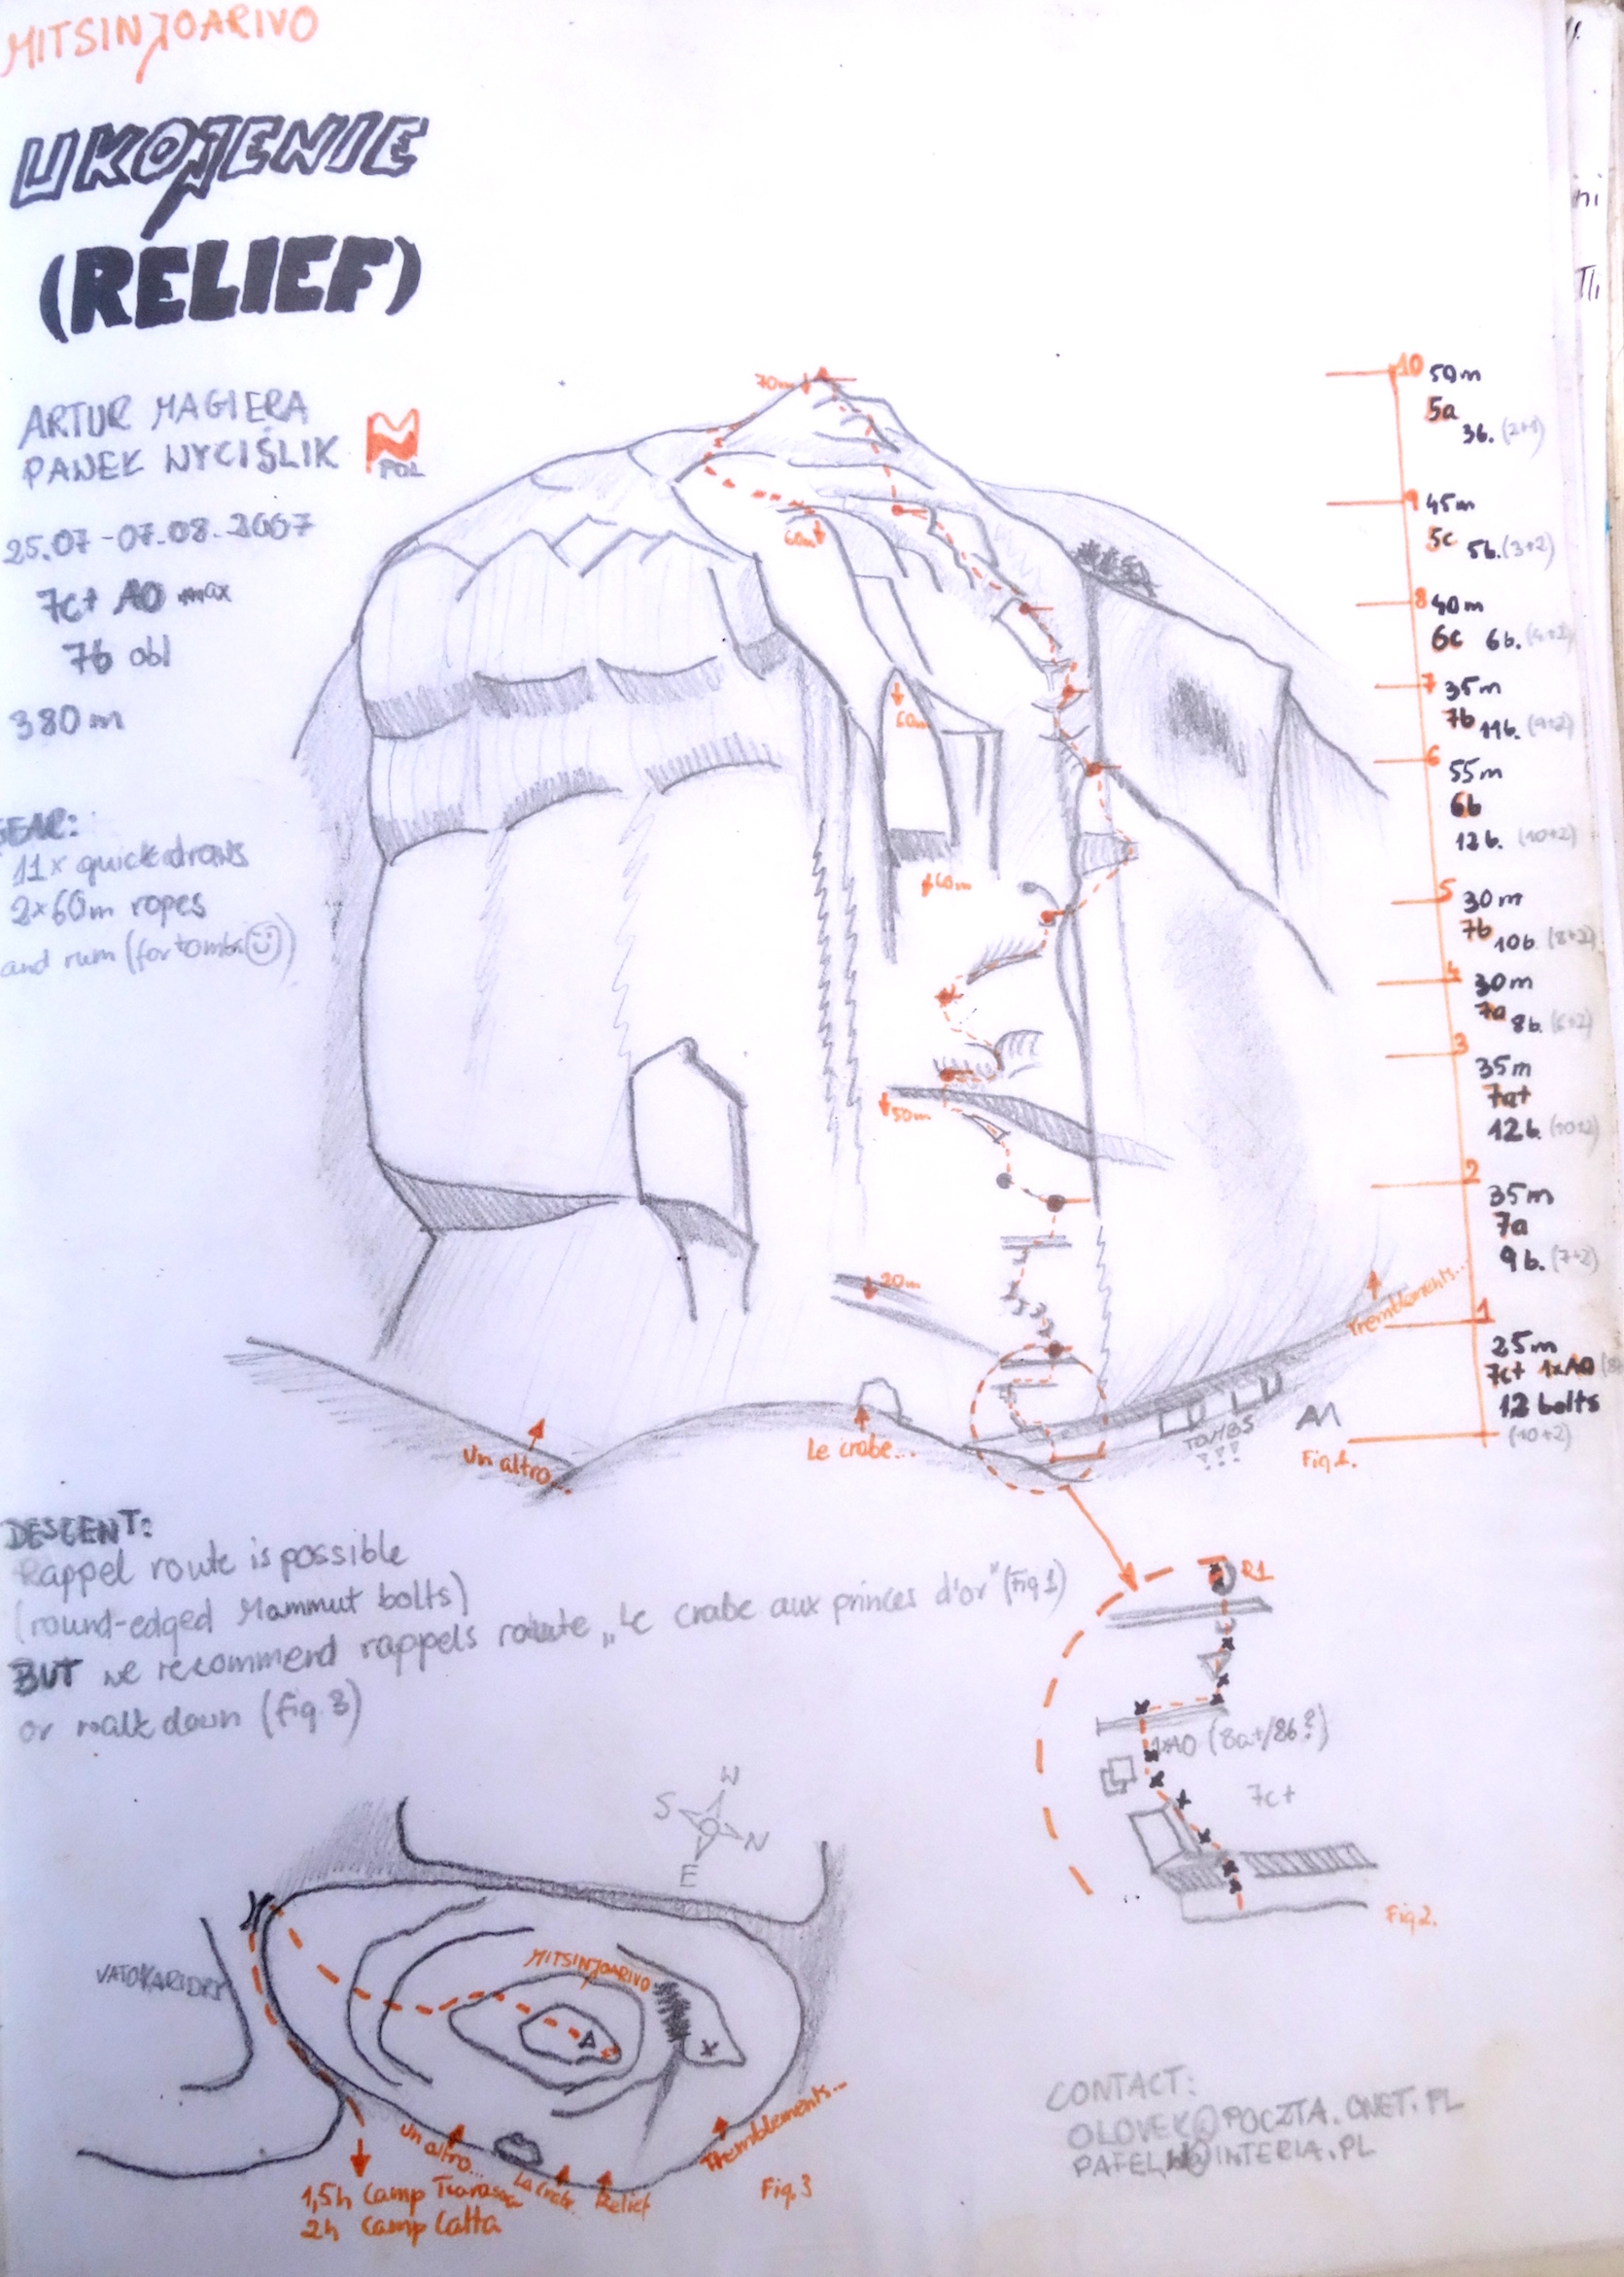
7c+
Relief
Climbing notes: ⚠️ 7b obligatory! Abseil notes: Although you can abseil via this route (round-edged Mammut bolts) we recommend abseiling via 'Le crabe aux pinces d'or' (route to the left) although you can You can also walk down. See route diagram (at the bottom) for more info. Recommended equipment:
Pitches info:
Route diagram: |
|
7a+ A3
Tremblements hilarants
Pitches info:
Route diagram: |
|
7a+/b
Tsara Airlines
Climbing notes: ⚠️ 6b+ obligatory! Abseil notes: ⚠️ Important notes about the abseil are written on the route diagram (link below) in French. Could not accurately translate, sorry. Recommended equipment:
Route diagram: |
| Tsaranoro Massif |
| Tsaranoro |
| Tsaranoro Massif Tsaranoro |
| Tsaranoro Atsimo |
| Tsaranoro Massif Tsaranoro Tsaranoro Atsimo |
| 8b+ Dreams of youth |
| 8a Mai più cosi |
| 8b+/c Mora Mora |
| 8a+ Fire in the belly |
| 7c+ Soava Dia |
| 7b+ Tokagasy |
| 7a+ Arc en ciel |
| 7b Varavaran tontolo |
| 7a Life fairy tale |
| 7b+ Via de las rubias |
| 8a+ Rivotra Mahéri |
| Tsaranoro Massif Tsaranoro |
| Tsaranoro Be |
| Tsaranoro Massif Tsaranoro Tsaranoro Be |
| 8a Manara Potsiny |
| 7b+ Escalier Magique |
| 7c+ Zaza Be |
| 8a+ Mitapitapy Vahaza |
| 7c ★ Cuento de Habas |
| 7a Vazimba |
| 7b+ Old Master |
| 7c+ Short Cut |
| 7c Gondwalaland |
|
8a+
★★★ Lalan 'i Mpanjaka
German report in SBB magazine 4/2017 page 44ff. |
| Tsaranoro Massif Tsaranoro |
| Tsaranoro Kelly |
| Tsaranoro Massif Tsaranoro Tsaranoro Kelly |
| 7a Norspace |
| 7b+ Hijo de la pedri |
| 7b+ Cucumber flying circus |
| 7b Everything in your mind |
| 7a Out of Africa |
| 6c No women no cry |
| Tsaranoro Massif Tsaranoro |
| Tsaranoro Nord |
| Tsaranoro Massif Tsaranoro Tsaranoro Nord |
| 7a Linea bianca |
| 8b Bravo les filles |
| 6a A3+ The Zoze |
| Tsaranoro Massif |
|
Karambony
More info about the crag layout can be found here: |
| Tsaranoro Massif Karambony |
|
6a A0
Cas Nullard
Abseil notes: Walk down the small Karambony corridor. A bit more info at CampCatta route diagram (link below) in French. Recommended equipment:
Pitches info:
Route diagram: |
|
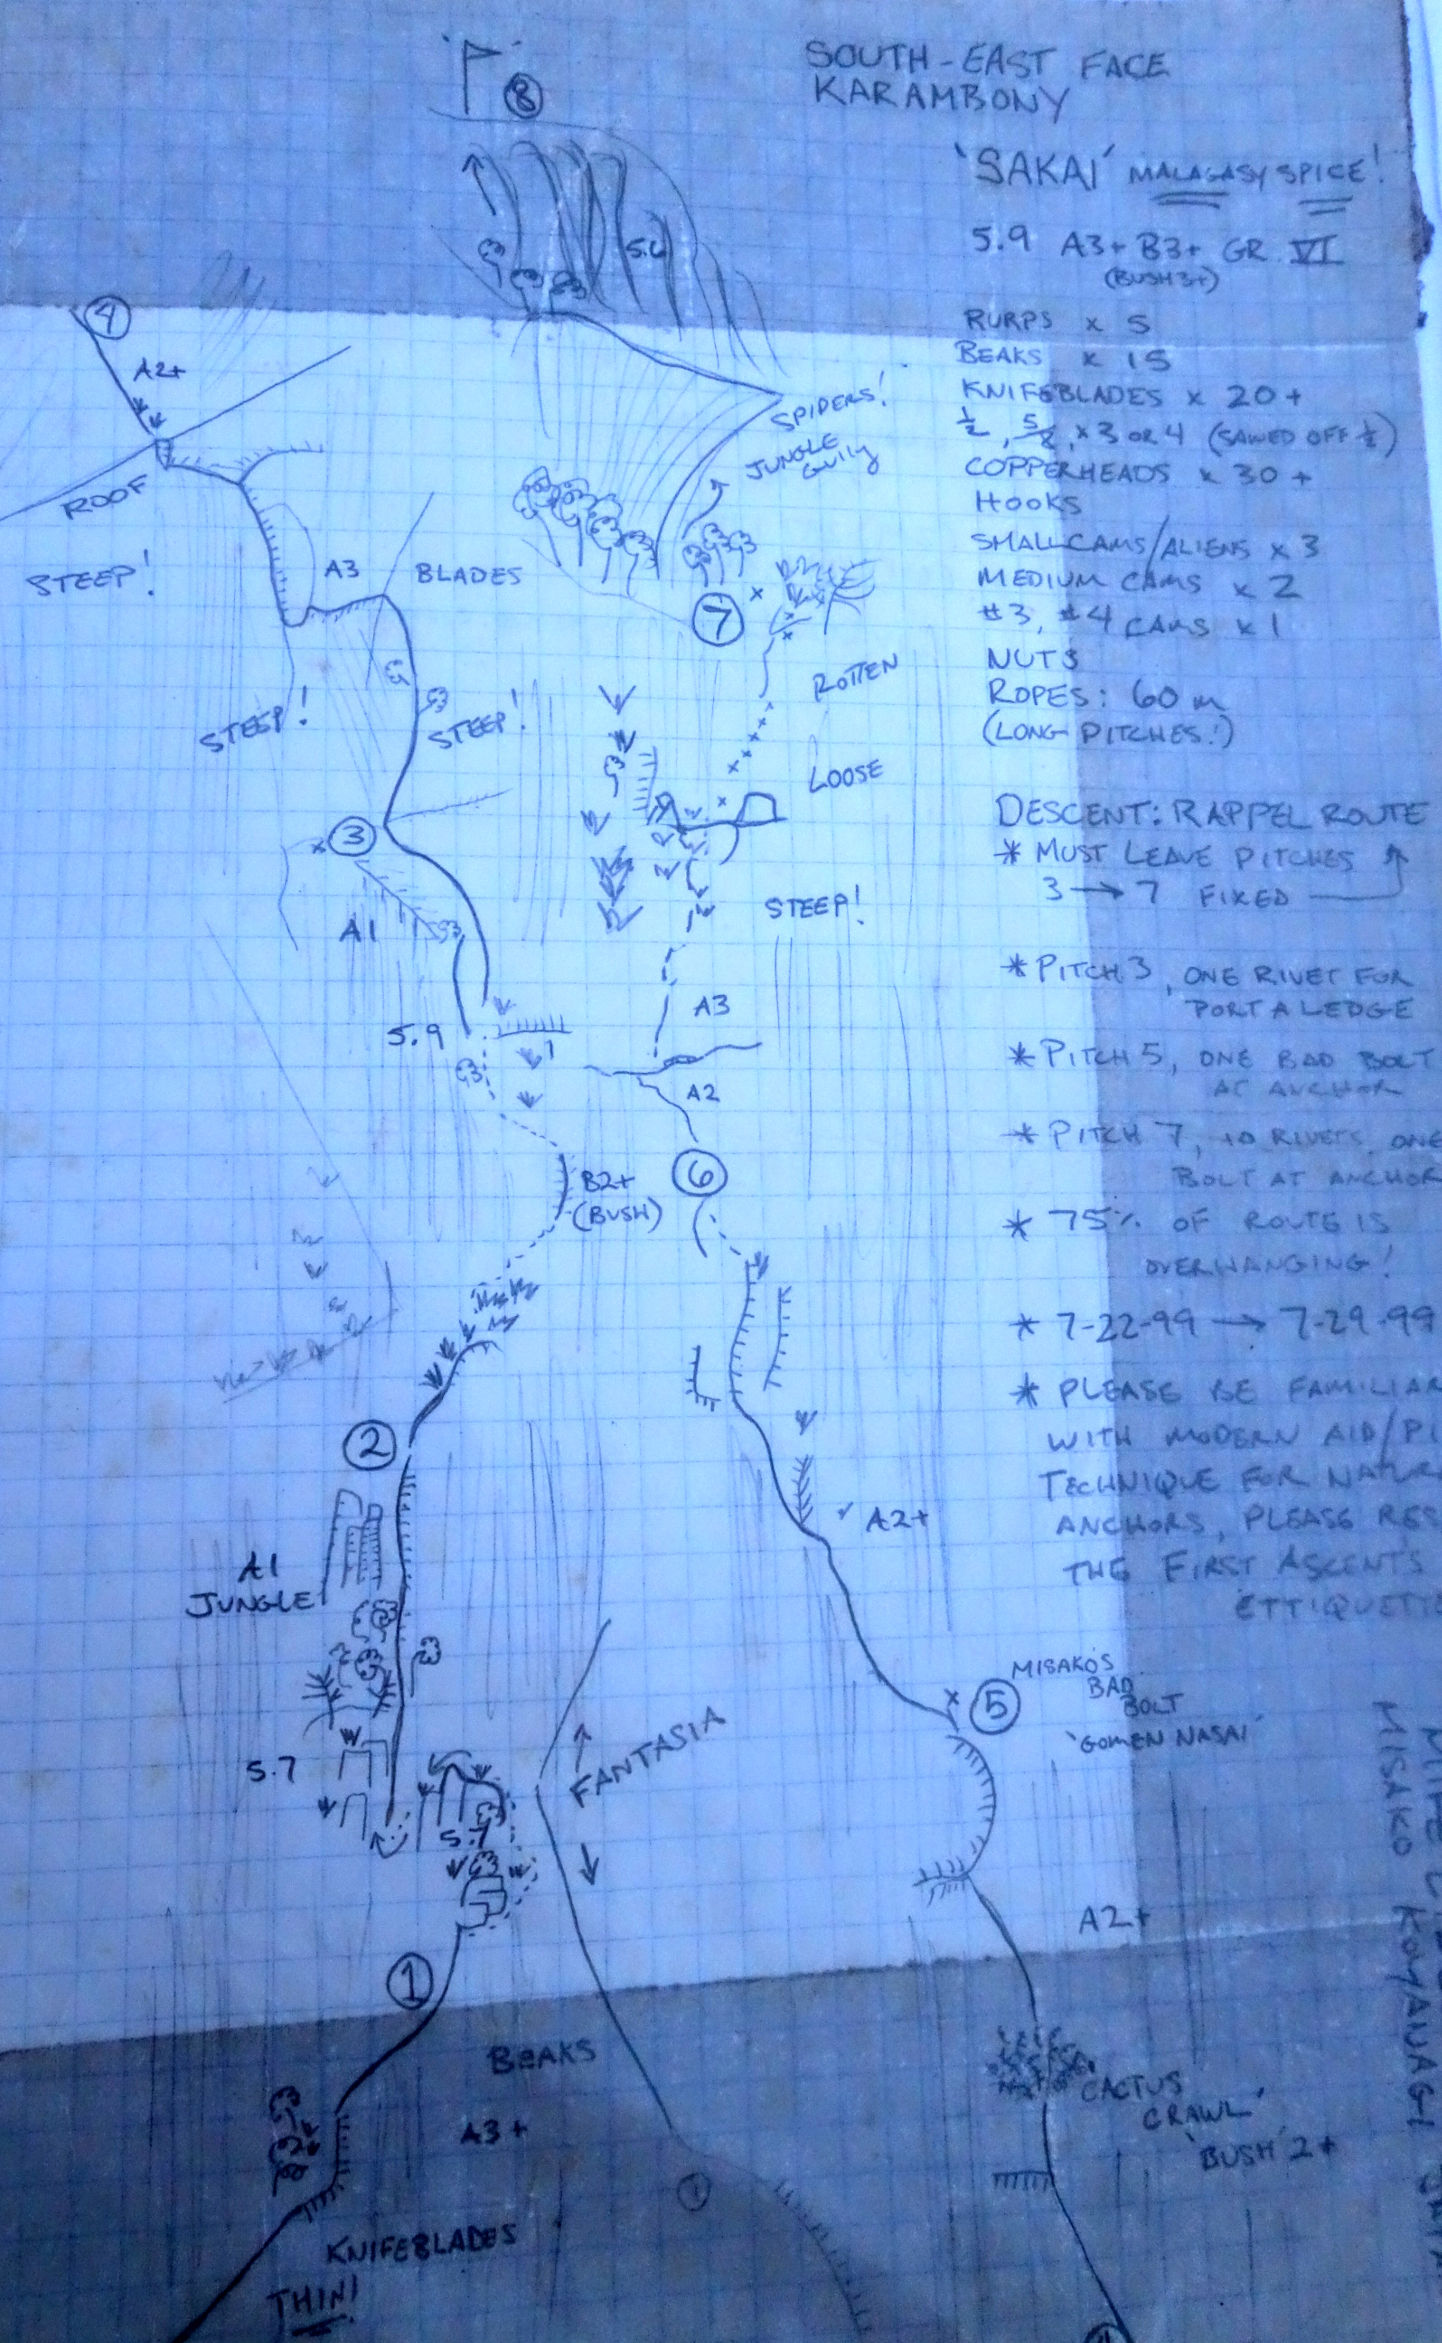
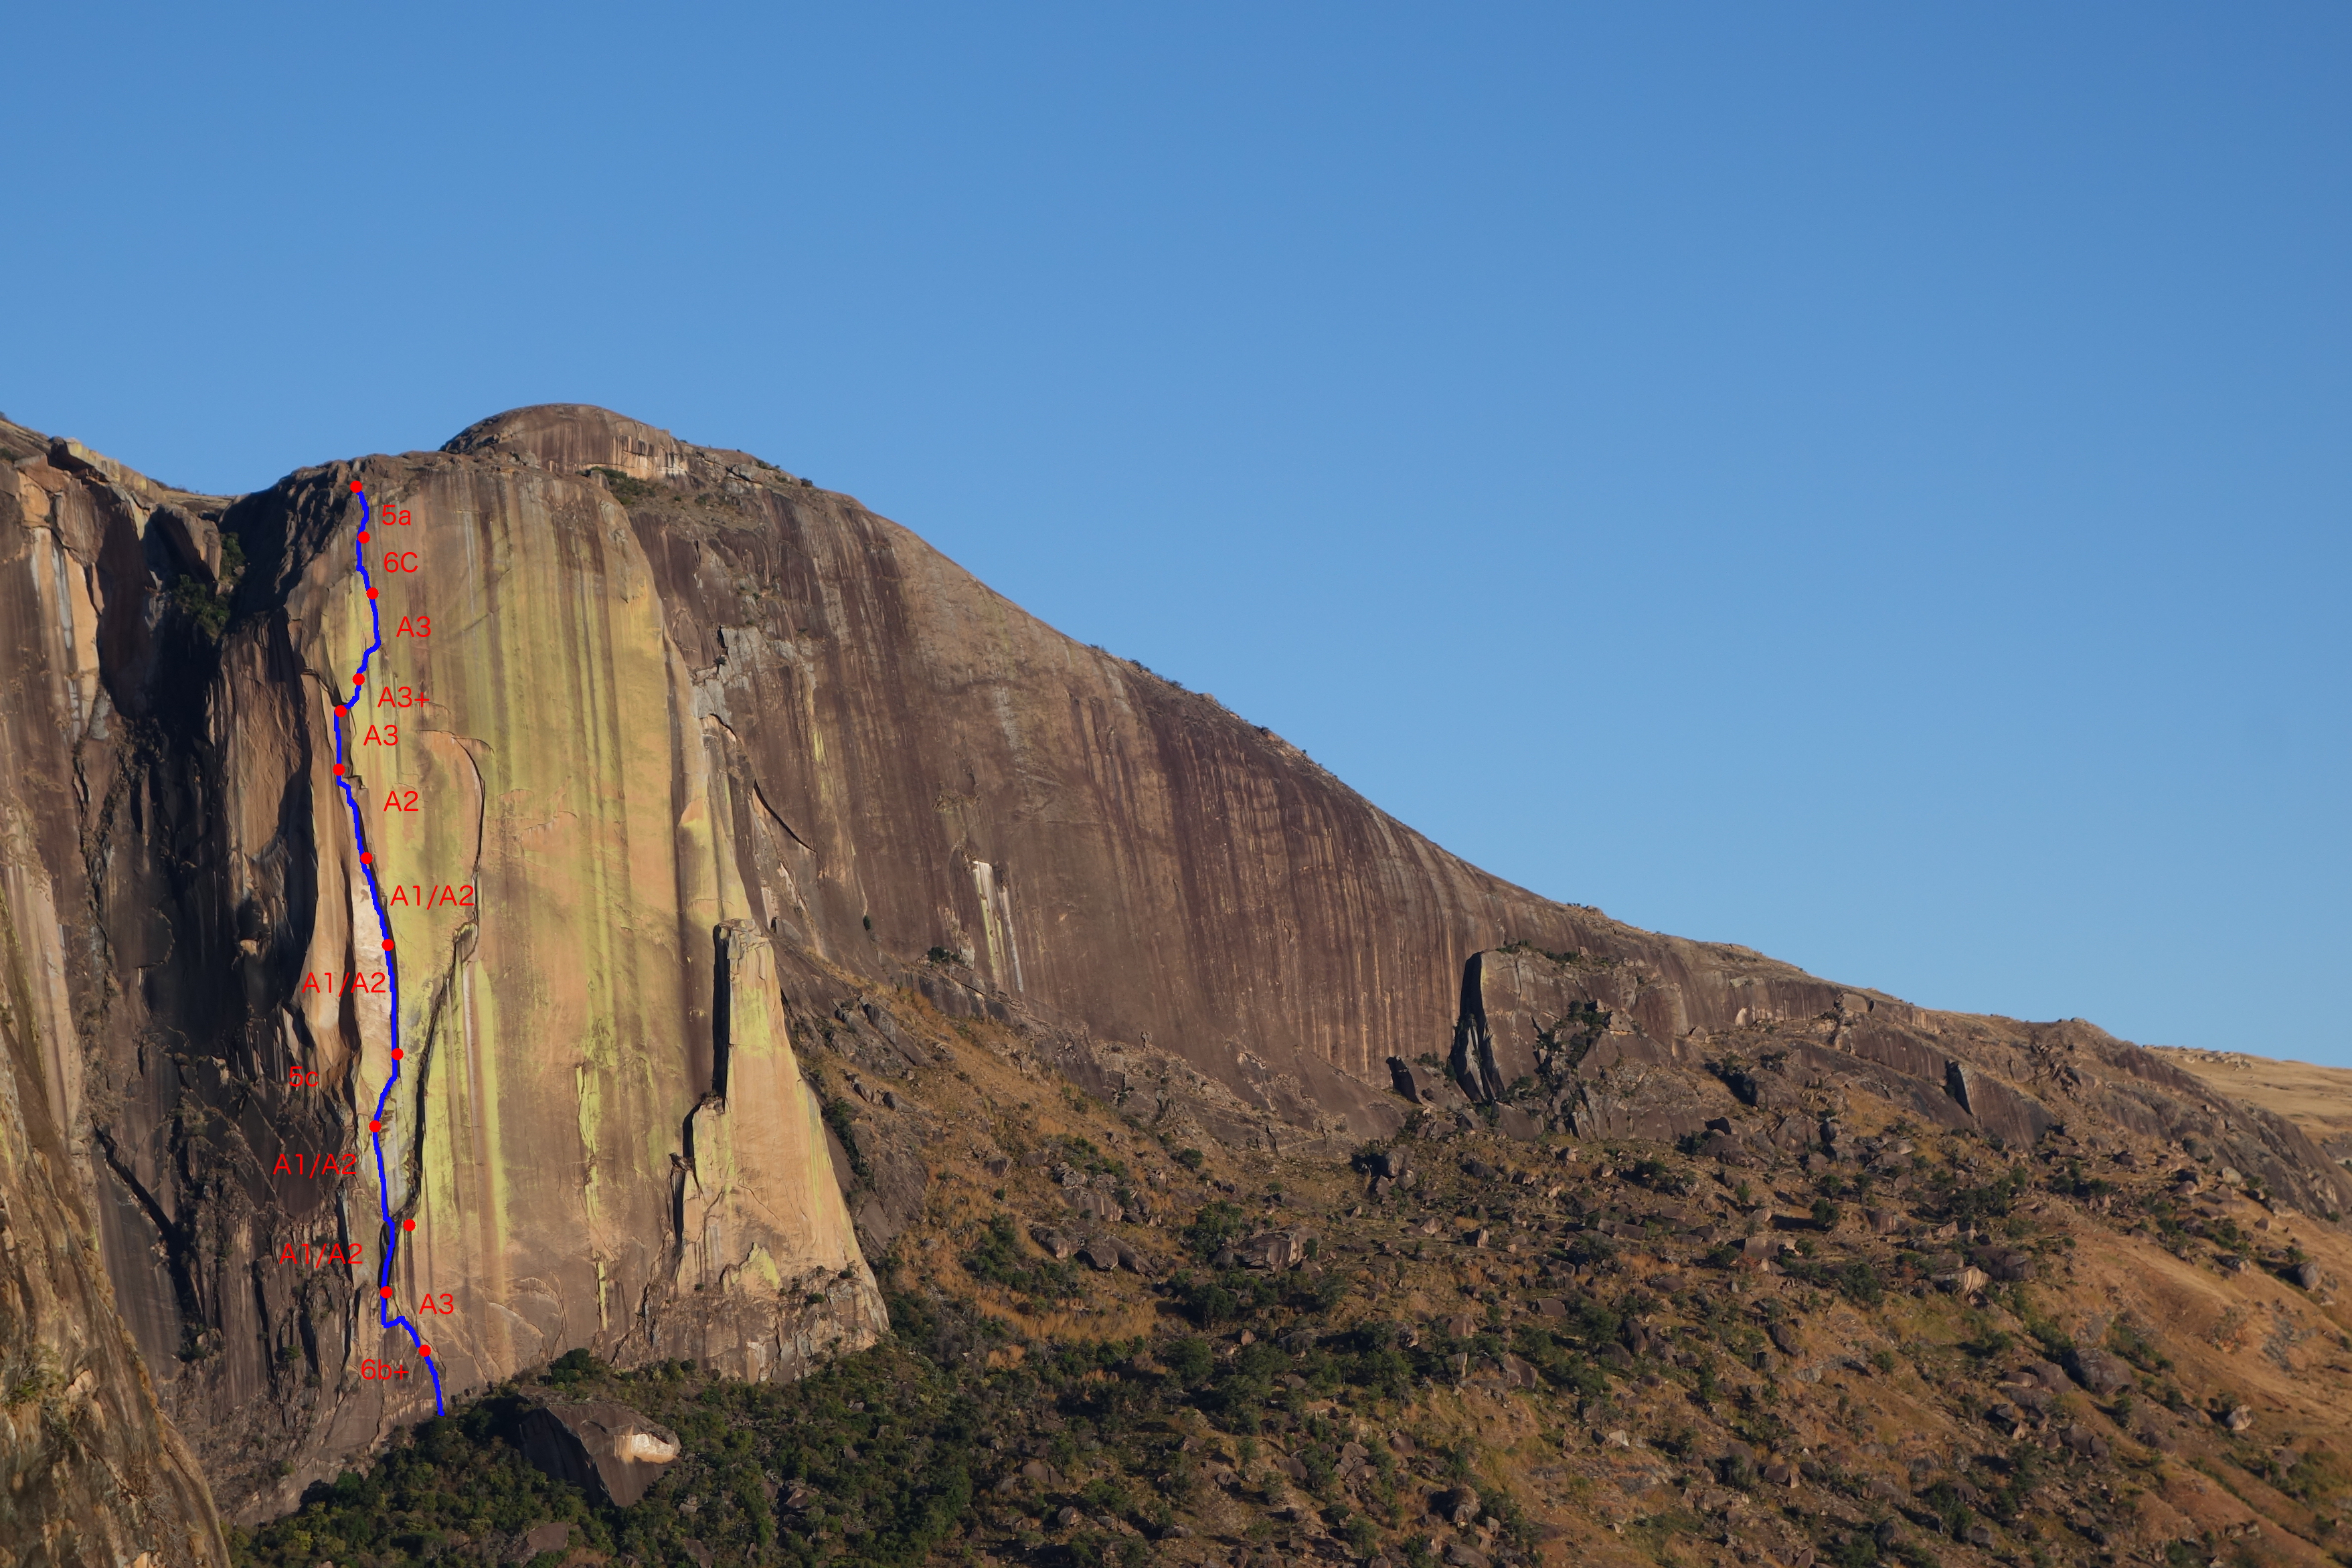
5c A3+
Sakai
Climbing notes: 75% of the route is overhanging! Abseil notes: Abseil via route. Must leave pitches 3 -> 7 fixed. Walk down the small Karambony corridor. Recommended equipment:
Route diagram: |
|
6c A3
Fantasia
Abseil notes: Abseil via route or hike down the Karambony trail. Read more about abseiling on CampCatta page (link below). Recommended equipment: Read more about it on CampCatta page (link below). Route diagram: |
|
8b+
Tough Enough
Technical face climbing on exceptional rock. |
|
8c
Tough Enough Original
Same line with the original, harder 8th pitch. |
| 8b Air Madagascar |
| A3 Bijou |
| 7b+ Rain Botto |
| 7c+ Always the sun |
| 7a+ Namana |
| 5c+ Dadarabe |
| 6b Alien 2 |
| 6b ★★ Alien 1 |
| 5b Babakely |
| 6b+ Ripped my flesh |
| 6b+ Le mur lemur |
| 6b So Lonely |
| Tsaranoro Massif |
|
Lemur Wall
More info about the crag layout can be found here: |
| Tsaranoro Massif Lemur Wall |
|
7a
Gipsy crack
Route diagram: |
|
6b
Pectorine
Climbing notes: ⚠️ 6a+ obligatory! Abseil notes: ⚠️ Abseil via the same route except for the last two pitches. See route diagram (link below) for more info! You can also walk down the 'Lemur Wall' ridge. Recommended equipment:
Pitches info:
Route diagram: |
|
7a
★ Tsaradonga
Climbing notes: ⚠️ 6b+ obligatory! Abseil notes: Abseil via the same route. You can also climb a bit above the last anchor point and walk down the 'Lemur Wall' ridge. See route diagram (link below) for more info! Recommended equipment:
Pitches info:
Route diagram: |
|
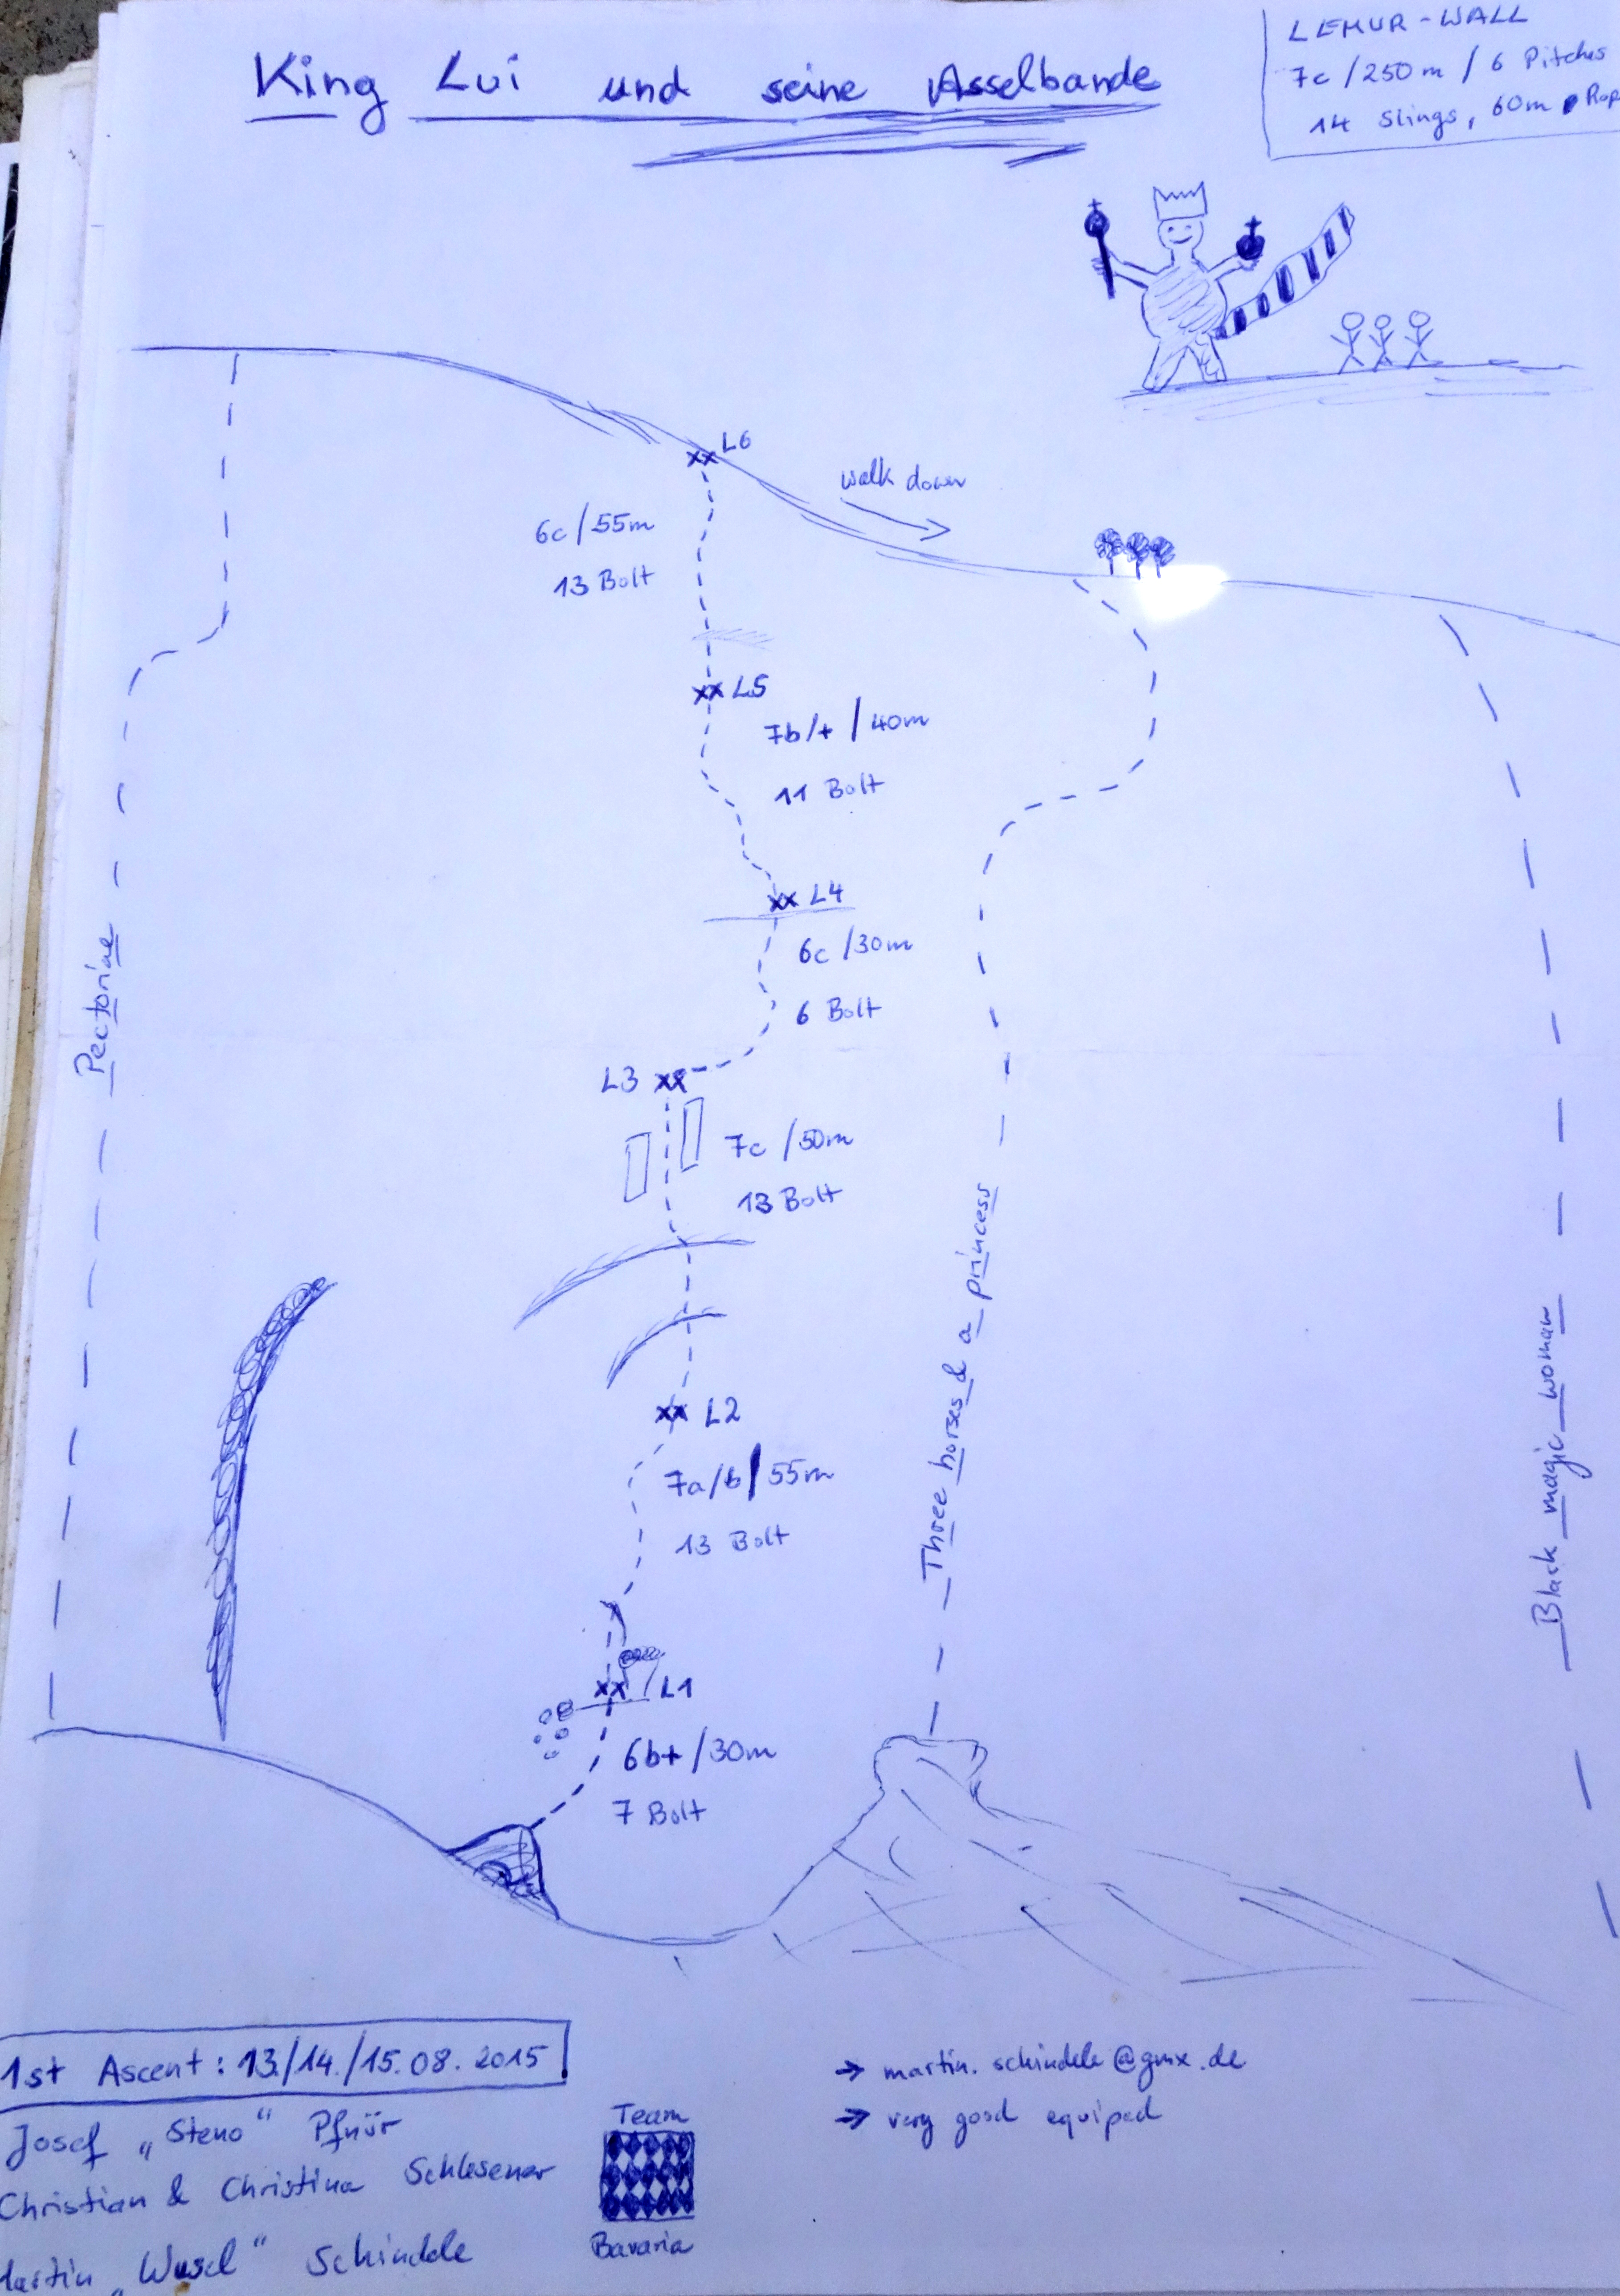
7c
King Lui
Abseil notes: Abseil via the same route. You can also walk down the 'Lemur Wall' ridge. See route diagram (link below) for more info! Recommended equipment:
Pitches info:
Route diagram: Other notes: Very well equipped. |
|
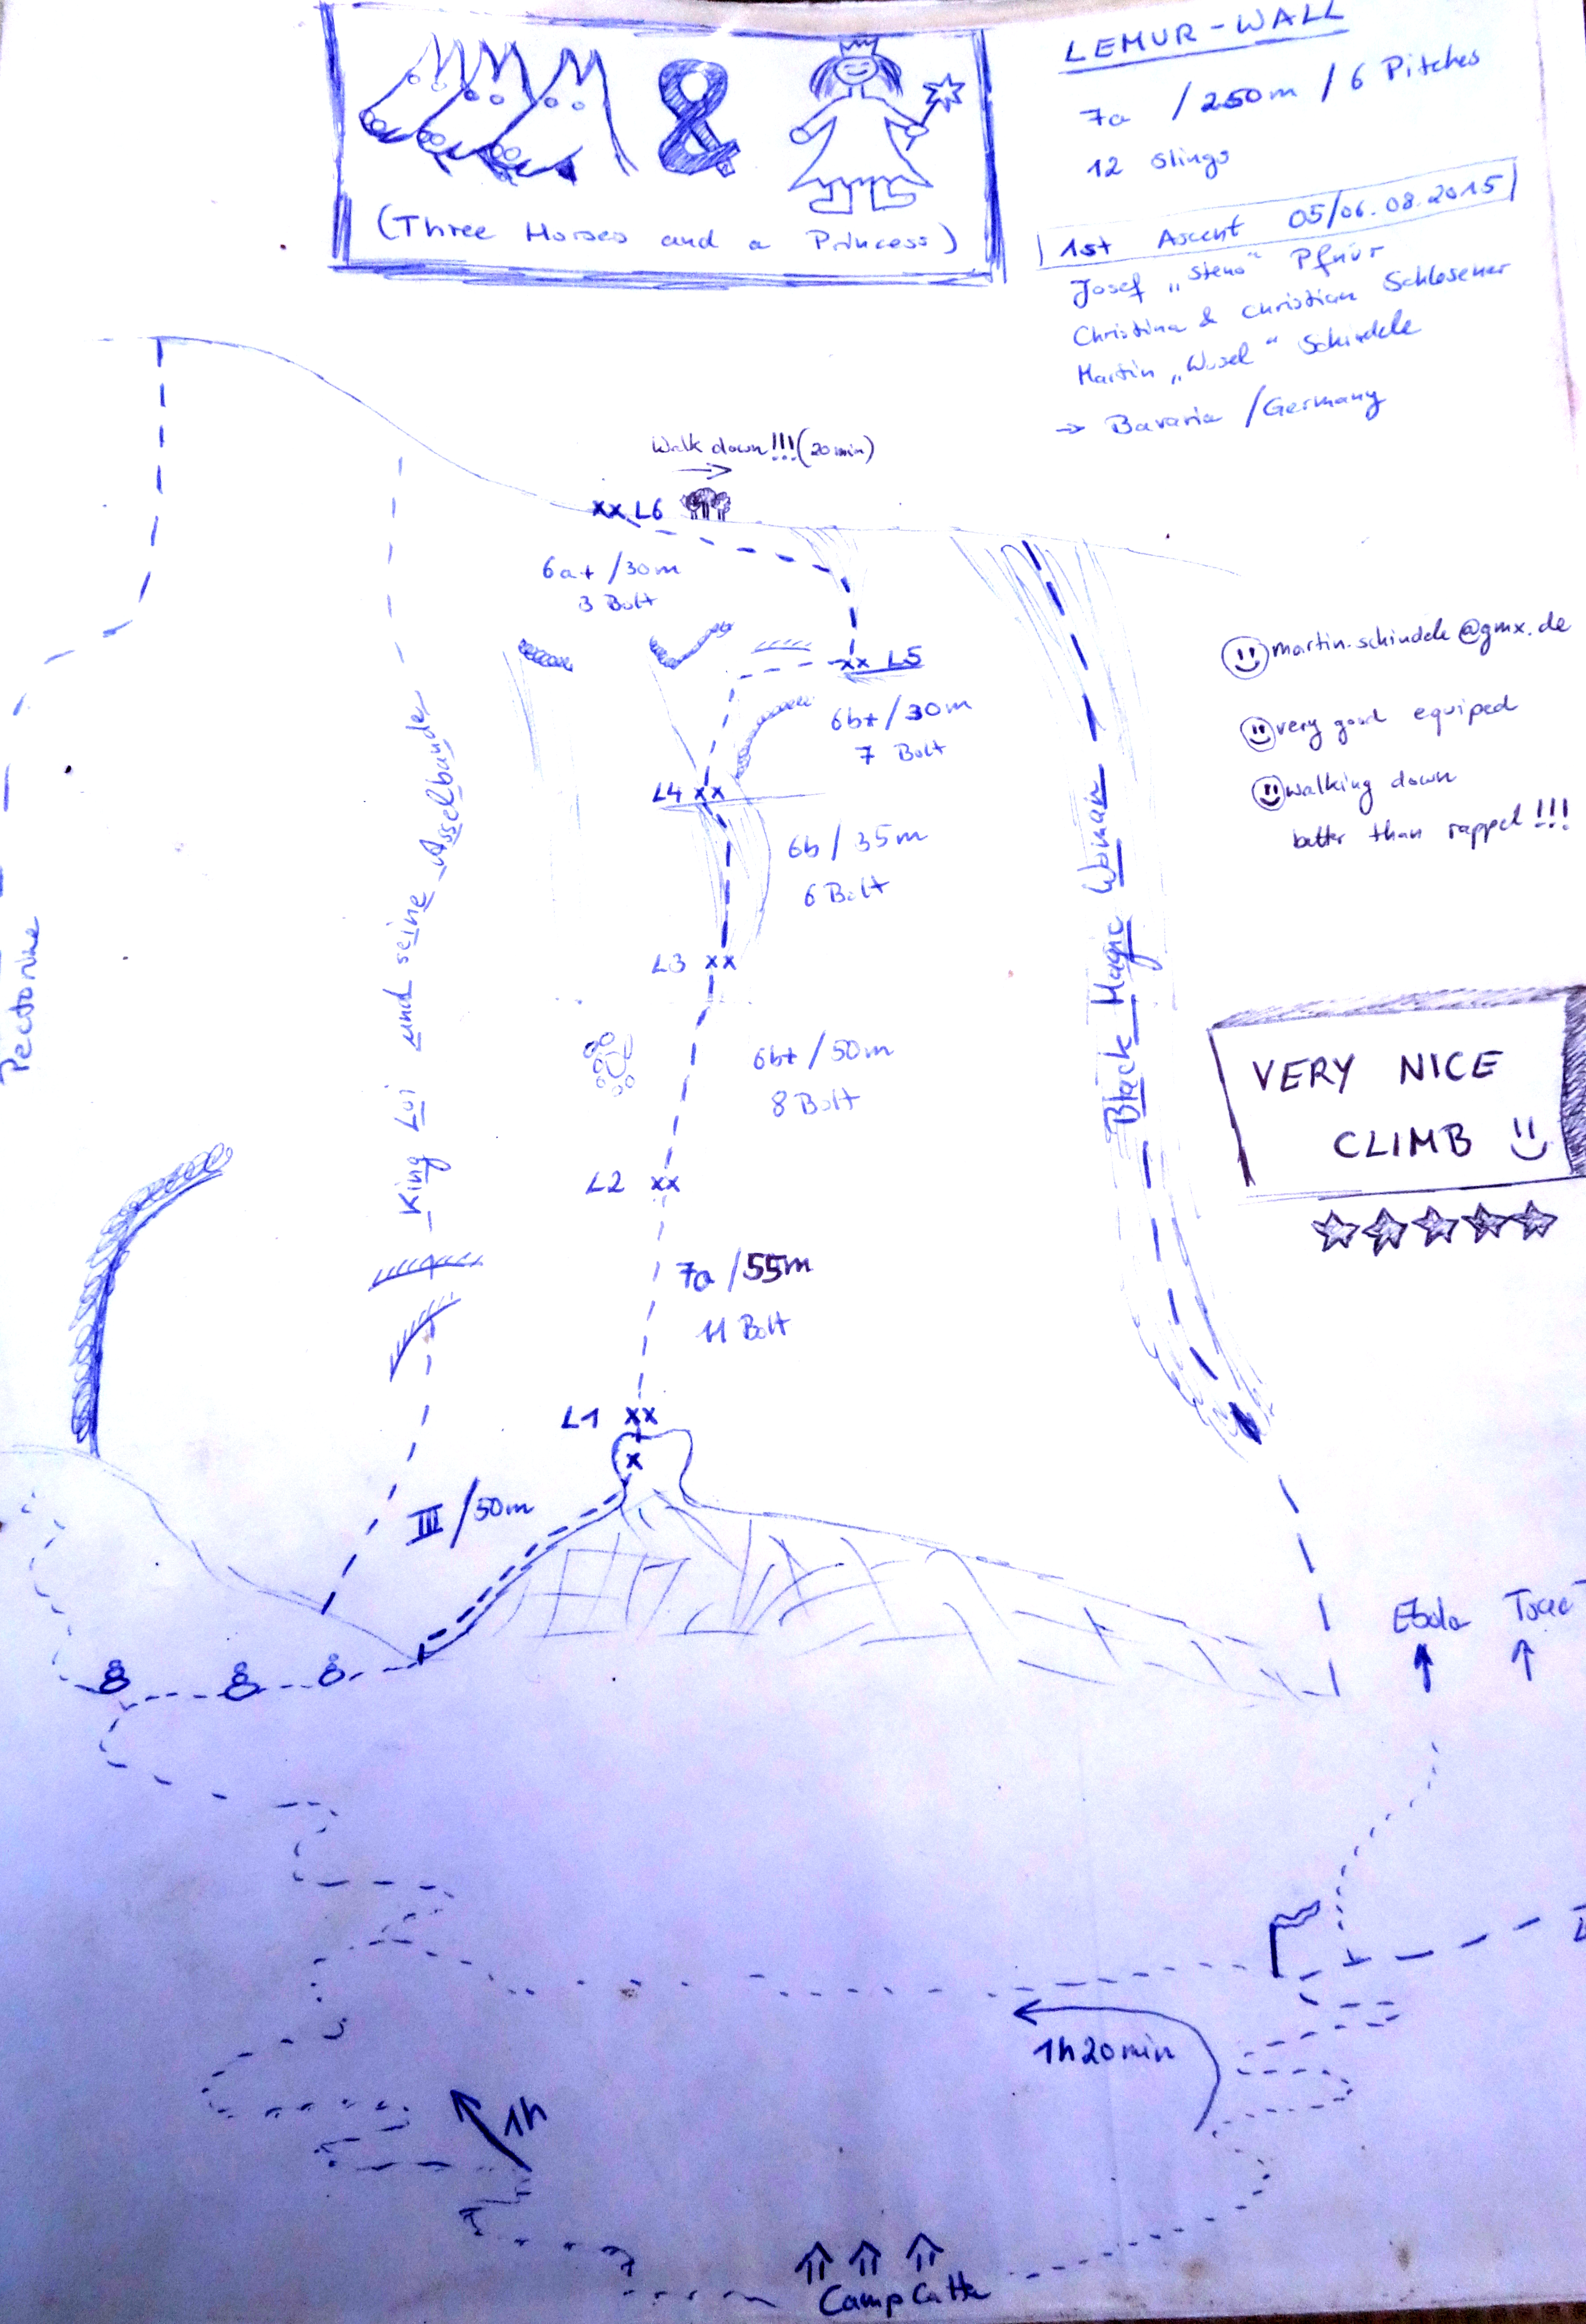
7a
Three horses and a princess
Abseil notes: Abseil via the same route. You can also walk down the 'Lemur Wall' ridge (20 min, better than abseil). See route diagram (link below) for more info! Recommended equipment:
Pitches info:
Route diagram: AILEDESCIMES - Three horses and a princess Other notes: Very well equipped. |
|
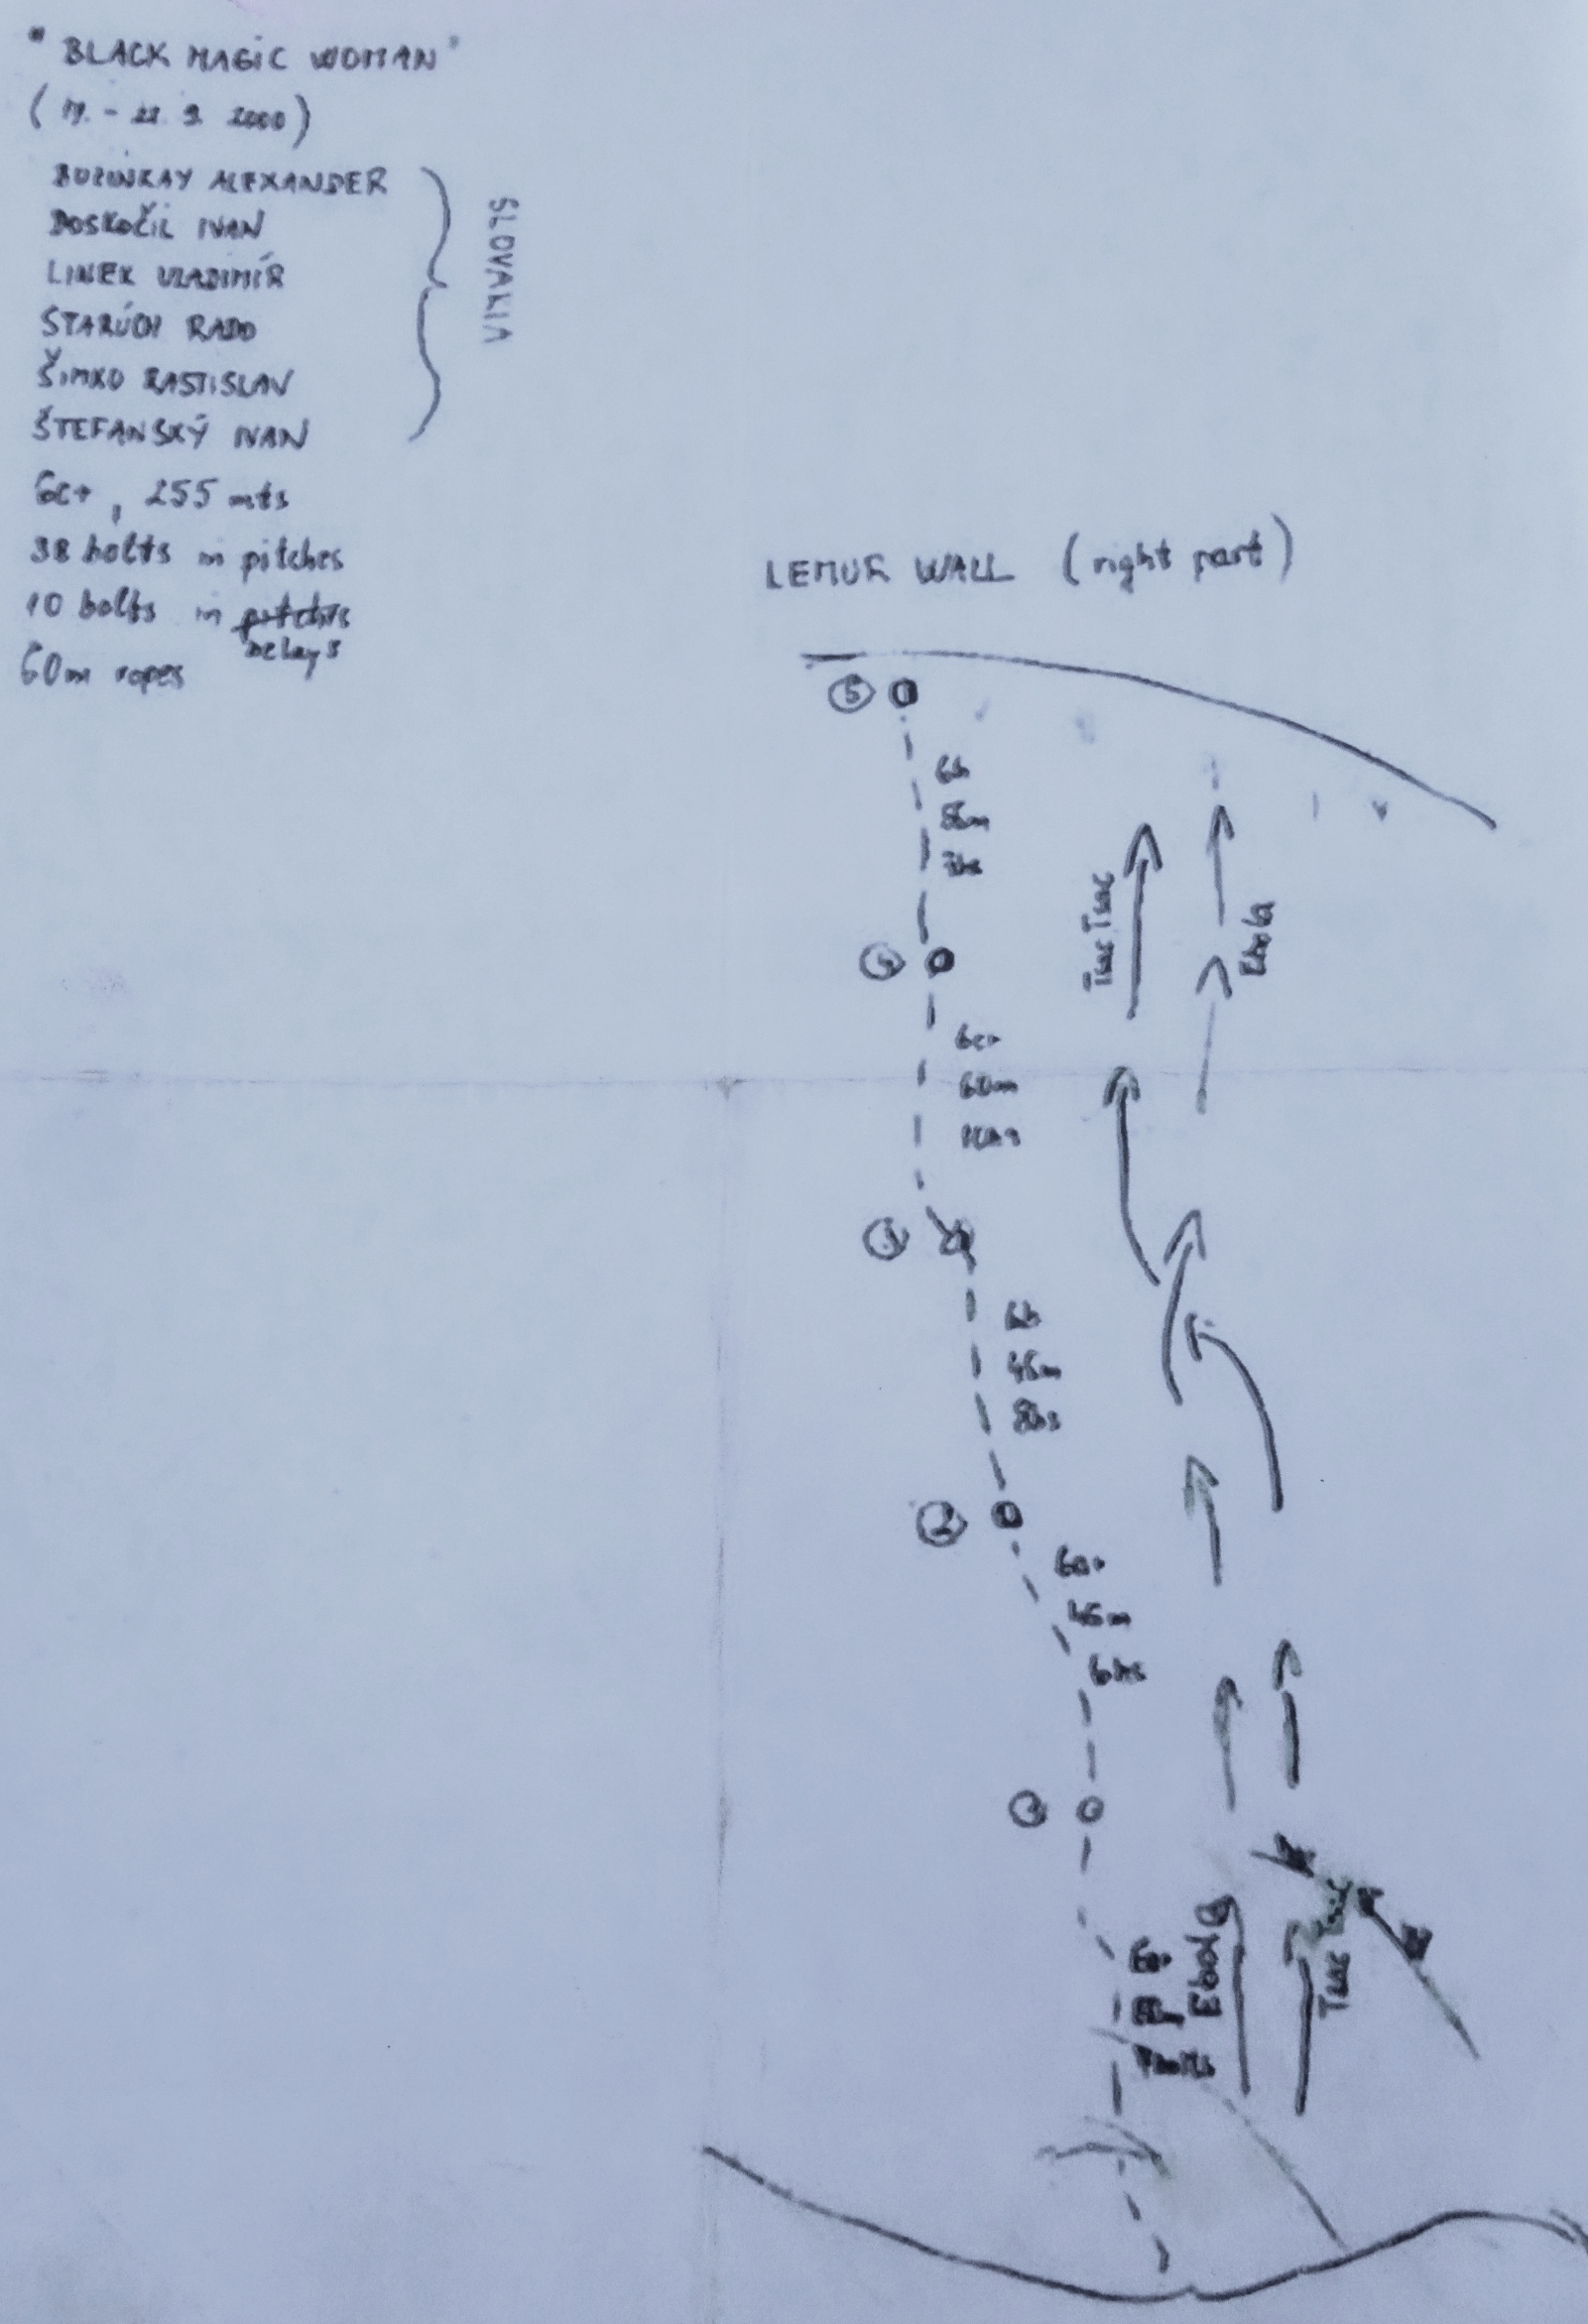
6c+
★★★ Black magic woman
Climbing notes: ⚠️ 6b+ obligatory! Recommended equipment:
Pitches info:
Route diagram: |
|
6b+
Ebola
Climbing notes: ⚠️ 6b+ obligatory! Abseil notes: Abseil via the same route. You can also walk down the 'Lemur Wall' ridge. Recommended equipment:
Route diagram: |
|
7a+
Tsac Tsac
Climbing notes: ⚠️ 6c obligatory! Abseil notes: Abseil via the same route. You can also walk down the 'Lemur Wall' ridge. Recommended equipment:
Route diagram:
|