
A Crag Guide gives an extensive view of all sub areas and climbs at a point in the index. It shows a snapshot of the index heirachy, up to 300 climbs (or areas) on a single web page. It shows selected comments climbers have made on a recently submitted ascent.
At a minor crag level this should be suitable for printing and taking with you on a climbing trip as an adjunct to your guidebook.
This guide was generated anonymously. Login to show your logged ascents against each route.
Warning
Rock climbing is extremely dangerous and can result in serious injury or death. Users acting on any information directly or indirectly available from this site do so at their own risk.
This guide is compiled from a community of users and is presented without verification that the information is accurate or complete and is subject to system errors. By using this guide you acknowledge that the material described in this document is extremely dangerous, and that the content may be misleading or wrong. In particular there may be misdescriptions of routes, incorrectly drawn topo lines, incorrect difficulty ratings or incorrect or missing protection ratings. This includes both errors from the content and system errors.
Nobody has checked this particlular guide so you cannot rely on it's accuracy like you would a store bought guide.
You should not depend on any information gleaned from this guide for your personal safety.
You must keep this warning with the guide. For more information refer to our:
Usage policy
Contributors
Thanks to the following people who have contributed to this crag guide:
Oliver Story
Dane Evans
Brendan Heywood
CElliott
Ethan Parkes
John Wilson
Benjimin
Eleanor Hewitt
Dave McGregor
Owen Cameron
The size of a person's name reflects their Crag Karma, which is their level of contribution. You can help contribute to your local crag by adding descriptions, photos, topos and more.
Some content has been provided under license from: © Canberra Climbers' Association (CC BY-SA) © ANU Moutaineering Club (Creative Commons Attribution-Share Alike)
Table of contents
- 1.
Snake Rock
42 in Crag
- 1.1. Scooby 3 in Sector
- 1.2. Upper Tier 6 in Sector
- 1.3. Lower Tier 14 in Sector
- 1.4. The Ampitheatre 6 in Sector
- 1.5. The Buttresss 12 in Sector
- 2. Index by grade
1. Snake Rock 42 routes in Crag
- Summary:
-
Sport climbing, Trad climbing and Top roping
Lat / Long: -35.479142, 148.953291
summary
Snake Rock is one of the closest sport crags to Canberra and offers a range of grades, it's sunny in winter, and in the shade early in summer, and the river provides a nice way too cool off
description
Snake Rock has become a popular little spot for getting out and about. Many of the recent additions are sport lines and complement the early trad routes,making the crag suitable for a large range of experience and interests.
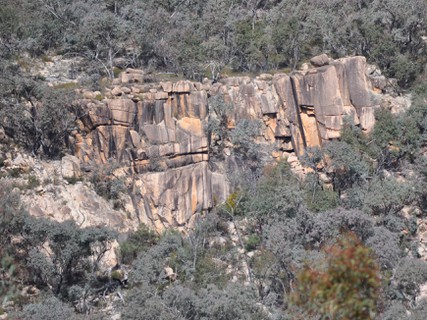
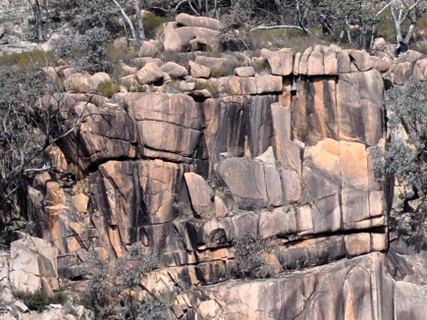
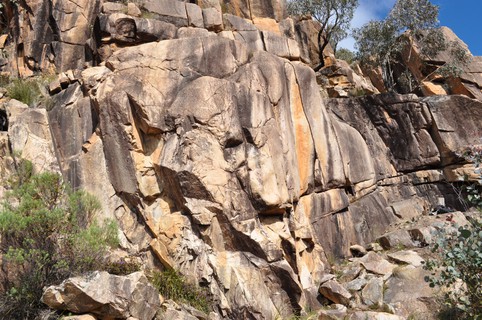
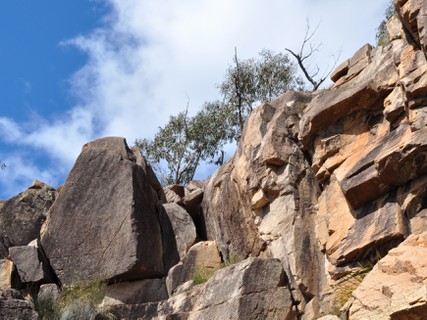
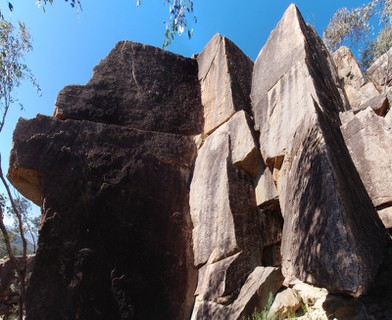
The small cliff line on the eastern side of the Corin Valley, an unimpressive pile of yellow/brown granite about to slide down into the creek. Close up, it's rather reminiscent of gritstone and has some classic short routes in the range 18-26 (complete with bolts, very unreminiscent of gritstone). A good alternative to 'Gibraltar Peak' or 'The Fortress' in winter as you can follow the sun most of the day.
access issues
Snake Rock is located within Namadgi National park, the boundary appears to be the creek, with the sections closer to the road falling within Gibraltar Ck State forest
approach
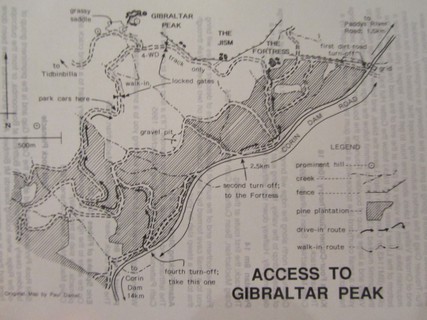
Snake Rock is visible across the valley to your left as you drive up Corin Road. Park at the 3.9 kilometre mark at a blocked-off track next to a power pole. Follow the track, turn right at the junction, continue downhill for 200 metres to a cairn on the left, just as the track turns back uphill. Cairns mark the way through bush, across the creek and uphill to the crag (about 10 minutes).
| Route | Grade | Style | Selected ascents | |||||
|---|---|---|---|---|---|---|---|---|
| 6 |
★ Small Things Amuse
This small slanting handcrack faces Gibralter Creek in a small tor slightly higher than and about 400m east of Snake Rock. It is probably the only climb here. FA: John Wilson & Gary Ewart, 2005 | 15 | 6m | |||||
    |
||||||||
1.1. Scooby 3 routes in Sector
- Summary:
-
All Top roping
Lat / Long: -35.479037, 148.953429
description
Nice easy beginners lines
approach
Leftmost 'wall' of the crag
 |
||||||||
| Route | Grade | Style | Selected ascents | |||||
|---|---|---|---|---|---|---|---|---|
| 1 |
★ Scooby
FA: Willem Grant-Ryan, 2012 | 7 | 7m | |||||
| 2 |
★ Shaggy
FA: Willem Grant-Ryan, 2012 | 7 | 7m | |||||
| 3 |
★ Fashion Fairytale
FA: Ingrid Grant-Ryan | 3 | 9m | |||||
1.2. Upper Tier 6 routes in Sector
- Summary:
-
Mostly Sport climbing
Lat / Long: -35.479153, 148.953341
description
Consider slinging a rope to keep you from dropping off the ledge if you are doing these climbs.
 |
||||||||
| Route | Grade | Style | Selected ascents | |||||
|---|---|---|---|---|---|---|---|---|
| 1 |
★★ Yohan
Warning Fixed Gear: Bolt hangers twisted & bent FA: Justin Ryan, 2012 | 19 | 7m | |||||
| 2 |
Usain
FA: Justin Ryan, 2012 | 22 | 7m | |||||
| 3 |
★ Asafa
Warning Fixed Gear: 2nd and 3rd bolts spinning FA: Justin Ryan, 2012 | 21 | 7m | |||||
| 4 |
Scaled
FA: Dave McGregor, 2012 | 14 | 7m | |||||
| 5 |
★ Non-Venomous
FA: Dave McGregor, 2012 | 13 | 7m | |||||
| 6 |
★ Twin Set
FA: Twin Set, 1997 | 18 | 7m | |||||
1.3. Lower Tier 14 routes in Sector
- Summary:
-
Sport climbing and Trad climbing
Lat / Long: -35.479122, 148.953259
 |
||||||||
| Route | Grade | Style | Selected ascents | |||||
|---|---|---|---|---|---|---|---|---|
| 1 |
★ A Garden Lost
FA: Justin Ryan, 2012 | 9 | 7m | |||||
| 2 |
★ It Was Complicated
FA: Justin Ryan, 2012 | 24 | 10m | |||||
| 3 |
Conflict Therapy (hard start)
2m to the left of Little Cherie FA: Justin Ryan & Lionel Meynadier, 2008 | 22 | 10m, 4 | |||||
| 4 |
★ Conflict Therapy (easy start)
FA: Justin Ryan, 2012 | 19 | 10m | |||||
| 5 |
★ Little Cherie
Up the nose of the lower left tier, just left of Puff Adder FA: Lionel Meynadier & Justin Ryan, 2008 | 18 | 10m, 4 | |||||
| 6 |
★ Puff Adder
The crack system left of the orange streak. Was a thin trad lead; now a great sport climb. FA: John Churchill & Mike Peck, 1997 | 19 | 7m, 4 | |||||
| 7 |
★ Chasing Amy
The thin crack up the prominent orange streak. Either finish at the lower-off on the ledge, or follow the crack up through two more bulges (Twin Set). FA: Jonathan Edwards & Jamie Valdivia (both led), 1997 | 26 | 12m | |||||
| 8 |
Electra Luxx
FA: Justin Ryan, 2012 | 24 | 10m | |||||
| 9 |
★ Snakes and Ladders
The layback crack on the right hand side of the lower tier. Up the crack. Finish at the half-height anchor. Better than it looks. FA: John Churchill, Catherine Eadie & Mike Peck, 1997 | 16 | 12m | |||||
| 10 |
★ Snakes and Ladders direct finish
As for Snakes and Ladders, but from the anchor continue up the arete past two bolts to the top. FA: Mike Peck, John Churchill & Catherine Eadie, 1997 | 17 | 17m, 2 | |||||
| 11 |
★ Jelly Bean
FA: Dave McGregor, 2012 | 8 | 7m | |||||
| 12 |
★★ Jack and the beanstalk
Trad anchor at top!!! Adventurous beginners trad route. climb up jelly bean past the tree then up the easy well protected chimney. be aware not to kick loose rocks off. FA: Ethan Parkes & Glenn | 10 | 18m | |||||
| 13 |
★ Wires In The Hand
FA: Dave Anderson-Smith, 2012 | 14 | 7m | |||||
| 14 |
★ Energy Efficiency
Warning Rock: Loose rock in offwidth FA: Justin Ryan, 2012 | 17 | 7m | |||||
1.4. The Ampitheatre 6 routes in Sector
- Summary:
-
All Sport climbing
Lat / Long: -35.479241, 148.953237
 |
||||||||
| Route | Grade | Style | Selected ascents | |||||
|---|---|---|---|---|---|---|---|---|
| 1 |
★ Bergenhardia
The short arete high up on the left of the ampitheatre. Take care clipping the second bolt. FA: Oliver Story, 2012 | 23 | 5m, 2 | |||||
| 2 |
★ Copperhead
FA: Dave McGregor, 2012 | 22 | 7m | |||||
| 3 |
★ Legless Lizard
FA: Dave McGregor | 11 | 10m | |||||
| 4 |
★ Arrow of Time
FA: Justin Ryan, 2012 | 21 | ||||||
| 5 |
★ Slithering Sideways
The second bolt is poorly placed so use an alpine draw to avoid edge clipping. FA: Dave Anderson-Smith, 2012 | 16 | 12m | |||||
| 6 |
★ Slithering Direct
Set: Dave Anderson-Smith, 2013 FA: Thomas Polden, 2013 | 18 | 12m | |||||
1.5. The Buttresss 12 routes in Sector
- Summary:
-
Sport climbing and Trad climbing
Lat / Long: -35.479349, 148.953162
 |
||||||||
| Route | Grade | Style | Selected ascents | |||||
|---|---|---|---|---|---|---|---|---|
| 1 |
★ Black Adder
The black corner on the left side of the top buttress with four bolts. FA: John Churchill & Mike Peck, 1997 | 19 | 10m, 4 | |||||
| 2 |
Disco Cobra / Disco Disco
The orange arete right of BA and left of Crawlin King Snake. Up arete to the crux pulling over rooflet. Start with the first one or two bolts clipped. FA: Justin Ryan, 2008 | 26 | 12m | |||||
| 3 |
★★ Crawlin' King Snake
Superb sustained climbing, every move worthwhile. The obvious orange corner crack to a roof and bolt. Move right then finish back up the slab past one more bolt. FA: Mike Peck & John Churchill, 1997 | 23 | 15m, 2 | |||||
| 4 |
King Cobra Link-up
Start as for Crawlin' King Snake. Traverse right along horizontal break on natural pro and finish up the Disco Cobra slab to top-out. Retro-trad run-out for purists. | 23 | 12m | |||||
| 5 |
Spitting Viper
A climb of two contrasting styles. Up the arete right of CKS. Bouldery start. FA: Justin Ryan, 2012 | 26 | 14m | |||||
 |
||||||||
| Route | Grade | Style | Selected ascents | |||||
| 6 |
★★ Snake-in-the-Grass
The arete on the right hand side of the orange buttress past three bolts. Cam in break. FA: Mike Peck & Catherine Eadie, 1997 | 20 | 15m, 3 | |||||
| 7 |
★★ Reptilian
Start as for Snake-in-the-Grass. Straight up the wall. Optional cam in break (#0.4-0.5 BD). Lower down Red Belly. FA: D.McGregor, 2002 | 25 | 13m, 5 | |||||
| 8 |
★★ Red Belly
The sustained thin corner right of Reptilian with two bolts at the finish (crux). FA: Mike Peck, John Churchill & Catherine Eadie, 1997 | 22 | 12m, 2 | |||||
| 9 |
★ Pythonista
A good, hard climb if you can contrive it. The arete right of Red Belly and left of OET. Up the arete, avoiding the OET crack and its edges to the right. Optional small cam (#0.4 BD) in break. Lower down Red Belly. FA: Oliver Story, 2012 | 24 | 12m, 5 | |||||
| 10 |
★ One Eyed Trousersnake
Take your #5 camalot and enjoy. The chimney/offwidth/layback. FA: John Churchill & Mike Peck, 1997 | 18 | 10m | |||||
| 11 |
★★ Snakeskin Shuffle
Start up the hanging nose and continue up the arete past four bolts. FA: Mike Peck & Catherine Easie, 1997 | 19 | 12m, 4 | |||||
| 12 |
★★ Anacondan
Up the right side of the nose then arete, on bolts. Alternatively, as for the first ascent - Up the corner to the right of the nose of SS (small cam / wires) to ledge (#7 nut / small cam). Up the right side of the arete past 2 bolts. FA: Daniel Gordon & Oliver Story, 2012 | 20 | 12m, 4 | |||||