A Crag Guide gives an extensive view of all sub areas and climbs at a point in the index. It shows a snapshot of the index heirachy, up to 300 climbs (or areas) on a single web page. It shows selected comments climbers have made on a recently submitted ascent.
At a minor crag level this should be suitable for printing and taking with you on a climbing trip as an adjunct to your guidebook.
This guide was generated anonymously. Login to show your logged ascents against each route.
Warning
Rock climbing is extremely dangerous and can result in serious injury or death. Users acting on any information directly or indirectly available from this site do so at their own risk.
This guide is compiled from a community of users and is presented without verification that the information is accurate or complete and is subject to system errors. By using this guide you acknowledge that the material described in this document is extremely dangerous, and that the content may be misleading or wrong. In particular there may be misdescriptions of routes, incorrectly drawn topo lines, incorrect difficulty ratings or incorrect or missing protection ratings. This includes both errors from the content and system errors.
Nobody has checked this particlular guide so you cannot rely on it's accuracy like you would a store bought guide.
You should not depend on any information gleaned from this guide for your personal safety.
You must keep this warning with the guide. For more information refer to our:
Usage policy
Contributors
Thanks to the following people who have contributed to this crag guide:
The size of a person's name reflects their Crag Karma, which is their level of contribution. You can help contribute to your local crag by adding descriptions, photos, topos and more.
Table of contents
- 1.
Stellako
9 in Crag
- 1.1. The Big Eddy / Eddy’s Wall 9 in Cliff
- 2. Index by grade
1. Stellako 9 routes in Crag
- Summary:
-
모두 톱로핑
Lat / Long: 54.028600, -124.969100
1.1. The Big Eddy 9 routes in Cliff
- Summary:
-
Lat / Long: 54.028150, -124.969205
설명
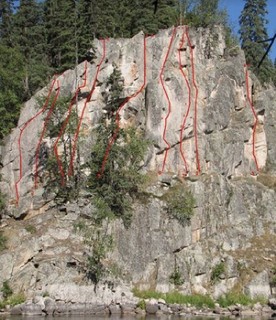
The Big Eddy is a small climbing crag situated next to the Stellako River. There are a total of nine developed routes of moderate grades offering a nice mix of climbing styles. The rock is made up of exfoliating (on both a macro and micro level) coarse pink granite. There are many large flake systems that could be released with the right trigger. All users should keep this in mind. This crag is especially nice on a hot summer day as the swimming in the river is excellent. It is also worth a visit in the fall to observe the spectacle of the spawning sockeye salmon.
접근
Drive west on hwy 16 to about 2 km west of the community of Fraser Lake. Turn left on to Francois Lake Road and drive approximately 5 km. At the apex of a sweeping left bend in the road look for a small dirt road exiting off the right bank. Go 100 m down this road and park in a small clearing being sure to leave room for other users. Walk down the right fork (drive if you have high clearance vehicle) for another 100 m to a clearing. Look for a trail leaving the clearing on the left back corner. Follow the trail for about 20 minutes generally keeping right at intersections until the crag becomes visible on your left. From the top of the crag scramble down on skiers left and traverse back to the base of the routes on your right. The first route you will pass is # 9, You Otter Climb This.
 |
||||||||
| Route | Grade | Style | Selected ascents | |||||
|---|---|---|---|---|---|---|---|---|
| 1 |
Back Ferry Left
A nice warm up route. | 5.6 | ||||||
| 2 |
Back Ferry Right
Another nice warm up route | 5.5 | ||||||
| 3 |
Bye Bye Sockeye
A tricky climb. Tree anchor. | 5.10a | ||||||
| 4 |
★ Big Fish Small Pond
A nice climb that protects very well. Back stepping off the block to your right at the crux lowers the grade a notch. | 5.8 | ||||||
| 5 |
★★ Catch and Release
Another nice climb with a variety of climbing. Try to avoid using the big flake to the left of the splitter finishing crack. The anchor is set quite far back to force leaders to make the final top out moves. The bolt lower down on the route is intended as a TR directional, not leader protection. | 5.9 | 1 | |||||
| 6 |
★★★ The Captain
Two bolts. Likely the most popular route at the crag. For TR purposes be sure to put a directional on the upper bolt. | 5.9 | 2 | |||||
| 7 |
Deliverance
Four bolts. A great route up the face and prow. Has its own anchor on the face at top of prow. | 5.10 | 4 | |||||
| 8 |
A River Runs to it
An OK that doesn’t get done often. Shares the anchor (on top of prow) with The Captain. | 5.7 | ||||||
| 9 |
You Otter Climb This
Use caution when topping out on the final block! | 5.8 | 1 | |||||
2. Index by grade
| Grade | Stars | Name | Style | Pop | Area | |
|---|---|---|---|---|---|---|
| 5.5 | Back Ferry Right | 1.1. The Big Eddy | ||||
| 5.6 | Back Ferry Left | 1.1. The Big Eddy | ||||
| 5.7 | A River Runs to it | 1.1. The Big Eddy | ||||
| 5.8 | ★ | Big Fish Small Pond | 1.1. The Big Eddy | |||
| You Otter Climb This | 1 | 1.1. The Big Eddy | ||||
| 5.9 | ★★ | Catch and Release | 1 | 1.1. The Big Eddy | ||
| ★★★ | The Captain | 2 | 1.1. The Big Eddy | |||
| 5.10a | Bye Bye Sockeye | 1.1. The Big Eddy | ||||
| 5.10 | Deliverance | 4 | 1.1. The Big Eddy |