You might encounter cases in which the same route or area was registered twice on theCrag, maybe under a different name or simply as duplicate in a different area.
While your first reaction might be to trying to delete the “wrong one”, you will quickly realise that there is only a very limited delete functionality on theCrag. The reason being that routes may be referenced elsewhere or climbers might have logged ascents against the route, all information that should not be lost.
The solution to the problem is to merge the routes or areas in question and thus to combine the information related to the duplicate entries in one entry.
While this sounds easy, there are many subtleties to this process, many of them explained here below.
Merging routesVoltar a conteúdo
Merging routes in the same areaVoltar a conteúdo
If you encounter two routes in the same area that should be merged, simply select both of them, click on the arrow next to the “Registrar ascensão” button and select “Mesclar elementos”.

The next window displays your selection with the radio button “Merge With Selected Climb” active and the route (Navigation Child Nodes) to be merged listed.
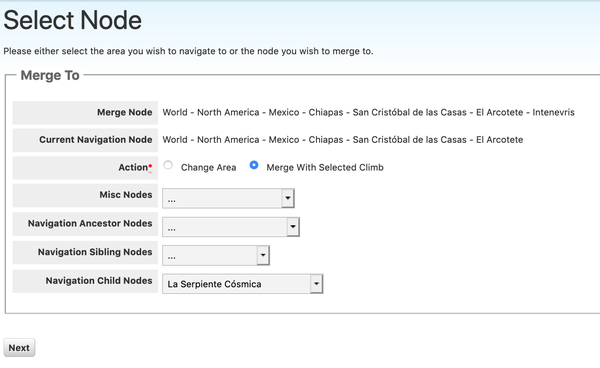
Simply click on “Próximo” if you want to merge these two routes. As this action can not be undone, another confirmation page is displayed. To continue, simply select “yes” and click “Próximo”.
The following screen allows you to edit the new, merged route. Please verify the names (you might want to delete one of them in case it was a typo or something like “Unnamed 1”), style, grade and all other information that the system combined from the two routes.
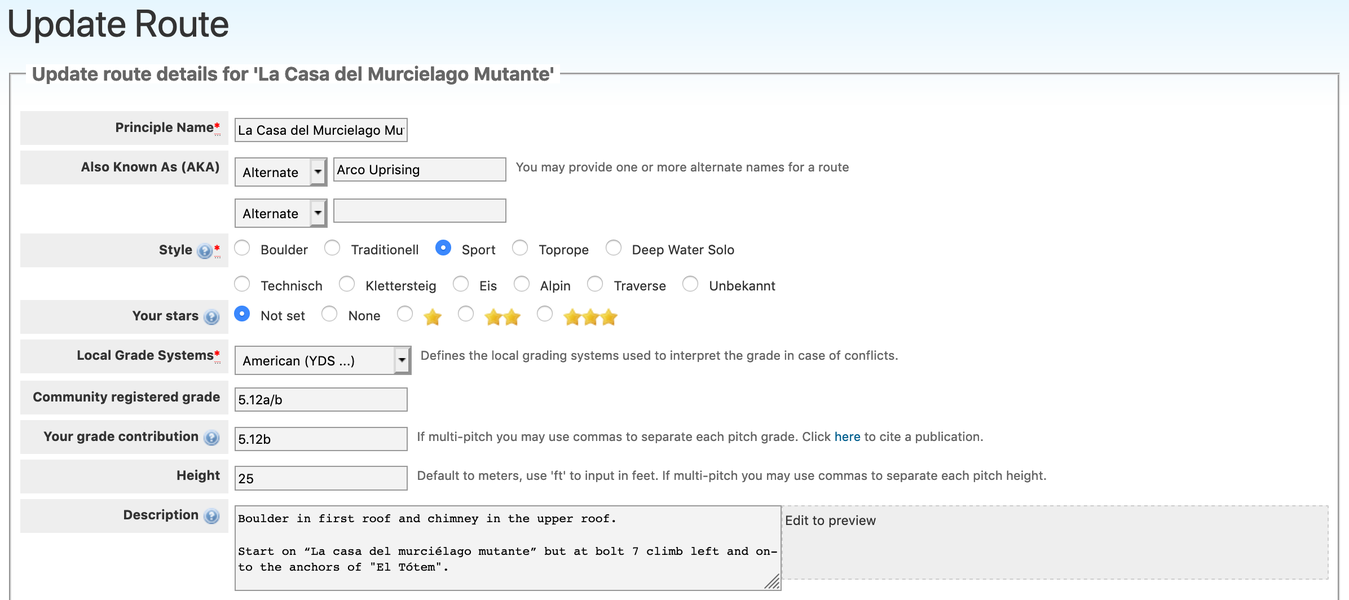
Once you have made your edits, simply click “Salvar” to finish the process. At that time the system also combines photos and ascents from both routes in the background. If both routes were shown on topos, the merged route is deleted from it. Please verify that topos are still correct in this case.
You may only merge two routes at a time. If you need to merge more than two routes, repeat the process above again.
Merging routes from different areasVoltar a conteúdo
If you plan to merge routes from different areas, you have two options. You may first move the route in question to the correct node and merge then as described above. Or you may open the route page of the “wrong route” and click on the 3 dots next to “Editar via” and select “Mesclar via”.

The “Select Node” form opens (see also above). Activate the radio button “Navigate to” and select the area, where the “correct route” is located using the dropdowns. Click “Próximo” to navigate to the selected area. You might have to run through this process multiple times to navigate to the correct area.
Once you see the route in question in the “Navigation Child Nodes” dropdown select it and activate the radio button “Merge With Selected Climb”. Click on “Próximo” in order to continue through the merge process as described above.
Merging areasVoltar a conteúdo
Merging two areas follows the same concept as Merging routes from different areas. Open the “wrong area” and click on the 3 dots next to “Editar local de escalada” and select “Juntar local”.

The “Select Node” form opens (see also above). Activate the radio button “Navigate To” and select the area, where the “correct area” is located using the dropdowns. Click “Próximo” to navigate to the selected area. You might have to run through this process multiple times to navigate to the correct area.
Once you can select the area in question in any of the dropdowns, select it and activate the radio button “Mesclar com setor selecionado”. Click on “Próximo” in order to continue. As this action can not be undone, another confirmation page is displayed.
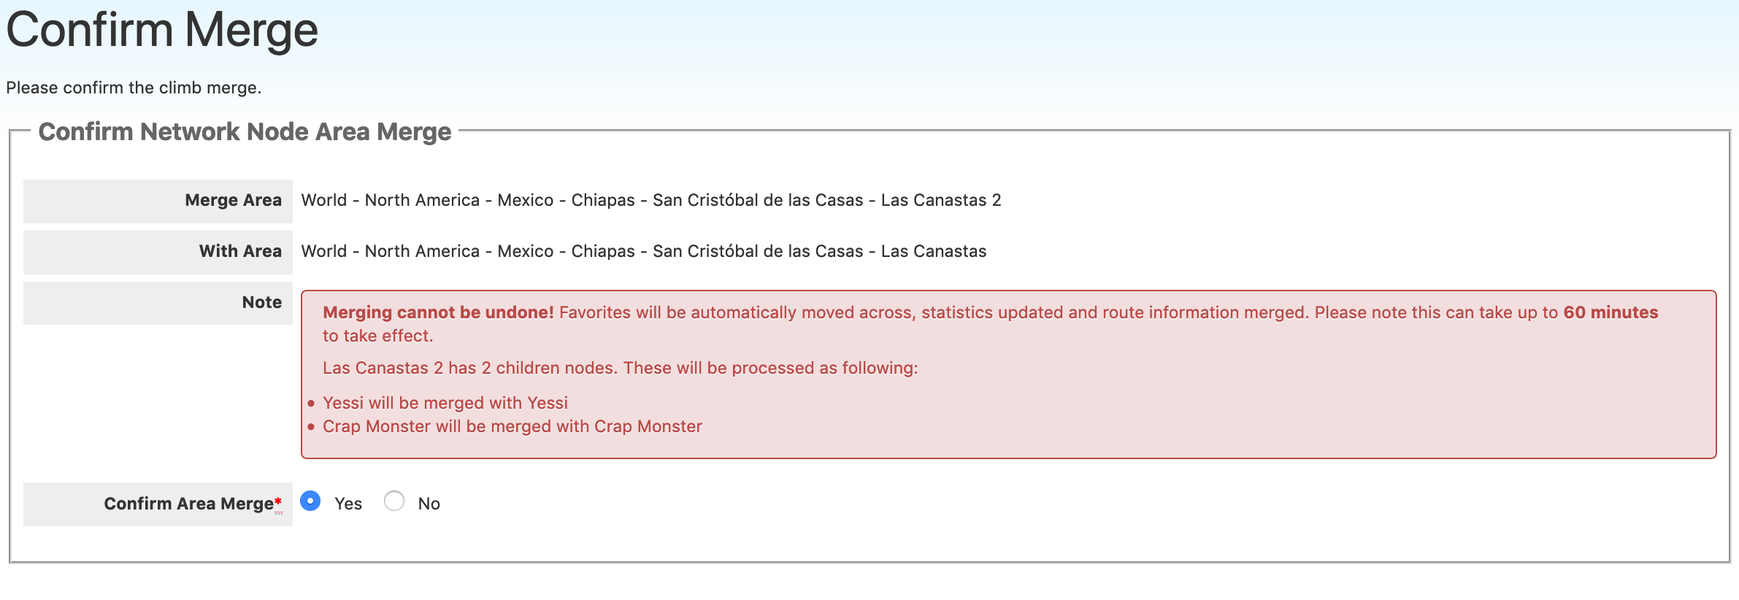
If the area has children (e.g. routes or sub-areas), a warning is displayed informing you about the planned processing for the first level of children. Sub-areas or routes, if not potential duplicates in the merged area, will be moved to the new area. Identified duplicates will be merged during the process. Please read this warning carefully and consider if it is what you want to happen. If you are ok, select “yes” and click “Salvar”.
The following screen allows you to edit the new, merged area. Please verify the names, area type and all other information that the system combined from the two areas. Once you have made your edits, simply click “Save” to finish the process. At that time the system also combines photos and topos and consolidates location information from both areas in the background.
Please be aware that it can take up to several hours to update certain statistics (e.g. route count, grade distributions) after a merge operation.
DeletingVoltar a conteúdo
The only time theCrag allows you to actually delete a route or an area is when the item was not already referenced in any activity (such as logging an ascent for a route).
So if you created a route by accident and realize it, just open the route page and click on the 3 dots next to “Editar via”. If you see the “Apagar via” function, you may delete it. If “Apagar via” forwarded you here, you may only remove the route by running through the Merge routes process. The same process applies synonymously to areas.
