
A Crag Guide gives an extensive view of all sub areas and climbs at a point in the index. It shows a snapshot of the index heirachy, up to 300 climbs (or areas) on a single web page. It shows selected comments climbers have made on a recently submitted ascent.
At a minor crag level this should be suitable for printing and taking with you on a climbing trip as an adjunct to your guidebook.
This guide was generated anonymously. Login to show your logged ascents against each route.
Warning
Rock climbing is extremely dangerous and can result in serious injury or death. Users acting on any information directly or indirectly available from this site do so at their own risk.
This guide is compiled from a community of users and is presented without verification that the information is accurate or complete and is subject to system errors. By using this guide you acknowledge that the material described in this document is extremely dangerous, and that the content may be misleading or wrong. In particular there may be misdescriptions of routes, incorrectly drawn topo lines, incorrect difficulty ratings or incorrect or missing protection ratings. This includes both errors from the content and system errors.
Nobody has checked this particlular guide so you cannot rely on it's accuracy like you would a store bought guide.
You should not depend on any information gleaned from this guide for your personal safety.
You must keep this warning with the guide. For more information refer to our:
Usage policy
Contributors
Thanks to the following people who have contributed to this crag guide:
Ian Geatches
Tony Williams
Jason McCarthy
Paul Frothy Thomson
Will Vidler
TimTam
Alec Landstra
Jason
Mitch Perkins
Jimmy O'Reilly
The size of a person's name reflects their Crag Karma, which is their level of contribution. You can help contribute to your local crag by adding descriptions, photos, topos and more.
Table of contents
- 1. DG's / Delmonte 25 in Crag
- 2. Index by grade
1. DG's 25 routes in Crag
- Summary:
-
Escalada esportiva, Escalada trad e Escalada em rocha
Lat / Long: -33.686649, 150.277606
sumário
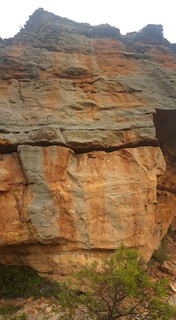
Several short walls and caves with nice views down into the Megalong + one rap in climb out multi trad route.
descrição
Some of the info described here is a bit of an educated guess, as several routes were not written up when first done. The topos may be inaccurate - if you know better please fix them! All bolts are stainless, but some are hot bent so look black.
questões de acesso
Private Property. Take care, don't get climbing banned.
acesso
As this crag sees almost no traffic, there is no established track to the cliff. Expect a (short) but vigorous bushbash. Go to end of Delmonte Drive, and then bash down the hill to the crag (crossing a walking track about halfway down) . It's a bit tricky the first time, but once you know the way, it takes about 15 minutes.
ética
Although sport climbing is well entrenched as the most popular form of Blueys climbing, mixed-climbing on gear and bolts has generally been the rule over the long term. Please try to use available natural gear where possible, and do not bolt cracks or potential trad climbs. If you do the bolts may be removed.
Because of the softness of Blue Mountains sandstone, bolting should only be done by those with a solid knowledge of glue-in equipping. A recent fatality serves as a reminder that this is not an area to experiment with bolting.
If you do need to top rope, please do it through your own gear as the wear on the anchors is both difficult and expensive to maintain.
At many Blue Mountains crags, the somewhat close spacing of routes and prolific horizontal featuring means that it is easy to envisage literally hundreds of trivial linkups. By all means climb these to your hearts content but, unless it is an exceptional case due to some significant objective merit, please generally refrain from writing up linkups. A proliferation of descriptions of trivial linkups would only clutter up the guide and add confusion and will generally not add value to your fellow climbers. (If you still can't resist, consider adding a brief note to the parent route description, rather than cluttering up the guide with a whole new route entry).
If you have benefited from climbing infrastructure in NSW, please consider making a donation towards maintenance costs. The Sydney Rockclimbing Club Rebolting Fund finances the replacement of old bolts on existing climbs and the maintenance of other hardware such as fixed ropes and anchors. The SRC purchases hardware, such as bolts and glue, and distributes them to volunteer rebolters across the state of New South Wales. For more information, including donation details, visit https://sydneyrockies.org.au/rebolting/
It would be appreciated if brushing of holds and minimisation/removal of tick marks becomes part of your climbing routine. Consider bringing a water squirt bottle and mop-up rag to better remove chalk. Only use soft (hair/nylon) bristled brushes, never steel brushes.
The removal of vegetation - both from the cliff bases and the climbs - is not seen as beneficial to aesthetics of the environment nor to our access to it.
Remember, to maintain access our best approach is to 'Respect Native Habitat, Tread Softly and Leave No Trace'. Do not cut flora and keep any tracks and infrastructure as minimal as possible or risk possible closures.
For the latest access related information, or to report something of concern, visit the Australian Climbing Association NSW Blue Mountains page at https://acansw.org.au/blue-mountains/
| Route | Grade | Style | Selected ascents | |||||
|---|---|---|---|---|---|---|---|---|
Northern WallOn the northern side of the descent track gully. This wall faces south west so remains in the shade until 2pm. | ||||||||
| 2 |
Chasing that Butterfly
Worst route on this wall - not worth a star. Shared start with Calm My Beating Heart for a couple of bolts then traverse left onto the arete. There is a fair bit of loose rock and scary clips with multiple ledges to hit if you fall off. FA: Josh Dodson, 2003 | 22 | 18m | |||||
| 3 |
★ Calm My Beating Heart
Great climbing with some lovely water polished rock down low. The unique pillar stuck onto the cliff near the end of this route looks and feels a bit sketchy but hasn't fallen off yet. FA: Ian Geatches, 2003 | 22 | 15m | |||||
| 4 |
★★ Defibrillator
Sustained thin climbing up the guts of the wall. Start as for first bolt of Wee Dram then traverse left and straight up wall. FA: Ian Geatches, 2003 | 23 | 15m | |||||
| 5 |
★ Wee Dram
Heaps of cool featured holds. Stickclip then start steeply and confidently way left. FA: Josh Dodson, 2003 | 20 | 15m | |||||
Middle WallThe wall of polished orange rock, covered in bolts, located between two large cave sections just south of the descent gully. Sun after 10 am. Routes were never written up by first ascentists so this info is missing names and grades are from repeat ascents. | ||||||||
| 8 |
★ Top Sail
Left route starting up seam crack feature with bouldery undercut start. Faded "24" written in chalk at the start is probably the official grade. Was grade 23 on first ascent. FA: Ian Geatches, 2003 | 23 | 15m | |||||
| 9 |
★★ First Mate
Best of these vertical routes. A good pump! Bouldery subtle arete start then easier but still excellent orange wall to finish. Was put up before the next route, graded 22 on first ascent. FA: Ian Geatches, 2003 | 22 | 15m | |||||
| 10 |
★ Josh route 1
Same arete start as for First Mate, then take the right line of bolts that climbs over the lip of the cave. Very questionable rock in the upper section and pretty silly anchor placement. | 23 | ||||||
| 11 |
Josh Route 2
Up the wall 2m right of Mystery Route 2 under the roof past one high RB then left across break on trad (#5 cam) to join up with bolts on Mystery Route 3. | 22 | 1 | |||||
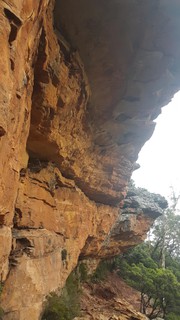
Delmonte CaveOrange cave just right of the Northern Wall. | ||||||||
| 13 |
★★ Mc Playground
First of the steep roof routes about 5m right of the vertical orange wall. Maybe 27? Bolted by C. Coghill along with angiotensin, just prior to discovering Egg and Farside so he never returned to free them. Freed 13 years later. Needs a bolt shuffle after roof boulder. FFA: Mattia Fornari Set: chris coghill | 27 | 15m | |||||
| 14 |
★★ Mad Taffy Traverse
Traverse the horizontal crack rightwards under the roof to lower offs. All trad. FA: mad taff Tony Williams, 2004 | 21 | 25m | |||||
| 15 |
Triple Treat
Batman start to second bolt (first bolt destroys quickdraw) up to an impossible to reach fourth bolt (it was the style at the time) , an excellent crux followed by good steep climbing. Double ring anchor at top of wall. FA: Josh Dodson, 2004 | 26 | 12m | |||||
| 16 |
★★ Angiotensin
Major steep route in the middle of the cave, steep gymnastic moves to a short crimpy headwall. Be careful clipping the 3rd bolt, FA was done with the 3rd clipped. Set: chris coghill FA: Jason McCarthy, 13 Apr 2020 | 26 | 15m | |||||
| 17 |
★★★ Voyage to Voltaren
The route right of Angiotension. Good steep sustained climbing with a dynamic finish. New crux beta = new grade. Gifted to Gary from HK. Set: Eww FFA: 25 Feb 2023 | 28 | 16m | |||||
| 18 |
★★★ Mans Physical World
Intense and athletic blast through much steepness. Pronounced crux at second bolt took many shots before hold was dry and heel stayed put. Consider bringing a small blowtorch if its not windy. Stick clip first two ubolts in roof. A small belay bolt keeps rope out of the way also. FFA: Hurok Daparti | 28 | 16m, 7 | |||||
| 19 |
The Thunderbolt Project
Open project. Bolted as such, and trying it does not warrant closing it! Heads right after MPW crux. Intense roof to jug, at around gr. 29 then some non stop superduper hard bouldering to top. Needs a run of dry weather for final hardest meters above hornblower to be dry. Belay boltplate and biner stolen early 2023. Bring a bolt plate to use on bolt left of high stickclip ubolt, rather than MPW belay bolts as route takes a hard right line. | |||||||
| 20 |
★★ Hornblower
Last the roof routes on the right edge of the cave. Funky steepness. The mallions on 6th bolt are to protect your biner from the edge. Top seeps after rain. FA: Ian Geatches, 2004 | 25 | 12m | |||||
| 21 |
★★ Chainsaw Juggler
Ringbolted fused corner on right side of cave. Climb the crack (crux) then get on the overhang thru the dinner plates to lower offs. FA: Tony Williams, 2004 | 21 | 10m, 4 | |||||
| 22 |
Buckaroo Direct
Contrived squeeze job up the vague arete forming the right side of Chainsaw's corner. Clip the first bolt of Buckaroo if you need to and then head up to the next on the direct. #1 and #2 cam for next placement. FA: Tony Williams, 2004 | 19 | 10m, 2 | |||||
| 23 |
Buckaroo
Starts 2m right of Chainsaw Juggler on overgrown slope. Go from the slope to the first bolt, get to the 2nd bolt. Gear from here. Good one if you've got your chick in tow that needs a lead. Hard to clean if you don't have a second. Possibly uses lower-off anchors on Chainsawe Juggler? FA: Tony Williams/ Nora Adam, 2004 | 14 | 10m, 2 | |||||
| 24 |
Exotic as I am
Easy trad route up juggy wall 10m right of Chainsaw Juggler. FA: Nora Adam/ Tony Williams, 2004 | 8 | 12m | |||||
Delmonte LowerThis 60m high overhung wall is located directly BELOW the left end of Delmonte Cave. Scramble down hillside to cliff edge. Find tree near edge - fix a 60m rope and rap to ground. | ||||||||
| 26 |
★★ Play With Madness
Crack line splitting the centre of this overhung orange wall. Probably the only line that can go on this wall starting from the ground. Rack - doubles of cams from tips finger size (sub 0.3) to #2 Camalot and single cams of 3, 4 and vital #5. A single set of wires and several long trad runners are also useful. Lastly a narrow bit of untied cord for an important thread near top of pitch 3. Best to bring two ropes - one 60m to fix from tree at top for easy descent - and one rope to lead on. All belays are bolted and on comfy ledges. Leave the #5 Cam on the bolt belay at end of pitch 2 unless you like weight training.
| 22 | 56m, 3, 5 | |||||
Southern Wall20m around the corner from the Delmonte Cave is this orange wall with 4 bolted routes. | ||||||||
| 28 |
★ Josh Route 3
Far left route starting off small high ledge (scramble up to this). Name and grade may not be correct. FA: Ian Geatches, 2003 | 23 | 12m | |||||
| 29 |
★ Josh Route 4
Easy scramble up to orange wall left of grey streak. Name and grade may not be correct. FA: 2003 | 22 | 12m | |||||
| 30 |
Test Drilling
The grey streak that seeps after rain. Route look dirty, but the rock is mostly good. Three bolt lower off. FA: Ian Geatches, 2005 | 23 | 10m | |||||
| 31 |
★★ Gold Dust
One of the best routes here. Right trending orange flake feature. Easier than 24 unless you contrive it. FA: Josh Dodson, 2004 | 24 | 15m | |||||
       |
||||||||
2. Index by grade
| Grade | Stars | Name | Style | Pop | |
|---|---|---|---|---|---|
| 8 | Exotic as I am | 12m | |||
| 14 | Buckaroo | 10m, 2 | |||
| 19 | Buckaroo Direct | 10m, 2 | |||
| 20 | ★ | Wee Dram | 15m | ||
| 21 | ★★ | Chainsaw Juggler | 10m, 4 | ||
| ★★ | Mad Taffy Traverse | 25m | |||
| 22 | ★ | Calm My Beating Heart | 15m | ||
| Chasing that Butterfly | 18m | ||||
| ★★ | First Mate | 15m | |||
| Josh Route 2 | 1 | ||||
| ★ | Josh Route 4 | 12m | |||
| ★★ | Play With Madness | 56m, 3, 5 | |||
| 23 | ★★ | Defibrillator | 15m | ||
| ★ | Josh Route 3 | 12m | |||
| ★ | Josh route 1 | ||||
| Test Drilling | 10m | ||||
| ★ | Top Sail | 15m | |||
| 24 | ★★ | Gold Dust | 15m | ||
| 25 | ★★ | Hornblower | 12m | ||
| 26 | ★★ | Angiotensin | 15m | ||
| Triple Treat | 12m | ||||
| 27 | ★★ | Mc Playground | 15m | ||
| 28 | ★★★ | Mans Physical World | 16m, 7 | ||
| ★★★ | Voyage to Voltaren | 16m | |||
| ? | The Thunderbolt Project |