
A Crag Guide gives an extensive view of all sub areas and climbs at a point in the index. It shows a snapshot of the index heirachy, up to 300 climbs (or areas) on a single web page. It shows selected comments climbers have made on a recently submitted ascent.
At a minor crag level this should be suitable for printing and taking with you on a climbing trip as an adjunct to your guidebook.
This guide was generated anonymously. Login to show your logged ascents against each route.
Warning
Rock climbing is extremely dangerous and can result in serious injury or death. Users acting on any information directly or indirectly available from this site do so at their own risk.
This guide is compiled from a community of users and is presented without verification that the information is accurate or complete and is subject to system errors. By using this guide you acknowledge that the material described in this document is extremely dangerous, and that the content may be misleading or wrong. In particular there may be misdescriptions of routes, incorrectly drawn topo lines, incorrect difficulty ratings or incorrect or missing protection ratings. This includes both errors from the content and system errors.
Nobody has checked this particlular guide so you cannot rely on it's accuracy like you would a store bought guide.
You should not depend on any information gleaned from this guide for your personal safety.
You must keep this warning with the guide. For more information refer to our:
Usage policy
Contributors
Thanks to the following people who have contributed to this crag guide:
Kieran Loughran
Brendan Heywood
Campbell Gome
Adrian Kladnig
Geordie Webb
Dave Scarlett
Kyle Dunsire
Luen Warneke
Will Vidler
John Pitcairn
The size of a person's name reflects their Crag Karma, which is their level of contribution. You can help contribute to your local crag by adding descriptions, photos, topos and more.
Some content has been provided under license from: © Australian Climbing Association Queensland (Creative Commons, Attribution, Share-Alike 2.5 AU)
Table of contents
- 1. Right Watchtower Face 34 in Cliff
- 2. Index by grade
1. Right Watchtower Face 34 routes in Cliff
- Summary:
-
All Trad climbing
Lat / Long: -36.751653, 141.836714
Stick to the paths.
Don't disturb the wildlife.
Routes near peregrine falcon nesting sites are closed in the spring.
Minimise the impact of your camping (fuel stoves not fires, take your rubbish with you, etc).
description
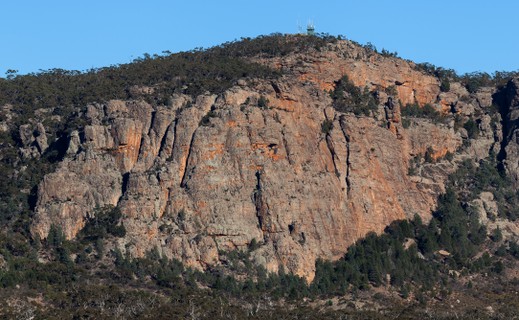
The best rock in this area - and indeed on the mountain.
Emergency Location: Mount Arapiles, The Watchtower Faces Area
access issues
Cultural heritage closures now apply to some parts of Arapiles. This advice continues to evolve and may not be fully reflected in this website; refer to Parks Victoria for details applicable at the time of your visit. https://www.parks.vic.gov.au/-/media/project/pv/main/parks/documents/management-plans/mount-arapiles-tooan-state-park/mount-arapiles-tooan-state-park---aboriginal-cultural-heritage-protections---october-2020.pdf
Bird Nesting September-December Raptors usually nest on the following climbs in Spring : Cassandra, Eurydice, Harlequin Cracks, Revelations. Nesting usually finishes mid-December. There may or may not be signs in place at these times. Please keep 50m clear of these climbs if there appears to be nesting activity.
State Park - no dogs. No fires allowed Oct-Apr (inclusive).
approach
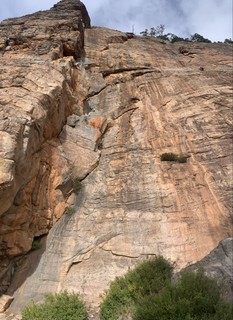
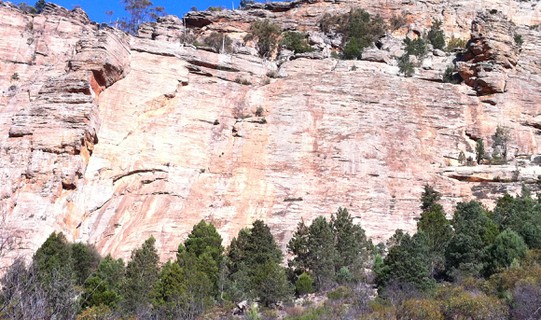
The big streaked and polished face, right of the Watchtower.
ethic
Mount Arapiles is first and foremost a trad climbing area. The few sport climbs tend to be in the higher grades where no natural pro is available.
Bolting, particularly retro-bolting, is discouraged and should only be undertaken after extensive consultation with the local climbers, first ascensionists, etc. Inappropriately placed bolts have been chopped.
Do not chip the rock.
Look after the park.
   |
||||||||
| Route | Grade | Style | Selected ascents | |||||
|---|---|---|---|---|---|---|---|---|
| 1 |
★ Flamingo
Start up the Watchtower Crack and then take a crack that leads up left to join original finish of Pumping Part 1, a sweeping crack that leads to the large ledge at the first belay of Watchtower Crack. FA: Hugh Foxcroft, Peter Newman & Nick Reeves., 1978 | 16 | 25m | |||||
| 2 |
★★★ Watchtower Crack
Fantastic climb. Much of this climb remains in the shade until mid-afternoon so it can be feasible on a hot day. Running the first two pitches together can keep the belay in the shade until the top. Despite the daunting appearance a mega-rack isn't required, but make sure you have a couple of bolt hangers and a #4 cam.
FA: John Fahey, Peter Jackson, Ted Batty & Bob Bull, 1966 | 16 | 95m, 4, 3 | |||||
| 3 |
Watches
An obvious link pitch but it doesn't justify the voyage required to do it. Climb Watchtower Crack until level with the Skink traverse, then climb towards the arete and finish up Arachnus. FA: Glenn Tempest & Mark Morhead, 1980 | 18 | 25m | |||||
| 4 |
★★★ Skink
A technical, exhilarating route. A great contrast to its companion climb. The majority of the route remains in the shade until late morning. Start as for Watchtower Crack.
FA: Chris Dewhirst & John Moore, 1966 | 18 | 110m, 3 | |||||
| 5 |
Sidewinder
If anyone suggests doing this climb, make sure they second the dangerous abseil section. If anyone is even considering extending the climb by girdling the left Watchtower face and linking the two, could you please shoot yourself beforehand and save the rest of us the bother. FA: Chris Baxter & Chris Dewhirst, 1967 | 15 X | 180m, 3 | |||||
| 6 |
★ Pumping Part II
The intimidating second pitch is a long, absorbing lead. A much better and more logical version of the old Mark Moorhead route of the same name. Sections of the two original pitches have been combined, the useless remnants of the copper bashie on the crux have been replaced with a bolt and a new first pitch added. Best to use a 70m+ rope. Starts as for Watchtower Crack.
Mark Moorhead climbed the crux section of the second pitch (having come in from Watchtower Crack) before traversing back into Watchtower Crack by reversing the Skink traverse (1979). He returned in 1980 to traverse back out along the Skink traverse and then up across the wall to join Gollum. First climbed as described Glenn Tempest, Karen Tempest. FA: Pitch 1: Mark Moorhead & Kim Carrigan. Pitch 2, 1979 FA: Mark Moorhead & many more., 1980 FA: Glenn Tempest & Karen Tempest, Aug 2023 | 22 | 95m, 2, 1 | |||||
| 7 |
★★ Gollum
Two interesting pitches that used to be thought very bold. But times change. Apparently gear can be found on the first pitch and Keith Egerton proved that even hexentrics in the horizontal breaks on the second pitch were adequate for 10 metre falls. The second pitch has cleaned up enormously over the years. Usually started by climbing The Confession as the first pitch. Belay on the ring-bolts at the top of pitch 1 of Auto Da Fe.
FA: Pitch 1 (Skink Connection) : Peter, Kevin Lindorff. Pitch 2 : Andrew Thomson & Mike Stone, 1976 | 20 R | 60m, 2 | |||||
| 8 |
★★ Salamander
Slabs and awkward cracks provide a good outing. Start as for Watchtower Crack.
FA: John Fahey, Peter Jackson & Bob Bull, 1964 | 14 | 120m, 5 | |||||
| 9 |
★ Smeagol
Great climbing all the way. One of the best and most varied climbs of its grade on the Watchtower Faces. Individual pitch grades were not supplied - the overall grade is 15 but some pitches may be easier. Start as for The Confession.
FA: Tim Lockwood, Keith Lockwood. (alts) This climb has been about 30 years in the making & although the above party were first to do it in its entirety., 2004 | 15 | 110m, 3 | |||||
| 10 |
★★ The Confession
Very good pitch. Make sure to take some tiny wires for the crux move. Start 10 metres right of Watchtower Crack at a little block. Note: this route is marked incorrectly in Simey and Glenn's '99 guide. It goes up the curvaceous white streak at 2/3 height, slightly right of where it is marked on page 230. FA: Ed Neve & Keith Lockwood, 1975 | 16 R | 45m | |||||
| 11 |
★ Skink Connection
Normally done as part of Gollum and is described as the first pitch of that climb. | 18 | 25m | |||||
| 12 |
No Road Between
Generally moderate slab climbing with good but spaced gear leading to trickier terrain up the final streak providing an alternative first pitch for Gollum. Double ropes and a big rack help to arrange protection. Climb midway between The Confession and Auto de Fe, mostly 1.5 – 2m left of Auto de Fe. At about 2/3 height cross the small diagonal overlap and follow the brown streak with 2 parallel white stripes (clearly seen in the topo on p278 of Metz/Tempest guide) to the ledge. This climb description was derived from a Chockstone post by Stuart. FA: Stuart Holloway & Lachie Currie, 2005 | 21 | 40m | |||||
| 13 |
★★★ Auto Da Fe
A fantastic climb with three fantastic pitches of very different styles. Start at a hard move to large dish, avoidable.
FA: Robin Miller & Kim Karrigan, 1982 | 21 R | 90m, 3 | |||||
| 14 |
★ Perentie
The companion route to Auto Da Fe. The first pitch is contrived but the climbing is enjoyable and quite well protected on its head-wall crux. The second pitch is the technical crux and although it is bolt-protected (and therefore far less serious than Auto Da Fe) it is still an intimidating lead. A single rope can be used but bring plenty of slings. Small tri-cams, RPs and a good range of small- and micro-cams are indispensable. Starts four metres R of the jump start on Auto Da Fe at the base of the grey concave wall (at the very bottom of the rap line down the wall on the rough stone pavement).
This route has a complex history. The crux section past the bolt on the second pitch was climbed in June 1996 by Tim Day and Wade Stevens (and named Perentie). The upper head-wall on the first pitch is probably Auto Da Fear by Muki Woods. Significant sections of both pitches have been climbed by others in the past. The route was brushed, added to, straightened, rebolted and climbed in its current form by Glenn and Karen Tempest in winter 2018. FA: Glenn Tempest & Karen Tempest, Jul 2018 | 22 | 85m, 2, 1 | |||||
| 15 |
Auto de Fear
Chop route, no gear, 23 slabbing with an X rating. FA: muki Woods | 22 X | 40m | |||||
| 16 |
★★ Fly Lichen Eagle
The superb second pitch has only one drawback, the possibility of being knocked off by an abseil rope from above. This was an extremely bold, mossy lead before the abseil route went in. Nowadays most leaders keep waiting for the scary runout bit and discover that the gear is fine. Start midway between Auto Da Fe and Gecko below the abseil line.
FA: Chris Baxter, Hugh Foxcroft & Peter Megens, 1983 | 20 | 90m, 2 | |||||
| 17 |
★ Gecko
A nice pitch that can be done as a direct start to Salamander or as a climb in its own right. FA: Chris Dewhirst, Chris Baxter & John Moore, 1965 | 14 | 48m | |||||
| 18 |
★★ Gecko / Salamander Link
As for Gecko (14) to the rap chains then follow Salamander to the top. | 14 | 100m, 3 | |||||
| 19 |
★ Monitor
Starts midway between Gecko and Brolga. Originally finished up Salamander (as described) but stepping left into Smeagol provides a more consistent grade.
FA: Keith Lockwood & Paul Daniels, 1982 | 15 | 110m, 3 | |||||
| 20 |
★★ Waiwera (Brolga DF)
The original finish of Brolga and the best way to finish the climb, if the rap route is not in use. Probably grade 18 if the final bulge to the rap anchor is taken direct or about 14 if taken further left. At end of Brolga P2, up and left to join Fly lichen Eagle. FA: D.Smith, 1994 | 18 | 20m | |||||
| 21 |
★★★ Brolga
Fantastic slab climbing up immaculate rock. With modern gear it is not nearly the scare fest it used to be. Start at the gorgeous water streak up the middle of the face that commences off the slight ledge just above the path.
FA: Keith Lockwood & Andrew Bowman, 1975 | 16 R | 90m, 3 | |||||
| 22 |
★ Thank Heavens for the Tasman
Plugs the gap between Brolga and The Mantle; a void not improved by the filling. Start 3 metres right of Brolga.
FA: Chris & Sue Baxter, 1983 | 16 | 95m, 3 | |||||
| 23 |
★★ Mantle
More great slabbing. Start 8 metres right of Brolga, directly below a thin crack that doesn't quite reach the ground.
FA: Chris Dewhirst & John Moore, 1965 FA: Chris Dewhirst & John Moore, 1965 | 14 | 90m, 3 | |||||
| 24 |
★ Lounge Lizard
The first of a couple of nondescript routes up the vast moss gardens of the right Watchtower. Start 5 metres right of The Mantle at a clean seam.
FA: Kieth Lockwood, Geoff Gledhill & Barry Edwards, 1981 | 14 | 95m, 3 | |||||
| 25 |
★ Blue Tongue
Another mossy filler. Start 8 metres right of Lounge Lizard on cleanish rock.
FA: Peter Kraehenbuhl & Darren Crawford, 1990 | 14 | 85m, 3 | |||||
| 26 |
Chameleon
Another just OK route wandering its way up the moss. Superseded by Chameleon Connection. FA: Norm Booth & Keith Lockwood, 1983 | 14 | 90m | |||||
| 27 |
★ Chameleon Connection
This route combines the best bits of Chameleon and Joyride as well as improving the first pitch of Chameleon. Start 25 metres right of Brolga at a short seam through a bulge, a few metres left of the bolted bulge of Omaha Beach.
FA: See Chameleon & Joyride, 2000 | 14 | 110m, 4 | |||||
| 28 |
★ Joyride
Another climb superseded by Chameleon Connection. FA: Peter Watling, Keith Lockwood & Kathy Burman (alt), 1975 | 13 | 100m | |||||
| 29 |
★★ Omaha Beach
Another clean streak that is proving popular. Start 10m left of Panzer.
FA: Yosef Murphy & Shaun Kratzer | 18 | 80m, 3, 1 | |||||
| 30 |
★ Chockstone staircase
A fun pitch that tackles the left side of the Panzer pinnacle/turret. A nice finishing pitch to Omaha Beach. From the belay after the second pitch of Panzer climb directly up into overhanging corner. Mantle up to reach a second overhang protected by a steep vertical crack. Careful of the loose rock at the top. Belay on top of the pinnacle. FA: Kane Hendy & Geordie Webb, 31 Mar 2016 | 17 | 28m | |||||
| 31 |
★★ Panzer
Start directly below the turret perching high above the right end of the face, just in front of a large boulder.
FA: Bruce Hocking & Mike Stone, 1965 | 12 | 95m, 3 | |||||
| 32 |
★ Battle Of The Bulge
Good climbing. Crux bulge is protected by a bolt. Originally graded 16. FA: Yosef Murphy & John Fischer, 2007 | 19 | 30m, 1 | |||||
| 33 |
Kampfwagon
Start on the terrace of Panzer's first belay, 4 metres right of the Panzer corner. FA: Darren Crawford & Peter Kaehenbuehl (alt), 1990 | 15 | 91m | |||||
| 34 |
Malcolm’s Bent Friends
A gentle introduction to the joys of slabbing. Take a selection of cams, bent or otherwise. Start right of Panzer at clean streak – Battle of the Bulge.
FA: Steve Findlay & Keith Lockwood, 21 Dec 2016 | 11 | 120m | |||||
2. Index by grade
| Grade | Stars | Name | Style | Pop | |
|---|---|---|---|---|---|
| 11 | Malcolm’s Bent Friends | 120m | |||
| 12 | ★★ | Panzer | 95m, 3 | ||
| 13 | ★ | Joyride | 100m | ||
| 14 | ★ | Blue Tongue | 85m, 3 | ||
| Chameleon | 90m | ||||
| ★ | Chameleon Connection | 110m, 4 | |||
| ★ | Gecko | 48m | |||
| ★★ | Gecko / Salamander Link | 100m, 3 | |||
| ★ | Lounge Lizard | 95m, 3 | |||
| ★★ | Mantle | 90m, 3 | |||
| ★★ | Salamander | 120m, 5 | |||
| 15 | Kampfwagon | 91m | |||
| ★ | Monitor | 110m, 3 | |||
| ★ | Smeagol | 110m, 3 | |||
| 15 X | Sidewinder | 180m, 3 | |||
| 16 | ★ | Flamingo | 25m | ||
| ★ | Thank Heavens for the Tasman | 95m, 3 | |||
| ★★★ | Watchtower Crack | 95m, 4, 3 | |||
| 16 R | ★★★ | Brolga | 90m, 3 | ||
| ★★ | The Confession | 45m | |||
| 17 | ★ | Chockstone staircase | 28m | ||
| 18 | ★★ | Omaha Beach | 80m, 3, 1 | ||
| ★★★ | Skink | 110m, 3 | |||
| ★ | Skink Connection | 25m | |||
| ★★ | Waiwera (Brolga DF) | 20m | |||
| Watches | 25m | ||||
| 19 | ★ | Battle Of The Bulge | 30m, 1 | ||
| 20 | ★★ | Fly Lichen Eagle | 90m, 2 | ||
| 20 R | ★★ | Gollum | 60m, 2 | ||
| 21 | No Road Between | 40m | |||
| 21 R | ★★★ | Auto Da Fe | 90m, 3 | ||
| 22 | ★ | Perentie | 85m, 2, 1 | ||
| ★ | Pumping Part II | 95m, 2, 1 | |||
| 22 X | Auto de Fear | 40m |