A Crag Guide gives an extensive view of all sub areas and climbs at a point in the index. It shows a snapshot of the index heirachy, up to 300 climbs (or areas) on a single web page. It shows selected comments climbers have made on a recently submitted ascent.
At a minor crag level this should be suitable for printing and taking with you on a climbing trip as an adjunct to your guidebook.
This guide was generated anonymously. Login to show your logged ascents against each route.
Warning
Rock climbing is extremely dangerous and can result in serious injury or death. Users acting on any information directly or indirectly available from this site do so at their own risk.
This guide is compiled from a community of users and is presented without verification that the information is accurate or complete and is subject to system errors. By using this guide you acknowledge that the material described in this document is extremely dangerous, and that the content may be misleading or wrong. In particular there may be misdescriptions of routes, incorrectly drawn topo lines, incorrect difficulty ratings or incorrect or missing protection ratings. This includes both errors from the content and system errors.
Nobody has checked this particlular guide so you cannot rely on it's accuracy like you would a store bought guide.
You should not depend on any information gleaned from this guide for your personal safety.
You must keep this warning with the guide. For more information refer to our:
Usage policy
Contributors
Thanks to the following people who have contributed to this crag guide:
Stephen Gordon
Murray
David Sarroff
Liam
Brody Payne
Ben Mace
Harrie Van de Linde
Josh Jordan
Garry A Williams
Dane Evans
The size of a person's name reflects their Crag Karma, which is their level of contribution. You can help contribute to your local crag by adding descriptions, photos, topos and more.
Table of contents
- 1.
Beechworth Area
188 in Crag
- 1.1. Beechworth Gorge 50 routes in Area
- 1.2. The Precipice 3 routes in Area
- 1.3. Flat Rock 6 routes in Area
-
1.4.
Mt Pilot 88 routes in Area
- 1.4.1. Bakery Wall 30 routes in Cliff
- 1.4.2. Lower Bakery Wall 16 routes in Cliff
- 1.4.3. Unearthed Wall 11 routes in Cliff
- 1.4.4. Groove Wall 4 routes in Cliff
- 1.4.5. Falcon Buttress 4 routes in Cliff
- 1.4.6. Valley Wall 5 routes in Cliff
- 1.4.7. Dentistry Wall 7 routes in Cliff
- 1.4.8. Eastern Slabs 6 routes in Cliff
- 1.4.9. Yeddonba Wall 4 routes in Cliff
- 1.4.10. Lone Ranger Boulder 1 routes in Cliff
-
1.5.
Mt Stanley 39 routes in Area
- 1.5.1. Main Tower Cliff 3 routes in Cliff
- 1.5.2. Talon Block 11 routes in Cliff
- 1.5.3. Grendel Gully 17 routes in Cliff
- 1.5.4. South of Grendel Gully 4 routes in Cliff
- 1.5.5. The Far Block 4 routes in Cliff
- 1.6. The Pinnacles 1 routes in Area
- 1.7. Mt Jack 1 routes in Area
- 2. Index by grade
1. Beechworth Area
- Summary:
-
Escalada trad, Boulder e outros estilos
Lat / Long: -36.356962, 146.690061
descrição
The area centred on Beechworth and bounded by the Hume Freeway on the northwest, the Alpine Road from Wangaratta to Myrtleford on the southwest, and the road from Albury to Myrtleford (via Yackandandah) on the east. Almost all of the rock is granite and a many of the crags are collections of boulders of varying sizes.
1.1. Beechworth Gorge
- Summary:
-
All Boulder
Lat / Long: -36.353151, 146.678683
descrição
Boulders and quarries located adjacent to Gorge Rd
acesso
Enter from the Beechworth-Wodonga Rd end of Gorge Rd for areas A, B and C. Enter at the Powder Magazine (Skidmore Rd) for areas D, E, F, G, H, I, J.
1.1.1. A
- Summary:
-
2 routes in Area
Lat / Long: -36.348154, 146.685413
acesso
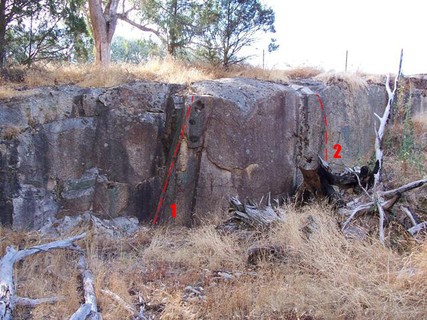
The first problems are encountered in a small quarry which lies on your right soon after entering the Gorge Drive. These can be a bit chossy after winter.
Topo and info from http://www.chockstone.org/Beechworth/Bouldering.htm
 |
||||||||
| Route | Grade | Style | Selected ascents | |||||
|---|---|---|---|---|---|---|---|---|
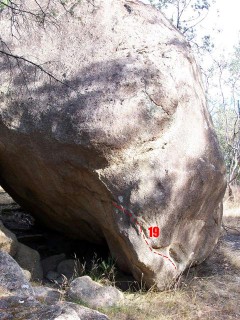
| 1 |
★★ Un-named V4
Up the arête avoiding the ledges on your left. | V4 | ||||||
| 2 |
Un-named V3
Start at the dodgy flake and straight up, the hardest part is the mantle! | V3 | ||||||
1.1.2. B
- Summary:
-
1 route in Area
Lat / Long: -36.350935, 146.681510
acesso
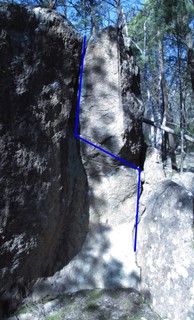
Further along the road and past the Flat Rock Road junction is a boulder with a hand crack facing the road.
 |
||||||||
| Route | Grade | Style | Selected ascents | |||||
|---|---|---|---|---|---|---|---|---|
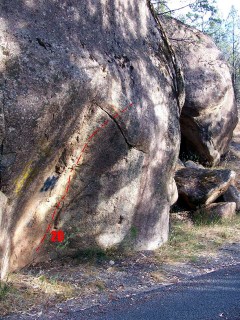
| 1 |
★ Bull Ant Crack
The obvious hand crack facing the road. Beware of its namesake in the crack! | V2 | 3m | |||||
1.1.3. C
- Summary:
-
6 routes in Area
Lat / Long: -36.351494, 146.681187
acesso
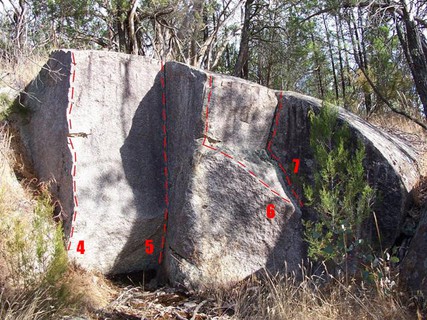
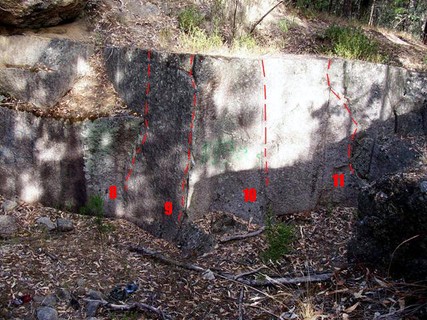
Park at the 1st lookout and walk down the left (S) side of the slab for 20mtrs, this small quarry has 4 decent problems.
   |
||||||||
| Route | Grade | Style | Selected ascents | |||||
|---|---|---|---|---|---|---|---|---|
| 1 |
High Bowl
Sit start in the far right corner crack and traverse left across the 'bowl' then up the main crack using the crimps out to the left | V3 | 4m | |||||
| 2 |
★ Split Egg
Sit start and go straight up the middle. Use left edge and the middle crimps. | V2 | 2m | |||||
| 3 |
Unnamed 1
The left arete. | V0 | 2m | |||||
| 4 |
Unnamed 2
The pinky fingers sized crack. | V2 | 2m | |||||
| 5 |
Unnamed 3
The central arête. Start as for Unnamed 4 and traverse in then up. Beware the creaking hold on the arête. | V0 | 2m | |||||
| 6 |
Unnamed 4
The right hand corner. | V0 | 2m | |||||
1.1.4. D
- Summary:
-
5 routes in Area
Lat / Long: -36.353782, 146.679068
acesso
Park at the Powder Magazine carpark and walk up the path immediately opposite (NW) towards Ingram’s Rock. This small quarry is at the top of the 1st ridge and on your right (E).
 |
||||||||
| Route | Grade | Style | Selected ascents | |||||
|---|---|---|---|---|---|---|---|---|
| 1 |
Unnamed 1
Climb to the edge/ledge and continue to the top via an easy mantle. | V0 | 4m | |||||
| 2 |
★ Unnamed 2
Climb to the edge/ledge and continue to the top via an easy mantle. | V0 | 4m | |||||
| 3 |
★ Unnamed 3
Climb the shallow groove to the right of Unnamed 2. | V2 | 4m | |||||
| 4 |
Unnamed 4
The ledges in the right hand corner make for an easy route up. | V0 | 3m | |||||
| 5 |
Named Traverse
Start on the right side of the cliff and traverse left and up the arete FA: 2024 | V0 | 3m | |||||
1.1.5. E
- Summary:
-
8 routes in Area
Lat / Long: -36.353691, 146.678215
acesso
The next 2 problems can be found by walking across the walking path in a westerly direction from the quarry mentioned above. You will find the next quality problem (Quarryman) by walking around the back of problems 12 and 13. This thought provoking problem is in another small quarry 20mtrs to the NW of the above problems.
 /93/fa/93fa75cc32e3aca4ec10c5b26e7b5f12cdcc6936) 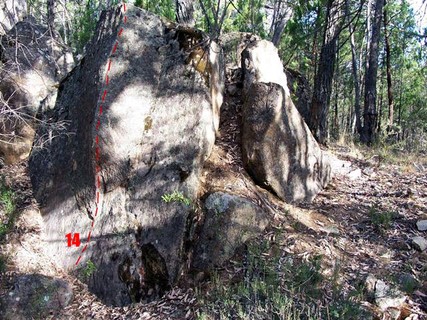  |
||||||||
| Route | Grade | Style | Selected ascents | |||||
|---|---|---|---|---|---|---|---|---|
| 1 |
★ Unnamed 1
Stand start at the hanging flake and climb it. | V0 | 4m | |||||
| 2 |
★ Unnamed 2
Sit start at hanging flake where it almost touches the ground. | V4 | ||||||
| 3 |
★★ American Psycho
7 metres right of problem no.2 is an obvious brushed face/slab. Stand start slightly left of centre using high gaston. Delicately smear up and right, using tiny holds to gain good left sidepull and high right gaston. Trust your feet whilst you turn the lip then finish up final slab. FA: Ben Mace, 2014 | V3 | ||||||
| 4 |
★ The Quarryman
A stunning line. Delicate moves up the central arête/rib lead to a committing top over. | V4 | 3m | |||||
| 5 |
★ Quarry Whelp
This boulder is in the northern region of Area E away from the main group of boulders. Fairly straight forward following the crack line up. FA: Murray, 20 Oct 2017 | V0 | 3m | |||||
  |
||||||||
| Route | Grade | Style | Selected ascents | |||||
| 6 |
★ Stone Hound
Around the side of the above boulder. A delicate start with the left hand on the underside of the a small crack. Work the right hand up into the crack and then use both hands the work your way up the crack. A difficult high right footing required to leverage up along the crack. FA: Murray, 20 Oct 2017 | V2 | 3m | |||||
| 7 |
Small Dog
Start matched on obvious ledge. Move up the thin crack and top out. FA: 2024 | V0 | ||||||
| 8 |
Big Dog
Project. Start on obvious ledge with poor feet. Make a couple of moves through the seam and onto the arete. Move left then top out at the highest point. Rough of the fingers. | |||||||
1.1.6. F
- Summary:
-
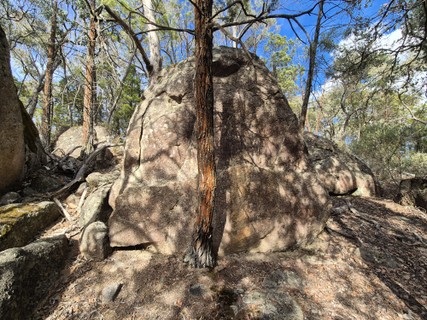
4 routes in Area
Lat / Long: -36.353941, 146.677284
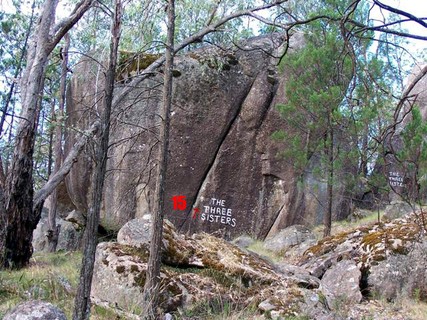
acesso
Proceed down Gorge Road towards Spring Creek to find the following boulders. You will pass a number of graffitied boulders; the 1st of which contains a highball hand crack, this is problem 15.
    |
||||||||
| Route | Grade | Style | Selected ascents | |||||
|---|---|---|---|---|---|---|---|---|
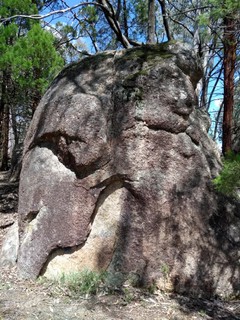
| 1 |
★★ Rocket
Often attempted, rarely topped out on! The highball hand crack is usually top roped as the crux is right at the top. Old school! FA: Michael Law, 1977 | V5 | ||||||
| 2 |
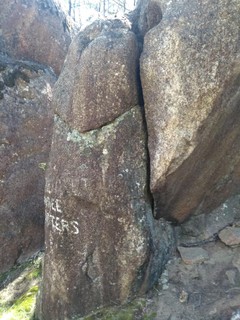
Ugly Sister
Adjacent East to the above, also marked 'The Three Sisters'. Not a bad crack to work up but the top out is awkward and rough. FA: Murray, 20 Oct 2017 | V1 | 2m | |||||
| 3 |
Ugly Sister Extension
Continues on from the above top out. Delicately work across the rock then up the other side. A tree is conveniently placed behind you at the insanely chossy crux! FA: Murray, 20 Oct 2017 | V2 | 2m | |||||
| 4 |
★ Forgotten Sister
Head further East from The Three Sisters rocks. Very difficult start due to the absence of any decent footholds. There is a flake sticking out of the ground that might come in handy... Bump up your hand holds on the left and right then work both into the crack. Big reach over the top of the boulder to secure a good hold to top out. | V4 | 3m | |||||
1.1.7. G
- Summary:
-
13 routes in Area
Lat / Long: -36.353460, 146.677175
acesso
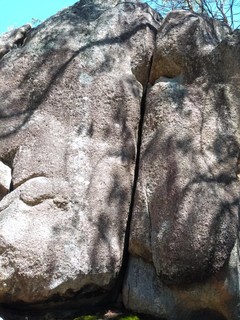
Further down the Gorge Road is an overhanging boulder. Park in the space and walk back up the road to the next 3 problems.
  /79/27/79277c242ff85d1180bbda10abe31931055a82b5) /0b/54/0b54141c7d566861f075bfd1214a1549d08835c0) |
||||||||
| Route | Grade | Style | Selected ascents | |||||
|---|---|---|---|---|---|---|---|---|
| 1 |
★★ Unnamed 1
Easily visible from the road, this classic highball finger crack is a stunning problem with the hardest moves saved for the finish. | V0 | ||||||
| 2 |
★ Roadkill
A few nice moves on this overhung boulder’s face leads to a hard pull to top out. | V3 | ||||||
| 3 |
Roadkill Extension
Work further along the ledge of Roadkill for a more difficult top out | V4 | ||||||
| 4 |
Roadkill left / Blinded by the lights project
Should be hard- Steep moves on rough, painful crimps. Traverse right along the seam, then throw to good holds and finish up Roadkill extension. Sit start looks possible. | |||||||
| 5 |
Undercut edge
Left of Roadkill. Almost certainly has been done. Lay away with the big undercut edge and up. | |||||||
     |
||||||||
| Route | Grade | Style | Selected ascents | |||||
| 6 |
★ Unnamed 2
An old time easy classic up the slab. | V0 | ||||||
| 7 |
Roadside Sideshow
Sit start at the slopers and up to the good dyke edges, head left and step off when matched at the last big edge. | V4 | ||||||
| 8 | Project | |||||||
| 9 |
Ya Butte
On top of the larger boulders in the area. Not much to see here as it is so short. Perhaps try traversing? FA: Murray, 20 Oct 2017 | V1 | 2m | |||||
| 10 |
★★ Chimney
Further around the hill. A great fun and easy chimney! Variety of ways to work it to make it harder. FA: Murray, 20 Oct 2017 | V0 | 4m | |||||
 /4d/cf/4dcfab8b87c251eaf441f777c00fb91ff8c49d0c) |
||||||||
| Route | Grade | Style | Selected ascents | |||||
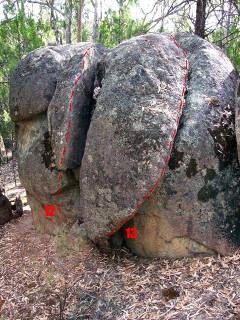
| 11 |
Sauron's eye
Around the side of the above chimney. A difficult looking rounded crack. | 4m | ||||||
| 12 |
Slabby Bridge
Make you way up the slab using the arete and/or crack. | 4m | ||||||
| 13 |
Dirty slab dog
Slab on the right hand side...use the arete! FA: 2024 | VB | 3m | |||||
1.1.8. H
- Summary:
-
5 routes in Area
Lat / Long: -36.348368, 146.677347
descrição
Spring Creek Boulders
acesso
As you cross the bridge, look down to your right and you can see the 1st three problems on the boulders just downstream of the bridge. Problems are listed from upstream to downstream (consult map) and start on the downstream side of the bridge. Park on the (W) side of the bridge and access the 1st problems by following the trail that starts just (W) of the bridge with some easy boulder hopping down to the creek.
   |
||||||||
| Route | Grade | Style | Selected ascents | |||||
|---|---|---|---|---|---|---|---|---|
| 1 |
★★ Bayou Baby
Classic! This is the 1st boulder on river right about 50 metres downstream from the bridge and ascends the stepped overhung orange face. Sit start using the chockstone for feet and pull hard off dual side pulls to get off the ground. | V6 | ||||||
| 2 |
Bayou Baby (no chockstone)
As above without the starting chockstone for feet. | V8 | ||||||
| 3 |
★ The Nymph
Sit start in finger crack on the downstream side of Bayou Baby. Up on slopers, heading left up the vague arête to join Bayou Baby at the top and pull over. | V3 | ||||||
| 4 |
★ Caddis
Thought provoking! The next boulder just downstream from The Nymph has a single big jug on its lower lip. Start matched in the big jug, pull up and over with much technicality. | V7 | ||||||
| 5 |
★ The Caddis Connection
Start 1 metre right of Caddis on very small sloping holds and high right heel hook on small edge. Big move left into huge hole, then finish as for Caddis. FA: Ben Mace, 2011 | V6 | ||||||
1.1.9. I
- Summary:
-
1 route in Area
Lat / Long: -36.347385, 146.677251
acesso
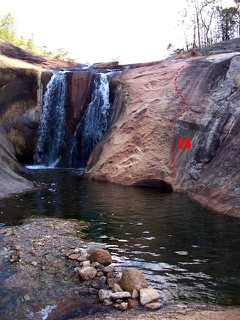
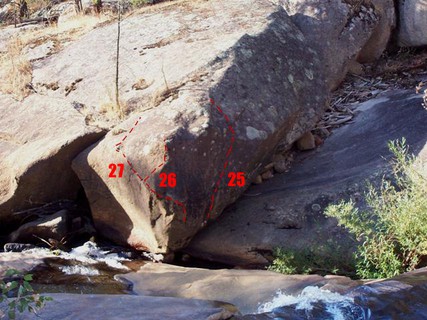
You'll find the next problems by following the creek down to the large waterfall and pool. Sunset Strip takes the orange slab to the W (river left) of the waterfall.
 |
||||||||
| Route | Grade | Style | Selected ascents | |||||
|---|---|---|---|---|---|---|---|---|
| 1 |
★★★ Sunset Strip
An extremely photogenic problem providing eerie climbing in a great position. Traverse into the bottom of the corner crack at the base of the pool, step left to gain the wall proper, up to little block, left around this, take a deep breath and head diagonally up left to the top, following the orange rock. (Not the black streak!). | V0 | ||||||
1.1.10. J
- Summary:
-
5 routes in Area
Lat / Long: -36.346759, 146.676820
acesso
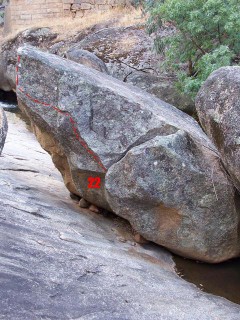
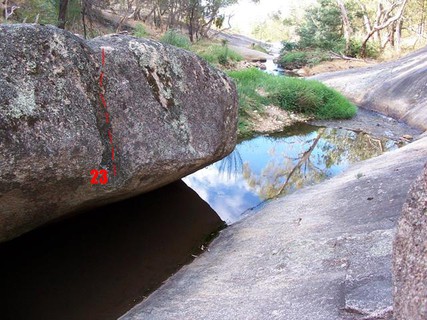
Cross over and walk downstream on river right of the creek until you get to the next big waterfall and see a large boulder which juts out into the creek. “A Little Ray of Sunshine” starts on the left hand (W) end of the boulder's upstream face and just to the right of the nice looking arete with the big sloping jug.
Cross back to river left of the creek and follow it downstream passing many rapids and small waterfalls, passing problem 28 on the way. “Sink or swim” is on the boulder about 100 metres from the end of the waterfalls.
 |
||||||||
| Route | Grade | Style | Selected ascents | |||||
|---|---|---|---|---|---|---|---|---|
| 1 |
A Little Ray of Sunshine
A striking and powerful line on very smooth overhung rock. Start matched on sloping hold/jug. Head diagonally right and up, top out. | V5 | ||||||
| 2 |
Flotsam
Start at largest low hold on arête and straight up to top out…easier than it first appears when using the full array of holds. | V3 | ||||||
| 3 |
Project
Start as for ‘Flotsam’. Take a deep breath and traverse left across the lip to the big flat top to a mildly terrifying pull over. | |||||||
| 4 |
Puddles
Scary slabbing. Starts behind the cypress pines in the small ‘cove’ on river left. Straight up the clean black streak. | V0+ | ||||||
| 5 |
Sink or Swim
The small boulder in the centre of the creek provides a good problem if the start isn’t underwater! Sit start on the obvious big flat top on the river left side of the boulder; follow the line of holds to the top. | V0 | ||||||
1.2. The Precipice
- Summary:
-
3 routes in Area
All Escalada em rocha
| Route | Grade | Style | Selected ascents | |||
|---|---|---|---|---|---|---|
| 1 | Gold Finger | 15 | 15m | |||
| 2 | Black Gold | 17 | 15m | |||
| 3 | Fools Gold | 15 | 15m | |||
1.3. Flat Rock
- Summary:
-
Mostly Escalada trad
Lat / Long: -36.358089, 146.643926
sumário
tiny 5-8m crag, hidden in the bushland, overgrown and a bit loose
descrição
As the name describes, flat rock is just that, A very large, flat, granite slab rock. can be easily walked up from any angle. crag is not part of the slab, but hidden in bush land on NE side.
questões de acesso
some tall grass, follow tracks, and traverse slabs.
acesso
boulder problem is on obvious large boulder, on top of slab, more potential possible. the rest of the climbsa are on the NE side of the slabs. Park at the North side fence corner, follow the fence (relatively) for 5 min, and youll find the crag and cave
onde ficar
plenty of camping around, prob go to Mt Pilot or Buffalo.
ética
trad or toprope, not worth the bolts
história
check the old VIC guides for details on lots of small areas like this.
| Route | Grade | Style | Selected ascents | |||||
|---|---|---|---|---|---|---|---|---|
| 1 | Raven | 12 | 8m | |||||
| 2 | Patella Cuttus Muchus | 12 | 10m | |||||
| 3 | ★ The Old Mans Ghost | 15 | 9m | |||||
| 4 | Rawhide | 20 | 12m | |||||
| 5 | Traverse Of The Clods | 16 | 14m | |||||
| 6 |
The Obvious Line
The obvious line that looks easy to layback... from a distance. The crack's flared and the granite is crumbly but everyone does it just to stand on top. | 16 | 3m | |||||
 |
||||||||
1.4. Mt Pilot
- Summary:
-
Escalada trad, Escalada esportiva e outros estilos
Lat / Long: -36.252220, 146.666647
descrição
Mt Pilot is a granite outcrop roughly halfway between the towns of Chiltern and Beechworth. Rock quality varies, however most of the routes are on good quality rock. The area is popular with locals as a short walk from the carpark offers good views in all directions.
acesso
Exit the Hume Freeway at Chiltern and turn towards Beechworth. After about 10 minutes, you'll pass a nursery on the left. At the top of the next hill, turn left on an unsealed track. Follow this to the carpark.
1.4.1. Bakery Wall
- Summary:
-
30 routes in Cliff
Escalada trad, Escalada esportiva e outros estilosLat / Long: -36.251303, 146.664035
descrição
The Bakery Wall is probably the most popular area at Mt Pilot, and is also home to many of the best climbs.The rock is generally of very good quality, although the crystal size varies considerably along the length of the wall. The wall has a northerly aspect, which means it bakes in summer (go to Buffalo instead) - pick a cool, dry day from early autumn to spring for the best friction.
Climbs are described right to left facing the cliff.
acesso
From the fire tower, head W across the dome and through heavy brush to another open area on the N side of the ridge (a trail used to be established but it was overgrown due to disuse after the 2003 fires). From here, head diagonally uphill and W to the start of a well-established trail which will lead you to the top of the cliff. Walk down on the western end of the cliff.
| Route | Grade | Style | Selected ascents | |||||
|---|---|---|---|---|---|---|---|---|
| 1 |
★ The Happy Baker
The first route on the wall, start on ledge behind cypress. Difficult moves past 2 FHs to rings. FA: Paul Martin & John Lewis | 21 | 8m, 2 | |||||
| 2 |
★★ Life In The Fat Lane
Start 2m L of The Happy Baker. Up a mini arete to a sloping ledge, and then continue past horizontal breaks. 2FHs to rings. FA: Paul Martin & John Lewis | 18 | 9m, 2 | |||||
| 3 |
★ My Lust For Crust
The mini-arete on the boulder opposite Life In The Fat Lane. Although very short, this is a great warm-up, or beginner's lead. 2 FHs. FA: Paul Martin & John Lewis | 16 | 6m, 2 | |||||
|
The next 2 routes are just around the corner from My Lust For Crust on the short orange wall. | ||||||||
| 5 |
Rhinoceros Breath
Nice moves up the pockets/scoops to the gripping finger crack. Dodgy rock. FA: Matt Roper & Luke Fitridge, 1998 | 23 | 8m | |||||
| 6 |
John's Other Arete
The arete that forms the right edge of the chimney to the left of Rhinocerous Breath FA: John Schwerdfeger | 17 | 8m | |||||
 |
||||||||
| Route | Grade | Style | Selected ascents | |||||
| 7 |
★★ Solo Man
Probably the first route here. Excellent protection. The obvious finger/hand crack through a small overhang. | 16 | 12m | |||||
| 8 |
★★★ Doughboy
The first closed seam left of the small cave. Hard moves lead to hole and jugs. Lurch left to finger crack with one more hard move at the top. 4 FHs. The top of the crack may need brushing after rain. FA: Paul Martin & Ryan Butler, 1997 | 25 | 20m, 4 | |||||
| 9 |
Doughboy Direct Finish
Start as for Doughboy. At jugs continue up the line to where the seam peters out. Head out R (crux) on tiny crimps and then up. 6 FHs. FA: Robert Cowan, 2000 | 26 | 25m, 6 | |||||
| 10 |
★★★ Doughgirl
The bolted face left of Doughboy. Hard face moves lead to the finger crack which may need brushing. 3 BRs, 1 FH. FA: Paul Martin & Kurt Saggers, 1997 | 24 | 20m, 4 | |||||
| 11 |
★ Soot
The chimney. Bring BIG gear, otherwise go on an adventure and use the chockstones for pro. FA: Wayne Webb & Derek Rempe | 16 | 17m | |||||
  |
||||||||
| Route | Grade | Style | Selected ascents | |||||
| 12 |
★★ Chicken Salad Roll
Recently re-bolted (2014). Climb the left arete of "Soot" past 3 RB's, execute the thought-provoking mantle to gain 4th RB, then surmount final steepness clipping 5th RB a couple of metres above the lip (out of sight from the ground). Head left to Double Ring lower-off. FA: Matt Roper & Robert Cowan | 22 | 17m, 5 | |||||
| 13 |
The Bakery Connection
Climb Chicken Salad Roll to 3rd BR. Hard move out left to horizontal crack (takes gear), and up to jugs. FA: Paul Martin & John Lewis | 22 | 20m, 3 | |||||
| 14 |
Pass The Mustard
The tiny seam to the left of Chicken Salad Roll. Very technical. Uses Chicken Salad Roll's BRs and a few RPs, exit up The Bakery Connection. FFA: Robert Cowan, 2000 FA: Ryan Butler (w. aid), 2000 | 23 | 20m, 3 | |||||
| 15 |
★★★ Beechworth Bakery
Probably the best route at Mt Pilot. The finger-crack/flake a few metres L of Chicken Salad Roll. FA: Robert Cowan & Matt Roper | 21 | 20m | |||||
| 16 |
★ Breakfast at the Ponderosa
The next big crack 2m L of Beechworth Bakery. Can be protected fairly well. | 15 | 15m | |||||
| 17 |
Rumball Delight
Climb the thin crack left of Breakfast At The Ponderosa on natural gear to a bolt near the top. FA: John Schwerdfeger & Robert Cowan, 2001 | 21 | 20m, 1 | |||||
 /88/31/8831c19c72a2a7d40c921c0a69361b4d48a2bc1b)  |
||||||||
| Route | Grade | Style | Selected ascents | |||||
| 18 |
★★ Wissywoo
Off-width crack forming right side of John's Arete to ceiling bulge, then turn bulge by face on right. You can clip the BRs on John's Arete until some natural pro, then run it out to the top. FA: Rod Kerr, Damian Baker & Melissa Baker, 2000 | 17 | 20m | |||||
| 19 |
John's Arete
The lowish angled bolted arete past 3 BR's, can us some large gear to protect top out. Hard to avoid the crack. FA: John Schwerdfeger, 2000 | 23 | 20m, 3 | |||||
| 20 |
Stump Jumper
This route is about 3m left of John's Arete. Two moves of aid on bolts, then climb the finger/hand crack to the top. FA: Robert Cowan | 21 M1 | ||||||
| 21 |
★ Smoke Stack
About 10m past stumper jumper and 5m before the fatties is an obvious offwidth/squeeze chimney which goes up about 10m and then trends right, finishing with a short fist size crack. Would require very large pro to lead. FA: Craig Julian & Damien, 28 Jul 2019 | 16 | 12m | |||||
| 22 |
★ Big Fatty
The cool-looking right-hand line on suspect-looking (but surprisingly solid) rock. Straight up past 3RB's to double ring lower-off FA: Paul Martin & John Lewis, 1997 | 17 | 8m, 3 | |||||
| 23 |
★ Little Fatty
The left-hand line is also not too bad. Good gear down low. 1 FH to rings. FA: Paul Martin & John Lewis, 1997 | 17 | 8m, 2 | |||||
| 24 |
★ Goannas In The Bakery
Excellent and somewhat sustained climbing on the obvious half-height horizontal flake. At the end of the flake, head left for a couple of moves (crux - take RPs), then straight up into dyke city. 1 BR. FA: Paul Martin & Nick Danne | 20 | 15m, 1 | |||||
| 25 |
So, This is Aid Climbing?
Delicate hooking up centre of face until about half height, then fine wires in incipient seam. The increasing size of the seam towards the top is offset by the increasing crumbliness. FA: Top Roped by Damian Baker & Rod Kerr, 2000 | M6 | 20m | |||||
| 26 |
Rocky Road
This route starts in the middle of the main face at a weakness with heaps of dyke rock. Climb the slab to the rightward sickle crack and follow it to the top. 3 BRs. FA: Bob Cowan & John Schwerdfeger | 22 | 20m, 3 | |||||
| 27 |
★ Croissant
Start as for Rocky Road, only blast your way straight up the middle of the face passing 6 BRs on your way to glory! FA: Bob Cowan & John Schwerdfeger | 22 | 20m, 6 | |||||
| 28 |
Crossant Variant Finish
Start as for Rocky Road. Follow the leftward crack to the top on bad gear. FA: Bob Cowan & John Schwerdfeger | 20 | 20m | |||||
| 29 |
★ Apple Scroll
The low angled black slab behind the big dead tree. Excellent climbing past 3 BRs leads to huge jugs at the horizontal/ledge (2x#1 SLCDs). Continue past another BR to the top. FA: Bob Cowan & co. | 23 | 20m, 4 | |||||
/2f/d0/2fd0813074e8c49bf2cf8a7471614a1d2fbb27ad) |
||||||||
| Route | Grade | Style | Selected ascents | |||||
| 30 |
Iguana
The very coarse finger crack to the left of Apple Scroll. Heads right under bulges and up. Tape up! FA: Bob Cowan & co. | 18 | 17m | |||||
| 31 |
Apple Crumble
Aptly named. On the next separate cliff-line is a black slab capped by a big flattish boulder. This route starts on the right-hand end at all the edges and just left of the chossy chimney. 3 BRs lead to a crack (#1 SLCD) in the overhang, pull through this and head on up. FA: Matt Roper & Bob Cowan | 20 | 20m, 3 | |||||
1.4.2. Lower Bakery Wall
- Summary:
-
16 routes in Cliff
Escalada trad, Escalada em top rope e outros estilosLat / Long: -36.251109, 146.663776
descrição
This area is rarely visited but contains some great climbs. Routes are described from left to right.
BOLTS HAVE NOT BEEN CHECKED SINCE MAJOR FIRES IN 2003 AND MAY NOT BE SOLID. EXERCISE CAUTION!
acesso
Walk downhill from Breakfast At The Ponderosa and once you hit a cliffline, walk right until you can get down to the bottom of the cliff.
| Route | Grade | Style | Selected ascents | |||||
|---|---|---|---|---|---|---|---|---|
|
The first three routes are not actually on Lower Bakery Wall but on a nearby slab. The slab (dubbed Rocher Escarpe De La Nuit) can be found by locating a small boulder with a roof/lip at the eastern end of Lower Bakery Wall (left-hand end if you are facing the cliff). Walk past this boulder for about 30m northeast. The 3 routes are described left to right. | ||||||||
| 2 |
Grimpeuse de la Nuit
The line on the far left of the slab. Straight up through the slipperiness. FA: Paul Martin | 16 | 8m | |||||
| 3 |
★ Charbon
The centre line. Start as for Grimpeuse de la Nuit and then follow the line of little vertical seams/cracks. A direct start was done using the trees and a big edge at a grade of 21, but it's not known if the trees are still there. FA: Paul Martin | 18 | 9m | |||||
| 4 |
La Mer Noire
Pockets don't get any better than these! Start up Grimpeuse de la Nuit and then traverse right until you get to the line of pockets. FA: Paul Martin | 15 | 10m | |||||
/7f/b9/7fb97ba5b9ca259f39854d4dd3454be24e585e3b) /8e/89/8e8912f5db40dcdba904268d54adf19bc02d46f8) /52/9f/529fc199dd987f24be64e5908e1b0d5788d51362) |
||||||||
| Route | Grade | Style | Selected ascents | |||||
|
Now on to the cliff itself... | ||||||||
| 6 |
★★ Sarah's Slab
The first small slab between two cracks. Start in centre, go left to a big edge, up over bulge, then right to join Straight Up. FA: Sarah Jacob & Paul Martin | 16 | 6m | |||||
| 7 |
★★ Straight Up
As the name implies, straight up. FA: Paul Martin & Ben Ching | 19 | 6m | |||||
| 8 |
★★ Ethics
The crack 2m right of straight up, which angles slightly right. Jamming from thin hands to fist up higher. Start 1m left of fused crack on jug, then up to diagonal crack for pro. Anchors at top for lower off. FFA: Robert Cowan & Steve Lyons | 16 | 8m | |||||
| 9 |
The Knifeblade
The first bolted route. Up the black wall past a FH to big jugs at 4m. Wander up and left placing whatever gear you can find, just don't fall at the top! FFA: Jason Owen & Paul Martin | 20 | 15m, 1 | |||||
| 10 |
The Venus Fly Trap
Horrible. The major ugly looking crack. A lot harder than it looks and not recommended. FFA: Steve Lyons & Robert Cowan | 20 | 15m | |||||
| 11 |
The Venus Fly Trap LHV
Another awful route. Start up flake/crack that joins The Venus Fly Trap at about 4m. Up as for The Venus Fly Trap. Also not recommended. FFA: Matt Roper & Paul Martin | 20 | 20m | |||||
/f9/a4/f9a4d2efe5ac5ab37c5cc260b94814d84eaa26a8) |
||||||||
| Route | Grade | Style | Selected ascents | |||||
| 12 |
★ Seamstress
The wall with 3 FHs offers some very hard and steep cranking. Stick clip first FH. Hard moves past this lead to excellent incuts. Exit out left at twin seams, lower-off at chains. FFA: Paul Martin & Ben Ching | 24 | 10m, 3 | |||||
| 13 |
★ Bobbin
Short but sweet. Takes the steep bulge right of Seamstress. Stick clip the first FH, pull over the bulge and meander up to the top. FFA: Paul Martin & Robert Cowan | 21 | 15m, 3 | |||||
| 14 |
Crack One
Not recommended. The first crack around the corner from Bobbin. FFA: Matt Roper & Robert Cowan | 19 | 20m | |||||
| 15 |
★ Crack Two
The next crack right of Crack One. | 20 | 12m | |||||
| 16 |
★ Ache To Touch You
Quite a nice route on excellent hard dyke-rock. Three metres right of Crack Two is a scoop with 2 FHs. Bouldery moves lead to a pocket and the second FH. Step right and finish up Thredbo. FFA: Paul Martin & Jason Owen | 23 | 10m, 2 | |||||
| 17 |
Thredbo
A really cool route if you can do the start. The wall 2m right of Ache To Touch You. A very hard start leads to jugs. FFA: Jason Owen & Paul Martin | 20 | 10m | |||||
|
The final route is on a boulder about 300m to the west (right if you are looking at the cliff). The boulder is about 8m high and has a brilliant orange north facing wall and finger crack. | ||||||||
| 19 |
Boulderly Yours
The finger crack to the huge horizontal slot and roof, continue up the headwall. Gear was pre-paced above the roof on the FFA. FFA: Robert Cowan & Paul Martin, 1997 | 23 | 8m | |||||
1.4.3. Unearthed Wall
- Summary:
-
Escalada esportiva e Escalada trad
11 routes in Cliff
Lat / Long: -36.252139, 146.671409
descrição
This area has seen the most recent activity at Mt Pilot. It only had one route for a long time before a few more were added in 2013. Routes are described L to R looking at the wall.
All bolts on this wall require bolt plates.
acesso
Head up the walking track for about 150m. When the surrounding trees open out on the R, break off the track to the top of Unearthed Wall.
descent notes
Descend off one of the 2xBR anchors (which can be difficult to find) or the tree. Sticky Date Sunrise is about 5m left of the tree (looking out) and has an anchor at the top.
Alternatively, you can walk down on the left hand side (looking out) through thick scrub.
To help retrieve anchors there are some single access carrot bolts set quite far back from danger above The Holy Grail and Mount Pilot Unearthed.
 /78/2a/782ac4f1ba614c91b70d15b27358e68934a32ee9) |
||||||||
| Route | Grade | Style | Selected ascents | |||||
|---|---|---|---|---|---|---|---|---|
| 1 |
★★ The Holy Grail
About 4 metres to the left of 'Helmets On!' Fun crimps up to a scoop. Mantle and then head up a bit more to a more tradition slab finish. Crux in between 1st and 3rd Bolt. Double carrot belay. | 17 | 20m, 6 | |||||
| 2 |
★ Helmets On!
Towards the L end of the wall there is a crack which ends at about half height. Up this and then continue on up the slab. FA: Stephen Gordon & Rob Burton | 12 | 20m | |||||
| 3 |
★ Derailed
2m left of Mount Pilot Unearthed is a line of bolts. Tricky first move leads to an awesome rail, head straight up with plenty of crimps on offer! | 15 | 18m, 5 | |||||
| 4 |
★ Mount Pilot Unearthed
The original route on this wall. The arete on the L of the large crack splitting the wall past 3 BRs. Please be aware the final section of this route is somewhat run-out. FA: Robert Cowan & Richard Spry | 17 | 20m, 3 | |||||
| 5 |
Pretty Choughed
Channel your inner chough as you clear leaf litter from the back of this crack to find great cam placements, and maybe the buried treasure of hexes that fit a bit too perfectly. Easy beginner trad for learning to place and clean cams, with the odd hex placement. Follow the large crack splitting the wall up to the tree. FA: Nicko, 14 Aug 2023 | 8 | 15m | |||||
  |
||||||||
| Route | Grade | Style | Selected ascents | |||||
| 6 |
C.R.E.A.M
Mixed trad starting in the crack chimney to the left of sticky date and joining at the 3rd bolt of sticky date with an obvious step across. Nice stances in the crack feature. FA: Stewart George, 24 Sep 2023 | 13 | 20m, 4 | |||||
| 7 |
★ Sticky Date Sunrise
Great beginner route! Tricky opening sequence leads to excellent, well protected slab climbing. Starts 1m R of the wide crack splitting the wall (if standing at cliff base). Double BR top anchor. | 15 | 20m, 6 | |||||
| 8 |
★ Lucky Charlie
Fantastic first lead! Well protected fun slabbing. Starts 7m right of Sticky Date Sunrise (if standing at cliff base). Tricky opening moves, then easily up the slab. Double BR top anchor. | 11 | 15m, 6 | |||||
| 9 |
★★ Broken China
Start about a Metre right of Lucky Charlie, climb up a thinking start to first bolt, up past some nice crimps into another tricky section before the last bolt. FA: Josh Jordan, 27 Nov 2018 | 15 | 10m, 4 | |||||
| 10 |
★ Psycho Midget Madness
A hard start leads to good face climbing, finishing easily up the slab. Start off the block 5m R of Lucky Charlie (if standing at cliff base). If needed, the start can be skipped by using the tree. Double BR top anchor near small gumtree on ledge. | 17 | 15m, 6 | |||||
| 11 |
Dead Fish
Starting half a metre to a metre right of Psycho Midget Madness, through the obvious brushed section, move right after 2 metres and than up. Soon to be bolted and graded, otherwise can be top roped at about a grade 20 , off the bolts below the tree at the top of the crag. | 15m | ||||||
1.4.4. Groove Wall
- Summary:
-
Escalada trad e Escalada esportiva
4 routes in Cliff
Lat / Long: -36.253580, 146.671488
descrição
The Groove Wall is the closest to the carpark, about 50m away.
acesso
From the carpark head east towards the table closest to the 'Fires in fireplace, please take rubbish' sign. There is then a small path going through a line of trees. After going through the trees, head left (north) while crossing the clearing. Follow the path through the next line of trees to the top of the cliff.
descent notes
Head to the north end of the cliff and a path will lead to the bottom of the climbs. Alternatively, there are ring bolts near the tree close to the cliff edge.
 |
||||||||
| Route | Grade | Style | Selected ascents | |||||
|---|---|---|---|---|---|---|---|---|
| 1 |
Project B.M
Follow crack up until bolts travel to the right and up to 2BB. | 3 | ||||||
| 2 | Project B.M Variant Direct Finish | |||||||
| 3 | ★ Project C.B.C.F | |||||||
| 4 |
★ Project L.C.M.C
Follow the crack all the way past a thrutchy crux. Take 2 hangers for the anchor. | 16 | 12m | |||||
1.4.5. Falcon Buttress
- Summary:
-
4 routes in Cliff
All Escalada tradLat / Long: -36.252786, 146.672012
descrição
This is the closest area to the carpark, and the routes are some of the longest, however it does suffer a little from loose rock.
Do not climb in this area between June and December as the resident Peregrine Falcon breeds here during this period.
acesso
Follow the walking track for 60m and turn off to the R. Walk downhill for about 50m and then head to the R. This will put you at the top of the cliff.
descent notes
Walk down to the south or abseil down Valley Wall and walk to the bottom of this wall.
| Route | Grade | Style | Selected ascents | |||
|---|---|---|---|---|---|---|
| 1 |
Encephalopathy
The first route as you walk down. Climb the face left of the arete to the horizontal crack. Swing right on the face above the slab and up to the top. Has 5 BRs or so, take a few small cams as well. FA: Matt Roper & Robert Cowan | 20 | 30m, 5 | |||
| 2 |
★ Two Scoops
Start as for Falcon's Lair, move left past the two scoops then up the face past 3 BRs to join Falcon's Lair. FA: Robert Cowan, John Schwerdfeger & Matt Roper | 25 | 45m, 3 | |||
| 3 |
Falcon's Lair
Up centre of the face to diagonal crack. Pull through then up face past 5 BRs. FA: Robert Cowan, John Schwerdfeger & Matt Roper | 22 | 45m, 5 | |||
| 4 |
Falcon's Nest
Right side of face. Pull past BR to thin ledge, traverse right and over small roof. Climb the arete past 4 BRs. FA: Robert Cowan, John Schwerdfeger & Matt Roper | 23 | 45m, 5 | |||
1.4.6. Valley Wall
- Summary:
-
5 routes in Cliff
All Escalada tradLat / Long: -36.252288, 146.672025
descrição
Shaded for most of the day, and sometimes used by SES and Army for abseiling practice. Please don't remove moss/lichen.
acesso
Follow the walking track for 60m and turn off to the R. Walk downhill for about 50m and then a bit to the L until you're in front of a large orange boulder. This is the top of Valley Wall.
| Route | Grade | Style | Selected ascents | |||
|---|---|---|---|---|---|---|
| 1 |
Rough Edge
Starts at the main corner of the left-hand end of the cliff and about 50m left of The Lighthouse Of Alexandria.
Set: Peter Cunningham & Iain Sedgman, 1979 | 17 | 40m, 2 | |||
| 2 |
★ Lightning Fork
The obvious wide chimney that has a zig in it. FA: A team including C. Trafford, 1976 | 12 | 40m | |||
| 3 |
★ On The Edge
Start off the big block at the base of the chimney. Ordinary gear leads to a FH and then a ledge (another FH). Continue up the left arete passing 3 FHs to the top. FA: Jason Owen & John Lewis | 20 | 25m, 5 | |||
| 4 |
Fingered
To the R of On The Edge is a beautiful clean finger crack. Climb this to the ledge and then boldly mount the face above. FA: Bob Cowan & John Schwerdfeger | 21 | 10m | |||
| 5 |
The Lighthouse Of Alexandria
Forty metres right of the left-hand end of the cliff at a leftward diagonal line becoming a flake/chimney.
FA: Iain Sedgman & Phillip Armstrong, 1979 | 15 | 55m, 2 | |||
1.4.7. Dentistry Wall
- Summary:
-
7 routes in Cliff
Escalada trad e Escalada esportivaLat / Long: -36.251387, 146.671978
descrição
Dentistry Wall was developed in the late 90s and features some new-fangled fixed hangers! The rock is mostly very solid except for the occasional pebble blowing off.
acesso
From the bottom of Unearthed Wall, walk about 100m downhill and left. Alternatively, walk N from the bottom of Valley Wall as it is on the same contour.
| Route | Grade | Style | Selected ascents | |||||
|---|---|---|---|---|---|---|---|---|
|
About 100m left of the upper section of Dentistry Wall is a large boulder containing the first route. | ||||||||
| 2 |
Another Boulder Problem
Climb past 3 BRs on the face. FA: Bob Cowan, Matt Roper & Richard Spry | 22 | 15m, 3 | |||||
|
The next 4 routes are on the upper section of Dentistry Wall. | ||||||||
| 4 |
★★ Crown Jewel
Climb up a ramp past 2 BRs and then mount the headwall above past one more BR. FA: Bob Cowan & Ryan Butler | 19 | 20m, 3 | |||||
| 5 |
Plaque Removal
Climb the thin wall past 6 BRs. FA: Robert Cowan | 24 | 15m, 6 | |||||
|
There's two routes between Crown Jewel and Bridge Work. If anybody knows which one is Plaque Removal please update the topo. | ||||||||
| 7 |
★★ Bridge Work
Bridge the crack and slip up the arete past 2 BRs. FA: Robert Cowan & Ryan Butler | 21 | 15m, 2 | |||||
| 8 |
★★ Crack Cusp Technique
4m right of Bridge Work is a clean curving crack. FA: Ryan Butler & Robert Cowan | 17 | 15m | |||||
|
The next two routes are on the lower section of Dentistry Wall. | ||||||||
| 10 |
★ Root Canal
Has a nice committing crux that has seen more than one fall! On the next tier below the climbs described above, is a cracked face topped by a bulge. Climb the broken crack system and clip a BR before pulling the root-bulge. FA: Richard Spry & Matt Roper | 17 | 15m, 1 | |||||
| 11 |
It's A Gas
6m left of Root Canal is a rippled face. Crank your pants off past 5 BRs. FA: Robert Cowan, 1999 | 25 | 15m, 5 | |||||
    |
||||||||
1.4.8. Eastern Slabs
- Summary:
-
6 routes in Cliff
Escalada em top rope, Boulder e Escalada esportivaLat / Long: -36.251445, 146.671108
descrição
These slabs form the northeast side of Mt Pilot itself.
acesso
Walk 50m NE from the fire tower to find the top of the main slab.
descent notes
Walk down the gully on the left (facing out).
| Route | Grade | Style | Selected ascents | |||||
|---|---|---|---|---|---|---|---|---|
|
The following route can be found on the eastern side of a large boulder just before the track gets to the summit of Mt Pilot. | ||||||||
| 2 |
Auto Pilot
A nice easy finger crack to warm up. | 9 | 12m | |||||
|
The following 2 routes are on the main slab just NE of the fire tower. Walk down on the left. | ||||||||
| 4 |
Burlock Dinky
The first white water streak on low angled rock. No gear. FA: Kurt Saggers, 1996 | 9 | 20m | |||||
| 5 |
39 Cents Of Glory
On the main slab is an obvious white water streak. Follow this over the steepening and past some dubious flakes. No protection! FA: Iain Sedgman, Peter Watson & Peter Cunningham, 1979 | 20 | 30m | |||||
|
The remaining routes can be found directly below the main slab and a little to the south (right looking downhill). | ||||||||
| 7 |
Little Crack
The short crack at the left end of the Flake Off wall is a "muck around boulder problem". FA: Iain Sedgman & Peter Cunningham, 1979 | 18 | 6m | |||||
| 8 |
★ Pegasus
The clean black water streak in the centre of the slab. FA: Paul Martin | 23 | 12m | |||||
| 9 |
★★ Flake Off
To the right of Pegasus is a line with heaps of flakes. Nice climbing past 2 FHs leads to an anchor. FA: Paul Martin, 1994 | 17 | 12m, 2 | |||||
1.4.9. Yeddonba Wall
- Summary:
-
4 routes in Cliff
All Escalada tradLat / Long: -36.250923, 146.669940
descrição
The tallest cliff at Mt Pilot, however it is mostly quite low-angled.
acesso
Walk 40m W and then N from the firetower to the top of the obvious cliff.
descent notes
Walk down around the L side (facing out) and along a ledge with some pines. Routes are described right to left facing the wall.
| Route | Grade | Style | Selected ascents | |||||
|---|---|---|---|---|---|---|---|---|
| 1 |
★ Oil On Canvas
The first closed corner you come across. A hard start leads to good pockets and good gear. Avoid the chossy direct finish by moving left over the slab at the end of the corner to join The Tourist Route. FA: Paul Martin, Nick Danne & Andrew Porter, 2000 | 22 | 30m | |||||
/8e/f6/8ef665936e076e038458f1e695bd97b5b85c0ab5) /b2/76/b27668599f995509dbd1a973ff2455f1b299eadb) /65/76/6576b3a606ece57520d515c66e1ca564375e06ee) /c7/25/c725e1d82adaf73e83d129ac334730b7b7e289ee) |
||||||||
| Route | Grade | Style | Selected ascents | |||||
| 2 |
★★ The Tourist Route
The obvious big layback flake. Fun laybacking leads to a pleasant doddle up the slab (1 FH). Don't fall while clipping. FA: Paul Martin, Nick Danne & Andrew Porter, 2000 | 16 | 30m, 1 | |||||
| 3 |
★ Room With A View
Duck through the cave and this is the next nice crack along. Easy moves out of the cave lead to a no hands rest. Continue up the thin corner (crux). FA: Paul Martin, Nick Danne & Andrew Porter, 2000 | 19 | 35m | |||||
| 4 | ★★ Yeddonba Wall | 10 | 40m, 2 | |||||
1.4.10. Lone Ranger Boulder
- Summary:
-
1 route in Cliff
All Escalada trad
descrição
This 10m boulder can be found as you drive out of Mt Pilot. It's on the south side of the road about 500m back from the car park.
| Route | Grade | Style | Selected ascents | |||
|---|---|---|---|---|---|---|
| 1 |
Luke's Route
Climb the hand-crack on the back of the boulder, then pull past some thin moves protected by a FH. FFA: Luke Fitridge & Matt Roper | 22 | 10m, 1 | |||
1.5. Mt Stanley
- Summary:
-
Escalada trad, Escalada esportiva e Escalada em top rope
Lat / Long: -36.449125, 146.802096
descrição
Mt Stanley consists of a number of granite outcrops that are very similar to Mt Buffalo, although they are mostly quite short. This makes it a great spot to get some practice in for your projects on the mountain! The location of the crag (facing west and above 1000m altitude) means that it can quickly turn very cold, so be prepared for the weather! In winter, it can be snowing or cool with fantastic friction. In summer, it can be boiling hot or refreshingly cool (especially in the morning).
acesso
The drive to Mt Stanley is easy if it is dry. However, when it is wet, a few sections are very muddy and require a 4WD.
From Beechworth, drive to Stanley. When you get to the intersection in the middle of Stanley where you can turn right to Myrtleford, go left (Hillsborough Rd). Follow this - shortly after you pass Highgrove Orchard it turns to dirt. The second turn off to the right is Mt Stanley Rd - take this and follow it to the end where you'll see the main tower. To get to Talon Block and Grendel Corner, turn around and drive back about 300m and take the first 4WD track on the left. If you're in a car, park just off the road as this track is 4WD only. Follow it up and over the ridge and then around the corner you'll find the new (2013) comms tower.
1.5.1. Main Tower Cliff
- Summary:
-
3 routes in Cliff
All Escalada tradLat / Long: -36.451325, 146.802786
descrição
These routes are located on a small cliff just under the main tower.
 |
||||||||
| Route | Grade | Style | Selected ascents | |||||
|---|---|---|---|---|---|---|---|---|
| 1 |
★★ Danish Crack
The left corner/roof. FA: Russ Crow (solo), 1988 | 14 | 7m | |||||
| 2 |
Geranium Crack
The crack 1m right of Danish Crack. Up the left side of the top block which may be loose. FA: Russ Crow (solo), 1988 | 13 | 6m | |||||
| 3 |
Fear Of Heights
3m right of Geranium Crack. The widening to off-width crack. FA: Iain Sedgman, 1993 | 15 | 7m | |||||
1.5.2. Talon Block
- Summary:
-
11 routes in Cliff
Mostly Escalada tradLat / Long: -36.443561, 146.802509
descrição
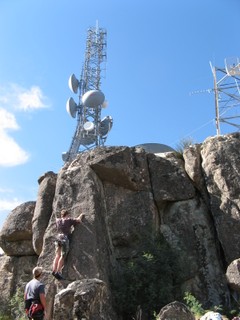
These routes are all located on the cliffline just to the west of the new (2013) comms tower.
acesso
Take the last 4WD track on the right about 300m before the main tower. Follow this up to the top of the ridge where you'll find the tower. Talon Block is to the west. The obvious crack/corner with a spiky protrusion at the top is Talon.
| Route | Grade | Style | Selected ascents | |||||
|---|---|---|---|---|---|---|---|---|
| 1 |
Pardalote
Arete left of Spoonerism. FFA: Andrew Patrick (solo), 1998 | 12 | 10m | |||||
| 2 |
Spoonerism
Opposite Talon. Arete and face. FFA: Janet Roper, 1998 | 12 | 8m | |||||
 |
||||||||
| Route | Grade | Style | Selected ascents | |||||
| 3 |
★★ Talon
The crack/corner, exiting over the top of the talon. FFA: Andrew Patrick & Richard Melder, 1997 | 15 | 9m | |||||
| 4 |
★★ Is That A Light Sabre In Your Pocket?
The cool hanging arete to the right of Talon. 3 BRs natural anchor. FFA: Mat Roper, 1998 | 23 | 10m, 3 | |||||
| 5 |
Thomas Flares
A fun and sporty route to the right of "Is That A Light Sabre In Your Pocket?". FFA: Mat Roper, 1998 | 23 | 10m, 3 | |||||
| 6 |
Project
Overhanging off-width crack to the right of Thomas Flares. | |||||||
| 7 |
Laser Line
Small pro in crack line to the right of the off-width crack. Go left of centre. FFA: Mat Roper, 1998 | 21 | 8m, 1 | |||||
|
The next routes are on a cliff immediately below Talon and are described left to right. | ||||||||
| 9 |
★ Comic Relief
The fist-crack left of the blunt arete, then mantle the flake and up. FFA: Andrew Patrick & Richard Melder, 1997 | 10 | 8m | |||||
| 10 |
★ G String
The crack around right of Comic Relief. FFA: Andrew Patrick (solo), 2000 | 12 | 7m | |||||
| 11 |
Small Wires
Small seam right of G String. Bad pro to start leading to nice flakes. FFA: Paul Martin, Kurt Saggers, Jenny Palmer & Andrew Porter, 1999 | 19 | 7m | |||||
| 12 |
Right Route
The right end of the face, trending right past a FH to a horizontal (pro). Then go left to the steep finger crack and up. FFA: Paul Martin, Kurt Saggers, Jenny Palmer & Andrew Porter, 1999 | 17 | 9m, 1 | |||||
1.5.3. Grendel Gully
- Summary:
-
17 routes in Cliff
Escalada trad, Escalada esportiva e Escalada em top ropeLat / Long: -36.445074, 146.801617
descrição
These routes are in a gully just off to the left before the new comms tower.
acesso
Follow the directions for Talon Block. The gully is off the left side of the road about 40m before the tower.
The obvious bolted arete on the left of the gully is You Can Leave Your Helmet On.
| Route | Grade | Style | Selected ascents | |||||
|---|---|---|---|---|---|---|---|---|
| 1 |
★ You Can Leave Your Helmet On
Arete left of Valkyrie. Originally climbed by the 2 BRs on the western side, it now has 2 FHs. FFA: Mat Roper, 1998 | 20 | 7m, 2 | |||||
  /72/b1/72b136f672cda5657abf78bf9ed4ae594bcdd1cb) |
||||||||
| Route | Grade | Style | Selected ascents | |||||
| 2 |
★ Valkyrie
Left side of face. Thin crack to off-balance ledge, stem to gain small alcove and a couple of jams to exit. FFA: Mat Roper & Richard Melder, 1997 | 18 | 12m | |||||
| 3 |
★ Chariots Of Fire
Solid for the grade. Up the wall a couple of metres left of Grendel past two BRs. Small cam protects the finish. FFA: Andrew Patrick & John Schwerdfeger, 1997 | 17 | 13m, 2 | |||||
| 4 |
★ Grendel
The obvious corner crack which takes great protection. FFA: Mat Roper & Richard Melder, 1997 | 16 | 13m | |||||
|
The next two routes are on the boulder above Grendel, next to the snow gum. | ||||||||
| 6 |
★ Western Exposure
Short and sweet. Start on the lower right and roughly follow the arete past 2 BRs. FFA: Mat Roper & John Schwerdfeger, 1997 | 19 | 6m, 2 | |||||
| 7 |
★ Golden Dung Line
20m downhill and left (SW) of Western Exposure is an obvious crack line. FFA: Richard Melder & Andrew Patrick, 1997 | 16 | 6m | |||||
 |
||||||||
| Route | Grade | Style | Selected ascents | |||||
|
The next three routes are on a block across the gully from You Can Leave Your Helmet On (about 30m north). | ||||||||
| 9 |
★ Bosch
The left arete past 2 BRs. Starting boulder problem is about V2! FFA: Bob Cowan & Josh ?, 1998 | 18 | 9m, 2 | |||||
| 10 |
★ Sunset
Boulder onto the rail, balance your way up to the next ledge, and then try and figure out how to get up through the scoop. Probably 23 for short people! 3 BRs. FFA: John Schwerdfeger & Andrew Patrick, 1999 | 18 | 10m, 3 | |||||
| 11 |
Sliver Off
Wires plus 1 BR. The right hand route. FFA: Bob Cowan & Josh ?, 1998 | 17 | 8m, 1 | |||||
|
The next two routes are about 30m down the gully on the same side as Bosch. | ||||||||
| 13 |
Sister Crack
At small gum tree go straight up finger crack. FFA: Richard Melder & Andrew Patrick, 1997 | 13 | 10m | |||||
| 14 |
New Moon
Arete right of Sister Crack. Up to horizontal, then crux moves to clip the only BR. FFA: Mat Roper & John Schwerdfeger, 1999 | 18 | 11m, 1 | |||||
 /38/80/3880df672102379f305d93e631194afd875ff237) |
||||||||
| Route | Grade | Style | Selected ascents | |||||
|
Further down the gully on the right (north side) is an obvious arete. | ||||||||
| 16 |
Obelisk
The obvious arete with 2 BRs. FFA: Mat Roper, 1998 | 18 | 10m, 2 | |||||
| 17 |
Unnamed top-rope
The wall to the left of Obelisk. Feel free to bolt it. | 22 | 10m | |||||
|
Keep heading down the gully and scramble around right (north) two a small wall with another couple of routes. | ||||||||
| 19 |
Young Ones
The hard one. 2 BRs plus wires. FFA: Rob Cowan & John Schwerdfeger, 1998 | 22 | 12m, 2 | |||||
| 20 |
Old Guns
The easier one. 2 BRs plus wires. FFA: John Schwerdfeger & Rob Cowan, 1998 | 17 | 12m, 2 | |||||
|
Head down left of Golden Dung Line for about 150m. Belay chain in gum tree. | ||||||||
| 22 |
★★ Matinee
Start at bottom of block. Up vertical broken crack to fist jam, over ledge and follow line to horizontal. Go left and up. FFA: Mat Roper, 1998 | 17 | 20m | |||||
| 23 |
★★ Unnamed
Right of Matinee. The 75 degree left-leaning finger-crack (which is of excellent quality). Surmount ledge, move right, and step down slightly for thin moves up arete. According to the guidebook this had a bolt but there's no sign of it now. FFA: Mat Roper & Andrew Patrick, 1998 | 20 | 18m | |||||
1.5.4. South of Grendel Gully
- Summary:
-
4 routes in Cliff
All Escalada tradLat / Long: -36.448865, 146.801272
descrição
These few climbs are scattered among the gullies to the south of Grendel Gully. The first two are located on a wall with a lonely ringbolt, 2 gullies south and downhill a bit from Grendel.
| Route | Grade | Style | Selected ascents | |||||
|---|---|---|---|---|---|---|---|---|
| 1 |
Paul And Sarahs Arctic Adventure
The obvious weakness on the left arete. No real protection. FFA: Paul Martin & Sarah Jacob, 1997 | 17 | 8m | |||||
| 2 |
Ode To A Frenchman
Hard and dangerous. Crank up on a few good holds (RB) to stance on right. Take a deep breath and traverse left (crux - fiddly RPs) to seam/gastons. Keep going left and up until you hit the top. FFA: Paul Martin, John Lewis & Andrew Porter, 1997 | 22 | 10m, 1 | |||||
|
Head south along the ridge from Grendel for about 600m, then down hill. | ||||||||
| 4 |
Supercrack Project
Stunning crack, both in appearance and difficulty! | |||||||
| 5 |
Turkey Baster
Flake system on high side of green chasm. Worthwhile. FFA: Mat Roper, R. Linsley & R. Melder, 1998 | 17 | 15m | |||||
1.5.5. The Far Block
- Summary:
-
4 routes in Cliff
Escalada trad e Escalada esportivaLat / Long: -36.457387, 146.798585
acesso
Head south down 4WD track from the main fire-tower for about 800m. Once you pass a rocky outcrop on the left, keep going for another 150m (approx). Where the trail flattens briefly, there is a bulldozed drainage culvert on the right which you can park in. At the end of the culvert, turn to about 2 o'clock and go through bush for about 200m. When the terrain drops steeply off, the cliff should be obvious. The north-facing slab has 4 routes.
| Route | Grade | Style | Selected ascents | |||
|---|---|---|---|---|---|---|
| 1 |
Guatemalan Disco Adventure
Left of Scooter. From under overhang, move to arete, onto face and up. FFA: R. Linsley & R. Melder, 1998 | 15 | 10m | |||
| 2 |
★★ Scooter
Balancy. Up the slab past 3 BRs. Exit right on hand traverse and mantle out to ledge. FFA: John Schwerdfeger & Andrew Patrick, 1997 | 20 | 15m, 3 | |||
| 3 |
★★ Shadowline
In the middle of the face, step right and back left to tiny mantle ledge and up small hanging corner. 2 BRs and small wires. FFA: Mat Roper & John Schwerdfeger, 1997 | 17 | 15m, 2 | |||
| 4 |
★★ Skyline
Start as for Shadowline to first BR, out to second BR and continue up arete past 3rd BR. Small wires at the end (BD nuts size 2-3). FFA: John Schwerdfeger & Andrew Patrick, 1997 | 18 | 15m, 3 | |||
1.6. The Pinnacles
- Summary:
-
1 route in Area
All Escalada em rocha
| Route | Grade | Style | Selected ascents | |||
|---|---|---|---|---|---|---|
| 1 | Grease Lightning | 16 | 60m | |||
1.7. Mt Jack
- Summary:
-
All Escalada em rocha
Lat / Long: -36.497711, 146.900530
| Route | Grade | Style | Selected ascents | |||
|---|---|---|---|---|---|---|
| 1 |
★★ Burkey's Birthday Bash Corner
The curving corner crack on the right of the little crag (known locally as Bum Rock) on the western slopes of Mt Jack northeast of Myrtleford. FA: Paul Badenoch & Chris Oerman, 2008 | 18 | 25m | |||