A Crag Guide gives an extensive view of all sub areas and climbs at a point in the index. It shows a snapshot of the index heirachy, up to 300 climbs (or areas) on a single web page. It shows selected comments climbers have made on a recently submitted ascent.
At a minor crag level this should be suitable for printing and taking with you on a climbing trip as an adjunct to your guidebook.
This guide was generated anonymously. Login to show your logged ascents against each route.
Warning
Rock climbing is extremely dangerous and can result in serious injury or death. Users acting on any information directly or indirectly available from this site do so at their own risk.
This guide is compiled from a community of users and is presented without verification that the information is accurate or complete and is subject to system errors. By using this guide you acknowledge that the material described in this document is extremely dangerous, and that the content may be misleading or wrong. In particular there may be misdescriptions of routes, incorrectly drawn topo lines, incorrect difficulty ratings or incorrect or missing protection ratings. This includes both errors from the content and system errors.
Nobody has checked this particlular guide so you cannot rely on it's accuracy like you would a store bought guide.
You should not depend on any information gleaned from this guide for your personal safety.
You must keep this warning with the guide. For more information refer to our:
Usage policy
Contributors
Thanks to the following people who have contributed to this crag guide:
Vanessa Wills
Jason Smith
Jimmy Mullan
William Frost-Foster
Nick Murphy
Tom Hodgson
Tim Haasnoot
Matthew Browne
Michael Tonon
Sean Gallagher
The size of a person's name reflects their Crag Karma, which is their level of contribution. You can help contribute to your local crag by adding descriptions, photos, topos and more.
Table of contents
- 1.
Koolewong
125 in Crag
-
1.1.
Lara Street Boulders 65 in Crag
- 1.1.1. Bikini Cave 9 in Boulder
- 1.1.2. The Chalkboard 2 in Boulder
- 1.1.3. Lara's Lips Boulder 8 in Boulder
- 1.1.4. Pitt Brick 13 in Boulder
- 1.1.5. Warmup Block 5 in Boulder
- 1.1.6. Gnostic Cave 2 in Boulder
- 1.1.7. Emperor's Tomb 9 in Boulder
- 1.1.8. Fire In The Hole Boulder 2 in Boulder
- 1.1.9. Star Boulder 4 in Boulder
- 1.1.10. Palin Boulder 3 in Boulder
- 1.1.11. Cranberry boulder 8 in Boulder
- 1.2. Lara Street Crag 40 in Crag
- 1.3. Koolewong Crag 15 in Crag
- 1.4. Waterfall Valley 5 in Crag
-
1.1.
Lara Street Boulders 65 in Crag
- 2. Index by grade
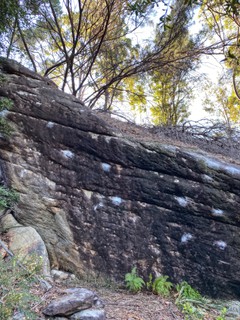
1. Koolewong 125 routes in Crag
- Summary:
-
Bloc, Escalade sportive et autres styles
Lat / Long: -33.470042, 151.315729
description
Koolewong is a suburb in the Central Coast region of New South Wales. Koolewong has a population of approximately 800 people.
Limitations de l'accès
If you have benefited from climbing infrastructure in NSW, please consider making a donation towards maintenance costs. The Sydney Rockclimbing Club Rebolting Fund finances the replacement of old bolts on existing climbs and the maintenance of other hardware such as fixed ropes and anchors. The SRC purchases hardware, such as bolts and glue, and distributes them to volunteer rebolters across the state of New South Wales. For more information, including donation details, visit https://sydneyrockies.org.au/rebolting/
approche
Koolewong is easily accessible by car via Brisbane Water Drive.
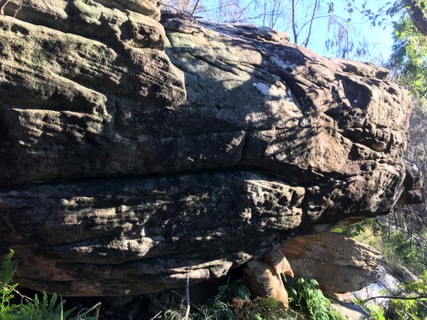
1.1. Lara Street Boulders 65 routes in Crag
- Summary:
-
Tous Bloc
Lat / Long: -33.478633, 151.318047
description
Mostly hard bouldering on slopey pockets with even slopier top outs. Lots of boulders spaced out over a large area with heaps of potential for new problems. (The guide is incomplete at this stage and some problems may have FA before currently listed.)
Limitations de l'accès
The boulders are situated above a residential area so it is important to be quiet and courteous when using this area. When driving under the bridge be aware that clearance is only 2.1m and high tide can come up to your wheels. Do not block access to Lara St.
approche
From the highway take the Gosford turn and head down the hill and turn right on Brisbane Water Drive. Turn right onto Lara St just before the bridge. Follow the road under the bridge and park on the right. Best not to park further along as these are resident parks.
Follow the road past the house and take the right branch up the hill until you see a large boulder on the left. Turn left just after here on the walking track just behind the new apartments and over a bridge. Follow the track/fire break behind the houses until you reach a boulder on the left where the track takes a slight kink to the left. There's also a small yellow drain. Turn right up hill here past the Bikini Cave on the left. Scramble up the small cliffline and head diagonally right up the hill and the boulders should appear. Hopefully the map will help a bit.
 |
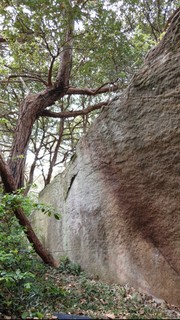
1.1.1. Bikini Cave 9 routes in Boulder
- Summary:
-
   |
||||||||
| Route | Grade | Style | Selected ascents | |||||
|---|---|---|---|---|---|---|---|---|
| 1 |
★ Big Pimpin
Start matched on the right facing crimp. Move up the left side of the scoop to top out. Arete is off up until it changes angle up high. FA: dan stephenson, 19 Sept 2016 | V3 | 3m | |||||
| 2 |
★★ G Slam
Run and jump to the top jugs, off of the small footer at knee height. FA: Nathan Hingee | V3 | 2m | |||||
| 3 |
★ One Piece Traverse
Rising lip traverse along the top of the left hand wall. Good warmup | V2 | 4m | |||||
| 4 |
★ Goat Whisperer
Start low on the triangular ironstone feature. Up using the arete and avoiding the wall behind FA: Jason Smith | V4 | 3m | |||||
| 5 |
Neck to Knee
Lay down start under roof, pull up into roof with all limbs in crack and on rails, then head to right with no feet below roof,and finish up open chimney to top out using both walls, body jams, and whatever takes your fancy | V3 | 4m | |||||
| 6 |
G String Theory
The back pocketed wall. Sit start and up the left side of the bikini feature. Big reach around to halfway break, then finish on the wall out left | V3 | 3m | |||||
| 7 |
★ Bikini Right
Low sit start, up the right side of the bikini feature to finish on the half way break. Topout still not linked? FA: Al Choi | V7 | 5m | |||||
| 8 |
Under Your Pants
Stand start on ledge. Up left along beak and up. Basically the top out of Bikini Right. Highball FA: Jason Piper | V5 | ||||||
| 9 |
BB King Bikini
Sit start ledge pockets to trav R on break. Top out on slab FA: Jason Piper | V4 | ||||||
1.1.2. The Chalkboard 2 routes in Boulder
- Summary:
-
approche
The smallish face/slab boulder below and to the left of Lara's Lips Boulder next to the track.
 |
||||||||
| Route | Grade | Style | Selected ascents | |||||
|---|---|---|---|---|---|---|---|---|
| 1 |
★★ The Chalkboard
Start matched on the lowest left facing sloper moving left and up to gain small horizontal crack then up over the lip with either a high foot or jump. FA: William Frost-Foster | V6 | 3m | |||||
| 2 |
The Chalkboard Direct
Shared start with 'The Chalkboard' but move directly up along awful slopey crimps then tiny crimp rail to lip. All holds left of the start hold are off. Open Project | 3m | ||||||
1.1.3. Lara's Lips Boulder 8 routes in Boulder
- Summary:
-
description
The best boulder for warm ups
approche
The first boulder you come to 100m up the hill past the Bikini Cave
 |
||||||||
| Route | Grade | Style | Selected ascents | |||||
|---|---|---|---|---|---|---|---|---|
| 1 |
★★ Lara's Lips
Sit start as low as possible on the right side of ships bow and follow the huge slopey jugs to top out right at the top. | V3 | 3m | |||||
| 2 |
★★ Lara's Bottom Lip
Start as for Lara's Lips, traverse left low using the bowl and up from the horn. | V3 | 3m | |||||
| 3 |
★★ Lara's Secret Slot
Same as Lara's Bottom Lip but keep heading left to just before the tree, then up. | V3 | 4m | |||||
| 4 |
★★ Lara’s Little Lips
Start matched on the small incut edge under the hueco. Move directly up via the small shallow pocket and small crimps, pulling through the big hold just below the lip. All jugs left and right are off for both hands and feet. FA: Jess Roach | V4 | 2m | |||||
| 5 |
★ Lara's secret direct
Sit start next to tree and go straight up | V3 | 3m | |||||
| 6 |
★★ Lara's Late Night
Sit start compressing between two side pull crimps, and not great feet. Dyno/Driveby left hand to the juggy rail. Top out as per other problems. FA: Tom Hodgson | V5 | 3m | |||||
 |
||||||||
| Route | Grade | Style | Selected ascents | |||||
|
On the river side of the boulder is a shallow slab and the next problems. | ||||||||
| 8 |
★ Fat Jack
Stand start on the big flake. Mantle up and left. FA: dan stephenson, 19 Sept 2016 | V1 | 2m | |||||
| 9 |
★ Not So Fat Jack
Crouch start on the sloper on the lip of slab. Move up to the flake and then top the same as Fat Jack. FA: Jack Folkes, 19 Sept 2016 | V3 | 2m | |||||
1.1.4. Pitt Brick 13 routes in Boulder
- Summary:
-
description
3 to 4 metre high boulder featuring slopey pockets and hard top outs.
  |
||||||||
| Route | Grade | Style | Selected ascents | |||||
|---|---|---|---|---|---|---|---|---|
| 1 |
★★ Gravel Pitt
On the south side of the boulder. Sit start on two pockets moving directly up via slopers and jug to top out. FA: William Frost-Foster | V3 | 3m | |||||
| 2 |
★★ Womb Raider
Sit start below the hollow bone feature just to the right of the access slope on the water side of the boulder. Up past a good flat hold to a big throw over the top. FA: Jason Smith | V4 | 4m | |||||
| 3 |
Womb Raider (Low)
True sit start to Womb Raider, starting on two slopey pockets half a metre down and right of the original holds. Tricky start move, like an easier version of the core movements start. | V5 | ||||||
| 4 |
★★★ A Lesson In Core Movements
Start 4m right of Womb Raider in the slopey 1 and 2 finger pockets and traverse up and left into Womb Raider top out. FA: Michael Tonon, 2012 | V9 | 4m | |||||
| 5 |
★★★ A Lesson In Symbiosis
A Lesson in Core Movement direct. After the crux of core movement, head straight up to a slopey edge and delicately mantle your way out using various slopers and blind feet. FA: Michael Tonon & Tom Hodgson | V10 | ||||||
| 6 |
★★ Eli's Direct
Direct top out of Eli's Closed Proj. | V10 | 3m | |||||
| 7 |
★★★ Eli's Closed Proj
Start as for A Lesson In Core Movements and head up and right. Once at the lip, keep traversing right to top out as for Mick's Arete Left. https://www.instagram.com/p/CNy4xvhlDih/?utm_source=ig_web_copy_link FA: Liam Healy, 2017 | V10 | 3m | |||||
| 8 |
★★ Someday Soon
Start on the two slopers, a tricky sit move gains the right hand gaston finishing with a final jump to the lip. Not sure on the grade. FA: Tom Hodgson | V9/10 | ||||||
| 9 |
★★★ Neil's Arete
Sit start at the bottom right hand corner of the arete then move up and left on horrible slopes to a hard top out. NOTE: The far undercling holds on Micks arete are off. FA: Neil Wallace, 2010 | V10 | 4m | |||||
| 10 |
★★★ Mick's Arete
Sit start on the bottom corner of he arete and follow slopes and shallow pockets on the right hand of the arete. Slam the top slopes and commit to the scary top out. Classic FA: Mick Yuen, 2009 | V7 | 4m | |||||
| 11 |
★★★ Fight Club
Stand start to Mick's Arete on sloper and undercling. FA: Jason Piper, 2009 | V5 | 4m | |||||
 |
||||||||
| Route | Grade | Style | Selected ascents | |||||
| 12 |
★★★ Everyone but Ben
Stand start and straight up to the press out mantle. A great technical line that gets progressively harder to an easyish mantle. FA: Michael Tonon, 11 Juil 2020 | V8 | 5m | |||||
| 13 |
★★ Rusty Platter
Sit start on the lowest lip hold at the little cavelet before the arete. Bust up left to a crimp rail, and start trending up and right before a slabby/layback style top out. Keeping on the face of the boulder until the end. (Starting mega jugs of the arete problem are out) FA: Tom Hodgson, 6 Juin 2021 | V7 | 4m | |||||
 Emmanuel Madayag
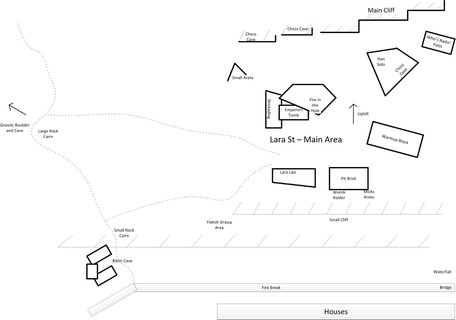
1.1.5. Warmup Block 5 routes in Boulder
- Summary:
-
description
Square block directly behind Fire In the Hole when looking at this problem.
| Route | Grade | Style | Selected ascents | |||||
|---|---|---|---|---|---|---|---|---|
| 1 | Left Arete | V1 | 3m | |||||
| 2 |
★ Left Face
Stand start on decent edge. Move straight up to top out. | V1 | 3m | |||||
| 3 |
★★ Left Face Dyno
Dyno from the start edge to the horn/highest point. | V3 | 3m | |||||
/77/47/7747e8c115c90e1cc685a6899a40065744703ebc) |
||||||||
| Route | Grade | Style | Selected ascents | |||||
| 4 | ★★ Right Arete | V3 | 3m | |||||
| 5 | ★★ Right of Arete | V4 | 3m | |||||
1.1.6. Gnostic Cave 2 routes in Boulder
- Summary:
-
approche
Head off left from the rock cairn and find the cliff line back towards the water
 |
||||||||
| Route | Grade | Style | Selected ascents | |||||
|---|---|---|---|---|---|---|---|---|
| 1 |
★★ Shick A Ding
Start in the low break. Big move to lip then up headwall to top out. | V4 | 4m | |||||
| 2 | ★ Shick A Ding Ling Long | V3 | ||||||
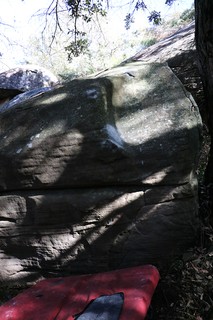
1.1.7. Emperor's Tomb 9 routes in Boulder
- Summary:
-
approche
The obvious cave capped by a hanging roof above the Pitt Brick
| Route | Grade | Style | Selected ascents | |||||
|---|---|---|---|---|---|---|---|---|
| 1 |
Left arête
Sit start at base of arête and climb overhanging arête | V1 | 2m | |||||
 |
||||||||
| Route | Grade | Style | Selected ascents | |||||
| 2 |
★★ Jade Emperor
Sit start at left hand side under little roof. Pull up on some holds below the lip with feet on the back ledge. Move up to the slopey break then climb the little face with small crimp rails. Right of the crack is off for hands as is the left arete. FA: Dan Da Silva | V5 | 3m | |||||
| 3 |
★ Stone Army
Sit start deep under the roof on the right hand side.From deep in the cave climb out using some underclings etc in the roof. Pull the lip using various slopey holds to gain the big break, then punch over the bloc on top for a tricky mantle. This problem does not use the big jug on the right FA: Dan Da Silva | V5 | 3m | |||||
| 4 |
★★ Maxipad
Start matched on the low rail. Trend right to take a right crimp, then up to jugs and mantle. FA: Joseph Prinable | V4 | 3m | |||||
| 5 |
★★ Emperor's Tomb
Sit start around the corner from the big jug.Starts matched on a good flat edge. Climb left to gain the big jug. Punch up to the break then exit via the tricky mantle. The original line here. FA: Dan Da Silva | V4 | 4m | |||||
| 6 |
★ Ming Dynasty
Sit start around the R/H corner on the flat edge.Climb out via the easiest way. FA: Dan Da Silva | V1 | 3m | |||||
| 7 |
★★ Emperor's new groove
Sit start under the L/H roof as for 'Jade Emperor'. From the sit gain the good slopey rail, a low traverse right gains the good jug then top out via the mantle exit. FA: Dan Da Silva | V6 | 3m | |||||
| 8 |
★★ Ming The Merciless
Start as the ming Dynasty to the big jug, then drop down and traverse low to the good slopey rail on Jade emperor, match it then finish as for that problem. All the higher holds above the line of the good slopey rail are off FA: Dan Da Silva | V7 | 3m | |||||
| 9 |
★★ Ming The Repugnent
As for ming the merciless but eliminate the big jug for your hands. There are some small crimps before it you can use. FA: Dan Da Silva | V8 | 3m | |||||
1.1.8. Fire In The Hole Boulder 2 routes in Boulder
- Summary:
-
approche
Head towards the top of the hill past the Emporers Tomb and the boulder will appear on the left.
 |
||||||||
| Route | Grade | Style | Selected ascents | |||||
|---|---|---|---|---|---|---|---|---|
| 1 |
★★ Fire In The Hole
The downhill facing arete. Sit start in the slopey jug hole and follow sidepulls and a mono to a desperate top out out right a bit. Nails at 5 FA: Jason Smith | V6 | 4m | |||||
| 2 |
★★ Bombs Away
Shared start with 'Fire In the Hole' but moving right and up along small slopey crimps, then jumping for the lip and mantling over. Vision by Tom Hodgson climbed by William Frost-Foster. | V9 | 4m | |||||
1.1.9. Star Boulder 4 routes in Boulder
- Summary:
-
description
Looks like a big triangle slab from below
approche
Head straight up the hill and right from Fire In The Hole and its the first massive block you come to.
| Route | Grade | Style | Selected ascents | |||||
|---|---|---|---|---|---|---|---|---|
| 1 |
★★ Princess leia
Just left of the left arete straight up on good but diagonally sloping holds | V0 | 4m | |||||
 |
||||||||
| Route | Grade | Style | Selected ascents | |||||
| 2 |
★★★ Han Solo
Starts matched on obvious jug on the right side of the left arête. Head straight up using poor slopers and side pulls to mantle straight over the top. An awesome line. FA: Michael Tonon, 1 Oct. 2014 | V10 | ||||||
| 3 |
★★★ Huck like Tom
Starts about 2m to the right of Han Solo. One move then a big throw/huck to the lip and mantle FA: Tom Farrel, 2017 | V8 | ||||||
| 4 |
★★ Doppelgänger
2m right from Huck like Tom, Towards the lower end of the bloc. Sit start with left hand side pull and right hand crimp. Head directly up and mantle out. FA: Tom Hodgson | V8 | 3m | |||||
1.1.10. Palin Boulder 3 routes in Boulder
- Summary:
-
 |
||||||||
| Route | Grade | Style | Selected ascents | |||||
|---|---|---|---|---|---|---|---|---|
| 1 |
Who's Nailin' Palin Left
Low sit start with feet under roof. Up to the slopey break, left along it then up FA: Jason Smith | V2 | ||||||
| 2 |
Who's Nailin' Palin Centre
Straight up - project? | |||||||
| 3 |
Who's Nailin' Palin Right
Sit start then swing out right over the void and up FA: Jason Smith | V4 | ||||||
1.1.11. Cranberry boulder 8 routes in Boulder
- Summary:
-
| Route | Grade | Style | Selected ascents | |||
|---|---|---|---|---|---|---|
| 1 |
Salvation
The vertical crack like feature facing the track. SIt start | V0 | 3m | |||
| 2 |
It's not Hollywood
The large round pocket right of S, straight up, sit start | V1 | 3m | |||
| 3 |
The faithful departed
The inverted V right of InH, straight up, sit start | V2 | 3m | |||
| 4 |
Zombie
The arête to the right of TFD, sit start | V1 | 4m | |||
| 5 |
★ Linger
Sit start near descent boulder on the face towards slab at diagonal ironstone rail. Head left and up face | V3 | 4m | |||
| 6 |
★ Yellow skies
Sit start on right arête of bay side of boulder. Up arête to undercling and when on slab follow ramp left to tree branch descent | V2 | 3m | |||
| 7 |
War child
The right side of the low arête starting at 2 large dishes. Straight up | V0 | 4m | |||
| 8 |
So insecure
Start as for WC at large dishes near arête and follow diagonal line right to top out | V2 | 5m | |||
1.2. Lara Street Crag 40 routes in Crag
- Summary:
-
Escalade sportive, Bloc et Escalade traditionnelle
Lat / Long: -33.477716, 151.317214
résumé
Short well featured sandstone routes, mostly on Carrot bolts with single u-bolt anhors. Easy to set up top ropes.
description
The small crag above the Lara St boulders. Routes are described left to right, with gaps on walls not yet climbed. The crag ends just above Star boulder. There are several projects on ring bolts indicated with a tag on the first bolt. There are a number of U bolts and the odd hex bolt scattered across the top of the crag. The top is easily accessed from either end or via scrambles between caves.
Limitations de l'accès
Best to abseil down and clean routes, especially if you want to top out, as the cliff top is covered in she oak needles. The hex heads are quite fiddly to get hangers over sometimes.
approche
Drive out of Woy Woy North on Brisbane Waters Drive and take the immediate left after the bridge into what looks like a dirt parking lot. Follow this down left to the water and cross under the railway bridge. Park in the dirt turn in's on the right just after the small grass open area. Don't continue further up the hill as this is resident parking ONLY.
Continue along the road past the house and take the right branch up the hill until you see a large boulder on the left. Turn left just after here on the walking track just behind the new apartments and over a small bridge. Follow the track/fire break behind the houses until you reach a boulder on the left where the track takes a slight kink to the left. There's also a small yellow drain beside a power pole. Turn right up hill here past the Bikini Cave on the left. Scramble up the small cliffline and head diagonally right up the hill until it flattens out a bit and follow up to the right aiming for the Cranberry boulder, a large boulder with ironstone swirls just to the left of the track. You walk over the top of Slab World which is down to the left. You meet the main crag at a small cave, which has 'Superstition' above it. There's a few routes in the small gully between the walls here and the remainder of the crag is to the right notable by the three large caves you'll find.
éthique
DON'T park in front of any of the residents houses, use the public parking near the grass area or just after crossing under the bridge.
This area is close to houses so avoid making any unnecessary noise passsing the houses and avoid playing loud music and carry out all your rubbish.
historique
Most routes were put up between 1995-2000 by David Forbes with some routes added by Richard Jeffrey and Paul Rivière.if there is knowledge of original names of climbs please change.
 |
||||||||
| Route | Grade | Style | Selected ascents | |||||
|---|---|---|---|---|---|---|---|---|
| 1 |
Trackside boulder 1
The large boulder to the left of the main approach track. Has 3 u bolts on top for anchors. This is the left route on the south face. Come in from arête. Single U-Bolt on top | 17 | 9m, 3 | |||||
| 2 |
★★ Trackside boulder 2
Climbs just to the left of the right arête of the south face. Single U-Bolt on top shared with 'Trackside boulder 1' | 16 | 8m, 3 | |||||
| 3 |
Trackside high step
Boulder up 1m right of the bolted arête route, on the up hill wall facing the corridor the track runs through. Easily TR from a U-bolt immediately above | V1 | 5m | |||||
| 4 |
Trackside boulder boulder
2m right of arête, just before small trees. Well featured. | V0 | 4m | |||||
| 5 |
Kalani
Opposite the trackside boulder and 6m left of the twin cracks is a blunt arête, just past a ledge that is half way up the wall. This climbs the left side of the blunt arête | V0- | 3m | |||||
| 6 |
★ Kemeko
The right side of the blunt arête 6 m left of the cracks. Up to knob with slabby top out. | V1 | 3m | |||||
 |
||||||||
| Route | Grade | Style | Selected ascents | |||||
| 7 |
★ Superstitious Kids
A fun traverse link up starting with a couple of wires in 'Hand crack' and 'Finger crack' on the left hand end of the wall, then using the first bolt of 'Kids Cruise', the second bolt of 'Slab Slapper' and the third bolt of 'Superstition'. Fun way to get used to traversing FFA: Nick Murphy & Cameron Reid, 26 Mai 2019 | 13 | 10m, 3 | |||||
| 8 |
Hand crack
On the east wall of the corridor, the left of 2 cracks going up to tree. Anchor off large tree, be sure you use soft material to protect tree from slings. | 4 | 5m | |||||
| 9 |
★ Finger crack
On the east wall of the corridor, the thin crack going up to tree. | 4 | 5m | |||||
| 10 |
Kids Kruise
Just right of the cracks is a juggy slab on great rock. Single U-bolt on top. | 6 | 7m, 2 | |||||
| 11 |
Slab slapper
The middle sports route on the east wall of the corridor. Shares single U-bolt on top with 'Superstition' | 10 | 8m, 2 | |||||
| 12 |
★ Superstition
Balancy traverse start from left onto face above small cave then up slab to U-bolt. 1m right of SS. | 13 | 9m, 3 | |||||
| 13 |
White tail
Down and right of small cave where track meets crag, as the direction of the cliff changes there is a boulder at track level with a diagonal seam leading to a scoop. Sit start, climb up through scoop then left to top out at large angaphora. | V2 | 3m | |||||
| 14 |
Golden orb
The first climb you come to after leaving the main track and contouring along the base of the cliff towards the caves. There are 4 routes just before the first honeycombed cave. Climb the chimney to ledge and step onto face following seam and flake (wires) with small cams in horizontals. U bolt on platform above route. WARNING: Gear placements are not solid, rock is soft and feels a lot harder than a 15! | 15 R | 9m | |||||
/fd/7f/fd7f5e9945ea8ed1b4ffefb88b6d1bd1d4d37e11) |
||||||||
| Route | Grade | Style | Selected ascents | |||||
| 15 |
★ Charlottes web
The blunt arête right of chimney up three carrots to single U-bolt on top. | 14 | 9m, 3 | |||||
| 16 |
★ Spiders silk
Undercut start onto slab right of blunt arête to share single U-bolt anchor with 'Charlottes web' | 14 | 10m, 3 | |||||
| 17 |
★★ Fangs
The overhung juggy left arête of the first cave. There is a bolt 3m back. Suggested to bring second up route to clean. | 18 | 11m, 5 | |||||
| 18 |
★ Incy Wincy
Climb the overhanging crack on the left edge of the first major cave using only the crack for hands. It meets Fangs at its 3rd bolt and it's easy to walk off into the cave. Lead it on gear, top rope or solo | V3 | 6m | |||||
| 19 |
★ Huntsman
Climb the crack as for incy wincy but all hand holds are in. | V2 | 6m | |||||
| 20 |
Arachnida
Right side of first cave, sit start at undercut then up over prow | V1 | 3m | |||||
| 21 |
★★ Cave 2
Alerte Protections: First bolt At the left side of the second cave start up arch to step left at second bolt and up face past third bolt to single U-bolt on top. | 18 | 10m, 3 | |||||
| 22 |
Ground floor
Sit start to Cave 2 climb at undercut, up over prow .Easy to traverse off right when level with first bolt | V0 | 3m | |||||
| 23 |
Pyramid
Opposite the right side of the second cave is a pyramidal boulder with a narrow arête on the uphill side. Sit start and climb arête to top out. | V0 | 3m | |||||
/4a/05/4a05981e10b7a096b7168b45f0648dbe2c21926c)  |
||||||||
| Route | Grade | Style | Selected ascents | |||||
| 24 |
Beware of the snake
Right of the third cave and just left of Fox wall is an arête with 2 ring bolts starting off a triangular boulder. Single U-bolt on top. A finger sized cam will protect final moves. Use a short draw or single 'biner on first bolt to minimise fall distance. | 24 | 9m, 2 | |||||
| 25 |
★ Red Fox
Just right of corner on reddish slab to vertical finish. Single U-bolt after topping out | 18 | 8m, 2 | |||||
| 26 |
Vixen
1m right of RF, up to single bolt trending slightly right and top out. Using single U-bolt to left. | 17 | 8m, 1 | |||||
| 27 |
Reuben
Left of TD, bouldery slab to first bolt, mantle, then more easily to top. Use bolt above TD for anchor. | 17 | 8m, 2 | |||||
| 28 |
The Den
Awkward overhung start at small triangular cave feature where face abuts another block requiring hand jam, then more easily up arête | 19 | 9m, 2 | |||||
| 29 |
Pro1
The left arête of the wall to the right of fox wall. Mind the tree. Ring bolts. Project, stay off. Équip.: Vanessa Wills | 9m, 3 | ||||||
| 30 |
Pro2
The right side of wall starting at cairn. Project, stay off. Équip.: Vanessa Wills | 11m | ||||||
 |
||||||||
| Route | Grade | Style | Selected ascents | |||||
| 31 |
★★ Late for the Circus
The arête at right side of wall . Climbs the right face. Unfortunately first bolt makes you swing around arête if you come off, just start with second clipped. A long sling over the edge from anchors on platform will protect last moves. FFA: Vanessa Wills, Fév 2018 | 22 | 11m, 3 | |||||
| 32 |
Bull Ants
1m to right of arête with mantle to top out, the left most route on the wall with a chimney at its right end. High first carrot bolt! Single U-bolt on top shared with 'Jack Jumpers' | 16 | 10m, 3 | |||||
| 33 |
★ Jack Jumpers
The middle route on the wall with high first carrot bolt to begin, protected straight up to finish with a cam, or step left to finish as for 'Bull Ants'. Shares single U-bolt on top with 'Bull Ants' | 16 | 9m, 2 | |||||
| 34 |
★ Sugar ant
The route just left of chimney, add a few extra grades for the top mantle, but best to preplace anchor on tree and just lower off. | 16 | 8m, 3 | |||||
| 35 |
Chimney
Bridge up between walls to slightly tricky finish. Preplace anchor off tree to avoid sketchy leaf littered finish. | 6 | 8m | |||||
| 36 |
Jugs
Just right of chimney up wall and arête. Grade 10 with preplaced anchor to avoid mantle. Ironstone buckets. There is a single hex bolt above this route to anchor off | 10 | 9m, 3 | |||||
| 37 |
★★★ Knobs
Interesting climbing on ironstone knobs. A single U-bolt above route. 2m R of 'Jugs', best route at the crag probably! | 18 | 11m, 4 | |||||
/df/da/dfdaccacaafc0a678a08c6ae8eea6bb3fdf42e79) /e2/df/e2dfb6ac76bb6c80ad54a48760520166976cd36e) |
||||||||
| Route | Grade | Style | Selected ascents | |||||
| 38 |
★★ Crag police.
Straight up small rails to first bolt then traverse right to second bolt. Then straight up thin crimps to anchors FA: Eric c & Todd Wright | 17 | 8m, 4 | |||||
| 39 |
★★ Death Star
Just right of arête on most rightward wall of crag, undercut start but huge jugs the whole way, opposite Star boulder. Originally used anchor of 'Knobs' but this is about 5 metres from top and causes huge rope drag and loads the U-bolt incorrectly | 12 | 10m, 2 | |||||
| 40 |
Light Sabre
Middle of face around arete to the right of 'Knobs', up centre of well featured slab. No anchor to be found, best to avoid for now. | 16 | 8m | |||||
1.3. Koolewong Crag 15 routes in Crag
- Summary:
-
La plupart Escalade sportive
Lat / Long: -33.463312, 151.311123
description
Three main sandstone outcrops with intermediate caves overlooking Brisbane waters, Koolewong.
approche
Park before the bus stop at the Junction of Glenrock Parade and Havendale Cl. There is access to the trail behind the bus stand, follow diagonally left for 50m until you come to two marked trees (pink and orange tags), then direcly up the escarpment for 100m. Take care through loose steep terrain.
| Route | Grade | Style | Selected ascents | |||||
|---|---|---|---|---|---|---|---|---|
| 1 |
★★ 45 degrees of seperation
Steep climbing, out the 45deg wall, short but pumpy. FA: Jason Piper, 2008 | 22 | 6m | |||||
| 2 | ★ Inside left cave arete | 20 | 6m | |||||
| 3 |
★★ Pete The Pilling Pelican
Starting 2m from the left arete, out through the steep cave. FA: Tim Haasnoot, 2008 | 22 | 7m | |||||
| 4 |
Slit Risks
Up the short wall to roof, then top out on slopey holds. FA: Jason Piper, 2008 | 24 | 8m, 3 | |||||
| 5 |
Bloodstone Dyno
Good holds up face to a giant leap through the cave to top out. FA: Jason Piper, 2007 | 25 | 8m, 3 | |||||
| 6 | Traverse (project) | 10m | ||||||
| 7 |
★★★ Bad Reception
Right hand end of main cave. Up left of the arete on the slopey holds to lower off. FA: Tim Haasnoot, 2008 | 25 | 8m, 5 | |||||
| 8 | ★ R side 3rd cave | 21 | 10m | |||||
| 9 | ★ Outside 3rd cave | 17 | 10m, 5 | |||||
| 10 |
★ Red label
Left most climb on the first cave you get to walking up the track. Lower of under small rooflet. FA: Jason Piper | 19 | 9m | |||||
| 11 | Direct start | 20 | 9m | |||||
| 12 |
★ Gold label
Start in back of cave, out lip and up on crimpers to lower off under rooflet. FA: Jason Piper | 22 | 9m | |||||
| 13 |
★★ Green label
Tough dyno start to a hard move to pull lip and head up crimpers to lower off. FA: Tim Haasnoot, 2009 | 24 | 9m, 5 | |||||
| 14 | Daves anchorless route | 20 | 9m | |||||
| 15 |
★ Train spotting
FA: V Wills | 18 | 9m | |||||
/ad/0b/ad0bc2d2c826cc6564744a1c3bd83a1aca998d99) /2b/9e/2b9ecc827d03fbf41471c232f51590ef1a9171f1) /72/0a/720ac36a9467d92d69d50c7f576288db256d2ef8)  /93/7a/937a521dadadb395b116bb974581ec562bca9b3a) |
||||||||
1.4. Waterfall Valley 5 routes in Crag
- Summary:
-
Style inconnu et Escalade sportive
Lat / Long: -33.469678, 151.313756
1.4.1. Left end 3 routes in Area
- Summary:
-
Tous Style inconnu
| Route | Grade | Style | Selected ascents | |||
|---|---|---|---|---|---|---|
| 1 | ★ Left route with long deadpoint | 23 | ||||
| 2 | Project (long dyno) | |||||
| 3 | Amphibious? (Route bolted by S Ahern) | 21 | ||||
1.4.2. Main Wall 2 routes in Area
- Summary:
-
Tous Escalade sportive
/46/b9/46b9c9cf73f66ebcd13ef16edb616cf090d53a82) |
||||||||
| Route | Grade | Style | Selected ascents | |||||
|---|---|---|---|---|---|---|---|---|
| 1 | ★ Made with Milo | 23 | 12m | |||||
| 2 | ★ Pitch 1 carrot route | 21 | 12m | |||||