A Crag Guide gives an extensive view of all sub areas and climbs at a point in the index. It shows a snapshot of the index heirachy, up to 300 climbs (or areas) on a single web page. It shows selected comments climbers have made on a recently submitted ascent.
At a minor crag level this should be suitable for printing and taking with you on a climbing trip as an adjunct to your guidebook.
This guide was generated anonymously. Login to show your logged ascents against each route.
Warning
Rock climbing is extremely dangerous and can result in serious injury or death. Users acting on any information directly or indirectly available from this site do so at their own risk.
This guide is compiled from a community of users and is presented without verification that the information is accurate or complete and is subject to system errors. By using this guide you acknowledge that the material described in this document is extremely dangerous, and that the content may be misleading or wrong. In particular there may be misdescriptions of routes, incorrectly drawn topo lines, incorrect difficulty ratings or incorrect or missing protection ratings. This includes both errors from the content and system errors.
Nobody has checked this particlular guide so you cannot rely on it's accuracy like you would a store bought guide.
You should not depend on any information gleaned from this guide for your personal safety.
You must keep this warning with the guide. For more information refer to our:
Usage policy
Contributors
Thanks to the following people who have contributed to this crag guide:
benwiessner
Campbell Gome
Brendan Heywood
Cameron Roy
Kieran Loughran
tgbuckley482
Douglas Hockly
Wendy Eden
Rod Young
Paul Badenoch
The size of a person's name reflects their Crag Karma, which is their level of contribution. You can help contribute to your local crag by adding descriptions, photos, topos and more.
Some content has been provided under license from: © Australian Climbing Association Queensland (Creative Commons, Attribution, Share-Alike 2.5 AU) © Cameron Roy (CC BY-SA 3.0 AU)
Table of contents
- 1. John's Pinnacle 14 in Cliff
- 2. Index by grade
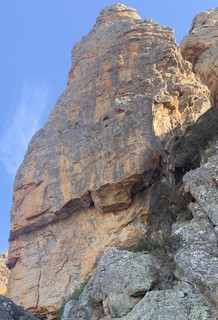
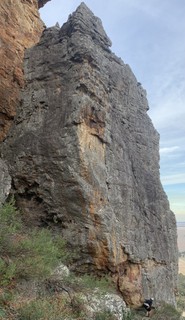
1. John's Pinnacle 14 routes in Cliff
- Summary:
-
All Trad climbing
Lat / Long: -36.757186, 141.845099
Stick to the paths.
Don't disturb the wildlife.
Routes near peregrine falcon nesting sites are closed in the spring.
Minimise the impact of your camping (fuel stoves not fires, take your rubbish with you, etc).
description
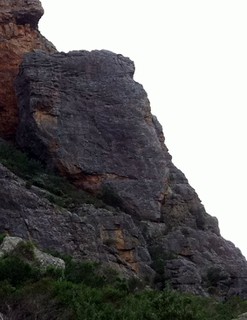
Emergency Location: Mount Arapiles, Bluffs Area
access issues
Cultural heritage closures now apply to some parts of Arapiles. This advice continues to evolve and may not be fully reflected in this website; refer to Parks Victoria for details applicable at the time of your visit. https://www.parks.vic.gov.au/-/media/project/pv/main/parks/documents/management-plans/mount-arapiles-tooan-state-park/mount-arapiles-tooan-state-park---aboriginal-cultural-heritage-protections---october-2020.pdf
Bird Nesting September-December Raptors usually nest on the following climbs in Spring : Cassandra, Eurydice, Harlequin Cracks, Revelations. Nesting usually finishes mid-December. There may or may not be signs in place at these times. Please keep 50m clear of these climbs if there appears to be nesting activity.
State Park - no dogs. No fires allowed Oct-Apr (inclusive).
approach
Easiest approach is to climb Ali's, but you could also do any of the routes on Morfydd Wall.
descent notes
Abseil from ring bolts on N side.
ethic
Mount Arapiles is first and foremost a trad climbing area. The few sport climbs tend to be in the higher grades where no natural pro is available.
Bolting, particularly retro-bolting, is discouraged and should only be undertaken after extensive consultation with the local climbers, first ascensionists, etc. Inappropriately placed bolts have been chopped.
Do not chip the rock.
Look after the park.
   |
||||||||
| Route | Grade | Style | Selected ascents | |||||
|---|---|---|---|---|---|---|---|---|
| 1 |
★★ Allez
Start in the middle of the east face of the pinnacle (which looks over Ali's and Fang Buttress). Tough crack R of arete to small roof at 4m. There's a RB on the lip and another up higher, it's wise to stick-clip the first. FA: Mark Moorhead & Dave Fearnley, 1982 | 24 | 25m, 3 | |||||
| 2 |
Atomic Fusion
As for H to BR then trend L to roof, BR on lip, then up middle of face with high BR. FA: Martin Grulich, 1986 | 26 | 25m, 3 | |||||
| 3 |
Homegrown
Start at the arete just R of Allez. Up to BR then into crack which takes you R around the corner. FA: Mark Moorhead & Ian Anger, 1980 | 23 | 25m, 1 | |||||
| 4 |
Flappers' Delight
Up the juggy wall on the north face of John's pinnacle, close to Denim Wall. Bad pro and rock but if that doesn't put you off at this grade then it's a nice summit to bag. FA: John Fahey, Ted Batty, Chris Baxter, Bob Bull & Peter Jackson, 1965 | 4 | 16m | |||||
| 5 |
Nostalgia
Start on the west face of the pinnacle. Stick clip bolt, veer R, then back L. Apparently has a fragile undercling. FA: Mark Moorhead, 1981 | 23 | 20m, 1 | |||||
| 6 |
I'll Nail You
Arete 2m R of Nostalgia. Straight up to the overhang's highest point. From ledge finish up juggy wall. No pro. FA: Patrick Alseby. Summer, 1998 | 25 X | 17m | |||||
| 7 |
Piggy in the Middle
Up Shoadee for 4m, then traverse L to brief ramp (BR). Up middle of black wall. FA: Ant Prehn & Rod Young, 1986 | 23 | 27m, 1 | |||||
| 8 |
★ Shoadee
Start just left of the SW arete of the pinnacle. Hand traverse R to shallow corner on R side of arete, and up it to slopy finish. FA: Chris Dewhirst & Phillip Stranger, 1967 | 14 | 24m | |||||
| 9 |
Let Me Cry
Start down R of Shoadee. Small roof to stance then L and up a grey streak just R of Shoadee. FA: Jon Muir & solo, 1985 | 25 X | 30m | |||||
| 10 |
Shalimar Direct Start
Start at the large flake topped with sharp, broken rock, a few metres down from the start of Shoadee. The difficulties ease soon after pulling through the steepness, then trend slightly right to join the corner of Shalimar. It seems unlikely that this route wasn't done earlier, but the only route written up in the vicinity that I can find is "Let Me Cry" (graded 25X). FA: benwiessner & John Mader, 8 Apr 2018 | 20 | ||||||
| 11 |
★ Shalimar
Start 1.5m L of the SE arete (i.e., start 3.5m L of Allez). Tough start then veer L into a short groove which is just L of the centre of the face. Finish R. FA: Phillip Stranger & Chris Dewhirst, 1967 | 18 | 31m | |||||
| 12 |
★ Shanghai
Start and finish as for Shalimar, but climb the R arete of the face (just L of Allez). | 18 | 30m | |||||
| 13 |
The Invisible Hand
Start 4m L of Let Me Cry. From the ground climb up to thin R leaning and L facing flake and continue up to ledge. from this join groove which is shared with Shalimar and finish up left. Spaced wires. FA: Patrick Alseby. Summer, 1998 | 24 R | 26m | |||||
| 14 |
Handle with Care
"Start variant 2m right left of Let Me Cry" - whatever that means! FA: Patrick Alseby. Summer, 1998 | 23 R | 8m | |||||
2. Index by grade
| Grade | Stars | Name | Style | Pop | |
|---|---|---|---|---|---|
| 4 | Flappers' Delight | 16m | |||
| 14 | ★ | Shoadee | 24m | ||
| 18 | ★ | Shalimar | 31m | ||
| ★ | Shanghai | 30m | |||
| 20 | Shalimar Direct Start | ||||
| 23 | Homegrown | 25m, 1 | |||
| Nostalgia | 20m, 1 | ||||
| Piggy in the Middle | 27m, 1 | ||||
| 23 R | Handle with Care | 8m | |||
| 24 | ★★ | Allez | 25m, 3 | ||
| 24 R | The Invisible Hand | 26m | |||
| 25 X | I'll Nail You | 17m | |||
| Let Me Cry | 30m | ||||
| 26 | Atomic Fusion | 25m, 3 |