Photos
Help

Les Grandes Dalles

3
YDS
5.7

Seasonality

J
F
M
A
M
J
J
A
S
O
N
D

Summary

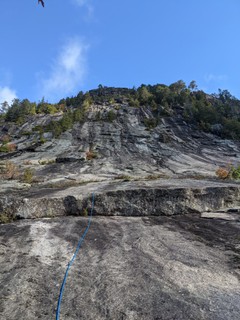
Ceci est la première paroi que l'on aperçoit lorsqu’on se dirige vers Aventurex à partir de Saint-Siméon. Il n’y a qu’une seule voie cataloguée sur cette paroi.

This is the first wall that you will see when heading towards Aventurex from Saint-Siméon. There is only one route on this wall.

Access issues

Ce site est géré par Aventurex et la FQME. Vous devez acquitter vos droits d’accès au site Aventurex (47.895379, -69.988996). Au site, les employés vous remettrons une clé (en échange d’une pièce d’identité) qui vous permettra d’ouvrir la barrière du stationnement. Vous devriez être membre de la FQME ou avoir une passe journalière.

This crag is managed by Aventurex and the FQME. You must pay your access fees at the Aventurex site (47.895379, -69.988996). At the Aventurex site, the staff will trade a piece of ID for a key which opens the gate (wire) to the parking lot. You should be a member of the FQME or have a day pass.

Approach

Suivre les rubans orange pour 1km (gain vertical de 110m). Il y a deux embranchements qui sont bien indiqué, suivre les affiches. Vous trouverez le début de la voie lorsque vous atteignez la dalle sur votre gauche. Cherchez les ancrages pour trouver le début de la voie (environs 47.89855, -69.96082).

Follow the orange ribbons for 1km (vertical gain of 110m). There are two forks that are well marked, follow the signs. You will find the route once you reach the slab on your left. Look for anchors to find the beginning of the route (roughly 47.89855, -69.96082).

Where to stay

Le site Aventurex offre du camping et autres accommodations à quelques minutes du stationnement (https://aventurex.ca/les-palissades-de-charlevoix/hebergements/).

The Aventurex site offers camping and other accommodations a few minutes from the parking (https://aventurex.ca/les-palissades-de-charlevoix/hebergements/).

Routes

Add route(s) Add topo Reorder Bulk edit Convert grades
Grade Route
1 5.3
2 5.4
3 5.6
4 5.6
5 5.6
6 5.7
7 5.7

Nice initiation to longer routes. This climb apparently goes at 400m but I have my doubts. Starts as a slab then the route wanders to find easier terrain. There are a lot of other very interesting features to be climbed on gear around.

  1. P1: 5.3 - Easy slab. Follow the bolt line. The pitch is ~66m if you start from the bottom of the slab. If you have a 60m rope and don't want to simul-climb, belay from the first bolt.

  2. P2: 5.4 - Starts being a little steeper but still slab.

  3. P3: 5.6 - You can either pull through the juniper bushes or avoid them by going around to the right.

  4. P4: 5.6 - There is an obvious bolt up and right from the anchor. This is not your route. You are going left. Watch out for loose rocks around the belay.

  5. P5: 5.6 - Traversing out and left through a ledge with a few trees.

  6. P6: 5.7 - Left and then up. This pitch probably has the most interesting climbing of the whole route.

  7. P7: 5.7 or 5.9 - There are two variants here. When you get to the headwall, you can either go up and pull through 1-2 moves of 5.9 or go out and right to avoid it. The 5.9 variant is more interesting.

Top:
Enjoy and great view of the region and the surroundings and a good refueling break as you can roam free around the top of the climb.
Descent:
To descend, you can either rappel or walk off (not recommended).
  • Rappel

    1. Stuck ropes are common, you must have the necessary skills to handle stuck ropes and self-rescue. Budget 5+ hours to descend.

    2. Most rappels are longer than 35m. Bring two 60m (or longer) ropes.

    3. The first rappel station is roughly 5-10m right (climber's right) of the P7 belay station.

    4. There are seven rappel anchors. The rappel anchors are independent of the belay anchors, except for the anchor of P5. The first two rappels are climber's right of the route, the last four are climber's left of the route. Follow where gravity wants to take you.

    5. In 2021, a rappel station was added above P5 to mitigate stuck rope. While it is possible to rappel to P5 from the top, do NOT skip this rappel anchor. At P5 belay anchor, take a moment to locate it right above you. At P6 belay anchor, it should be to your right.

    6. There are a many trees over at climber's left to escape. Some may already have slings but make sure you inspect them.

    7. Most pitches are a little more than 30m so try not to link pitches on the way down if you use the bolted anchors. The last rappel can safely be skipped with two 70m ropes.

  • Walk Off (Not Recommended)

    1. Follow the red flags to the parking lot.

    2. Note that this route does not lead back to the base of the climb, if you leave items at the base, you will have to hike again from the parking to the base and back.

FFA: Patrick Brouillard, François Guy Thivierge & Charles Lacroix, 2018

1 5.4 R
2 5.5
3 5.6
4 5.4
5 5.4
6 5.7
7 5.5

Much less climbed than its bolted sister, this climb is surprisingly clean of moss and offers much better slab and crack climbing at an affordable grade. The climb follows great features from bottom to top. The R grade comes from the first pitch on the slab which is hard to protect (some gear spoiler in logged ascent).

Disclaimer: Grades and pitches info are approximate since we simul-climbed it. Please update information as you see fit. Although mostly on solid rock, this climb is still adventure terrain. Make sure you know what you're getting into.

Climbing

  1. 5.5R 70m: Start climbing about 20m right of the 'Sport 400' and about 10m left of the tree-line splitting the cliff. The first pitch climbs up a friction slab to a slight, shallow dihedral which offers few protections. Make your way up to a pile of broken fridge-sized blocks. Beware of loose rocks. Warning: There was some easily avoidable poison ivy on the first overlap encountered ~15m from the ground.

  2. 5.5 ~70m: Climb over the bulge to a low angle, left-leaning dihedral. Possible tree/gear anchor on a comfortable ledge. There might be a line in the larger dihedral right of the bulge.

  3. 5.6 ~60m: Follow a nice crack splitting the blocky black rock straight up from the previous ledge, through one steeper move. Move on to a few easier slab moves to another tree ledge. Lots of loose rocks.

  4. 5.4/5.9 ~50m: This pitch bypasses the first big roof seen from the ground on the left. We climbed through the tree patch up a slightly overhung and very mossy off-width crack (5.9?). Bring a #5 or sling a forearm-sized tree trunk. Alternatively, you can chimney your way up between that forearm-sized tree and the wall to the right of the off-width. It might be possible to avoid this by climbing between the room and off-width.

  5. 5.4 ~40m: A shorter pitch through easier terrain brings you to a bolted anchor right below the big roof overlooking the whole climb.

  6. 5.7?/5.9+ 35m: From the bolted anchor, we climbed straight up from the anchor through 3-4 overhung bouldery moves. Hard to protect properly. After a bolt, there is a second bulge that is easily passed by going left for 2m and following the flake under the roof right back into the correct line. You then get to climb a wonderful and exposed dihedral past a bolt to finish this wonderful pitch with 10m of easier slab. Gear anchor in a large finger-sized crack curving left. I believe the first bulge can be avoided by climbing 2m to the right. Looked like around 5.7 (confirmation?)

  7. 5.8/5.5 ~40m: Climb up the stellar squeamish-style finger-crack to a crux traverse move and then made your way up towards the shrub guarding the summit. An alternative is going out right past a visible glue-in and up some easier terrain(5.5?). Either build a tree anchor or use the bolted rappel anchor. (This leaves the second unprotected for the finish section.)

Descent

Follow the same beta as for the 'Sport 400'

Description to be updated.

Hello!

First time here?

theCrag.com is a free guide for rock climbing areas all over the world, collaboratively edited by keen rock climbers, boulderers and other nice folks.

You can log all your routes, connect and chat with other climbers and much more...

» go exploring, » learn more or » ask us a question

Accommodations nearby more Hide

Share this

Wed 26 Apr
Check out what is happening in Les Grandes Dalles.

Get a detailed insight with a timeline showing

  • Ticks by climbers like you
  • Discussions of the community
  • Updates to the index by our users
  • and many more things.

Login to see the timeline!

Deutsch English Español Français Italiano 한국어 Português 中文