A Crag Guide gives an extensive view of all sub areas and climbs at a point in the index. It shows a snapshot of the index heirachy, up to 300 climbs (or areas) on a single web page. It shows selected comments climbers have made on a recently submitted ascent.
At a minor crag level this should be suitable for printing and taking with you on a climbing trip as an adjunct to your guidebook.
This guide was generated anonymously. Login to show your logged ascents against each route.
Warning
Rock climbing is extremely dangerous and can result in serious injury or death. Users acting on any information directly or indirectly available from this site do so at their own risk.
This guide is compiled from a community of users and is presented without verification that the information is accurate or complete and is subject to system errors. By using this guide you acknowledge that the material described in this document is extremely dangerous, and that the content may be misleading or wrong. In particular there may be misdescriptions of routes, incorrectly drawn topo lines, incorrect difficulty ratings or incorrect or missing protection ratings. This includes both errors from the content and system errors.
Nobody has checked this particlular guide so you cannot rely on it's accuracy like you would a store bought guide.
You should not depend on any information gleaned from this guide for your personal safety.
You must keep this warning with the guide. For more information refer to our:
Usage policy
Contributors
Thanks to the following people who have contributed to this crag guide:
The size of a person's name reflects their Crag Karma, which is their level of contribution. You can help contribute to your local crag by adding descriptions, photos, topos and more.
Table of contents
- 1. Dead Ringers Block 4 in Cliff
- 2. Index by grade
1. Dead Ringers Block 4 routes in Cliff
- Summary:
-
Rock climbing and Sport climbing
approach
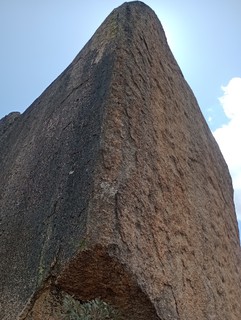
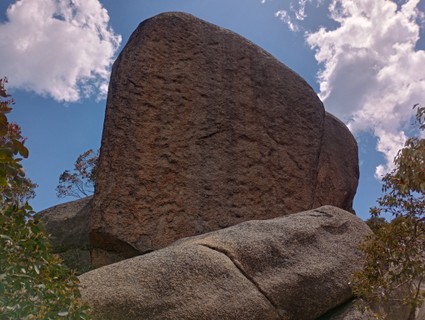
From Lake Catani, keep driving about 700m past the Cathedral car park, to a gated 4WD track that leads off to the right up the hill (as you approach this point you can see the Dead Ringers block on the hillside horizon). Park near the gate, walk up the 4WD track for a minute, then turn left and bash to the base of the wall.
If you'd rather abseil inspect the routes first, it is possible to do a nasty scramble/solo around the back, to get to the top of the block. A prototype ring and a couple of carrots can be found on top.
ethic
Climbing here varies from trad climbing, mainly up obvious lines and features, to sport climbing up slabs and sections of rock impossible to protect with natural gear. Of course, there are lots of climbs protected with a mixture of trad gear augmented with occasional bolt runners. Given that the trad ethic is still strong here, and the continuing need to minimize our environmental climbing 'footprint', please avoid unilateral decisions to retro-bolt and be restrained in using fixed protection when establishing new routes.
  |
||||||||
| Route | Grade | Style | Selected ascents | |||||
|---|---|---|---|---|---|---|---|---|
| 1 |
Assume The Position
Starts 8m L of White Chemical Dustbins, following some carrots. FA: Nick White, 1992 | 24 | 18m | |||||
| 2 |
White Chemical Dustbins
On the L side of the arete. One carrot and two FHs. FA: Nick White, 1992 | 25 | 18m, 3 | |||||
| 3 |
★★ Dead Ringers
Takes the line to the right of the striking arete. 3 early edition ring bolts that are starting to show their age. FA: Malcolm Matheson, Peter Croft & Parrish Robbins, 1990 | 25 R - X | 18m, 3 | |||||
| 4 |
Spitting Image
FA: Malcolm Matheson, 1992 | 25 | 15m | |||||
2. Index by grade
| Grade | Stars | Name | Style | Pop | |
|---|---|---|---|---|---|
| 24 | Assume The Position | 18m | |||
| 25 | Spitting Image | 15m | |||
| White Chemical Dustbins | 18m, 3 | ||||
| 25 R - X | ★★ | Dead Ringers | 18m, 3 |