A Crag Guide gives an extensive view of all sub areas and climbs at a point in the index. It shows a snapshot of the index heirachy, up to 300 climbs (or areas) on a single web page. It shows selected comments climbers have made on a recently submitted ascent.
At a minor crag level this should be suitable for printing and taking with you on a climbing trip as an adjunct to your guidebook.
This guide was generated anonymously. Login to show your logged ascents against each route.
Warning
Rock climbing is extremely dangerous and can result in serious injury or death. Users acting on any information directly or indirectly available from this site do so at their own risk.
This guide is compiled from a community of users and is presented without verification that the information is accurate or complete and is subject to system errors. By using this guide you acknowledge that the material described in this document is extremely dangerous, and that the content may be misleading or wrong. In particular there may be misdescriptions of routes, incorrectly drawn topo lines, incorrect difficulty ratings or incorrect or missing protection ratings. This includes both errors from the content and system errors.
Nobody has checked this particlular guide so you cannot rely on it's accuracy like you would a store bought guide.
You should not depend on any information gleaned from this guide for your personal safety.
You must keep this warning with the guide. For more information refer to our:
Usage policy
Contributors
Thanks to the following people who have contributed to this crag guide:
Matt Tranter
Marshall
Simon Vaughan
Brendon Flanagan
Adam Rabjohns
Brendan Heywood
Jon S-D
Chris A
Campbell Gome
Marek
The size of a person's name reflects their Crag Karma, which is their level of contribution. You can help contribute to your local crag by adding descriptions, photos, topos and more.
Some content has been provided under license from: © Australian Climbing Association Queensland (Creative Commons, Attribution, Share-Alike 2.5 AU)
Table of contents
- 1.
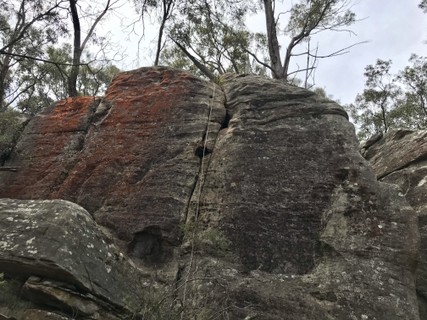
The Chopping Block
16 in Crag
- 1.1. Left hand boulders. 2 in Sector
- 1.2. The Chopping Block 14 in Cliff
- 2. Index by grade
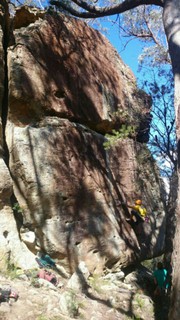
1. The Chopping Block 16 routes in Crag
- Summary:
-
Mostly Sport climbing
Lat / Long: -34.554086, 150.227787
description
Small out crop in Belangalo Forest. Nice featured rock, potential for lots more routes scattered in the gorges around the area.
access issues
If you have benefited from climbing infrastructure in NSW, please consider making a donation towards maintenance costs. The Sydney Rockclimbing Club Rebolting Fund finances the replacement of old bolts on existing climbs and the maintenance of other hardware such as fixed ropes and anchors. The SRC purchases hardware, such as bolts and glue, and distributes them to volunteer rebolters across the state of New South Wales. For more information, including donation details, visit https://sydneyrockies.org.au/rebolting/
1.1. Left hand boulders. 2 routes in Sector
- Summary:
-
Trad climbing and Sport climbing
Lat / Long: -34.554004, 150.227702
description
Left hand end of crag when facing rock.
approach
Descent through slot and turn up hill. Routes start 1 metre off track.
descent notes
Walk back down.
 |
||||||||
| Route | Grade | Style | Selected ascents | |||||
|---|---|---|---|---|---|---|---|---|
| 1 |
Project MT
Pull on to the party ledge. Up slappy arête with no holds in sight. | 22 | 12m, 3 | |||||
| 2 |
★ Frail Deeds.
FA: Matt Tranter, 16 Nov 2020 | 19 | 10m | |||||
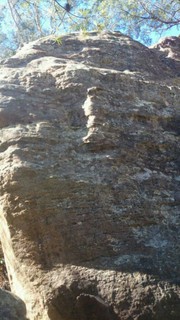
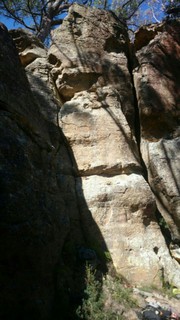
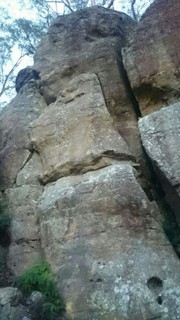
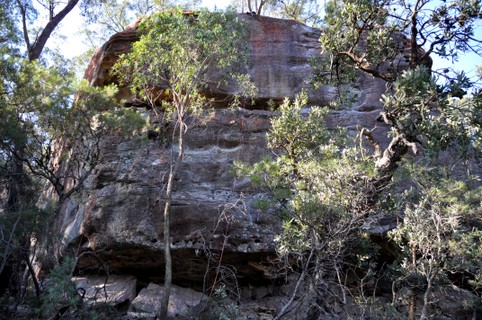
1.2. The Chopping Block 14 routes in Cliff
- Summary:
-
Mostly Sport climbing
Lat / Long: -34.554091, 150.227791
description
Outcrop of rock in the Belanglo State Forest. Good long route on OK rock and small snappy boulders with face climbing. Routes are described from the far right side of the crag back to the descent path.
approach
Located just outside of Berrima. Exit the Hume Highway at the Belanglo sign. (Cross the highway if coming from Sydney, if you hit Sutton Forrest McDonalds you have gone to far.) Drive past the Gordon VC rest area and onto the good dirt track. (Belanglo Road.) Contine through Forest for a cople of KMs. Once you have passed Dailys Road rest area on the right take the second fire trail on the left. If you reach the Cherry Tree Road and the horse farm you have gone one road to far.
Drive down the fire trail, straight across the first junction and the second juction (Dogleg and a bit bumpy.) Join Cherry Tree Firebreak and wind down this for 5 minutes until you reach the turning circle at the end.
Park here and follow the path and cairns down hill for 2 minues until you reach the cliff. Approach through boulders to the right.
    |
||||||||
| Route | Grade | Style | Selected ascents | |||||
|---|---|---|---|---|---|---|---|---|
| 1 |
★ Bone Machine
Step off the large boulder (or off the ground if you have fingers of steal). Balance up the areve and finish at shared anchors. Short. First route on the small boulder at the bottom of the descent gully FA: Matt Tranter, 2011 | 17 | 8m, 5 | |||||
| 2 |
John Doe
Snappy bottom , up two small ledges to the Gritstone finish. Much harder if you stay out of the crack First route on The Boulder. FA: Matt Tranter, 2011 | 15 | 9m, 4 | |||||
| 3 |
Hitching a Ride
One hard move over the lip and it is all over. Bring those large sea gull bashers. Trad crack at the far left end of the Block, next to the descent path. FA: Stephan Pervanoglu, 2011 | 15 | 10m | |||||
| 4 |
★ Shallow Grave
1m right of the trad crack.Pull over the lip and trend left. The second block. Updated 2017 - harder after a number of key holds pulled off. FA: Matt Tranter, 2011 | 18 | 11m, 5 | |||||
| 5 |
★ A Murder of Crows
Off balance, mean and thugish. use anything you like, twist and turn, pull through the bands, finish at the right hand anchors. Start 1 metre right of Shallow Grave. FA: Matt Tranter, 2011 | 18 | 10m, 6 | |||||
| 6 |
Burried in a Crack.
As the name suggests, get deep in that crack. Wobble without much protection using both walls and exit to the bolts at the top of the crag. The second trad crack on this face. FA: Stephan Pervanoglu, 2000 | 15 | 10m | |||||
    |
||||||||
| Route | Grade | Style | Selected ascents | |||||
| 7 | Unknown 1 | 8m | ||||||
| 8 |
★ The Hatchet
Hard pull from a three finger slot. Up the features to the large ledge. Bouldery and very balancy finish. The last line of bolts on this side of the block. FA: Simon Vaughan, 2011 | 22 | 12m, 6 | |||||
| 9 |
★ The Danse Macabre
Hard pull off the big jugs, trend left to a large rest ledge. Two cruxes follow, join the finger pockets and stretch as tall as possible. Shared start with Dodging Bullets. FA: Matt Tranter, 2011 | 22 | 12m, 7 | |||||
| 10 |
★ Dodging Bullets
Nice heaving on big holds to balancy moves to gain stance then some trickiness to triple bolt anchors. Under cut start left hand side of wall facing the gorge FA: Simon Vaughan | 21 | 12m | |||||
| 11 |
★ Close to the Bone
Heave up jug start then balancy and surprisingly powerful 4 move traverse, then straight up Start as for Dodging Bullets then move right Steep and then balancy climbing on great rock, firction is superb from Autumn onwards FA: Simon Vaughan | 23 | 12m | |||||
| 12 |
★ One Fatal Blow
Up corner with interest to an airy finish on the headwall In the corner around to the right of the main wall as you face the cliff The corner is hard and 3D to get up and the headwall is steeper than you think FA: Simon Vaughan, 2011 | 20 | 12m, 6 | |||||
| 13 |
Project
Probably a batman start to get it done we will see FA: Simon Vaughan | |||||||
| 14 |
Project Matt T
Share the start with the previous climb. Still needs one more bolt to go directly to the lower offs. Going to be really hard as all the holds run out. Start: 2 metres further right | |||||||
2. Index by grade
| Grade | Stars | Name | Style | Pop | Area | |
|---|---|---|---|---|---|---|
| 15 | Burried in a Crack. | 10m | 1.2. The Chopping Block | |||
| Hitching a Ride | 10m | 1.2. The Chopping Block | ||||
| John Doe | 9m, 4 | 1.2. The Chopping Block | ||||
| 17 | ★ | Bone Machine | 8m, 5 | 1.2. The Chopping Block | ||
| 18 | ★ | A Murder of Crows | 10m, 6 | 1.2. The Chopping Block | ||
| ★ | Shallow Grave | 11m, 5 | 1.2. The Chopping Block | |||
| 19 | ★ | Frail Deeds. | 10m | 1.1. Left hand boulders. | ||
| 20 | ★ | One Fatal Blow | 12m, 6 | 1.2. The Chopping Block | ||
| 21 | ★ | Dodging Bullets | 12m | 1.2. The Chopping Block | ||
| 22 | Project MT | 12m, 3 | 1.1. Left hand boulders. | |||
| ★ | The Danse Macabre | 12m, 7 | 1.2. The Chopping Block | |||
| ★ | The Hatchet | 12m, 6 | 1.2. The Chopping Block | |||
| 23 | ★ | Close to the Bone | 12m | 1.2. The Chopping Block | ||
| ? | Project | 1.2. The Chopping Block | ||||
| Project Matt T | 1.2. The Chopping Block | |||||
| Unknown 1 | 8m | 1.2. The Chopping Block |