Help

Klein Winterhoek

  • Grade context: SA
  • Photos: 5
  • Ascents: 8

Seasonality

J
F
M
A
M
J
J
A
S
O
N
D

Summary

This mountain has some of the greatest multiday, steep climbing to be found. A grade 6 paradise.

Description

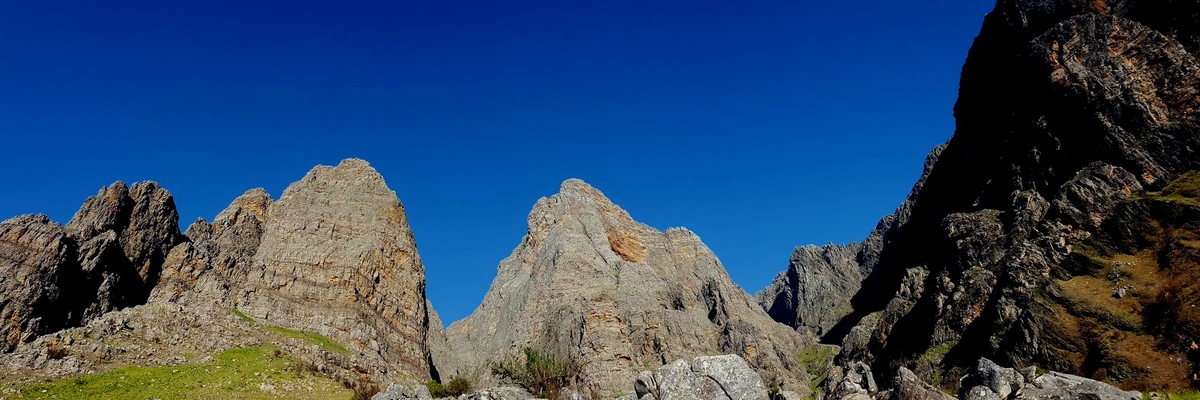
The mountain is characterized by the prominent frontal ridge that is visible from Cape Town, and by the enormous overhanging amphitheatre on the eastern side of the peak.

Access issues

the historical access via the Zeeman’s farm Bergplaas is closed. Subsequently Adam Roff negotiated access via an adjacent farm. Please therefore contact Adam Roff at roff.adam@gmail.com to obtain the current access arrangements, and failing getting hold of Adam then try Mike Scott at scottmj@telkomsa.net

Routes

Add route(s) Add topo Reorder Bulk edit Convert grades
Grade Route

FA: Hans Graafland & Mike Scott, 1969

Starts at Camp Roger in the gully next to the stream, ascends the ridge and finishes just below the amphitheatre. Suitable to be combined with the Frontal Route for a long moderate route of about 20 pitches.

FA: Hilton Davies & Guy Paterson-Jones, 2012

1 14 50m
2 14 40m
3 14 50m
4 C 50m
5 15 50m
6 C 80m
7 15 30m
8 15 60m
9 C 50m

Klein Winterhoek Frontal

The route follows the immaculate line of the tapered pillar immediately left of the amphitheatre. This is R of a large groove/gulley that drops down the middle of the face.

From Campsite in Kloof follow rough path up then trending up r steeply onto grassy shoulder. Walk up grassy shoulder to the rock. Start Scrambling, heading vaguely up and R for the base of the pillar. There is a broad grassy ledge one rock band below level of base of amphitheatre. This rock band is the crux of the scramble. Various ways. Probably easiest to traverse to R skyline. You should now be on level with sickle of grass running into base of amphitheatre. (about 1.5 hours from campsite)

Scramble a further rope length or so to start of first pitch – a short R facing corner above a little ledge. There may be a beacon.

  1. Up Corner. Traverse L below obvious smooth open book. (Original route goes up the smooth book above – it’s HARD!! They stood on each others’ shoulders). Traverse about 10m L of book, up ramp L then back up diag R on Pockets, then Rails, cracks, then Ledge. Belay above start of pitch.

  2. (Fixed wire above belay is in the wrong place. Next corner R is correct. Original route traversed further R to awkward corner – pin. Not recommended) Up and R steep pull into corner, out L then Up to small ledge below Bullseye Overhang.

  3. Up L of bullseye overhang. Then Either up crack step R onto Nose and straight up followed by C grade straight up pitch, or 5m L into corner/groove, up this out L at top. followed by C grade 50m diag R pitch. Belay at narrow ledge system where rock steepens below clean wide open book.

  4. Diagonal R pitch or straight up depending on what you did for pitch 3

  5. (Spikes Pitch) Up Open Book out R. Up L on suspect rock into shallow groove. Up groove till forced out L, up to good long ledge system going left.

  6. (Yates Traverse) Traverse L on ledge system, moving up slightly after about a rope length. Pass a beacon, belay on a massive chockstone in a massive chimney. This chimney is part of the groove/gulley system that runs the full length of the face.

  7. Up Bulging wall L of chimney on face holds (tricky) into easy chimney (another one). Up this move L to thin crack up to massive ledge. (walk-off ledge from oceans etc). Next pitch starts on R of bivvy spot.

  8. Up rickety rock on ridge, over block down, up past block, up layback, belay on R. Beware nip in tail of this pitch!

  9. Scramble to the top.

Descent: From summit follow beacons North along top of wall towards Groot Winterhoek. These lead to large grassy gulley which is followed to grass slopes and eventually back to the shoulder you started on. Descent to campsite about 2 hours.

FA: George Londt, Frank Berrisford, RS Yates & Stanley Morton, 1920

On the left side of the amphitheatre. Starts 100m lower than other routes. Only route to climb the headwall above the escape ledge.

FA: Hilton Davies & Guy Paterson-Jones, 2012

1 19 30m
2 20 20m
3 20 40m
4 19 40m
5 A2 20m
6 A3 25m
7 A3 15m
8 19 30m
9 A2 30m
10 A3 35m
11 20 25m
12 19 35m
13 15 40m
14 17

Original grade 20 A3, freed at 28.

Start: from a ramp in the middle of the amphitheatre.

  1. Climb the small corner to a handrail on the left. Gain a sloping ramp and traverse left to a belay ledge.

  2. Traverse 10m left from the end of the ledge. Climb blocky rock at the end to a series of grooves. Belay next to a huge flake.

  3. Hand rail the flake. Climb up and back right into a crack which is climbed to a ramp. Move right and layback to a ledge.

  4. Climb the crack above to a sloping ramp. Move up and over a bulge. Rail left, then walk across to blocks on the Ledge of Forgotten Dreams.

  5. Aid the crack and roof to a hanging belay (bolt).

  6. A few free moves left before nailing the bulge to a rail. Aid left to a hanging belay in the corner.

  7. Aid through the diagonal crack and up the wall to a hanging belay beneath the biggest roof.

  8. Aid/free along the rail left.

  9. Aid left into the corner, around and up a vertical crack. Aid and free moves lead to a sloping ramp belay (Bev Bivvi).

  10. Aid the crack/corner to the roof. Go left and nail a thin crack leading to a hanging belay.

  11. Climb diagonally right to a roof. Handrail left and turn the roof at its left-hand end. Move up to belay in a small corner on the right.

  12. Start on the right, and handrail left across a flake to a blocky ledge. Go left to a ramp. Climb this to a wall and rail left to 'Ecstasy Ledge'.

  13. Traverse right to the corner, stem it and move left. Climb the wall diagonally left to a ledge below a crack.

  14. Climb the crack and continue to the highest ledge. Traverse/walk left and finish up the last 100m of LF route.

FA: Andrew de Klerk & Greg Lacey, 1983

FFA: Andrew de Klerk & Julie Brugger, 1994

FA: Clinton Martinengo & Joe Moehle, 1991

1 19
2 20
3 16
4 15
5 18
6 A3
7
8 21 A4
9 A3
10 20
11 21
12 17
13 16

Takes a line right of OOF. Start in the same place, i.e. the ramp. Scramble up to the short corner.

  1. Climb the corner, up the wall above. Go slightly left to a sloping ledge, then move right, climbing flakes to belay at a rail (peg).

  2. Traverse right under the roof to the corner. Climb up and belay on a thin ledge.

  3. Traverse left to a break. Pull through and continue up trending leftwards to a ledge next to some blocks.

  4. Climb into a corner-system leading to a belay on the ramp below a right facing corner.

  5. Climb the corner to rail under the roofs. Traverse left to the Ledge of Forgotten Dreams.

  6. Zig-zags Into Infinity Base: From the highest block nail the corner to the rail. Go right and up the next corner. Intricate nailing leads left and up to belay 3m right of the scoop/hollow at the top of the OOF's A2 crack.

  7. The Cloak of Black Mystery: Aid straight up on hooks to a pocket. Nail across the wall into a thin crack going diagonally right. Bolt Belay.

  8. Afterimages of Pain and Desire: Hook the wall to a slanting seam going left under the roof. Aid left to the bolt-ladder leading to the Halls of Desolation. Straight up to the rail. Move left and through the next roof. Diagonally left on blades and up to the rail under the big roof. Traverse left to belay.

  9. The Downbound Train: Go diagonally left to the corner. Drop down and hook left into a very steep corner. Hook the pockets on the left-hand wall and into the crack - The Visions of Paradise. Climb the crack to belay in a corner under a roof.

  10. Freeclimb right for 7m, pull through the bulge, and up the corner to a sloping ledge. Climb diagonally right across the wall to a tiny sloping ledge below a blank corner crack: The Silver Hearts Bivvi.

  11. Traverse left and up to a small block. Up to a ramp. Climb leftwards up the ramp to a crack through the bulge. Belay in the corner above.

  12. Go diagonally left into a rightward arching flake/corner system. At the top traverse left to a triangular ledge - Darkness on the Edge of Town.

  13. Layback flakes and corners to reach the ramps and so the long ledge. Traverse left and finish up the last 100m of LF route, as per OOF - The Circle of Silence.

FA: Andy de Klerk, 1986

FA: Jeremy Colenso & Jeremy Samson, 1987

1 15
2 19
3 17
4 15
5 20
6 19
7 18
8 15
9 19
10 17

Opened originally at 20 A2. freed at 21.

Start in the same place as OOF and TWOS, at the small ramp leading up to the ledge.

  1. Climb up and diagonally right following rails to belay on the right-hand side of a large block.

  2. Climb up the thin crack above to rail. Move right to a long corner/crack. Up this to a ledge.

  3. Climb diagonally left to a ledge. Traverse right until above the start of the pitch.

  4. Start up the flake on the right and follow the break to a stance in a shallow corner.

  5. Climb diagonally right over hollow flakes to a big corner which is climbed to a ledge. Walk right to a prow.

  6. Start up the ramp and move left to a crack/corner. Up this to an undercut rail. Traverse right and mantleshelf. Move left and up to a stance on a block.

  7. Pull over the bulge to reach a corner. Climb leftwards up this to reach Castle Ledge.

  8. Traverse right at the same level around the corner until able to layback up a groove to a ledge high on the left. Continue up this further to stance next to a big flake (60m pitch).

  9. From the flake climb up and move right. Pull over the bulge and continue up left, then right to belay below a big recess/corner.

  10. Climb the recess and move right following grooves and cracks to a big scramble off rightwards to the summit ridge.

FA: Greg Lacey, Dave Cheesmond & Chris Lomax, 1978

FFA: Chris Lomax, Greg Lacey & Andy de Klerk, 1983

The rib right of TTTAAC.

FA: Jeremy Colenso & Marina Reid, 1989

Information needed

This crag does not have approach information. Could you describe the approach to this crag?

If you can help provide a better quality resource for the climbing community then please click 'edit this crag' button near the top of the page.

Accommodations nearby more Hide

Share this

Photos Browse all photos

Upload a photo of area

Tue 9 May
Check out what is happening in Klein Winterhoek.

Get a detailed insight with a timeline showing

  • Ticks by climbers like you
  • Discussions of the community
  • Updates to the index by our users
  • and many more things.

Login to see the timeline!

Deutsch English Español Français Italiano 한국어 Português 中文