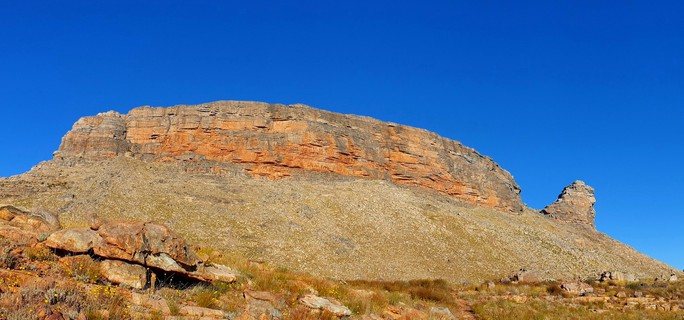
A Crag Guide gives an extensive view of all sub areas and climbs at a point in the index. It shows a snapshot of the index heirachy, up to 300 climbs (or areas) on a single web page. It shows selected comments climbers have made on a recently submitted ascent.
At a minor crag level this should be suitable for printing and taking with you on a climbing trip as an adjunct to your guidebook.
This guide was generated anonymously. Login to show your logged ascents against each route.
|
|
| Route | Grade | Style | | Selected ascents |
| 1 | |
★★★ Vuvuzela
Follows a direct line just right of Digeridoo on the main wall. Prominent features are the purple nose on pitch 3 and the massive corner system on pitch 4 right of the last pitch of Central Direct. Start by doing any two pitches to get to the belay at the end of pitch 2 of Tafelberg Frontal
15 m (16) Climb straight up to the left-facing corner to a ledge. Belay on a large block on the right. 25 m (20) Climb into the awkward, undercut feature above the block and reach left to a finger crack. Go up past an overhang on the right, then do some thin moves and exit left. Stance on the left under the roof crack (as for Digeridoo). 30 m (19) Traverse 3m left, up 3m, then back right onto the purplish nose. Climb the steep break just left of the nose. Exit right and climb straight up easy rock to belay next to a block. (If you step right around the nose and go straight up the grade drops.) 30 m (23) Step off the block into the fierce, thin crack up to the small roof. Reach desperately through then move diagonally up left into the massive, left-facing corner system. Climb this to the huge roof and stance on the right. 10 m (22) Climb the short, sharp layback crack just right of the stance.
FA: A. Roff & F. Buhrmann, 2008
FFA: D. Steyn & A. Hall, 2009
| 23
| Trad 110m, 5
| |
|
| 2 | |
★★ I Do Orange
Tends up and right from Vuvuzela. The second pitch is easier than it is hard as it looks from the stance.
45 m (19) Shares the first 15m of Vuvuzela. Climb straight up to the left-facing corner to a ledge. Traverse a few meters right and pull through an overlap. Head more or less straight up the face until the roof. Traverse right for about 10m. 30 m (21) Pull onto the short undercut face and through the narrowest part of two roofs. Pull up to the next rail under an overlap, pull up and right across the face for a few meters to horizontal break with a roof to the right. Continue straight up the face to belay on a ledge below a left arching crack 40 m (19) Climb the crack, move slightly right and then straight up the face to a horizontal break. Follow a left tending diagonal for 1m to pass the roof on its left then step right and continue up the face to a narrow ledge. Traverse right to a left tending crack (shared with Boomerang Direct and Assegai). 10 m (18) Follow the crack this to where it terminates, and step right onto a brown face and follow good crimps to the top.
FA: Richard Halsey, J. Wakeling & G. Bird, May 2019
| 21
| Trad 130m, 4
| |
|
| 3 | |
★★★ Freedom Feather
Another line starting above the massive roof just right of Tafelberg Frontal. Do the first two pitches of the Frontal and walk right along the ledge to about 10m left of where Boomerang goes up. Start at the right-hand end of some roofs above you, about 1m right of an obvious recessed corner, and below a white nose.
20 m (16) Head directly up to the white nose just right of the corner. Reach up to an awesome jug on the tip of the nose and climb up to a big ledge. 35 m (19) Pull up onto the face above the stance and up a small, left-facing corner system towards the right-hand side of a detached roof that is almost an arch. Rail 2m right to skirt the roof and up to a ledge. 25 m (20) The Improbable Pitch. Start off a block a few metres left of where you just came up. Climb up to the second rail then traverse left past an obvious vertical crack. At some loose blocks head up and slightly left to a small stance. 20 m (21) Head straight up past some delicate moves to a huge ledge. Could be combined with the previous pitch. 20 m (21) Walk about 8m left to some blocks at the base of a blunt, white nose with layback cracks on either side. Climb up the easier right-hand side until able to reach across to the left side. Climb up to a small overlap. Pull through and head up to the base of an impossible looking, smooth, round corner below the summit. Traverse 8m left past a short finger crack to a small stance below a recessed crack.
P6. 10 m (17) Climb the crack and a delicate move to finish.
FA: D. Steyn & Richard Halsey, 2012
| 21
| Trad 130m, 6
| |
|
| 4 | |
★★ Assegai
A straight route crossing Boomerang.
30 m (24) Start ~5m right of Freedom Feather directly below two narrow corners about 15m up. The right corner has a large undercling flake at the top. Follow a series of overhanging rails, then easy climbing, to a ledge below the corners. Pull up to a rail (about a foot wide), then up into the left corner. Hard moves into the right corner, then exit right onto the face above. Head straight up to the next ledge. 35 m (20) Pull up past the narrow part of the roof above (just left of a left-pointing fin). Head up and left using parts of the crescent undercling feature to the rail below the main roof. Rail right until able to pull onto a small ledge. Step left and head up, passing a short corner to the Space Station (a glorious stance on a projecting pillar). 35 m (22) From the stance, step right onto a large block. A thin rail low on the right takes tiny cams. Above are some vague underlings. Use these and face holds to gain a small, good edge (crux). Match here and make a long move right to a big edge. Head up aiming for the left arching crack. Follow this to where it terminates, and step right onto a brown face and follow good crimps to the top. Belay at good mushrooms. The grade is very height dependant. Significantly easier if over 6ft tall.
FA: D. Steyn & Richard Halsey, Nov 2014
| 24
| Trad 100m, 3
| |
|
| 5 | |
★★★ The Black Pearl
Arr me mateys, a fine voyage up the vertical Cederberg seas.
Avail yourself of the first pitches of Boomerang to gain the ledge over the huge roof. Start ~6m left of Boomerang pitch 3.
17m (18) Step off a block to reach a high rail and past a small left-facing corner, with bush, to a ledge. At the overlap above, high step onto the face on the left to reach a good layback. Continue straight up the face and at the wide horizontal break move right to stance on the gangplank, just below the peg from Boomerang. 15m (23) Step off the left side of the gangplank, leaving any Landlubber tendencies behind, and rail left over the deep. Use underclings to gain the bottomless corner and fight to establish over the void, no quarter given. Straight up to stance in the large boulders on the ledge. Suggest tapping left pinkie finger. 30m (18) From the stance, move right to easily pull up onto the face. Follow the left facing features to a wide rail and move right to a narrow ledge (the large layback crack on Boomerang is just to the right). Head up and left for a few meters, then straight up to weigh anchor on the ledge. 40 m (21) Reach the good, high hold (aye, you can use the cairn if you be short), then follow good flat holds until the angle eases. Cross Boomerang Direct and pull onto the right side of the bulge on the grey rock. Get some micro nuts in the thin seem and crank up to good rails. Pull up and right over the overlap into a vague recess, followed by a mantelshelf onto a smooth, narrow ledge. Head diagonally up and right past the overhang on its right side, then head back slightly left to the top and fly the Jolly Rodger
FA: Richard Halsey & M. Beaumont, Mar 2019
| 23
| Trad 100m, 4
| |
|
| 6 | |
★★★ Boombox
Takes a fairly direct line to the right of Boomerang Direct. Start by doing any approach pitches to get to the right-most end of the ledge where pitch 3 of Boomerang begins.
Pitch 1. 10 m (17) Start directly below some underclings that allow you to reach a higher rail. Pull up to a second, wide rail below a roof and traverse over the void until you can move easy diagonally right to a ledge. Stance in an oblique corner, where the right wall is very smooth and rectangular (3m x 1.5m).
Pitch 2. 30 m (21) Up the corner and left around a slight bulge to a ledge. Pull through a series of steep, inverted steps and pass the last roof on its right-hand side. Move slightly left and then straight up to a big ledge with a large triangular block on it.
Pitch 3. 25m (17) Starting about 2m left of the block, follow a vague crack and then move slightly right to another crack. Above this pull through the right-hand side of the roof at a big upside-down slot. Head up and slightly right to a huge ledge.
Pitch 4. 20 m (24) This pitch climbs the large left facing corner (to the left of a wide roof at 5m height) and exits left across the face. A tricky start through the thin crack/bulge into the corner. Climb up several meters until the first inverted step, where you traverse left, and then pull up to the next overhang. Hard moves up to, and left under the final roof until you gain the face above. Stance a few meters higher at the base of a wide left lending crack. A fairly demanding pitch and solid at the grade.
Pitch 5. 10 m (17) Climb the arched crack to the top.
FFA: Richard Halsey
FA: Richard Halsey & U. Pitsch, 2011
| 24
| Trad 95m, 5
| |
|
| 7 | |
★★★ Tail Wind
A good mix of corners, flakes, ramps and roofs.
Use the Frontal or Boomerang to gain the far right end of the ledge over the huge roof. Start as for Boombox
20m (17) Start directly below some underclings that allow you to reach a higher rail. Pull up to a second, wide rail below a roof and traverse right and up. Continue right past the smooth, left-facing corner on Boombox and take the next easy right facing recess up to a ledge. Traverse a few meters right to a below a corner that is dark brown on the right-hand wall. 15m (21) Blast up the corner and then diagonally up and left to reach a fantastic flake in brown rock. Romp up the flake to the roof, where you pull through the middle and then move slightly right until able to crank up to the ledge. 20m (20) Step off the top of the sail-shaped rock onto the face. Step right and then straight up to the roof about 10m up. Move left and use good holds that rise diagonally to the left to pull over the roof. Head back right and follow an easy break to the large ledge. Walk right, under the Whistling Woozel corner to the shiny, left-facing ramp. 35 m (21) Climb the ramp to a horizontal rail and step right. Tricky face moves up and right allow one to establish on the wall above. Ride the winds up, following the easiest line and near the top move right to a grey flake and then straight to the summit.
FA: Richard Halsey & M. Penso, Mar 2019
| 21
| Trad 90m, 4
| |
|
| 8 | |
★★★ Whistling Woozle
Another route starting off the ledge above the huge roof right of the Frontal. Start at the right-hand end of the ledge (as for Boombox).
30 m (17) Start as for Boombox directly below some underclings that allow you to reach a higher rail. Pull up to a second, wide rail below a roof and traverse out over the void. Continue to traverse right below a white dihedral then diagonally up and right to a ledge below a big, vertical crack capped by a double roof. 15 m (22) About 3m right of the crack climb straight up to a narrow roof with an obvious undercling on the lip. Pull through to the rail below the next roof. Move 1m right then up into the break, through the top roof. A beefy layback leads up to stance on a small ledge with a bush. 35 m (19) Climb straight up to the black roof about 10m up. Pull through on flakes at the widest part. Go up past one big ledge to a second, massive ledge below an obvious corner crack system right of a big roof. 35 m (20) Climb the corner crack system exiting right at the top onto a tiny corner ledge. Tricky pull past a layback. Climb the face right of the obvious, black corner crack heading to the right of a projecting arete. Up the grey corner to the top.
FA: Richard Halsey & D. Steyn, 2012
| 22
| Trad 120m, 4
| |
|
| 9 | |
★★★ Fallen Iris
A fine outing with varied climbing, ample exposure, stupendous stances and a little bit of spice.
Start as for Boombox.
40 m (17) Start at the end of the ledge directly below some underclings that allow you to reach a higher rail. Pull up to a second, wide rail below a roof and traverse out over the void. Pull up to the next level and traverse right a further 30m until a vertical crack below the steep corner with the Dark Arête on the left. Pull up to an excellent stance. 18 m (19) The Dark Arête. Pull up into the steep corner and then move left onto the easy but exposed arête. Climb this to another great stance on the rippled prow. 35 m (19) From the stance, step up onto the shelf on the right. Traverse 4m right to some narrow vertical slots (small cams/wires). Pull up on great edges to a monster pocket. Step left and head up for a corner. Climb the light brown wall on the right of the corner to a ledge. Traverse right under the roof, then climb straight up to the big ledge. Stance at a right-arching layback crack, in brown rock, just right of some stacked blocks. 50 m (19) Climb the layback to a delicate flake (with small gear in a thin crack to the right). Move up and left to a ledge, then slightly further left until able to climb the orange ramp. Head for a narrow overlap which is passed on the left. Romp up the headwall and near the top tend slightly right to a large flake and featured face (left of a water runoff feature). Belay from the huge, convenient mushroom.
FA: Richard Halsey & A. Gietl, 2013
| 19
| Trad 140m, 4
| |
|
| 10 | |
★★★ Nambarrie
FFA: J. Möhle
FA: D. Shewell & I. Humberstone, 1993
| 30
| Trad 190m, 6
| |
|
| 11 | |
★★★ Cape Cobra
A 3 pitch route through the steepness between 'Nambarrie' and 'Snake in the Grass' Steep climbing through some imposing terrain. Large cams including a #4 Camalot useful. Starts by climbing the first pitch of 'Snake In The Grass' and then heads left for two pitches to a ledge on which one can traverse left a few meters to where 'Nambarrie' comes up in a corner. From here one can do a single abseil back to the ground.
- [20] 15m
- As for Snake in the Grass: up to the rail and traverse left on the wide broken rail. Continue left to hanging stance where the wide rail runs out.
- [26] 15m
- Straight up on edges to a rail and into a steep right-facing flare that turns into a crack. Continue straight to a roof, which is passed on the left side via some face moves to another wide rail. Crank through here to a rail and make a long move left to a side pull. Strenuously up to a break and a hanging stance on the right.
- [25] 20m
- Pull through the roof and corner to the left into a short left facing recess. Pull up to the next hand rail. Traverse left with increasing difficulty to the left end of the finger rail and pull up into the base of a vague right-facing recess. Continue up the recess, with a committing section (small wires) to a triangular feature below a roof (treat with care). Pull left and up to a wide ledge.
Descent: Locate a rap point about 5m left of where you come up above the corner on 'Nambarrie'. One ~50m free abseil to ground.
FA: Richard Halsey & D. Steyn, Feb 2022
| 26
| Trad 50m, 3
| |
|
| 12 | |
★★★ Snake in the Grass
FA: C. Lomax & K. Smith, 1983
FFA: A. de Klerk, 1985
| 23
| Trad 180m, 9
| |
|
|
|
| Route | Grade | Style | | Selected ascents |
| 13 | |
★★★ Lost in Time
Steep climbing through some imposing terrain. Large cams including a #4 Camalot useful. Start 20m right of Snake In The Grass. At this point, the large roof on the left ends and another starts on the right about 2m higher up.
20 m (25) From a projecting, good edge at head height, pull up past three rails into a short brown corner. A hard move (past an old peg) gets one to the roof. Traverse left until the roof almost peters out and crank up to the next rail. Move 2m right, up to the next rail, and back left to another old peg. From here head 3m diagonally up and right across a face to a hanging stance left of a bulge. 15 m (21) Climb up and then right to a recess. Continue straight up to a wide rail under a roof. Traverse right until able to pull through the roof at its narrowest point. Stance just above in a vague corner. 25 m (23) Step left and head up through a stepped series of roofs to a hand jam rail below the last roof. Head right over the void until able to pull up onto the face. Continue up to a spacious ledge. 35 m (21) Climb up on the good orange rock, just right of a black scrappy corner, to another ledge. Move right until below a corner and featured arete about 10m higher up. Continue straight up to this corner, and then climb to the right on the featured arete until you reach the walk-off ledge.
Descent: Stroll rightwards along the walk-off ledge until you can scramble down below the Black Ice Wall. Perhaps one day some strong blokes will find a way from the walk off ledge to the summit.
FA: D. Steyn & Richard Halsey, 2014
| 25
| Trad 95m, 4
| |
|
| 14 | |
★★ Route X
Definitely, not 18. Been told more 20/21
We started below the roof, not at the break.
- 16 15m
- Pull onto the face and up and right towards the break, then traverse left on the ledge to a dish below the prominent layback to stance.
- 20 20m
- Climb the powerful layback crack, then rail right, and up to stance.
FA: E. February & D. Cheesmond, 1974
| 20
| Trad 35m, 2
| |
|