Stagionalità
Limitazioni per l'accesso ereditato da Emily Gap
To climb please Email the ranger at pwpermits@nt.gov.au with AT LEAST one day notice for weekdays and within Friday for weekends. Just state your names and preferably the wall you are going to be.
Emily Gap is situated on Aboriginal land, and is reportedly the most sacred areas in the Alice Springs region. According to legend this is the site where the giant Yeperenye Caterpillar emerged and created much of the local landscape. Climbing is recognised as a permitted activity in the Parks Joint Management Plan for Yeperenye Nature Park (which Emily and Jessie Gap are located in) for routes outside of the gap.
No climbing is permitted in the gap itself.
Etica ereditato da Emily Gap
This is a special area. No bolting, and tread lightly.
Tags
Pianifica viaggio
Lo sapevi?
Sai che puoi creare un account per registrare e condividere le tue ascensioni? Migliaia di arrampicatori lo stanno già facendo.


Alloggi in zona more Nascondi
Condividi questo
Foto Sfoglia tutte le foto
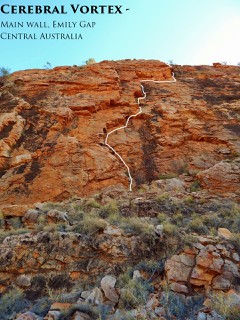
Justin Tosh su ★★ Cerebral Vortex 17 - DSCN1242 (960x1280).jpg
/33/74/3374270260a77e55e356ddc8fc6ae87617f500a0)
★★ Handle With Care 15 - Handle with care

★ Crown of Thorns 12 - GOPR0021.JPG
Dom 4 Giu
Controlla cosa succede a Main Wall.
Get a detailed insight with a timeline showing
- Ticks by climbers like you
- Discussions of the community
- Updates to the index by our users
- and many more things.
Login to see the timeline!