High quality photo-topos are the difference between boring pages of text and climbing porn that inspires other climbers.
Tip 1: Any topo is better than no topoRitorna ai contenuti

Good Quick rough topos can go a long way

Bad Help, I am lost!
While it is great to aim for great topos, anything is better than nothing. If you can snap a quick and dirty topo photo on your phone, or scribble on the back of an beer coaster and then take a picture of it, someone else can always use that as a rough guide and then improve on it later with a higher quality photo. So even if you've got a photo that breaks all the tips below, upload it anyway, we'd all love to see it!
Tip 2: Good topos are NOT good climbing photosRitorna ai contenuti
This is why many well intentioned topos aren't helpful when stumbling lost at the crag. A closeup oversaturated photo of your mate Jimi, screaming on the crux hold, is great for facebook, or even for a magazine. But it is the worst kind of topo photo. First the climber generally hides the route, secondly you are only likely to recognise the route if you already know it which defeats the purpose.

Good Boring photo = usable topo
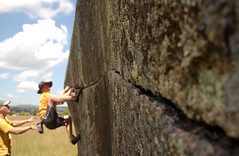
Bad Interesting photo = crap topo
Good topos have almost no ego. They aren't really artistic, they are just realistic.
Remember the photo itself isn't important, it's the rock that is, and the more clearly you can show the rock as you would see it in person the better.
Tip 3: Good topos ARE good photosRitorna ai contenuti
The technical aspects of a good topo photo are the same as taking any photo. The lighting needs to be good, the exposure needs to be right etc. You don't need to be a gun camera nerd just get the basics right:

Good Sharp, well lit, cropped well
Bad Blurred, uneven light, poorly cropped
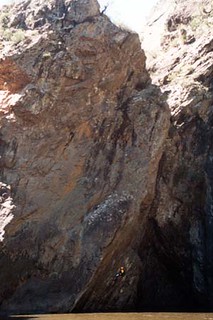
- Avoid harsh sun with harsh shadows, or dappled shadows. In bad light, err on the side of over exposing, so that the darker rock tones are properly exposed. It doesn't matter if you whiteout the sky, but the topo is useless if the rock is a silhouette.
- Take as sharp a picture as you can, with a wide depth of field and correct focus. and avoid camera shake by using a tripod, bracing against a tree or even building a small cairn.
- Take as hi-res a picture as you can - check your settings are on full size. Use a proper camera if your phone camera isn't great.
- Keep the horizon level.
Tip 4: Context is criticalRitorna ai contenuti
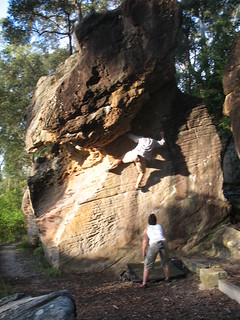
Topos are used to find the rock, not just to show where the route goes, so context is important.

Good Better for seeing the route

Also good Better for finding the route. Why not do both?
- Take the photo from further back to show nearby features and landmarks. This is especially important for bouldering where so many boulders can look the same, or the same rock looks different from another angle.
- Take photos from the angle you typically approach them from to aid identification.
- If a feature looks flat in a photo take additional photos from other angles that better show the shape.
- Try a wider angle lense, or stitching photos together - but be careful: warped / fish eye photos can make it much harder to recongise the rock features.
- Try being slightly elevated. Try standing on nearby boulders or climbing a tree, or rap down and jumar sideways if you want to be a pro.
Tip 5: Scale should be obviousRitorna ai contenuti

Good Scale is obvious
Bad What scale is this?
Scale is important, as rock can often look the same at different scales. For bouldering topos a mat in the photo is ideal. For a multipitch topo having a climber is helpful as long as they aren't obsuring anything important on the route.
- Photos are cheap, so take more. Photos showing the approach, like forks in tracks, or key landmarks can be helpful later when you can't remember where you where.
- If you can record the GPS location, and for bonus points the direcion the photo was taken in.
Tip 6: Correctly set the whitebalanceRitorna ai contenuti
This could have been under Tip 3 but removing any colour tints from photos is especially important when a guide is made by lots of different people with lots of different cameras. Setting the white balance is the single most important step to getting all these different photos looking similar. If you didn't set it when you took the photo you can correct it before you upload it.
Read more about White Balance