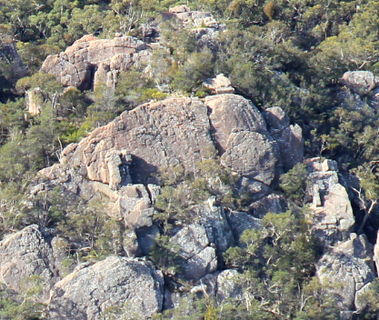
A Crag Guide gives an extensive view of all sub areas and climbs at a point in the index. It shows a snapshot of the index heirachy, up to 300 climbs (or areas) on a single web page. It shows selected comments climbers have made on a recently submitted ascent.
At a minor crag level this should be suitable for printing and taking with you on a climbing trip as an adjunct to your guidebook.
This guide was generated anonymously. Login to show your logged ascents against each route.
Warning
Rock climbing is extremely dangerous and can result in serious injury or death. Users acting on any information directly or indirectly available from this site do so at their own risk.
This guide is compiled from a community of users and is presented without verification that the information is accurate or complete and is subject to system errors. By using this guide you acknowledge that the material described in this document is extremely dangerous, and that the content may be misleading or wrong. In particular there may be misdescriptions of routes, incorrectly drawn topo lines, incorrect difficulty ratings or incorrect or missing protection ratings. This includes both errors from the content and system errors.
Nobody has checked this particlular guide so you cannot rely on it's accuracy like you would a store bought guide.
You should not depend on any information gleaned from this guide for your personal safety.
You must keep this warning with the guide. For more information refer to our:
Usage policy
Contributors
Thanks to the following people who have contributed to this crag guide:
Philip Armstrong
Matt White
Campbell Gome
angus smith
Brendan Heywood
Gareth Graham
Simon Pateman
Glen Buchanan
Tony Williams
Lachlan
The size of a person's name reflects their Crag Karma, which is their level of contribution. You can help contribute to your local crag by adding descriptions, photos, topos and more.
Alcuni contenuti sono stati forniti sotto licenza da: © Australian Climbing Association Queensland (Creative Commons, Attribution, Share-Alike 2.5 AU)
Table of contents
- 1.
Lake Bellfield
104 in Crag
-
1.1.
Pastoral Buttress 20 in Crag
- 1.1.1. The Girls Wall 6 in Cliff
- 1.1.2. Main Cliff 14 in Cliff
- 1.2. Diving-Board Rocks 3 in Crag
- 1.3. Rural Rocks 10 in Crag
- 1.4. Little Joe Hill 58 in Crag
- 1.5. Gamblers wall 1 in Cliff
- 1.6. The Grand Old Man 3 in Crag
- 1.7. Netherby Towers 4 in Crag
- 1.8. Jacks Rest 1 in Crag
- 1.9. Rock of Ages 2 in Crag
- 1.10. Power Tower 1 in Cliff
- 1.11. Fallen Slab Wall 1 in Crag
-
1.1.
Pastoral Buttress 20 in Crag
- 2. Index by grade
1. Lake Bellfield 104 routes in Crag
- Summary:
-
Per lo più Arrampicata trad
Lat / Long: -37.185222, 142.560670
Find out about and observe access restrictions and agreements.
Use existing access tracks to minimise erosion - keep to hard ground & rock surfaces.
Do not disturb nesting birds or other wildlife.
Protect all native vegetation, especially at the base of cliffs. Wire brushing to remove mosses and 'gardening' in cracks and gullies is not permitted. Use slings to protect trees while belaying or abseiling if belay anchors are not provided.
Respect sites of geological, cultural, or other scientific interest. Do NOT develop new climbs in or near Cultural Heritage sites.
Chalk has high visual impact - minimise your use of it. Parks Victoria have requested the use of coloured chalk in Gariwerd.
Minimise the placement of fixed equipment, especially where Trad gear is available. Respect any "no bolting" areas.
Do not leave any rubbish - take it home with you.
Dispose of human waste in a sanitary manner (bury, or even better pack it out). Do not pollute water supplies.
Off-road driving is illegal in Gariwerd.
Keep campsites clean, and do not light campfires outside of official metal fire pits.
limitazioni per l'accesso
Climbing restrictions apply to many crags in Gariwerd/Grampians. Some of these restrictions are likely to change over time as assessments are completed. Tags are being applied to most crags to reflect their current status. Additional access-notes are provided to clarify restrictions where required (and will over-ride this notice). Current and further Parks Victoria advice can be found at https://www.parks.vic.gov.au/places-to-see/parks/grampians-national-park/rock-climbing-in-gariwerd
etica
Grampians / Gariwerd access issues have emerged (2019) due to potential risk to the environment and cultural sites. Climbers need to be aware that there are significant Aboriginal sites in the Grampians, especially in cave areas. Please take time to understand the access situation. Leave no trace and climb responsibly.
Please note that due to the fact that the Grampians is a National Park, dogs and other pets are not allowed in the park except in vehicles on sealed roads and in sealed car parks.
===Cliffcare Climber’s Code===
For more detailed information visit https://www.cliffcare.org.au/education
1.1. Pastoral Buttress 20 routes in Crag
- Summary:
-
Per lo più Arrampicata trad
Lat / Long: -37.165713, 142.540790
limitazioni per l'accesso
On the prioritised assessment list
avvicinamento
Park near the standpipe on Grampians Road, just North of the turn-off to the Halls Gap Lakeside Tourist Park.Head to the creek, cross it, and try and work out where the cliff you could see from the other side went.
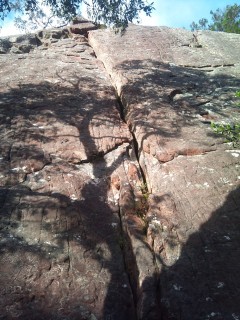
1.1.1. The Girls Wall 6 routes in Cliff
- Summary:
-
Tutti Arrampicata trad
descrizione
Little face above and left of main face. Distinguished by wide crack (Token Male).
| Route | Grade | Style | Selected ascents | |||
|---|---|---|---|---|---|---|
| 1 |
Eyes of a Dog, Courage of a Doe
Start on left side of Girls Wall at right- leaning diagonal. Up this. FA: Peter Smith & Peter Thomson, 1993 | 11 | 8m | |||
| 2 |
Mercy's Sister
‘Corner’ 1m left of Sisters of Mercy. FA: Peter Budisalvijevic & Phillip McMillan, 1997 | 12 | 9m | |||
| 3 |
★ Sisters of Mercy
A bit artificial. Thin crack just left of Token Male is climbed without using corner on left. FA: Maureen Gallagher, Chris Baxter & Sue Baxter, 1987 | 14 | 9m | |||
| 4 |
★ Token Male
Take a 5" tube. Hand-crack that becomes an off-width. FA: Maureen Gallagher, Chris Baxter & Sue Baxter | 14 | 9m | |||
| 5 |
Girls Like Us
Jam and layback right crack, back of Girls Wall. Beware loose block. FA: Peter Thomson & Peter Smith, 1993 | 13 | 5m | |||
| 6 |
Easy, Not Cheap
Hand-crack on right edge of Girls Wall. FA: Peter Thomson & Peter Smith, 1993 | 11 | 9m | |||
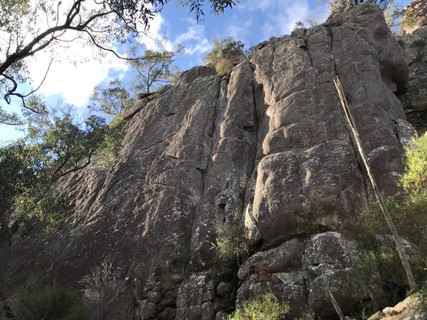
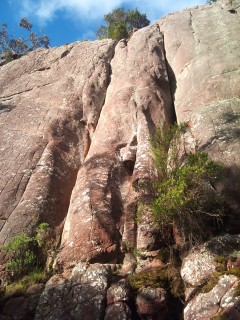
1.1.2. Main Cliff 14 routes in Cliff
- Summary:
-
Per lo più Arrampicata trad
Lat / Long: -37.165869, 142.540667
descrizione
A small cliff with easy access and some good lines packed in on good quality rock. Originally noted for a couple of good quality crack climbs it now has several good face/slab climbs at a harder grade.
avvicinamento
The cliff is directly in line with the exercise equipment on the corner of Grampians Rd and Tymna Drive, approx 4km south of Halls Gap.. Walking directly to the cliff will take you through more gullies and thistles than is necessary. Instead walk 100m south to the edge of the large open area, cross the creek and walk back 100m on the other side. The cliff is 50m uphill obscured by trees.
note per la calata
Short walk/scramble down RHS (facing out)
| Route | Grade | Style | Selected ascents | |||||
|---|---|---|---|---|---|---|---|---|
| 1 |
The Lucky Country
At the far left end of main face, now largely covered by a tree. Boulder to diagonal. Left through bulge; #4 RP. Mantel, up. FA: Bo, Jeremy Boreham, James McIntosh & Phillip McMillan, 1997 | 21 | 15m | |||||
| 2 |
Cross Dressing
Start as for 'New Wave? Microwave!' below the small broken roof. Up, passing vegetation and some suspect rock. FA: Geoff Butcher, Michael Hampton & Rhyl Shaw, 1993 | 16 | 15m | |||||
| 3 |
★ New Wave? Microwave!
The prominent diagonal heading L to R starting behind the pinnacle at LH end of cliff. Up groove with detached flake then follow diagonal up right. FA: Chris Baxter, David Gairns & Maureen Gallagher, 1987 | 16 | 25m | |||||
| 4 |
★ Old Crumpet
Thin cracks 2m right of 'New Wave? Microwave!' FA: Wayne Maher & Glen Donohue, 1993 | 21 | 15m | |||||
  |
||||||||
| Route | Grade | Style | Selected ascents | |||||
| 5 |
★ On The Lam
Good fun with two bouldery cruxes. Effectively a sport climb with a little trad to get you to the top once the difficulties are over (A medium cam for the obvious horizontal and a small wire after that). Start as for Gambolling Lambs, then move left to shallow corner. At the third bolt step left onto the face and up on thin holds to the major break, then more easily to the top. FA: Martin Jackson, 1 Mag 2021 | 23 | 20m, 3 | |||||
| 6 |
★ Gambolling Lambs
Super balancy, delicate climbing up the middle of the dimpled wall to the left of Spare Rib. Start just to the left of big tree, 3m left of Spare Rib. Stick clip the first bolt to protect the starting move. Strenuous and balancy pull onto the wall, then up to the shallow pocket. Step right to find some shallow edges, then back left and up. At the fifth bolt, step left onto the face to finish. FA: Martin Jackson, 1 Mag 2021 | 23 | 20m, 5 | |||||
| 7 |
★ Spare Rib
Left-most of four prominent lines, crack climb towards the left end of the main face, near a large Eucalypt. Hard start off ground, follow line to top. Hollow sounding flakes high on left of climb. Some very large blocks at top. shallow left-facing corner About 15m right of 'New Wave? Microwave!'. FA: Maureen Gallagher, Chris Baxter & David Shirra, 1987 | 18 | 20m | |||||
| 8 |
★ Spare Frock
A good face climb at a moderate grade linking the start of Spare Rib with the finish of Frock From Hell. Start as for Spare Rib and move up to around 5m before swinging right onto the face to gain a small ledge below a FH. Up and right and slightly run-out to the second FH. Up to the crack and finish up that on small cams/wires. FA: Martin Jackson, 1 Set 2021 | 18 | 20m, 2 | |||||
| 9 |
★★ Frock From Hell
Straight up the sustained main wall between Spare Rib and Udder Shudder. Established with "minimal pro" and with no known repeats, the FA agreed to a retrobolt to make this sane. Probably a grade easier without the threat of death. Start 3m left of Udder Shudder. Up the face with RPs to start (or very high stick clip) to meet up with crack in the final headwall. FA: Glenn Tempest, Geoff Butcher & Michael Hampton, 1993 | 24 | 20m, 3 | |||||
 |
||||||||
| Route | Grade | Style | Selected ascents | |||||
| 10 |
★ Udder Shudder
Left crack on right end of main face. Leads to an excellent finger-crack. FA: Chris Baxter, Maureen Gallagher & David Shirra, 1987 | 19 | 20m | |||||
| 11 |
★★ Skirt Alert
Right hand crack on right end of main face, 3m right of Udder Shudder. FA: Chris Baxter, Maureen Gallagher & David Shirra, 1987 | 18 | 20m | |||||
| 12 |
★ Bucolica
Pastoral Poetry. Elegant climbing up the rounded arete to the right of Skirt Alert finishing up the crack in the headwall. Start 3m right of Skirt Alert. Pull onto the first bulge and step left to gain the small pea-pod. At the top of this step right onto the face, reaching over the bulge to gain the bolt. A hard move gets you to the good horizontal, then continue up the thin seam/crack directly above with some good edges and finger locks. FA: Martin Jackson, 17 Ott 2021 | 23 | 20m, 1 | |||||
| 13 |
★ Cocky Calamity
Excellent seam / crack at R end of main face. Reachy start (could be 21 if you're tall) leads to sustained climbing up the line. FA: Geoff Little, Chris Baxter & Maureen Gallagher, 1987 | 22 | 20m | |||||
| 14 |
The Crox
Needs a clean but will be quite good. Corner 15m up right of Cocky Calamity. Turn overhang on right and finish up groove above. FA: Chris Baxter & David Gairns, 1988 | 17 | 18m | |||||
1.2. Diving-Board Rocks 3 routes in Crag
- Summary:
-
Tutti Arrampicata trad
Lat / Long: -37.163820, 142.545292
descrizione
This is the collection of huge tors and faces, distinguished by a ‘diving-board’ rock on their top left side, high on the Mount William Range above Pastoral Buttress.
NOTE: Cliff details taken from VCC online update 2001.
avvicinamento
Approach as for Pastoral Buttress then keep going.
| Route | Grade | Style | Selected ascents | |||
|---|---|---|---|---|---|---|
| 1 |
Biggles Files
Good climbing throughout.
FA: David Gairns & Chris Baxter (alt), 1995 | 15 | 45m, 2 | |||
| 2 |
Sheik Rattlenroll
A gully leads up right below right side of main face. Below this gully is another face (which gets bigger the further right you go) towards left side of which is a pair of cairned, thin cracks/seams. FA: Chris Baxter & David Gairns, 1995 | 14 | 15m | |||
| 3 |
Farewell to Decorum
Right seam. FA: David Gairns & Chris Baxter, 1995 | 17 | 15m | |||
1.3. Rural Rocks 10 routes in Crag
- Summary:
-
Tutti Arrampicata trad
Lat / Long: -37.166920, 142.542016
descrizione
In a setting similar to Pastoral Buttress. It is 100 - 200m right of and slightly uphill from Pastoral Buttress.
| Route | Grade | Style | Selected ascents | |||||
|---|---|---|---|---|---|---|---|---|
| 1 | No Complaints! | 22 | 8m | |||||
| 2 | Why Bother? | 8 | 8m | |||||
| 3 |
★ Down Syndrome
Melon’s finest hour. The roof crack at the left end of the upper face. FA: Chris Baxter, 1992 | 25 | 12m | |||||
| 4 |
★ Missionary Position
Varied climbing with a distinct crux. Take two #4 Friends. The off-width 2m right of Down Syndrome to ledge on the right. Up and left above ceiling finishing up the blunt arête. FA: Chris Baxter, Sue Baxter, Maureen Gallagher & Geoff Little, 1992 | 19 | 17m | |||||
 |
||||||||
| Route | Grade | Style | Selected ascents | |||||
| 5 |
★ Hobby Bolter
Climb on second tier up. Climb crack to ledge, follow face up past 2 bolts, then sloping face, follow up face to top. FA: Venus Kondos, Mikl Law & Peter Woolford, 1992 | 19 | 18m, 2 | |||||
| 6 |
★ Sue's Climb
Shares the same crack start as Hobby Bolter, but traverse R after the crack to the thin crack. Nice moves, with the crux getting onto the top slab. FA: Chris Baxter, 1988 | 19 | 15m | |||||
| 7 |
Glory Box
The crack just right of the descent gully above lake. Follow this track until it (below Sue’s Climb). Tricky start, then crosses a creek in the bed of the gully easy climbing. FA: Chris Baxter & David Gairns, 1988 | 16 | 15m | |||||
| 8 |
★ Where the Girls Are
On arete left of Another Roadside Attraction, and right of Glory Box, starting up the finger crack. FA: Chris Baxter, Sue Baxter & David Gairns, 1988 | 14 | 18m | |||||
| 9 |
★ Happy Aid
Very good, sustained face climbing up the seam just right of Where The Girls Are. Up the wall 1m right of Where The Girls Are, move right at the break then up the seam. FA: David Gairns & Chris Baxter, 1988 | 17 | 18m | |||||
| 10 |
★ Another Roadside Attraction
Mixed face climbing up past 3 bolts. starting behind the tree 2m right of Happy Aid. Sustained; run out between second and third bolts. (The first bolt is unnecessary.) Climb the wall and seam (bolt) to break. Then diagonally right to spike (sling). Then the wall past 2 bolts. FA: Mikl Law & Venus Kondos, 1992 | 21 | 17m, 3 | |||||
1.4. Little Joe Hill 58 routes in Crag
- Summary:
-
Per lo più Arrampicata trad
Lat / Long: -37.169783, 142.545049
descrizione
Little Joe Hill is the rocky protuberance that overlooks the Lake Bellfield Dam wall and the Lakeside Caravan Park. The west face of the cliff has a number of different faces and levels. The east face is smaller and has longer access. The lower section of the West Face has a number of good middle grade routes. Now that abseil points have been put in above some of these the cliff is much more user friendly.
limitazioni per l'accesso
On the prioritised assessment list
avvicinamento
For the West Faces drive to the car park below the Lake Bellfield Dam Wall. From here the West Face is about 300m to the NE overlooking the campground. Walk back to the gate at the NE corner of the fence line [the corner closest to the campground]. Go through the gate and walk 40m along the jeep track then turn L. You will find a steep ramp descending to a clearing. Cross the clearing and head uphill on a steep track which eventually meets an old steep jeep track. Turn L and follow the jeep track for 110m to a switchback. Head back SE [uphill] for 50m to a short cairned track on the L. This heads up to the RH end of the cliffs arriving below a large smooth boulder below Silent Reach. 10 minutes from the car park. If you find yourself overlooking the old quarry, or heading up the steep gully to the R of the cliffs you have gone too far! The East Face is best approached from the Terraces Fire Line 4wd track. From Pastoral Buttress walk L about 150m to a 4wd track. Follow this uphill to the fire line. Head R until a line of orange buttresses are visible on the right about 100m off the track. Probably 15 minutes walk from Pastoral Buttress.
 |
||||||||
| Route | Grade | Style | Selected ascents | |||||
|---|---|---|---|---|---|---|---|---|
West FaceThe faces above the caravan park. This is the most accessible part of the cliff only 5-10 minutes from the car park below Lake Belfield dam wall. It contains a number of good middle grade routes and has lower offs and abseil points for descent. There are abseil chains above High Noon, Male Bonding, and on top of the Feed the Chooks pinnacle. | ||||||||
| 2 |
★ High Noon
6m left of Pale Rider is a chimney. This can be approached by climbing the slab as for Pale Rider then traversing left across to belay below the chimney, or after completing another climb in the area by stopping at the ledge below High Noon when abseiling down. Up the chimney a move [FH] then step out left onto the slabby ramp, up this past a FH. Follow the thin crack on the head wall past 2 more FH to finish at the abseil chains. FA: Philip Armstrong & Peter Cody, 26 Nov 2016 | 17 | 14m, 4 | |||||
| 3 |
★ Paleface
Climb Pale Rider to just above the bolt. Place a high piece in the crack, then step across the face to a FH. Continue left and up to reach a good cam placement. Belay from the Pale Rider rap station or use a large tree back from the cliff FA: Martin Jackson, 19 Mag 2018 | 19 | 25m, 3 | |||||
| 4 |
★ Pale Rider
About 120m left of where you reach the cliff is a short clean slab leading to a striking crack line. Up the slab past a FH to the foot of the crack. Sustained climbing up the crack passing a FH where it narrows down. Lower off chain at top. FA: Philip Armstrong & Peter Cody, 15 Ott 2016 | 18 | 24m, 2 | |||||
| 5 |
★ High Plains Drifter
Lovely slab and face climbing on good rock taking a steadily left drifting line. 10m right of Pale Rider. Up the slab past 3FH to a ledge [grade 15 to here with lower off rings on right]. Up left off the ledge past a FH and onto ramp [for the nervous a #2 or #3 cam can be used to protect the move off of the ledge]. Straight up past 2 more FH to the chains on Pale Rider. FA: Philip Armstrong & Peter Cody, 27 Ago 2016 | 15 | 24m, 6 | |||||
| 6 |
★ Ernest Tidyman
The next line of bolts right of HPD to lower off rings. More lovely clean rock. FA: Philip Armstrong & David Lia, 8 Ott 2016 | 13 | 12m, 3 | |||||
| 7 |
★★ Randolph Scott
13m uphill right from Ernest Tidyman. Up the technical slabby wall past 4FH to lower off rings. FA: Philip Armstrong, Peter Cody & Jerry Maddox, 3 Dic 2016 | 17 | 17m, 4 | |||||
| 8 |
Feed the Chooks
The second pitch was climbed years ago and starts from an inaccessible ledge half way up the cliff. With an independent start and abseil chains to get off it is now a fun middle grade outing up a prominent pinnacle. 40m right of Pale Rider [staying below the lower tier] is a gully. From 5m up the gully a shallow flake corner takes off on the right wall.
FA: David Dodemaide & Mark Schroeder FFA: 1992 | 15 | 37m, 2 | |||||
| 9 |
Feed the Chooks variant finish
Instead of traversing out to the hanging corner climb the knobbly crack up the steep wall above the slab. FA: Philip Armstrong & Jerry Maddox, 2010 | 19 | 9m | |||||
| 10 |
Free the Chooks
Start as for Feed the Chooks.
FA: Peter Cody, Philip Armstrong & alts, 23 Ott 2016 | 15 | 38m, 3 | |||||
| 11 |
Feed the Chooks Some More
From the gully on the right hand side of the FtC pinnacle. The crack and groove up the pinnacle FA: Philip Armstrong & Jerry Maddox, 2010 | 15 | 15m | |||||
| 12 |
Destry Rides Again
Near the top of the gully to the right of the Feed the Chooks pinnacle. Best approached from above. Climb the crack on the right hand side of the gully, opposite Feed the Chooks Some More. FA: Jerry Maddox & Peter Cody, 7 Mar 2022 | 15 | 11m | |||||
| 13 |
★ The Preacher
The buttress right of the Feed the Chooks gully has a prominent crack starting half way up it. Start towards the left side of this buttress below the left end of an overlap. Undercling and balance right past the wedged flake. Step up to reach the horizontal break [good gear in the break]. Traverse right to below the crack. Up the crack [BD#4 useful] to the abseil rings below the short headwall. Alternately continue up the headwall to the large ledge and finish up one of the Chooks. FA: Philip Armstrong & Jerry Maddox, 20 Ott 2016 | 17 | 25m | |||||
| 14 |
★★ Blessed be the Fruit
Start 4m right of The Preacher Requires several cams. Up the short face, past the overlapping flake and horizontal (medium cams) to the thin curving seam on the RHS of the major overlap. Thin climbing across the slab and up to the next thin vertical seam. Step left again and up the final face. Run it out over easy ground (RPs available) to a big ledge. Belay and descent via the Preacher Rap is possible from here. Otherwise continue over the next overlap (small cam) to the larger treed ledge to the start of the pitches on the "Chooks" block, or scramble down the gully on the left. FA: Martin Jackson, 19 Mag 2018 | 22 | 20m, 3 | |||||
| 15 |
★ Blessed Be the Chooks
A good second pitch for Blessed Be The Fruit. The start can also be accessed from above, by scrambling down the gully on the south side of the "Chooks" block. Descend either side of the summit via rap station Belay as for the second pitch of Feed the Chooks on the large ledge at the finish of BBTF. Up to the left end of the obvious horizontal break. Steep but straightforward hand traverse right, past the first bolt, then up the line. Finish up the left side of the summit face using the arete to get started. FA: Martin Jackson & S. Toal, 31 Ott 2018 | 20 | 20m, 5 | |||||
| 16 |
★ Son of a Preacher
10m right of The Preacher. Can be done as one pitch. Pitch one makes a nice short climb in its own right.
FA: P1. Philip Armstrong, Peter Cody, Isabel Hanson, Isaac Hanson 18/2/2017., P2 Peter Cody & Philip Armstrong, 18 Feb 2017 | 18 | 24m, 2, 6 | |||||
| 17 |
Methodist
Takes the upper buttress between The Preacher and Son of a Preacher. At the top of pitch 1 of Son of a Preacher clip the FH around to the left of the belay bolts. Thin moves left onto the nose, then up more easily [trad gear on the easy ground if needed] to abseil bolts. FA: Philip Armstrong & Peter Cody, 5 Apr 2017 | 19 | 12m, 1 | |||||
| 18 |
★ Open Range
The next buttress right of The Preacher [about 15m right]. This buttress has an obvious big groove up its centre. Open Range is the bolted line R of this groove. The upper wall is good fun. Start up a short smooth slab with a FH. Continue up easy crack [medium cam] to below bolted wall. Up wall, at the fifth FH step out R and up to a hidden flake edge. Up and L to sixth FH then up more easily to lower off chains. Alternately continue up to the large ledge and finish up Free Range to abseil off the bolts above Male Bonding. Note: There is a large flake out R of the third FH, it may be quite solid, but it is probably best to avoid using it. It is possible, but a bit harder, to climb direct from the 5th to the 6th FH. Getting past the first FH near the ground is a bit reachy. To keep the grade reasonable the vertically challenged might want to chin on the first bolt! FA: Philip Armstrong & Peter Cody, 7 Set 2016 | 17 | 24m, 6 | |||||
| 19 |
★ Wheels of Confusion
Takes the right edge of the Open Range face. 5m right of Open Range is a short right curving seam. Up the seam, then pick your way up to and up the right arête finishing at the rings. FA: Philip Armstrong & Peter Cody, 6 Mar 2017 | 18 | 24m, 6 | |||||
| 20 |
Restricted Range
From the ledge above Open Range. Head up and left to the deep crack. Up this. FA: Peter Cody & Philip Armstrong, 7 Set 2016 | 14 | 20m | |||||
| 21 |
Range Hood
The steep right facing corner crack system up and right from the trees above Open Range. From above the overhang at the end of the difficulties it is possible to continue straight up in the crack line or step right and up another easy crack system. FA: Philip Armstrong, 21 Gen 2017 | 15 | 25m | |||||
| 22 |
Over Range
Start up the chimney at the right hand end of the ledge above Open Range. There is a shallow flake crack on the right wall about 7m up. Chimney out next to this to a ledge on the arête. Move up and right about 2m to a concealed crack. Up this and the easier ground above. FA: Philip Armstrong & David Lia, 21 Gen 2017 | 13 | 25m | |||||
| 23 |
Free Range
Can be done as a second pitch to Open Range. Quite airy and interesting. From the RH end of the ledge above Open Range. Step out right and climb up just right of the arête for about 7m until level with a traverse line across the middle of the wall. Traverse right to the second crack. Up this passing an unusual pillar, through a small overhang and on up easier ground to belay. The abseil chains above Male Bonding are just 15m to the right. FA: Philip Armstrong & Jerry Maddox, 13 Ott 2016 | 13 | 25m | |||||
| 24 |
Where the Buffalo Roam
Nice climbing but a bit obscure. Gains the crack on the face right of the finish of Free Range from the gully right of the wall. From the abseil chains above Male Bonding abseil down 18m heading for the treed ledge in the gully on the left. Belay at the trees. Climb the short, steep crack and flake on the left side of the gully to a stance around the arete. Up the crack above. Can also be accessed by walking left along the narrow ledge above the initial crack on P2 of Male Bonding. FA: Philip Armstrong & Peter Cody, 23 Apr 2017 | 17 | 24m | |||||
| 25 |
★★ Male Bonding
Good sustained 2nd pitch. The grade is very dependant on how well you can jam. 25m right of Open Range is a flared crack leading to a ledge.
FA: Mike Wust, James McIntosh & alts FFA: 1993 | 16 | 35m | |||||
| 26 |
Bond Away
An alternate 2nd Pitch to Male Bonding. Start just L of P2 of MB. Mantle up to small ledge 2m up, then up flake to ledge. Finish up line 2-3m L of the corner/seam of MB. The start looks fierce and unprotected. FA: Jeremy Boreham, Mike Wust & James McIntosh FFA: 1993 | 16 | 25m | |||||
| 27 |
★★ Male Bonding variant finish.
Up diagonal crack as for P2 of MB, step R at top then directly up face via thin seam. FA: Philip Armstrong & Jeremy Maddox, 2005 | 17 | 25m | |||||
| 28 |
Scratching Post
Climb the short crack on the right edge of Male Bonding Pitch 1 to a stance a few metres up. From here take a rising line rightward to join and finish up Whipping Post. Small cams required. FA: Philip Armstrong, Kathy Matic, Peter Cody, David Lia & Emerson Cody, 11 Ott 2018 | 11 | 16m, 1 | |||||
| 29 |
★ Whipping Post
The bolted line just right of the first pitch of Male Bonding finishing at rings. FA: Philip Armstrong & Peter Cody, 5 Apr 2017 | 20 | 15m, 4 | |||||
| 30 |
Double Breasted Suit
Old fashioned. A deep chimney/crack line 20m right of Male Bonding forming the left edge of the Silent Reach buttress.
FA: Peter Cody, Philip Armstrong [alts] & Jerry Maddox, 29 Ott 2016 | 15 | 55m, 2 | |||||
| 31 |
★ Silent Reach
A steep R facing corner near the right hand end of the lower tier. About 30m right of Male Bonding Quite good first pitch once you get past the mossy start.
FA: Chris Baxter & David Gairns, 1988 | 18 | 55m | |||||
| 32 |
Michael Landon
Quite nice but spoilt somewhat by the alarming block on the first pitch.
FA: Philip Armstrong & Peter Cody, 2006 | 18 | 50m, 2 | |||||
Here's Trouble PinnacleThis pinnacle is just up and left from the top of Silent Reach. It can be easily reached from the top of any of the routes on the Lower West Face. The best way off of the pinnacle is for one climber to abseil down over the Here's Trouble crack into the gully behind the pinnacle. Then tie the rope to a tree in the gully so that the rest of the party can abseil on this tied off rope down the front of the pinnacle. | ||||||||
| 34 |
★★ Here's Trouble
Best approached from the top of Silent Reach. An excellent steep crack climb if you can find it. The climb is on the back of the next pinnacle immediately uphill from SR. Descend a short distance down the gully behind SR, then up and L in the next gully to the foot of the clean crack. FA: David Gairns & Chris Baxter FFA: 1988 | 18 | 15m | |||||
| 35 |
Home on the
There is a short wall just left of the Here’s Trouble pinnacle. The surprisingly strenuous and awkward little crack on this wall. Scramble leftward through the cave behind the climb for the quickest descent. FA: Peter Cody & Philip Armstrong, 11 Gen 2017 | 18 | 10m | |||||
| 36 |
Joe for PM
On the L front of the Here's Trouble pinnacle. Climb the steep corner and crack. FA: Paul O'Byrne & Mark Schroeder FFA: 1992 | 17 | 20m | |||||
| 37 |
How Much Trouble?
Start as for Joe for PM. Up the short steep crack on the right. Up the ramp to the thin flake. Up this and the shallow groove above. FA: Philip Armstrong & Peter Cody, 11 Gen 2017 | 15 | 20m | |||||
 |
||||||||
| Route | Grade | Style | Selected ascents | |||||
Billy Goat PointThis is the cliff face 2 tiers above the Pale Rider block. It is best approached by climbing NATO after doing a route on the lower walls. A neat collection of lower middle grade trad routes on good rock with good protection. The abseil chains above NATO are the best descent. It is possible, but much longer, to walk in to this area via the Terraces Fireline 4wd track. A large distinctive split block sits in front of the left end of the face. | ||||||||
| 39 |
★ NATO
20m uphill and slightly right from the top of Pale Rider. A flake crack on the face to the left of an obvious crack. A good connecting route between the lower cliff and the upper walls. Up the flake and the slabby face above passing 2FHs. Finish up the right edge of the face to abseil chains [24m abseil]. Billy Goat Point is the cliff behind the abseil point. Descending from here requires 2 abseils. The first one gets you down NATO. From the foot of NATO head down and right [looking out] to a large cairn. The abseil chains are just below here. [25m abseil] FA: Philip Armstrong & Peter Cody, 16 Nov 2016 | 14 | 24m, 2 | |||||
| 40 |
★ WGH
The major crackline just to the right of NATO is surprisingly awkward and sustained. Finish up the headwall as for NATO FA: Peter Cody, Philip Armstrong, Kathy Matic & Jerry Maddox, 28 Nov 2021 | 15 | 24m | |||||
| 41 |
Betty Joe
An easy climb on good rock in a nice position. The arête forming the left hand end of Billy Goat Point. About 5m left of the split blocks. FA: Peter Cody & Philip Armstrong, 25 Giu 2016 | 5 | 10m | |||||
| 42 |
Shoulder Dysfunction
Behind the detached split block and about 5m left of Brexit are some large blocks leaning against the face. Up the right edge of these to a ledge. Traverse out right on the narrow sloping ledge to a thin crack. Up this to the bushy ledge. Up the cracks on the undercut arête. FA: Jerry Maddox & Philip Armstrong, 6 Ott 2016 | 14 | 15m | |||||
| 43 |
★ Brexit
About 5m R of the large split block there is a short right facing groove with a couple of stacked blocks in it leading to a ledge. Up the groove to a ledge, follow thin crack to horizontal break, over bulge and up. FA: Philip Armstrong & Peter Cody, 25 Giu 2016 | 14 | 15m | |||||
| 44 |
★ Keep Calm and Carry On
Sustained and interesting. Up Brexit to the ledge. Traverse right to the next thin crack. Up this to the horizontal, step right and up line in headwall. FA: Peter Cody & Philip Armstrong, 25 Giu 2016 | 15 | 16m | |||||
| 45 |
Credibility Gap
The deep crack 6m right of Brexit. Up the crack for about 6m to a large foothold on the right. Step out left to an obvious foothold on the face. Up to the horizontal break. Finish up the headwall via the thin crack. FA: Philip Armstrong & Jerry Maddox, 6 Ott 2016 | 14 | 15m | |||||
| 46 |
Lifters and Leaners
8m right of Credibility Gap. Balancey moves up to a ledge below a thin crack. Climb the detached flakes at the left end of the ledge. From the top of the flakes step right and up the thin crack. FA: Jerry Maddox & Philip Armstrong, 6 Ott 2016 | 13 | 12m | |||||
| 47 |
UKIP
About 10m right of Lifters and Leaners. Start near the right hand edge of the face and head up a featured slabby wall to the thin cracks in the middle of the headwall. Up these [small wires and cams] to finish up short groove. FA: Philip Armstrong & Peter Cody, 25 Giu 2016 | 14 | 15m | |||||
 |
||||||||
| Route | Grade | Style | Selected ascents | |||||
Western LookoutThis is the face above the Open Range and Male Bonding faces. The face can be easily approached from the top of those buttresses via the climb Annie Oakley. Alternately approach as for the East Face along the Terraces fire line. At the saddle overlooking the dam wall head towards the left hand end of the East Cliff area. You will eventually pick up a rough walking track which comes up from the valley floor. Follow this first to the South Lookout then continue on to the top of the Western Lookout. A magnificent vantage point on a sunny day looking over Lake Bellfield to Mt William. Descend down right [looking out] to get to the foot of the face. | ||||||||
| 49 |
Annie Oakley
This route is good for access to the climbs on the Western Lookout after doing a climb on the West Face. The wall directly behind the finish of Restricted Range and Range Hood. Up the seam in the middle of the face passing 3FH. Some small cams can be placed. Abseil bolts up and right 3m at the top. FA: Philip Armstrong & Peter Cody, 18 Feb 2017 | 15 | 16m, 3 | |||||
| 50 |
Stumpy
Start 8m right of the LH end of the cliff. Climb the short crack and its right wall. FA: Peter Cody, Philip Armstrong & Jerry Maddox, 17 Lug 2016 | 13 | 10m | |||||
| 51 |
Rio Lobo
There is a cave formed by a large boulder leaning against the face. Walk through this. Start on a boulder 4m R of the cave exit. Head boldly up to a prominent jug, then continue up the featured wall above. FA: Jerry Maddox, Peter Cody & Philip Armstrong, 17 Lug 2016 | 13 | 18m | |||||
| 52 |
Turkish Coup
Start 8m right of the cave exit, 2m right of and below an obvious flake crack. Climb the tricky face to a break. Layback excitingly up the flake then follow cracks and features slightly leftward to the top. FA: Peter Cody, Philip Armstrong & Jerry Maddox, 17 Lug 2016 | 14 | 18m | |||||
| 53 |
Rio Bravo
Up Turkish Coup to the break. Traverse right to the crack line. Up. FA: Philip Armstrong, Peter Cody & Jerry Maddox, 17 Lug 2016 | 14 | 18m | |||||
| 54 |
SPC
In the gully behind the Western Lookout is a short wall with a clean cut crack towards its right hand side. Lovely rock and tricky jamming. FA: Philip Armstrong, Peter Cody & Jerry Maddox, 17 Lug 2016 | 19 | 10m | |||||
| 55 |
Back to Scratch
Around the RH end of the cliff is a major corner-chimney facing the valley. Use the native pine tree to make an awkward entry into the line. A bit of a thrutch. FA: Chris Baxter & David Gairns FFA: 1988 | 16 | 25m | |||||
East FaceThe orange walls facing the Terraces Fire-line walking track and best approached from that side [see approach details]. | ||||||||
| 57 |
Hop Sing
This is at the LH edge of the very LH buttress just L of an obvious crack in the headwall [Ponderosa]. Climb thin L leaning seam to ledge. Step L and up headwall past the block with a crack behind it. FA: Peter Cody & Philip Armstrong, 20 Mar 2016 | 13 | 10m | |||||
| 58 |
★ Ponderosa
Good clean crack climb. At the far LH end of the east facing blocks is a block with an obvious crack/groove in its upper wall. Start at the short steep corner down and R of this. Up corner, L under bulge, up awkward crack. FA: Philip Armstrong & Peter Cody, 20 Mar 2016 | 17 | 12m | |||||
 |
||||||||
| Route | Grade | Style | Selected ascents | |||||
| 59 |
★ Devil's Tower
About 20m R of the Ponderosa block is a large orange block. [Gerrymander takes a line on the RH side of this block.] At the LH side of this block is a short chimney between the face and a detached boulder. Chimney up to the chockstone. Step onto the wall and head up across a R leading ramp line to finish up the headwall. Head R to descend. FA: Peter Cody & Philip Armstrong, 20 Mar 2016 | 10 | 12m | |||||
| 60 |
★★ Katara
Beautiful line taking the centre of the perfect orange wall. Delicate, slippery face climbing. Much harder if you’re short. Probably classic | 26/27 | 13m, 5 | |||||
| 61 |
★ Gerrymander
Excellent, sustained face climbing. Towards the RH edge of orange wall, 20m R of Ponderosa. Gain the flake, climb it, mantleshelf then step L onto the wall [carrot bolt]. Move L and up. FA: Paul O'Byrne, David Dodemaine, Tiggy Forrell & Mark Schroeder FFA: 1992 | 22 | 18m | |||||
| 62 |
★ Bonanza
The RH edge of the Gerrymander block has a big chimney/corner. Up this with some interesting moves near the top. FA: Philip Armstrong & Peter Cody, 20 Mar 2016 | 12 | 18m | |||||
| 63 |
★ Wyoming
Down and R of Bonanza about 15m is a thin crack up the L side of a slabby wall. Nice moves up this crack, step L and up steep thin crack in headwall. FA: Philip Armstrong & Peter Cody, 20 Mar 2016 | 20 | 18m | |||||
1.5. Gamblers wall 1 route in Cliff
- Summary:
-
Tutti Arrampicata trad
Lat / Long: -37.177985, 142.557118
descrizione
Larger rocky outcrop in the middle of the ridge line that continues south from Boronia Peak. The outcrop is roughly at the centre of Lake Bellfield when looking from Grampians Road. The orange face can be seen from the main road, just above where a prominent gully meets the lake.
avvicinamento
Take the Boronia Fireline 4wd track behind Lake Bellfield until reaching the Parks management gate. Park here and walk the fireline for 2km up 2 steep hills. After the second short, but steep hill keep going until a small gully appears of the left hand side (inline with the road). A short way after this, a large fallen tree marks the point at which you turn right up the hill to the right. Follow the lightly cairned track up the left side of a small gully till you reach a small rocky cliff. After hitting the cliff line, trend left until reaching the end of the first rocky cliff. Keep going left and up, keeping close to the cliff edge where you will eventually reach the top of Gamblers Fallacy. GPS coordinates are most useful: (-37.17926, 142.55855)
 /17/2d/172d09072f55e6f1b57857daad77441372ce0aab) /e3/ef/e3efef77345e9829b9ef374ce04e6e7d2e9f9c90) |
||||||||
| Route | Grade | Style | Selected ascents | |||||
|---|---|---|---|---|---|---|---|---|
| 1 |
★★★ Gambler's Fallacy
Immaculately desperate corner crack with a powerful start. Begins from large shelf down low (climbers right). Up bouldery start and technical layback past bolt (using the slab on the left takes away a grade) continue up thin crack with technical feet and increasinly fleeting hands to the top. Plenty of bomber gear on solid rock. would strongly advise stick clipping the bolt. FA: angus smith, 20 Apr | 28 | 25m, 1 | |||||
1.6. The Grand Old Man 3 routes in Crag
- Summary:
-
Tutti Arrampicata trad
sommario
Cliff faces SW. Walking time 50 minutes. GR 386836
descrizione
Although west of the ridge, this crag is accessed from the East side so it's been placed under the Northeast 'Mt William' Range.
Crag high on ridge above E side of Lake Bellfield. From the dam wall, walk uphill (E) on rough tracks past Little Joe Hill to intersect Jeep track running N-S. Walk right (S) on this until the cliff can De seen high above. Walk up to it.
| Route | Grade | Style | Selected ascents | |||
|---|---|---|---|---|---|---|
| 1 |
The Grand Old Men
Prominent cairned line near middle of cliff.
Climbed in the 80s FA: Bill Andrews & Allan Hope (alt), 1985 | 14 | 50m | |||
| 2 | Spring Fever | 16 | 38m | |||
| 3 | Spring Fever Direct Variant | 17 | 9m | |||
1.7. Netherby Towers 4 routes in Crag
- Summary:
-
Tutti Arrampicata trad
| Route | Grade | Style | Selected ascents | |||
|---|---|---|---|---|---|---|
| 1 | Bump and Grind | 19 | 45m | |||
| 2 | Remembering Diana | 17 | 25m | |||
| 3 | Happy Lathering, Customers | 20 | 18m | |||
| 4 | How Do You Stop an Elephant? | 18 | 18m | |||
1.8. Jacks Rest 1 route in Crag
- Summary:
-
Tutti Arrampicata trad
descrizione
Although west of the ridge, this crag is accessed from the East side so it's been placed under the Northeast 'Mt William' Range.
| Route | Grade | Style | Selected ascents | |||
|---|---|---|---|---|---|---|
| 1 | Hot Dogs | 16 | 37m | |||
1.9. Rock of Ages 2 routes in Crag
- Summary:
-
Tutti Arrampicata trad
descrizione
Comprising smooth, grey, Mount Rosea-like rock, the top, only, of this outcrop is visible from Halls Gap-Dunkeld Road halfway up hill between Pastoral Buttress and Diving-board Rocks, and 50m north of those cliffs. Park on road directly below Rock of Ages. A pleasant, 20-minute stroll across paddocks and then through open woodland leads to cliff.
Cliff faces west.
NOTE: Cliff details taken from VCC online update 2001.
| Route | Grade | Style | Selected ascents | |||
|---|---|---|---|---|---|---|
| 1 |
The Ancient of Days
Excellent, technical climbing. From left toe of face, climb ramp up right to left vertical line. Up this. FA: Chris Baxter & David Gairns, 1997 | 20 | 24m | |||
| 2 |
Ageism on the Rise
Much harder than it looks, hard to pro- tect, and in need of a clean. Line on right side of face. From ledge with tree, climb groove to overhang. Step up left, then right above overhang. Up until easier rock is attained. FA: David Gairns & Chris Baxter, 1996 | 20 | 20m | |||
1.10. Power Tower 1 route in Cliff
- Summary:
-
Tutti Arrampicata trad
descrizione
Isolated pinnacle of very smooth, compact rock and limited potential on west side of Mount William Range above Lake Bellfield.
Cliff faces southwest.
NOTE: Cliff detail taken from VCC online update 2001.
avvicinamento
From Bellfield Settlement, cross Fyans Creek just below outflow from Lake Bellfield. Take walking track up towards Little Joe Hill as far as quarried terraces above dam wall. From top right corner of terraces follow foot track southeast to join four-wheel-drive track heading southeast above lake. Follow this track until it crosses a creek in the bed of the gully which has long, steep hill on its north side. Continue for 200m, then turn off left (northeast) and head uphill through light scrub for 250m to escarpment with prominent tower at its right end.
| Route | Grade | Style | Selected ascents | |||
|---|---|---|---|---|---|---|
| 1 |
When Push Comes to Shove
Scramble up chimney/gully below northwest corner of pinnacle, then over blocks to stance below crack in middle of west face. Crack. FA: Chris Baxter & David Gairns, 1997 | 16 | 20m | |||
1.11. Fallen Slab Wall 1 route in Crag
- Summary:
-
Tutti Arrampicata trad
descrizione
Although west of the ridge, this crag is accessed from the East side so it's been placed under the Northeast 'Mt William' Range.
| Route | Grade | Style | Selected ascents | |||
|---|---|---|---|---|---|---|
| 1 | The Road Less Travelled | 19 | 37m | |||