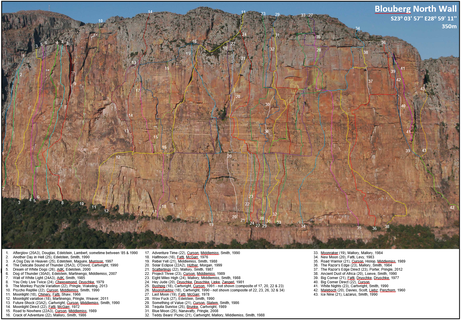
descrizione
Between HALFMOON and HEY JUDE, there is a 50m long roof at 70m height. In the middle of the roof are two large flake lines. Below the right-hand one, on a ledge about 10m off the normal ground level, is a pillar with a chimney-sized gap behind it. Start at the base of the right hand side of the pillar.
45m 20. Climb right hand side of pillar. Continue up flake line until first roof is reached. Move left to a break, and continue up to narrow ledge, directly above pillar, and about 8m below main roof.
30m A2. Great Roof Pitch. Thrash through hanging gardens up and left from stance (the swath of clear-cut from FA is likely to have re-grown). Move left at roof, then out along flake. At piton, move left for two moves onto drilled bat hook hole Move up through overlap to reach rail, then right onto ledge with poor peg belay.
40m 16. Move right into corner, then up and left to a grassy ledge, belaying off a tree. Awesome bivy to right of tree on cleared ledge below some low roofs (blackened corner). Next pitch starts from left end of these roofs, as for PROJECT THREE. The Grassy Ledge can be reached by walking right.
30m 20. (As for PROJECT THREE) Pull through initial overhang at chest height, move right, then follow corner to next roof. Move left, then up to stance on small ledge 10m left of peg on HEY JUDE.
35m 20 (As for PROJECT THREE) Clamber up blocks forming right hand side of stance. Follow intermittent crack above, stepping left when holds run out, then right again 2m higher. Continue up to stance on right end of Jungle Ledge.
50m 22A2+. Move up and right from stance, with very technical climbing leading to left-facing corner 15m right of HALFMOON’s chimney. When free climbing becomes untenable, start aiding. Beyond the roof, technically easy but exciting aid leads up and left of overhang, then up again on slabs until a stance can be made just below the right-leaning cracks.
40m 22 (19A1) Step left from the stance to gain the long right-leaning crack. Follow this until the crack splits. The right-hand line becomes a frightening offwidth through a huge roof. Follow the left-hand line around the roof with two points of aid, then right into a gully (as for SCATTERLINGS).
15m 15. Continue up through trees until the Disco Ledge Bivi is reached (a flattopped pillar about the area of a small car, with a small cave/fissure behind).
5m 15. Leave the Disco Ledge via the crack that the gully has narrowed to.
100m. Contribute to deforestation on your way to the top.
Notes:
Special equipment. Two hooks suitable for small edges, two standard hooks, one hook for 5mm wide, 8mm deep holes. Aiders (etriers) are useful. A handbolting kit is recommended to beef-up the second stance with two bolts. A double or triple rack of small wires is useful for pitch 6.
Free notes. Pitch 2 can probably be mostly freed at grades that someone you know can climb. Pitch 6 would be bold, but most moves should be doable free.
Pitch 7 sounds suspiciously like the crux of SCATTERLINGS (22)?
Storia via
| Feb 1999 | Prima ascensione: Alard Hüfner & Dylan Morgan |
|---|
Warnings
Località
- Lat/Lon: -23.06640, 28.98590
Alcuni contenuti sono stati forniti sotto licenza da: © Hector Pringle ()
Citazione grado
| 20,16,AID:A2,21,19,22 AID:A2,22,15,15 | Grado comunitario registrato |
| ★★Marc dM |
Get a detailed insight with a timeline showing
- Ticks by climbers like you
- Discussions of the community
- Updates to the index by our users
- and many more things.
Login to see the timeline!
