A Crag Guide gives an extensive view of all sub areas and climbs at a point in the index. It shows a snapshot of the index heirachy, up to 300 climbs (or areas) on a single web page. It shows selected comments climbers have made on a recently submitted ascent.
At a minor crag level this should be suitable for printing and taking with you on a climbing trip as an adjunct to your guidebook.
This guide was generated anonymously. Login to show your logged ascents against each route.
Warning
Rock climbing is extremely dangerous and can result in serious injury or death. Users acting on any information directly or indirectly available from this site do so at their own risk.
This guide is compiled from a community of users and is presented without verification that the information is accurate or complete and is subject to system errors. By using this guide you acknowledge that the material described in this document is extremely dangerous, and that the content may be misleading or wrong. In particular there may be misdescriptions of routes, incorrectly drawn topo lines, incorrect difficulty ratings or incorrect or missing protection ratings. This includes both errors from the content and system errors.
Nobody has checked this particlular guide so you cannot rely on it's accuracy like you would a store bought guide.
You should not depend on any information gleaned from this guide for your personal safety.
You must keep this warning with the guide. For more information refer to our:
Usage policy
Contributors
Thanks to the following people who have contributed to this crag guide:
Andreas Aachen
Kieran Loughran
Campbell Gome
Gareth Llewellin
jono schmidt
The size of a person's name reflects their Crag Karma, which is their level of contribution. You can help contribute to your local crag by adding descriptions, photos, topos and more.
Some content has been provided under license from: © Australian Climbing Association Queensland (Creative Commons, Attribution, Share-Alike 2.5 AU)
Table of contents
- 1. The Catacombs 18 in Crag
- 2. Index by grade
1. The Catacombs
- Summary:
-
Mostly Trad climbing
Lat / Long: -37.238946, 142.268624
Find out about and observe access restrictions and agreements.
Use existing access tracks to minimise erosion - keep to hard ground & rock surfaces.
Do not disturb nesting birds or other wildlife.
Protect all native vegetation, especially at the base of cliffs. Wire brushing to remove mosses and 'gardening' in cracks and gullies is not permitted. Use slings to protect trees while belaying or abseiling if belay anchors are not provided.
Respect sites of geological, cultural, or other scientific interest. Do NOT develop new climbs in or near Cultural Heritage sites.
Chalk has high visual impact - minimise your use of it. Parks Victoria have requested the use of coloured chalk in Gariwerd.
Minimise the placement of fixed equipment, especially where Trad gear is available. Respect any "no bolting" areas.
Do not leave any rubbish - take it home with you.
Dispose of human waste in a sanitary manner (bury, or even better pack it out). Do not pollute water supplies.
Off-road driving is illegal in Gariwerd.
Keep campsites clean, and do not light campfires outside of official metal fire pits.
description
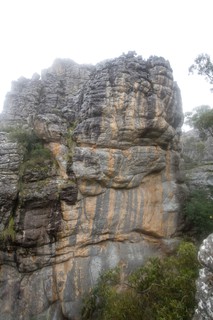
An area hidden away about 200m north west of the Tower. Good for summer as most routes are in the shade for most parts of the day. This area contains several quality walls facing in all directions. Quite a bit of new route potential exists.
access issues
Climbing restrictions apply to many crags in Gariwerd/Grampians. Some of these restrictions are likely to change over time as assessments are completed. Tags are being applied to most crags to reflect their current status. Additional access-notes are provided to clarify restrictions where required (and will over-ride this notice). Current and further Parks Victoria advice can be found at https://www.parks.vic.gov.au/places-to-see/parks/grampians-national-park/rock-climbing-in-gariwerd
approach
20-25 min mostly flat. Follow the Tower track for 20 min until after its first steep section (at -37.240470, 142.268542) and turn left at 'Sunny Boy Block' (big Boulder with a single bolted route on it). Follow track marked by red ribbons and cairns to tree creek crossing. Once You crossed the creek you will see the Afterlife wall on your left (an impressive 'Arapiles' style bulging wall). A single bolt rap anchor exists above Chimney Slot 'Thing'.
ethic
Grampians / Gariwerd access issues have emerged (2019) due to potential risk to the environment and cultural sites. Climbers need to be aware that there are significant Aboriginal sites in the Grampians, especially in cave areas. Please take time to understand the access situation. Leave no trace and climb responsibly.
Please note that due to the fact that the Grampians is a National Park, dogs and other pets are not allowed in the park except in vehicles on sealed roads and in sealed car parks.
===Cliffcare Climber’s Code===
For more detailed information visit https://www.cliffcare.org.au/education
  |
||||||||
| Route | Grade | Style | Selected ascents | |||||
|---|---|---|---|---|---|---|---|---|
| 1 |
★ The Evil Within
Crack then orange bulging face. 2 FHs and lower- off. Set: adam demmert, 2007 FFA: adam demmert & ross taylor, 2009 | 25 | 14m, 2 | |||||
| 2 |
★★ Ogre Power
In shade after 11am. Technical start past two RB. At 3rd bolt head up and left past juggy corner to horizontal break. Up juggy diagonal crack and then left towards powerful finish and DRB lower-off. Re-bolted 2018 Set: Heath Black & Andreas Aachen FA: Andreas Aachen, Oct 2018 | 27 | 25m, 7 | |||||
| 3 |
★ Evil Rabbit
Bouldery prow following seam, pockets and interesting slots. Same start as afterlife. | 28 | 20m | |||||
| 4 |
★ Afterlife
Shares start with Ogre Power. Technical climbing up and right towards rest and final headwall with overhanging crack. DRB lower-off. Soft as Kittens. Set: James Pfrunder, 2004 FA: Andreas Aachen, Sep 2018 | 25 | 25m, 7 | |||||
| 5 |
★ Stakes And Ladders
Weaves around to get up this pleasant wall. Starts 20m left of Wrapped In Pain, just left of scungy looking chimney slot thing. Heave over initial bulge, scuttle left then up mossy rounded face to gain horizontal. Traverse left a few metres then up right trending corner flake. When this runs out climb right (only obvious holds!) and up juggy face to finish. Full rack required + additional slings. FA: adam demmert, Cath & Neil, 2007 | 19 | 20m | |||||
| 6 |
Chimney Slot Thing
They don’t get better than this. The easiest way to the top. Single RB lower-off. FA: Gay Welders Union, 2007 | 5 | 20m | |||||
/32/c9/32c98929a3be92a29158167f5fc5646627f60543)  |
||||||||
| Route | Grade | Style | Selected ascents | |||||
| 7 |
★ Wrapped in Pain
Located on north facing main wall with a large scooped base. Malcolm forgot his harness and had to belay Neil's dogging efforts with a sling around his waist! Three FHs up right leading steep scoops to gain broken crackline. Up this with fiddly trad pro to committing top out up grey wall. FA: Neil Monteith & Malcolm Matheson, 2004 | 24 | 20m, 3 | |||||
| 8 |
★ Chair de Poule
Lean over to incuts/jugs and bomber #0.4 placement. Cut loose swing over and climb up the orange streak. Bail slightly to the right, once the handholds run-out. FFA: Andreas Aachen & Julie, 2018 | 16 | 20m | |||||
| 9 |
Rich's Face
Located in the small gully that can only be entered by tightroping across the hanging logs, about 20m right of Wrapped In Pain. No route description was written up - but can presume it climbs the east face somewhere on small gear. FA: Rich Ham & Anita Sharma, 2005 | 20 | 15m | |||||
|
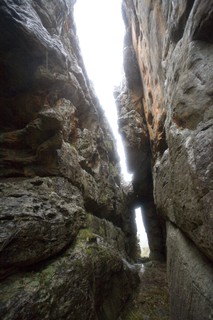
50m west (right) of Wrapped In Pain is a distinct chasm with a large chockstone at the southern end. This area stays in the shade for most of the day. | ||||||||
| 11 |
★ Maggot Ridden
West side of entrance to the 'Slow Torture' 'Gully' which is 50m west of 'Wrapped in Pain'. Worthwhile despite the name. Rounded arête with short crack at start. Bulgy and committing finish with last trad below your feet. FA: Neil Monteith Gareth Llewellin Adam Demmert, 2004 | 18 | 15m | |||||
| 12 |
★ Slow Torture
Starts 3m left of 'Maggot Ridden'. Technical face and seam climbing with spaced small trad gear. Great rock. FA: Adam Demmert, 2004 | 22 | 15m | |||||
  |
||||||||
| Route | Grade | Style | Selected ascents | |||||
| 13 |
★ Fly Grave
The giant flake on the wall between 'Slow Torture' and 'Skullcracker'. Gain the ledge below this flake by starting 8m right at weakness through rooflet (route was attempted direct but was abandoned when no pro and grade 23+ roof moves were encountered). Walk across sledge and then up nice orange wall until holds run out, look behind to see the big flake, stem onto it and jug easily on ledge. Up left to finish. FA: Neil Monteith, Adam Demmert & Cath, 2007 | 16 | 25m | |||||
| 14 |
★ Skullcracker
Scoops to flake crack then onwards to inverted ceiling. Place vital small cam in slot and swing downwards on horn jug (FH) and over lip to juggy face. Up this face (two FH¹s and sling horns) to clip-and-go lower-off. Start: Start 20m left of "Slow Torture". FA: Neil Monteith, Adam Demmert, Rich Ham & Jono Schimdt, 2005 | 22 | 20m, 3 | |||||
| 15 |
Knights Duel
Very featured crack directly opposite "Skullcracker" with nice jugs to finish. FA: Anita Sharman & Rich Ham, 2005 | 12 | 20m | |||||
| 16 |
★★ Fire Breathing Dragon
The first crack 1m from the arete on the left side of the wall as you walk into the 'Slow Torture' gully. Tricky roof move with nice crack to finish. FA: Anita Sharman, Rich Ham & Neil Monteith, 2005 | 15 | 20m | |||||
|
The next two routes are located on the left side of a south facing wall that is 50m north of Wrapped in Pain. Either scramble up grey jugs directly opposite Wrapped in Pain or find your way up the gully on east side. The climbs start on a terrace that has three thin cracklines on the left side. | ||||||||
| 18 |
Hudson's Training Route
The right crack. Stick place the first wire(easy to do), step across the gap, then blast up the crack pumping out placing gear. At small roof head up and left. Abseil off fixed sling above Walking the Void. FFA: adam demmert & Alister Hudson, 2005 FA: Adam Demmert, 2005 | 20 | 14m | |||||
| 19 |
★★ Walking The Void
The middle crack. Stick place the first wire (easy to do), step across the void, couple of hard moves lead to a rest, then waltz up the crack heading up the left branch where the crack forks and steepens. Pumpy last moves to good jugs. Abseil from sling. FFA: adam demmert, 2005 | 23 | 13m | |||||
|
The next route is in the continuation of the gully uphill from 'Afterlife' (towards Hudsons Traing Regime.) There is an impressive orange sweep of wall on the left side. On the uphill end is this black featured wall with two FH’s. | ||||||||
| 21 |
★ A Sling And A Prayer
Two FHs then rightwards diagonal fingercrack. Bolted by Kent in the pouring rain using a manky sling as a harness. Hangers were recycled from one of Brookies past glories at Camels Hump. Route was abandoned to the elements for three years and finally climbed by Neil. Set: Kent Paterson, 2004 FA: Neil Monteith, 2007 | 24 | 15m, 2 | |||||
2. Index by grade
| Grade | Stars | Name | Style | Pop | |
|---|---|---|---|---|---|
| 5 | Chimney Slot Thing | 20m | |||
| 12 | Knights Duel | 20m | |||
| 15 | ★★ | Fire Breathing Dragon | 20m | ||
| 16 | ★ | Chair de Poule | 20m | ||
| ★ | Fly Grave | 25m | |||
| 18 | ★ | Maggot Ridden | 15m | ||
| 19 | ★ | Stakes And Ladders | 20m | ||
| 20 | Hudson's Training Route | 14m | |||
| Rich's Face | 15m | ||||
| 22 | ★ | Skullcracker | 20m, 3 | ||
| ★ | Slow Torture | 15m | |||
| 23 | ★★ | Walking The Void | 13m | ||
| 24 | ★ | A Sling And A Prayer | 15m, 2 | ||
| ★ | Wrapped in Pain | 20m, 3 | |||
| 25 | ★ | Afterlife | 25m, 7 | ||
| ★ | The Evil Within | 14m, 2 | |||
| 27 | ★★ | Ogre Power | 25m, 7 | ||
| 28 | ★ | Evil Rabbit | 20m |