A Crag Guide gives an extensive view of all sub areas and climbs at a point in the index. It shows a snapshot of the index heirachy, up to 300 climbs (or areas) on a single web page. It shows selected comments climbers have made on a recently submitted ascent.
At a minor crag level this should be suitable for printing and taking with you on a climbing trip as an adjunct to your guidebook.
This guide was generated anonymously. Login to show your logged ascents against each route.
Warning
Rock climbing is extremely dangerous and can result in serious injury or death. Users acting on any information directly or indirectly available from this site do so at their own risk.
This guide is compiled from a community of users and is presented without verification that the information is accurate or complete and is subject to system errors. By using this guide you acknowledge that the material described in this document is extremely dangerous, and that the content may be misleading or wrong. In particular there may be misdescriptions of routes, incorrectly drawn topo lines, incorrect difficulty ratings or incorrect or missing protection ratings. This includes both errors from the content and system errors.
Nobody has checked this particlular guide so you cannot rely on it's accuracy like you would a store bought guide.
You should not depend on any information gleaned from this guide for your personal safety.
You must keep this warning with the guide. For more information refer to our:
Usage policy
Contributors
Thanks to the following people who have contributed to this crag guide:
Laurence Judd
pamelalansbury
Ben Dickson
Paul Badenoch
Friendlygoose
Liam
Cameron Roy
CCSA
Sam Morris
David Newell
The size of a person's name reflects their Crag Karma, which is their level of contribution. You can help contribute to your local crag by adding descriptions, photos, topos and more.
Table of contents
- 1.
Glen Osmond
21 in Area
-
1.1.
Glen Osmond Quarries 5 in Crag
- 1.1.1. The Oasis 4 in Crag
- 1.1.2. The Main Quarry 1 in Cliff
- 1.2. Wheal Watkins Mine 16 in Field
-
1.1.
Glen Osmond Quarries 5 in Crag
- 2. Index by grade
1. Glen Osmond 21 routes in Area
- Summary:
-
Bouldering and Trad climbing
Lat / Long: -34.968141, 138.654251
1.1. Glen Osmond Quarries 5 routes in Crag
- Summary:
-
All Trad climbing
Lat / Long: -34.973723, 138.652027
access issues
Sensitive area because of how close it is to the expressway.
1.1.1. The Oasis 4 routes in Crag
- Summary:
-
Lat / Long: -34.974401, 138.653231
approach
Unclear. The section of the Yurrebilla Trail from 198 Mt Barker Rd currently has Private Road signs as of March 2024. The access from Urrbrae may be complicated by works around the freeway/Hysen Tunnel upgrades.
Old approach description for reference:
Park at side of road near 198 Mt Barker Road and follow the Yurrebilla Trail until metal map/sign at start of the Peregrine Point Trail path (the trail is vague hard to follow until it becomes more defined further down hill). Continue on path. Cliff is about small wooded opening along the path. Could also be approached from Urrbrae side along the Urrbrae Ridge Trail
| Route | Grade | Style | Selected ascents | |||
|---|---|---|---|---|---|---|
| 1 |
★ Adult Themes
Crack L of arête to the L of Trish Delight. Gain the slab and finish up TD. FA: Paul Badenoch, Des Norman, David Newell & Chris Oerman, 2006 | 16 | 20m | |||
| 2 |
★★ Trish Delish
A varied route that takes a striking line. Begin at the hand crack just right of the arete. A hard start over a small roof leads to good crack climbing and a rest on the L arete level with the main roofline. Swing around R to regain the crack and follow it up the slab past a bush. Climb the ramp up L then straight up the wall just R of the arete. Quoted from Nick Neagles guide. FA: Nick Neagle & Paul Francis, 1989 | 22 | 22m | |||
| 3 |
★ Rapid Disimpaction
Delicate climbing up the arête L of Red Slab. FA: Paul Badenoch, Des Norman, David Newell & Chris Oerman, 2006 | 17 | 28m | |||
| 4 |
Red Slab
The unattractive LH corner in the centre of the quarry. FA: John Griffiths & Martin Bell, 1971 | 16 | 28m | |||
1.1.2. The Main Quarry 1 route in Cliff
- Summary:
-
| Route | Grade | Style | Selected ascents | |||
|---|---|---|---|---|---|---|
| 1 |
Ankle Biters
toproped old aid line (?) at RH end of cliff FA: Nick Neagle & Paul Francis, 1988 | 21 | ||||
1.2. Wheal Watkins Mine 16 routes in Field
- Summary:
-
All Bouldering
Lat / Long: -34.961318, 138.658578
summary
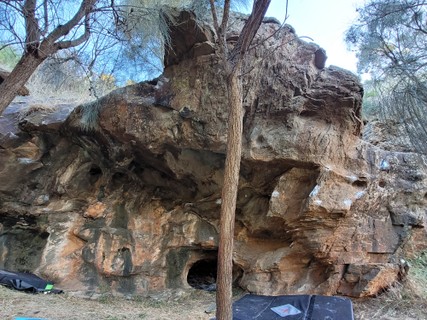
Two small rock bands on the side of a cliff on the walk-in into the Wheal Watkins Mine. The upper cliff has a really nice view of the city.
description
Located along the walk-in into the Wheal Watkins Mine. The area consists of a lower cliff and an upper cliff. The rock is of average Adelaide rock so climb with caution. Actual Route names and descriptions to come.
access issues
Not known. There are no signs prohibiting climbing in the area. Of course, don't climb on the mine site itself. Stick to the designated climbing area.
approach
Park in the parking area at the end of Allandale Avenue. This is the start of the walking trail to the Mine. Follow the walking trail taking the left path. Once you get to the boulders (approx 2mins) you can either take a dodgy scramble up or follow the path another 5-6mins until you are above the upper cave. The walk off the path down an easy hill to the upper cave.
ethic
This area is located on a revegetation site known as "Gully Reserve". The land is managed by the Burnside City Council as well as Bush for Life volunteers. Please follow these rules so that we can take care of this site and make a positive example of climbers.
Don't trample any plants. Plantings and valuable remnant veg are often (but not always) marked with bamboo stakes or blue pin tags.
Don't remove plant matter or soil from the rock. There are rare native plants such as ferns that grow in/on the rocks here.
Avoid causing erosion. The soil at Gully is unforunately very soft and prone to erosion. Tread carefully when scrambling up or down the hillside.
history
The area was first established by Paul Kinane and Simon Harris.
/34/01/3401124abdc5a2600950288321549eaf044c1dec) |
||||||||
| Route | Grade | Style | Selected ascents | |||||
|---|---|---|---|---|---|---|---|---|
| 1 |
★ The Upper Floor
Sit start on left hand side of upper cave on the big ledge. Traverse left and out and follow the Layered edges. Finish on good juggy holds or top out on the left hand side. FA: thestig | V3 | 10m | |||||
| 2 |
Up the Upper Floor
Start as for The Upper Floor but instead go straight up. | V0 | 4m | |||||
| 3 |
★ Possession Obsession
Sit start as for Upper Floor. Follow the same line left but only using the lower break. Finish matched on good juggy blocks at the end or top out. Some bum scraping action. FA: Paul Kinane | V5 | 9m | |||||
| 4 |
★★ Line 2
Sit start as for upper floor but head right along lip of cave to meet the right arete and top out via the arete. FA: Simon Harris | V4 | 6m | |||||
| 5 |
★★ Box Act
Sit Start in the centre of the cave on sloping/flat edges. Make a big move into a good crimp rail in the roof, continue through the roof on good holds to underclings at the lip, to finish in the big hole above the lip. FA: Laurence Judd, Sep 2022 | V2 | 3m | |||||
| 6 |
★★ Wish You Were Here
Sit start the main arete. Move to the next sloper hold of this problem then move left to the side-pull in the centre of the roof. From here make a big move to the gaston in the middle of the roof arete and mantle. Either top out or finish on the headwall. FA: unknown | V3 | 3m | |||||
| 7 |
★ Main Arete
Sit Start on good edges with feet on back wall. Head up arete on good jugs to a trickier top out. FA: Simon Harris | V2 | 4m | |||||
| 8 |
★★ Con lentitud pederosa
Start on rail crimp on right hand side of cave, move into first jug on inside of arete. Move through middle of roof on sharp holds (pinch or crimp), make big Gaston move with Rh to large sloper jug. Match and finish on the jug above the start of upper floor. | V5 | 2m | |||||
| 9 |
★★ Wheal of Time
Sit Start on the right arete as for 'Main Arete'. Head up that line until you hit the arete, then head left along the lip until you meet the 'Upper Floor'. Work you way into the break line and finish as for 'Upper Floor' FA: Laurence Judd, Sep 2022 | V4/5 | 15m | |||||
 |
||||||||
| Route | Grade | Style | Selected ascents | |||||
| 10 |
★ Hole in One
As the lower cave has a rock floor all the following lines have been established/completed with feet above this rock floor. Sit Start in the large hole in the centre of the cave with hands on decent edges above the opening. Head straight up to good jug then traverse right and finish up 'Whealy Easy' | V2 | 4m | |||||
| 11 |
★★ Iron Monger
Sit starts matched on the right hand side of the lower right cave. Traverse the lip and top out in the middle of the cave. Mantle. FA: Simon Harris | V5 | ||||||
| 12 |
Iron Maiden
Climb 'Iron Monger' but keep traversing left along the lip and mantle the left hand side of the cave. FA: Redanon | V5 | 5m | |||||
| 13 |
Whealy Easy
Sit Start on sloping edges of Iron Monger, move up and right via pinches and side pulls to the short wall right of the cave and mantle out. | V1 | 3m | |||||
| 14 |
★ Iron Cave Traverse
Sit Start as for Iron Monger but once you are up under the roof traverse left around the inside of the cave to the outer side where you will find a big victory jug to finish. | V1 | 6m | |||||
| 15 |
★ Whealy Long
Stand Start on the final jug of 'Iron Cave Traverse' and traverse right around the whole cave to meet 'Whealy Easy' and finish for that. | V1 | 8m | |||||
| 16 |
★ Jump & Run
Jump Start to the lip of Whealy Easy's mantle and then downclimb it left to the cave, then continue left into 'Iron Cave Traverse' and finish for that. | V2/3 | 8m | |||||
2. Index by grade
| Grade | Stars | Name | Style | Pop | Area | |
|---|---|---|---|---|---|---|
| V0 | Up the Upper Floor | 4m | 1.2. Wheal Watkins Mine | |||
| 16 | ★ | Adult Themes | 20m | 1.1.1. The Oasis | ||
| Red Slab | 28m | 1.1.1. The Oasis | ||||
| 17 | ★ | Rapid Disimpaction | 28m | 1.1.1. The Oasis | ||
| V1 | ★ | Iron Cave Traverse | 6m | 1.2. Wheal Watkins Mine | ||
| Whealy Easy | 3m | 1.2. Wheal Watkins Mine | ||||
| ★ | Whealy Long | 8m | 1.2. Wheal Watkins Mine | |||
| V2 | ★★ | Box Act | 3m | 1.2. Wheal Watkins Mine | ||
| ★ | Hole in One | 4m | 1.2. Wheal Watkins Mine | |||
| ★ | Main Arete | 4m | 1.2. Wheal Watkins Mine | |||
| 21 | Ankle Biters | 1.1.2. The Main Quarry | ||||
| 22 | ★★ | Trish Delish | 22m | 1.1.1. The Oasis | ||
| V2/3 | ★ | Jump & Run | 8m | 1.2. Wheal Watkins Mine | ||
| V3 | ★ | The Upper Floor | 10m | 1.2. Wheal Watkins Mine | ||
| ★★ | Wish You Were Here | 3m | 1.2. Wheal Watkins Mine | |||
| V4 | ★★ | Line 2 | 6m | 1.2. Wheal Watkins Mine | ||
| V4/5 | ★★ | Wheal of Time | 15m | 1.2. Wheal Watkins Mine | ||
| V5 | ★★ | Con lentitud pederosa | 2m | 1.2. Wheal Watkins Mine | ||
| Iron Maiden | 5m | 1.2. Wheal Watkins Mine | ||||
| ★★ | Iron Monger | 1.2. Wheal Watkins Mine | ||||
| ★ | Possession Obsession | 9m | 1.2. Wheal Watkins Mine |